hexo
---title: hexocategories: 博客tags:
- hexo
- github
summary: hexo博客搭建过程,git、hexo、node的安装,hexo博客的初始化,整合GitHub page
typora-root-url: hexo
abbrlink: ab21860c
date: 2019-01-23 09:07:30
---
安装Node.js
https://nodejs.org/en/
安装Git
https://git-scm.com/
安装Hexo
    //全局安装
    $ npm install -g hexo-cli
存放位置
C:\Users\libingshen\AppData\Roaming\npm\node_modules
验证安装是否成功
    C:\Users\libingshen>node --version
    v10.15.0

    C:\Users\libingshen>npm --version
    6.4.1

    C:\Users\libingshen>git --version
    git version 2.16.2.windows.1

    C:\Users\libingshen>hexo --version
    hexo-cli: 1.1.0
    os: Windows_NT 10.0.17134 win32 x64
    http_parser: 2.8.0
    node: 10.15.0
    v8: 6.8.275.32-node.45
    uv: 1.23.2
    zlib: 1.2.11
    ares: 1.15.0
    modules: 64
    nghttp2: 1.34.0
    napi: 3
    openssl: 1.1.0j
    icu: 62.1
    unicode: 11.0
    cldr: 33.1
    tz: 2018e
Hexo博客初始化
    $ cd D:\mytest\myhexo
    $ hexo init

    //安装依赖
    $ npm install

    //或者hexo generate生成静态页
    $ hexo g

    //或者hexo server,启动服务器,可以在http://localhost:4000/ 查看
    $ hexo s
Hexo博客部署到GitHub
本地客户端与GitHub建立授权连接生成公私钥
ssh-keygen -t rsa -C "[email protected]"
公私钥存放位置
C:\Users\libingshen\.ssh
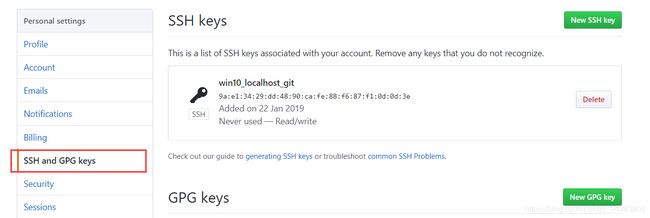
将公钥内容上传到GitHub
GitHub创建仓库作为hexo博客的站点
hexo配置GitHub连接
安装 hexo-deployer-git
$ npm install hexo-deployer-git --save
修改配置D:mytestmyhexo_config.yml
    #配置GitHub博客站址访问路径
    # URL这里要是没有配置,GitHub样式显示不出来
    ## If your site is put in a subdirectory, set url as 'http://yoursite.com/child' and root as '/child/'
    url: https://shenlibing.github.io/myhexo/
    root: /myhexo
    permalink: :year/:month/:day/:title/
    permalink_defaults:


    #博客推送到GitHub地址配置
    # Deployment
    ## Docs: https://hexo.io/docs/deployment.html
    deploy:
      type: git
      repo: https://github.com/shenlibing/myhexo.git
      branch: [master]
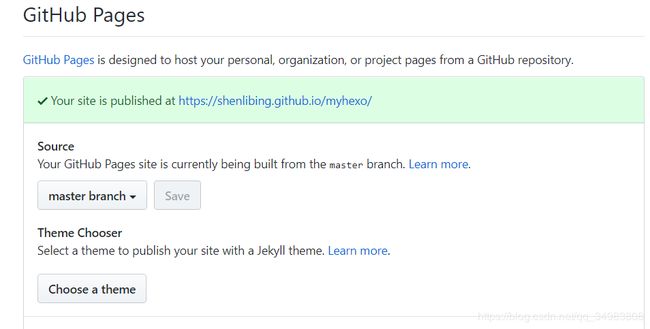
配置GitHub Pages
备份博客源文件
hexo部署到GitHub只上传.deploygit文件夹的内容,并不会上传posts文件夹下的博客源文件
    D:\mytest\myhexo\.deploy_git

    D:\mytest\myhexo\source\_posts
解决:
将_posts文件夹作为git仓库,上传到GitHub,使得其作为另一个分支
创建并切换到新分支
    libingshen@DESKTOP-7V287SK MINGW64 /d/mytest/myhexo/source/_posts (master)
    $ git checkout -b src
    Switched to a new branch 'src'
将新分支推送到GitHub
    git add .
    git commit -m 'add_v1:-新增hello-world笔记初始化'
    git push origin src
将博客源文件分支设为推送的默认分支,git push推送直接推送到src分支
补充:
删除本地分支
$ git branch -d src
删除远程分支
$ git push origin -d src
切换分支
$ git checkout master
查看提交日志
$ git log --oneline
拓展版本一
更换hexo主题
下载
https://github.com/theme-next/hexo-theme-next
解压放到D:mytestmyhexothemes
修改D:mytestmyhexo_config.yml配置文件
    # Extensions
    ## Plugins: https://hexo.io/plugins/
    ## Themes: https://hexo.io/themes/
    theme: hexo-theme-next-master
修改站点语言
编辑D:mytestmyhexo_config.yml文件
    # Site
    title: 小兵兵
    subtitle:
    description:
    keywords:
    author: shenlibing
    language: zh-CN
    timezone:
开启搜索、字数统计和阅读时长统计
安装依赖hexo-symbols-count-time、hexo-generator-searchdb,安装依赖不成功时先删除D:mytestmyhexonode_modules文件夹,重新安装依赖
    npm install hexo-symbols-count-time --save

    npm install hexo-generator-searchdb --save
配置主题样式文件
进入`D:mytestmyhexothemeshexo-theme-next-master`文件夹,编辑_config.yml文件
    # Local search
    # Dependencies: https://github.com/theme-next/hexo-generator-searchdb
    local_search:
      enable: true

    # Dependencies: https://github.com/theme-next/hexo-symbols-count-time
    symbols_count_time:
      separated_meta: true
      item_text_post: true
      item_text_total: false
      awl: 4
      wpm: 275
配置站点文件
编辑D:mytestmyhexo_config.yml文件
    #阅读时长和本文字数
    symbols_count_time:
      symbols: true
      time: true
      total_symbols: true
      total_time: true

    #搜索功能
    search:
      path: search.xml
      field: post
      format: html
      limit: 10000
添加分类和标签
    $ hexo new page categories

    $ hexo new page tags
编辑D:mytestmyhexosourcecategoriesindex.md
    ---
    title: categories
    date: 2019-01-22 16:37:58
    type: "categories"   #这部分是新添加的
    ---
编辑D:mytestmyhexosourcetagsindex.md
    ---
    title: tags
    date: 2019-01-22 16:38:40
    type: "tags" #新添加的内容
    ---
修改菜单,添加categories和tags到menu中
    menu:
      home: / || home
      #about: /about/ || user
      tags: /tags/ || tags
      categories: /categories/ || th
      archives: /archives/ || archive
      #schedule: /schedule/ || calendar
      #sitemap: /sitemap.xml || sitemap
      #commonweal: /404/ || heartbeat
新增文章,添加categories、tags
    ---
    title: hexo博客搭建
    date: 2019-01-23 09:07:30
    categories: 日常记录
    tags:
      - hexo
      - git
      - github
      - node
      - markdown
    ---
更换页面菜单布局位置
    # Schemes
    #scheme: Muse
    #scheme: Mist
    scheme: Pisces
    #scheme: Gemini
配置文章浏览量
注册
https://leancloud.cn/
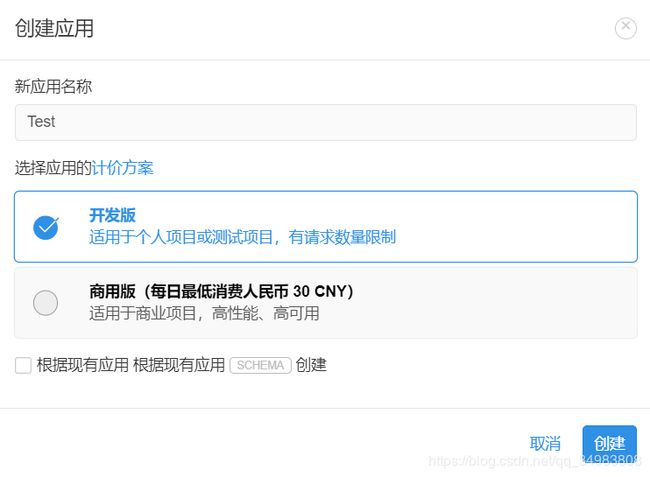
创建应用
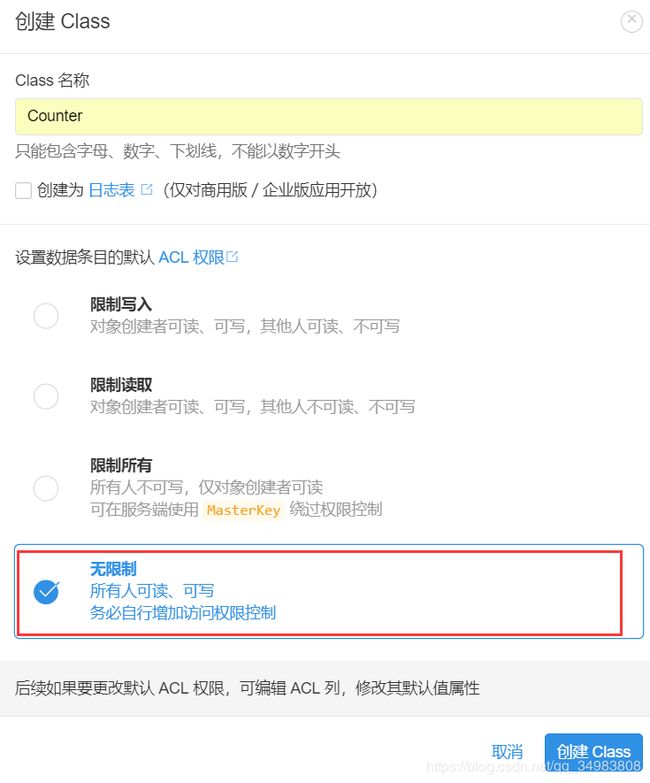
创建Class
配置web安全域名
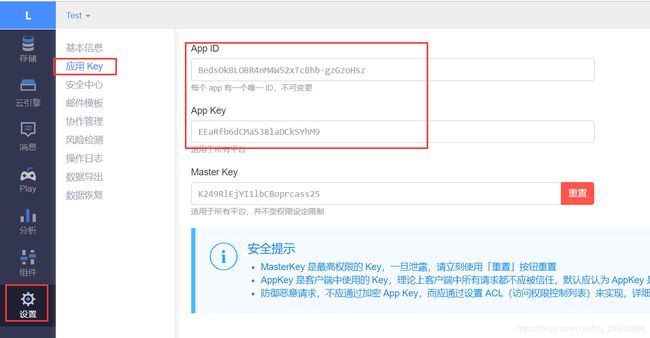
获取appid、appkey
编辑D:mytestmyhexothemeshexo-theme-next-master_config.yml配置文件,填app_id、
app_key;security设置为false
    # Show number of visitors to each article.
    # You can visit https://leancloud.cn get AppID and AppKey.
    leancloud_visitors:
      enable: true
      app_id: BedsOkBLOBR4nM4W52xTcBhb-gzGzoHsz #
      app_key: EEaRfb6dCMaS38laDCkSYhM9 #
      # Dependencies: https://github.com/theme-next/hexo-leancloud-counter-security
      # If you don't care about security in leancloud counter and just want to use it directly
      # (without hexo-leancloud-counter-security plugin), set `security` to `false`.
      security: false
      betterPerformance: false
插入图片
插入本地图片
安装依赖
npm install hexo-asset-image --save
编辑D:mytestmyhexo_config.yml配置文件
post_asset_folder: true
命令hexo new post test来生成博文时,/source/_post文件夹中除了test.md外,还有一个同名test文件夹
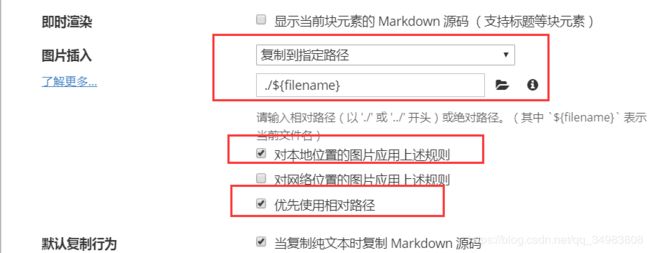
typora插入本地图片
typora设置
文件--偏好设置--图片插入
编辑--图片工具--设置图片根目录
typora-root-url: hexo/
制作动态图软件
ScreenToGif
图片压缩软件
Imagine
设置动态背景
进入D:mytestmyhexothemeshexo-theme-next-masterlayout文件夹,编辑_layout.swig文件,在``之前添加
添加Fork me on GitHub
进入D:mytestmyhexothemeshexo-theme-next-masterlayout文件夹,编辑_layout.swig文件,在
添加友情链接
方式一进入D:mytestmyhexothemeshexo-theme-next-masterlayout_partials文件夹,在footer.swig文件末尾追加
方式二进入D:mytestmyhexothemeshexo-theme-next-master文件夹,编辑_config.yml文件
    # Blog rolls
    links_icon: link
    links_title: Links
    links_layout: block
    #links_layout: inline
    #links:
      #Title: http://example.com
    links:
      美团技术团队: https://tech.meituan.com/
      百度FEX: http://fex.baidu.com/
      淘宝FED: http://taobaofed.org/
设置阅读全文
进入D:mytestmyhexothemeshexo-theme-next-master文件夹,编辑_config.yml文件
    # Automatically Excerpt. Not recommend.
    # Use  in the post to control excerpt accurately.
    auto_excerpt:
      enable: true
      length: 150
添加评论
选择gitalk
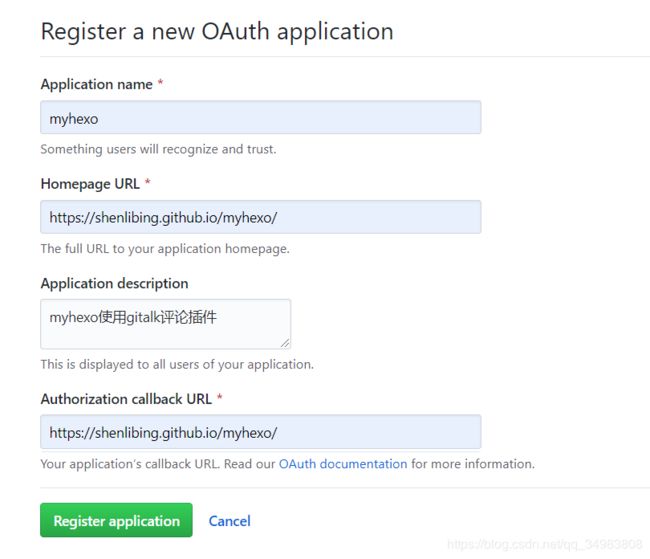
需要 GitHub Application,如果没有 点击这里申请,Authorization callback URL 填写当前使用插件页面的域名。
获取client_id和client_secret
进入D:mytestmyhexo文件夹,编辑_config.yml文件
- clientID
String
Required. GitHub Application Client ID.
- clientSecret
String
Required. GitHub Application Client Secret.
- repo
String
Required. GitHub repository.
- owner
String
Required. GitHub repository owner. Can be personal user or organization.
- admin
Array
Required. GitHub repository owner and collaborators. (Users who having write access to this repository)
# Gitalk
# Demo: https://gitalk.github.io
# Reference: https://asdfv1929.github.io/2018/01/20/gitalk/, https://liujunzhou.top/2018/8/10/gitalk-error/
gitalk:
  enable: true
  github_id:  shenlibing # Github repo owner
  repo:  myhexo # Repository name to store issues.
  client_id:  # Github Application Client ID
  client_secret:  # Github Application Client Secret
  admin_user:  shenlibing # GitHub repo owner and collaborators, only these guys can initialize github issues
  distraction_free_mode: true # Facebook-like distraction free mode
拓展版本二
开启打赏
进入D:mytestmyhexo文件夹,编辑_config.yml文件
# Reward
# If true, reward would be displayed in every article by default.
# And you can show or hide one article specially through add page variable `reward: true/false`.
reward:
  enable: true
  #comment: Donate comment here
  wechatpay: /images/wechat.jpg
  alipay: /images/alipay.jpg
  #bitcoin: /images/bitcoin.jpg
部署到云、使用图床、优化URL
部署到云服务器
拷贝本机的公钥id_rsa.pub内容到云服务器authorized_keys上
进入D:mytestmyhexo文件夹,编辑_config.yml文件
# URL
## If your site is put in a subdirectory, set url as 'http://yoursite.com/child' and root as '/child/'
# url: https://shenlibing.github.io/
url: http://bingbing.tech/
root: /
permalink: :year/:month/:day/:title/
permalink_defaults:


# Deployment
## Docs: https://hexo.io/docs/deployment.html
deploy:
  type: git
  # repo: https://github.com/shenlibing/shenlibing.github.io.git #https://bitbucket.org/JohnSmith/johnsmith.bitbucket.io
  repo: [email protected]:/root/project/hexo.git
#https://bitbucket.org/JohnSmith/johnsmith.bitbucket.io
#  repo: ssh://[email protected]:22/root/project/hexo.git
  branch: [master] #published
服务器创建裸仓库
[root@izm5eac6bnsz8uq175jkvez project]# git init --bare hexo.git
配置钩子
[root@izm5eac6bnsz8uq175jkvez hooks]# pwd
/root/project/hexo.git/hooks
[root@izm5eac6bnsz8uq175jkvez hooks]# chmod 744 post-receive
[root@izm5eac6bnsz8uq175jkvez hooks]# ll
total 44
-rwxr-xr-x 1 root root  452 Aug 13 16:59 applypatch-msg.sample
-rwxr-xr-x 1 root root  896 Aug 13 16:59 commit-msg.sample
-rwxr--r-- 1 root root  357 Aug 14 17:50 post-receive
-rwxr-xr-x 1 root root  189 Aug 13 16:59 post-update.sample
-rwxr-xr-x 1 root root  398 Aug 13 16:59 pre-applypatch.sample
-rwxr-xr-x 1 root root 1704 Aug 13 16:59 pre-commit.sample
-rwxr-xr-x 1 root root 1239 Aug 13 16:59 prepare-commit-msg.sample
-rw-r--r-- 1 root root 1348 Aug 13 16:59 pre-push.sample
-rwxr-xr-x 1 root root 4951 Aug 13 16:59 pre-rebase.sample
-rwxr-xr-x 1 root root 3611 Aug 13 16:59 update.sample

[root@izm5eac6bnsz8uq175jkvez hooks]# cat post-receive
#!/bin/bash -l
#GIT_REPO=<到hexo.git的目录>
#TMP_GIT_CLONE=<到临时blog的目录>
#PUBLIC_WWW=<到blog服务的目录/public/blog>


GIT_REPO=/root/project/hexo.git
TMP_GIT_CLONE=/tmp/blog
PUBLIC_WWW=/opt/module/website/blog
rm -rf ${TMP_GIT_CLONE}
git clone ${GIT_REPO} ${TMP_GIT_CLONE}
rm -rf ${PUBLIC_WWW}/*
cp -rf ${TMP_GIT_CLONE}/* ${PUBLIC_WWW}
[root@izm5eac6bnsz8uq175jkvez hooks]#
修改Nginx配置文件
[root@izm5eac6bnsz8uq175jkvez blog]# whereis nginx
nginx: /usr/sbin/nginx /usr/lib64/nginx /etc/nginx /usr/share/nginx /usr/share/man/man8/nginx.8.gz /usr/share/man/man3/nginx.3pm.gz
[root@izm5eac6bnsz8uq175jkvez blog]# cd /etc/nginx/
[root@izm5eac6bnsz8uq175jkvez nginx]# ll
total 72
drwxr-xr-x 2 root root 4096 May 10 16:14 conf.d
drwxr-xr-x 2 root root 4096 May 10 16:14 default.d
-rw-r--r-- 1 root root 1077 May 10 16:10 fastcgi.conf
-rw-r--r-- 1 root root 1077 May 10 16:10 fastcgi.conf.default
-rw-r--r-- 1 root root 1007 May 10 16:10 fastcgi_params
-rw-r--r-- 1 root root 1007 May 10 16:10 fastcgi_params.default
-rw-r--r-- 1 root root 2837 May 10 16:10 koi-utf
-rw-r--r-- 1 root root 2223 May 10 16:10 koi-win
-rw-r--r-- 1 root root 3957 May 10 16:10 mime.types
-rw-r--r-- 1 root root 3957 May 10 16:10 mime.types.default
-rw-r--r-- 1 root root 3051 Aug 15 20:29 nginx.conf
-rw-r--r-- 1 root root 2467 Aug 13 11:05 nginx.conf.bak
-rw-r--r-- 1 root root 2656 May 10 16:10 nginx.conf.default
-rw-r--r-- 1 root root  636 May 10 16:10 scgi_params
-rw-r--r-- 1 root root  636 May 10 16:10 scgi_params.default
-rw-r--r-- 1 root root  664 May 10 16:10 uwsgi_params
-rw-r--r-- 1 root root  664 May 10 16:10 uwsgi_params.default
-rw-r--r-- 1 root root 3610 May 10 16:10 win-utf
[root@izm5eac6bnsz8uq175jkvez nginx]# cat nginx.conf
# For more information on configuration, see:
#   * Official English Documentation: http://nginx.org/en/docs/
#   * Official Russian Documentation: http://nginx.org/ru/docs/

user nginx;
worker_processes auto;
error_log /var/log/nginx/error.log;
pid /run/nginx.pid;

# Load dynamic modules. See /usr/share/nginx/README.dynamic.
include /usr/share/nginx/modules/*.conf;

events {
    worker_connections 1024;
}

http {
    log_format  main  '$remote_addr - $remote_user [$time_local] "$request" '
                      '$status $body_bytes_sent "$http_referer" '
                      '"$http_user_agent" "$http_x_forwarded_for"';

    access_log  /var/log/nginx/access.log  main;

    sendfile            on;
    tcp_nopush          on;
    tcp_nodelay         on;
    keepalive_timeout   65;
    types_hash_max_size 2048;

    include             /etc/nginx/mime.types;
    default_type        application/octet-stream;

    # Load modular configuration files from the /etc/nginx/conf.d directory.
    # See http://nginx.org/en/docs/ngx_core_module.html#include
    # for more information.
    include /etc/nginx/conf.d/*.conf;

    server {
        listen       8000 default_server;
        listen       [::]:80 default_server;
        server_name  _;
        root         /usr/share/nginx/html;

        # Load configuration files for the default server block.
        include /etc/nginx/default.d/*.conf;

        location / {
        }

        error_page 404 /404.html;
            location = /40x.html {
        }

        error_page 500 502 503 504 /50x.html;
            location = /50x.html {
        }
    }

    server {
        listen      80;     #端口
#        server_name bingbing.tech;     #域名或IP
        root        /opt/module/website/blog;      #站点根目录
        charset     utf-8;              #文件编码
        index       index.html index.htm;    #首页
        error_page  404     /404.html;   #404页面
        error_page  500 502 503 504     /50x.html;   #服务端错误页面
        #url访问匹配路径,可以添加多个
        location / {
            index       index.html index.htm;
            root        /opt/module/website/blog;   #这里可以是绝对路径或者相对路径,基于站点根目录
        }
    }

# Settings for a TLS enabled server.
#
#    server {
#        listen       443 ssl http2 default_server;
#        listen       [::]:443 ssl http2 default_server;
#        server_name  _;
#        root         /usr/share/nginx/html;
#
#        ssl_certificate "/etc/pki/nginx/server.crt";
#        ssl_certificate_key "/etc/pki/nginx/private/server.key";
#        ssl_session_cache shared:SSL:1m;
#        ssl_session_timeout  10m;
#        ssl_ciphers HIGH:!aNULL:!MD5;
#        ssl_prefer_server_ciphers on;
#
#        # Load configuration files for the default server block.
#        include /etc/nginx/default.d/*.conf;
#
#        location / {
#        }
#
#        error_page 404 /404.html;
#            location = /40x.html {
#        }
#
#        error_page 500 502 503 504 /50x.html;
#            location = /50x.html {
#        }
#    }

}
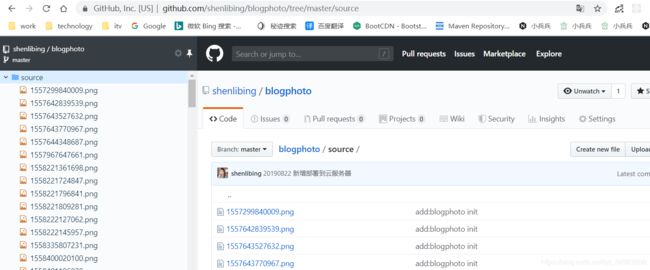
使用GitHub图床
创建个存放图片的仓库blogphoto
替换typora生成的图片路径
替换脚本
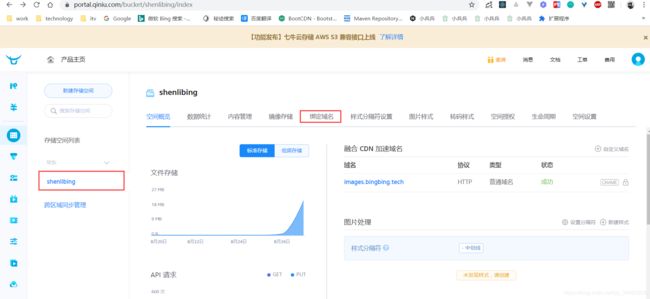
使用七牛云图床
如何配置域名的 CNAME
新建存储空间
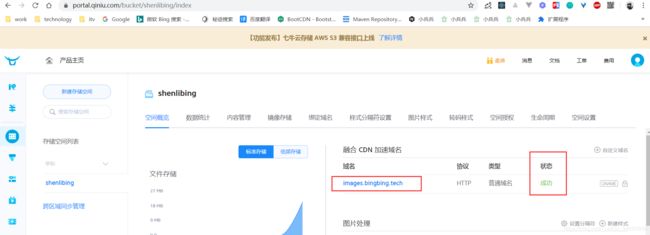
绑定域名
域名添加CANME记录
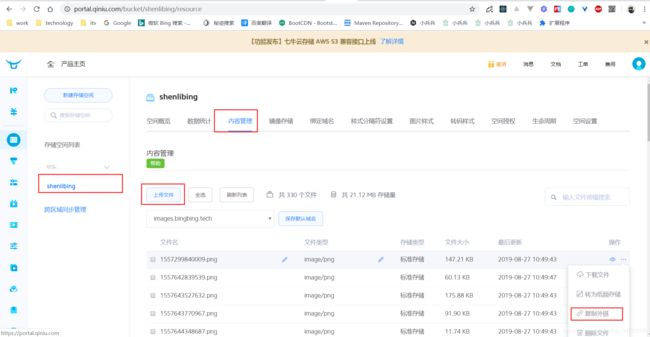
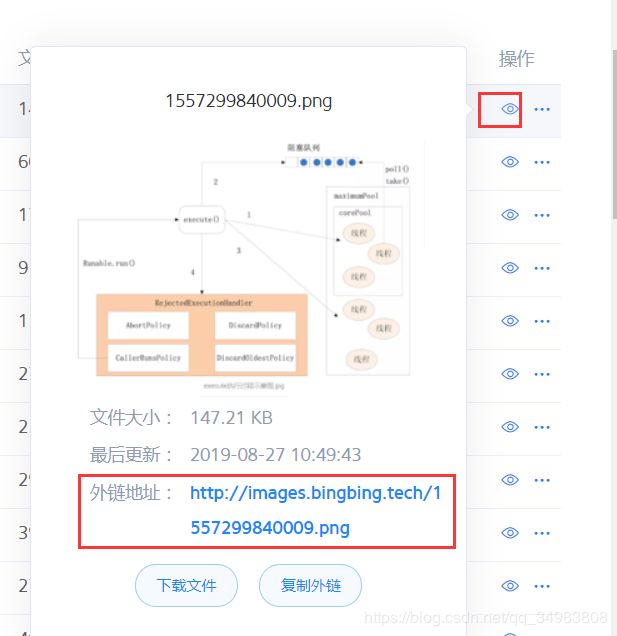
上传图片、外链访问
替换脚本
优化URL
安装依赖
npm install hexo-abbrlink --save
编辑D:mytestmyhexo_config.yml配置文件
# URL
## If your site is put in a subdirectory, set url as 'http://yoursite.com/child' and root as '/child/'
# url: https://shenlibing.github.io/
url: http://bingbing.tech/
root: /
# permalink: :year/:month/:day/:title/
# permalink_defaults:


#插件hexo-abbrlink
# permalink: :title/
permalink: archives/:abbrlink.html
abbrlink:
  alg: crc32 # 算法:crc16(default) and crc32
  rep: hex # 进制:dec(default) and hex
常见错误
错误一:
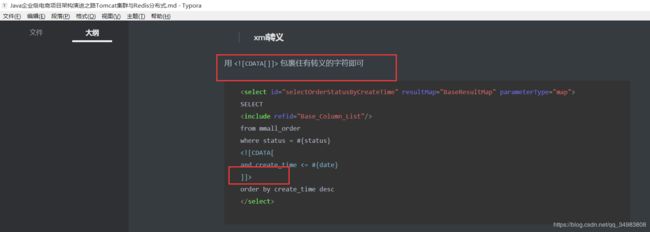
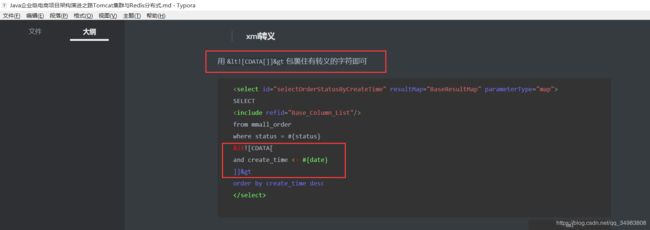
故障现象:xml转移错误,导致搜索不出结果
故障原因:
解决:
参考:
【持续更新】Github Pages Hexo 博客搭建,Next主题个性化修改
Hexo NexT 打造一个炫酷博客
hexo史上最全搭建教程
用 Typora 写 Hexo 博客 | zhangnew
使用Typora Hexo Google Drive打造自己的云笔记 | 情起·而深
我的云端硬盘 - Google 云端硬盘
