51单片机三线串行驱动12864液晶
以前写12864的液晶程序都是用的并行的方式,这种方式焊接起来很麻烦,而且占用的IO口比较多。
今天尝试使用串行方式来驱动该模块。
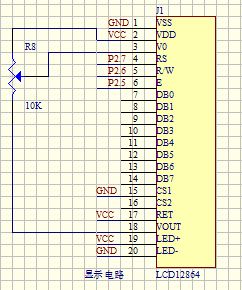
本程序是基于STC89C52的12864串行模式的程序,硬件电路连接只需要5根线,VCC GND RS RW E , 只需要三个个IO 口就可以显示,大大节省了资源。
12864液晶芯片是st7920。自带中文字库。
该程序功能:实现使用12864液晶显示字符、汉字(程序有详细的中文注释)。
已经调试通过,很好用。
下面是电路原理图
其时序图如下:
根据其时序图写出其代码如下:
#include
#include
#include
#include

#define uchar unsigned char
#define uint  unsigned int
sbit CS  = P2^7;//第4根线  RS
sbit SID = P2^6;//第5根线  RW
sbit SCK = P2^5;//第6根线  E
uchar code AC_TABLE[]={
0x80,0x81,0x82,0x83,0x84,0x85,0x86,0x87,    //第一行汉字位置
0x90,0x91,0x92,0x93,0x94,0x95,0x96,0x97,    //第二行汉字位置
0x88,0x89,0x8a,0x8b,0x8c,0x8d,0x8e,0x8f,    //第三行汉字位置
0x98,0x99,0x9a,0x9b,0x9c,0x9d,0x9e,0x9f,    //第四行汉字位置
};
/******************************** 函数名称    :SendByte  串口发送一个字节*****/
void SendByte(uchar Dbyte)
{
     uchar i;
     for(i=0;i<8;i++)
     {
           SCK = 0;
           Dbyte=Dbyte<<1;
           SID = CY;
           SCK = 1;
           SCK = 0;
     }
}

/***********接收一个字节***/
uchar ReceiveByte(void)
{
     uchar i,temp1,temp2;
     temp1 = 0;
     temp2 = 0;
     for(i=0;i<8;i++)
     {
           temp1=temp1<<1;
           SCK = 0;
           SCK = 1;
           SCK = 0;
           if(SID) temp1++;
     }
     for(i=0;i<8;i++)
     {
           temp2=temp2<<1;
           SCK = 0;
           SCK = 1;
           SCK = 0;
           if(SID) temp2++;
     }
     return ((0xf0&temp1)+(0x0f&temp2));
}

void CheckBusy( void )
{
     do   SendByte(0xfc);
     while(0x80&ReceiveByte());
}

void WriteCommand(uchar Cbyte )
{
     CS = 1;
     CheckBusy();
     SendByte(0xf8);
     SendByte(0xf0&Cbyte);
     SendByte(0xf0&Cbyte<<4);
     CS = 0;
}

void WriteData(uchar Dbyte )
{
     CS = 1;
     CheckBusy();
     SendByte(0xfa);
     SendByte(0xf0&Dbyte);
     SendByte(0xf0&Dbyte<<4);
     CS = 0;
}

uchar ReadData( void )
{
     CheckBusy();
     SendByte(0xfe);
     return ReceiveByte();
}

void Delay(uint MS)
{
     uchar us,usn;
     while(MS!=0)
      {
         usn = 2;
         while(usn!=0)
          {
            us = 0xf5;
            while (us!=0)
             {
               us--;
             };
            usn--;
           }
         MS--;
      }
}


void LcmInit( void )
{
     WriteCommand(0x30);
     WriteCommand(0x03);
     WriteCommand(0x0C);
     WriteCommand(0x01);
     WriteCommand(0x06);
}

void LcmClearTXT( void )
{
     uchar i;
     WriteCommand(0x30);
     WriteCommand(0x80);
     for(i=0;i<64;i++)
     WriteData(0x20);
}


void PutStr(uchar row,uchar col,uchar *puts)
{
     WriteCommand(0x30);
     WriteCommand(AC_TABLE[8*row+col]);
     while(*puts != '\0')
     {
           if(col==8)
           {
                 col='0';
                 row++;
           }
           if(row==4) row='0';
           WriteCommand(AC_TABLE[8*row+col]);
           WriteData(*puts);
           puts++;
           WriteData(*puts);
           puts++;
           col++;
     }
}


void DisplayDots(uchar DotByte)
{
     uchar i,j;
     WriteCommand(0x34);
     WriteCommand(0x36);
     for(i=0;i<32;i++)
     {
           WriteCommand(0x80|i);
           WriteCommand(0x80);
           for(j=0;j<32;j++)
           {
              WriteData(DotByte);
           }
           DotByte=~DotByte;
     }
}

void main( void )
{
     Delay(100);
     LcmInit();
     LcmClearTXT();
     while(1)
     {
        PutStr(0,0,"欢迎光临");
        PutStr(1,0,"Rayu技术分享");
	PutStr(2,0,"http://blog.rayu");
        PutStr(3,0,"u.com/");
     }
}
显示效果如下:


