私人定制:linux系统
简介
本文主要通过裁剪现有Linux系统,打造一个属于自己的Linux小系统,让其能够装载网卡驱动,并配置IP地址,实现网络功能。
主要步骤:
- 添加硬盘
- 对硬盘进行分区,并创建文件系统
- 创建挂载点
/mnt/boot和/mnt/root并挂载 - 安装
grub - 复制虚根和内核
- 编写
grub.conf配置文件 - 创建一级子目录,如
/bin,/lib等 - 复制
bash和相关库文件及其他命令 - 添加网络功能,并实现开机自动加载网卡
- 测试是否能够开机并引导系统启动
- 错误排查
1. 添加硬盘
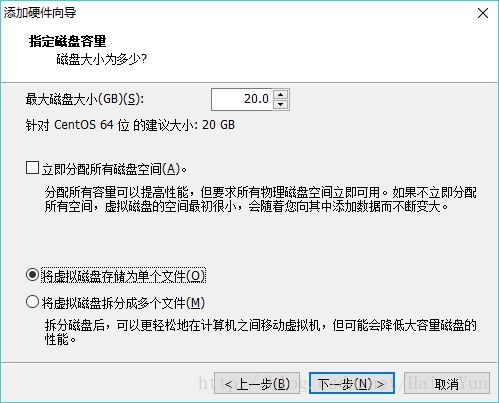
硬盘的大小20G已经足够用了。
2. 对硬盘进行分区
[root@centos6 ~]# echo "- - -" > /sys/class/scsi_host/host2/scan    <==让系统发现新硬盘
[root@centos6 ~]# lsblk         <==新增加的硬盘已经被系统识别
NAME   MAJ:MIN RM  SIZE RO TYPE MOUNTPOINT
sr0     11:0    1  3.7G  0 rom
sda      8:0    0  200G  0 disk
├─sda1   8:1    0    4G  0 part /boot
├─sda2   8:2    0   50G  0 part /
sdb      8:16   0   20G  0 disk
[root@centos6 ~]# fdisk -l /dev/sdb         <==对/dev/sdb进行分区,/dev/sdb1是为/boot目录准备的,/dev/sdb2是为/目录准备的

Disk /dev/sdb: 21.5 GB, 21474836480 bytes
255 heads, 63 sectors/track, 2610 cylinders
Units = cylinders of 16065 * 512 = 8225280 bytes
Sector size (logical/physical): 512 bytes / 512 bytes
I/O size (minimum/optimal): 512 bytes / 512 bytes
Disk identifier: 0x8c1b09e8

   Device Boot      Start         End      Blocks   Id  System
/dev/sdb1               1         132     1060258+  83  Linux
/dev/sdb2             133        2610    19904535   83  Linux
[root@centos6 ~]# mkfs.ext4 /dev/sdb1
。。。命令结果省略
[root@centos6 ~]# mkfs.ext4 /dev/sdb2
。。。命令结果省略
[root@centos6 ~]# blkid             <==分区已经创建完成,文件系统为ext4
/dev/sda2: UUID="498fb39f-0cc0-4921-9d11-0f122434bf8f" TYPE="ext4"
/dev/sda1: UUID="8a3beeae-eb82-40b7-8790-a7fd847b5719" TYPE="ext4"
/dev/sdb1: UUID="c2628450-9450-468f-8cf0-5aa911dcefb9" TYPE="ext4"
/dev/sdb2: UUID="4f13af1d-8a48-4b62-9cca-3ea3f5fa2e45" TYPE="ext4"
3. 创建挂载点/mnt/boot和/mnt/root并挂载
[root@centos6 ~]# mkdir /mnt/boot       <==创建/mnt/boot目录(目录必须为boot因为开机是需要boot目录的)
[root@centos6 ~]# mkdir /mnt/sysroot       <==创建/mnt/sysroot目录
[root@centos6 ~]# mount /dev/sdb1 /mnt/boot/    <==挂载/dev/sdb1到/mnt/boot
[root@centos6 ~]# mount /dev/sdb2 /mnt/sysroot/ <==挂载/dev/sdb1到/mnt/boot
4. 安装grub
[root@centos6 ~]# grub-install  --root-directory=/mnt /dev/sdb  <==注意:此处需要指定root的目录为/mnt,因为我们安装grub,默认是安装在/boot目录下的,这里指定/mnt为根,就会安装在/mnt/boot目录下了
Probing devices to guess BIOS drives. This may take a long time.
Installation finished. No error reported.
This is the contents of the device map /mnt/boot/grub/device.map.
Check if this is correct or not. If any of the lines is incorrect,
fix it and re-run the script `grub-install'.

(fd0)	/dev/fd0
(hd0)	/dev/sda
(hd1)	/dev/sdb                    <==安装完成
[root@centos6 ~]# ls /mnt/boot/     <==可以看到grub目录已经生成
grub  lost+found
5. 复制虚拟文件系统和内核
[root@centos6 ~]# cp /boot/vmlinuz-2.6.32-696.el6.x86_64 /mnt/boot/         <==cp虚拟文件系统
[root@centos6 ~]# cp /boot/initramfs-2.6.32-696.el6.x86_64.img /mnt/boot/   <==cp内核
[root@centos6 ~]# ls /mnt/boot/         <==可以看到已经复制成功
grub  initramfs-2.6.32-696.el6.x86_64.img  lost+found  vmlinuz-2.6.32-696.el6.x86_64
6. 编写grub.conf配置文件
[root@centos6 ~]# vim /mnt/boot/grub/grub.conf
default=0       <==表示有多个引导菜单时,选择哪一个作为默认启动引导菜单,0代表使用第一个title菜单中的配置
title ihaiyun   <==可以理解为grub引导的配置列表,ihaiyun代表title的名称(可以自定义)
timeout=5       <==表示如果5秒内,用户没有选择任何一个title,那么就使用default指定的title来启动系统
root (hd0,0)    <==表示kernel文件和initrd文件所在分区,并不是指“根分区”
kernel /vmlinuz-2.6.32-696.el6.x86_64 root=/dev/sda2 selinux=0  init=/bin/bash  <==指定kernel所在位置,和根目录所在分区,并把selinux关闭,开机启动程序为/bin/bash
initrd /initramfs-2.6.32-696.el6.x86_64.img     <==指定虚拟文件系统所在位置
7. 创建一级子目录
[root@centos6 ~]# mkdir /mnt/root/{usr,sbin,bin,lib,lib64,tmp,var,usr,sys,opt,home,root,dev,mnt,media}
[root@centos6 ~]# ls /mnt/root/         <==目录已经创建完成
bin  dev  home  lib  lib64  lost+found  media  mnt  opt  root  sbin  sys  tmp  usr  var
8. 复制bash和相关库文件及其他命令
复制一些常用命令bash,ls,cat,vim,reboot,hostname,ifconfig,netstat,ps等
注意:复制命令时,要记得把库文件和命令都要复制过去,本人是使用脚本进行复制的,脚本内容如下:
#!/bin/bash
#----------------------------------------------
# File name: copy.sh
# Revision: 1.1
# Date: 2017-09-01
# Author: houhaiyun
# Email: [email protected]
# Website: http://www.iav18.cn
# Description:
# Copyright: 2017 haiyun
# License: GPL
#----------------------------------------------
dir () {
    DIR=`dirname $SYS$line`
    DIR2=`dirname $SYS$CPATH`
    [ -d $DIR ] || mkdir -p $DIR
    [ -d $DIR2 ] || mkdir -p $DIR2
}

cpall () {
    cp  $line $DIR
    cp $CPATH $DIR2
}

SYS=/mnt/sysroot        #<==注意:如果你创建的/mnt/不是sysroot目录需要在此处进行修改哦

while [ "$COMD" != "quit" ] ; do
    read -t 10 -p "please input a command(input 'quit' to exit): " COMD
    [ $? -ne 0 ] && echo -e "\ntimeout exit..." && exit 10
    [ "$COMD" == "quit" ] && echo "exit..." && exit 12
    if `which --skip-alias $COMD &> /dev/null` ; then
        CPATH=`which --skip-alias $COMD`
    else
         echo "command not found or command is error"
         continue
    fi
    ldd $CPATH | grep -o "/.* " | while read line ; do
        dir
        cpall
        echo -e "cp $CPATH\t----->\t $DIR2"
        echo -e "cp $line\t----->\t$DIR"
    done
done
关于脚本内容:将会在后面博客介绍~~~~
[root@centos6 ~]# ls /mnt/root/bin/     <==可以看到/bin目录下已经有命令
bash      cat       hostname  ls        netstat   ps
[root@centos6 ~]# ls /mnt/root/sbin/    <==可以看到/sbin目录下已经有命令
ifconfig  ip  poweroff  reboot
9. 添加网络功能,并实现开机自动加载网卡
[root@centos6 ~]# ethtool -i eth0       <==显示网卡的驱动信息,可以看到驱动为e1000
driver: e1000
version: 7.3.21-k8-NAPI
firmware-version:
bus-info: 0000:02:01.0
supports-statistics: yes
supports-test: yes
supports-eeprom-access: yes
supports-register-dump: yes
supports-priv-flags: no
[root@centos6 ~]# locate e1000          <==搜索e1000
/lib/modules/2.6.32-696.el6.x86_64/kernel/drivers/net/e1000
/lib/modules/2.6.32-696.el6.x86_64/kernel/drivers/net/e1000e
/lib/modules/2.6.32-696.el6.x86_64/kernel/drivers/net/e1000/e1000.ko    <==这个为驱动
/lib/modules/2.6.32-696.el6.x86_64/kernel/drivers/net/e1000e/e1000e.ko
/usr/src/kernels/2.6.32-696.el6.x86_64/drivers/net/e1000
/usr/src/kernels/2.6.32-696.el6.x86_64/drivers/net/e1000e
/usr/src/kernels/2.6.32-696.el6.x86_64/drivers/net/e1000/Makefile
/usr/src/kernels/2.6.32-696.el6.x86_64/drivers/net/e1000e/Makefile
/usr/src/kernels/2.6.32-696.el6.x86_64/include/config/e1000.h
/usr/src/kernels/2.6.32-696.el6.x86_64/include/config/e1000e.h
[root@centos6 ~]# cp /lib/modules/2.6.32-696.el6.x86_64/kernel/drivers/net/e1000/e1000.ko /
mnt/root/lib64/         <==复制驱动到/mnt/root/lib64
[root@centos6 mnt]# vim /mnt/boot/grub/grub.conf    <==修改grub.conf文件
default=0
title ihaiyun
timeout=5
root (hd0,0)
kernel /vmlinuz-2.6.32-696.el6.x86_64 root=/dev/sda2 selinux=0 init=/bin/init.sh    <==将默认启动程序改为/bin/init.sh,脚本的内容在下面
initrd /initramfs-2.6.32-696.el6.x86_64.img

[root@centos6 mnt]# vim /mnt/sysroot/bin/init.sh        <==编写init.sh脚本
#!/bin/bash
insmod /lib/e1000.ko            <==加载网卡驱动
ifconfig eth0 192.168.8.8/24    <==配置IP
/bin/bash   <==注意:必须开启一个/bin/bash,如果写的话,那么开机启动完成网卡后,就卡在启动网卡界面,并不会打开一个bash
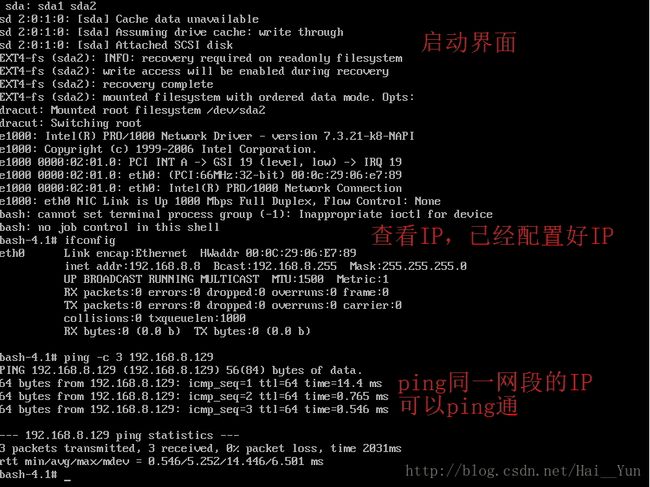
这样我们就实现了开机启动网卡,并配置iP
10. 测试是否能够开机并引导系统启动
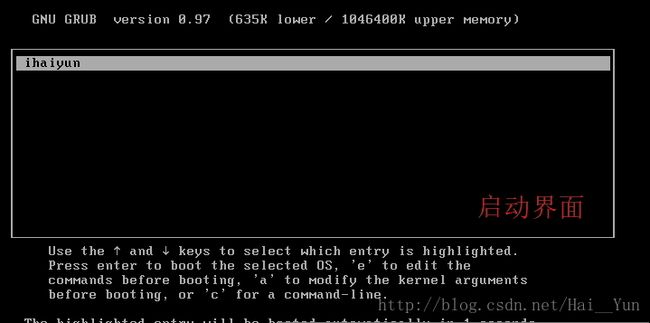
以下为启动界面:
11. 错误排查
- 如果启动过程中,发现
/dev/sda2提示busy...且一直卡在这个界面,重新安装grub即可。 - 当第8步进行到完成后,需要进行
chroot /mnt/sysroot进行切根,确保bash命令复制成功。
如果正常的话,我们的自制的linux系统,就已经安装完成了,是不是很有趣呢?给自己来一个私人定制!^_^


