Qt实现长图片的放大缩小以及动态显示
这篇文章是在这个基础上进行讨论的谈一谈分别利用opencv、Qt、matlab动态显示图片的实现
其实就是想找一种更加合适的方法进行图片的放大缩小以及动态显示。
这个是效果图
我把项目命名为Qtmline,因为之前做了和Qtimeline有关的东西
我们关心的是header files和source files里的文件
先说header files里的pixitem.h,放代码
#ifndef PIXITEM_H
#define PIXITEM_H

#include
#include
#include
#include
#include
#include
#include
#include

enum Enum_ZoomState{
    NO_STATE,
    RESET,
    ZOOM_IN,
    ZOOM_OUT
};

enum Enum_ZoomTimes{
    ZOOM_IN_TIMES = 5,
    ZOOM_OUT_TIMES = -5,
};

class PixItem : public QGraphicsItem        //继承自图元类,实现自定义的图元,,,qt预置的有直线,椭圆,文本图元,矩形图元等
{
public:
    PixItem(QPixmap *pixmap);   //构造函数初始化了变量pix
    QRectF boundingRect() const;    //实现自己的boundingRect 图元边界方法,完成以图元坐标系为基础增加两个像素点的冗余的工作
    void paint(QPainter *painter, const QStyleOptionGraphicsItem *option, QWidget *widget); //重画图形函数
    void wheelEvent(QGraphicsSceneWheelEvent *event);
    void setZoomState(const int &zoomState);

    void mousePressEvent(QGraphicsSceneMouseEvent *event);
    void mouseMoveEvent(QGraphicsSceneMouseEvent *event);
    void mouseReleaseEvent(QGraphicsSceneMouseEvent *event);

    int getScaleValue() const;
    void setScaleValue(const int &);

private:
    qreal m_scaleValue;   //缩放值

    QPixmap pix;    //作为图元显示的图片
    int m_zoomState;

    bool m_isMove;
    QPointF m_startPos;
};

#endif // PIXITEM_H
与之对应的pixitem.cpp代码
#include "pixitem.h"

#include
#include
#include
#include
#include
#include

//构造函数初始化了变量pix
PixItem::PixItem(QPixmap *pixmap)
{
    pix = *pixmap;
    setAcceptDrops(true);   //设置可拖拽
    m_scaleValue = 0;

    m_isMove = false;
}

//实现自己的图元边界函数
QRectF PixItem::boundingRect() const
{
    return QRectF(-pix.width() / 2, -pix.height() / 2,
                  pix.width(), pix.height());
}

//只需QPainter的drawPixmap()函数将图元图片绘出即可
void PixItem::paint(QPainter *painter, const QStyleOptionGraphicsItem *,
                    QWidget *)
{
    painter->drawPixmap(-pix.width() / 2, -pix.height() / 2, pix);
}

//鼠标点击事件  局部缩放
void PixItem::mousePressEvent(QGraphicsSceneMouseEvent *event)
{
    m_startPos = event->pos();
    m_isMove = true;

    int scaleValue = m_scaleValue;
    if(m_zoomState == ZOOM_IN)       //局部放大
    {
        scaleValue++;
    }
    else if(m_zoomState == ZOOM_OUT)        //局部缩小
    {
        scaleValue--;
    }

    if (scaleValue > ZOOM_IN_TIMES || scaleValue < ZOOM_OUT_TIMES)
        return;

    if (m_scaleValue != scaleValue)
    {
        setTransformOriginPoint(event->pos().x(), event->pos().y());
    }
    m_scaleValue = scaleValue;
    qreal s;
    //实现局部缩放
    if(m_scaleValue > 0)
    {
        s = pow(1.1, m_scaleValue);        //放大 计算x的y方次 参数都是double类型
    }else
    {
        s = pow(1 / 1.1, -m_scaleValue);      //缩小
    }
    setScale(s);
}

void PixItem::mouseMoveEvent(QGraphicsSceneMouseEvent *event)
{
    if(m_isMove)
    {
        QPointF point = event->pos() - m_startPos;
        moveBy(point.x(), point.y());
    }
}

void PixItem::mouseReleaseEvent(QGraphicsSceneMouseEvent *)
{
    m_isMove = false;
}

//使用滚轮整体缩放
void PixItem::wheelEvent(QGraphicsSceneWheelEvent *event)
{
    setZoomState(NO_STATE);

    int scaleValue = m_scaleValue;
    if(event->delta() > 0)  //delta()为正,滚轮向上滚
    {
        scaleValue++;
    }
    else
    {
        scaleValue--;
    }

    if (scaleValue > ZOOM_IN_TIMES || scaleValue < ZOOM_OUT_TIMES)
        return;

    m_scaleValue = scaleValue;
    qreal s;
    if(m_scaleValue > 0)
    {
        s = pow(1.1, m_scaleValue);        //放大 计算x的y方次 参数都是double类型
    }
    else
    {
        s = pow(1 / 1.1, -m_scaleValue);      //缩小
    }
    setScale(s);
    setTransformOriginPoint(event->pos().x(), event->pos().y());
}

//从widget获取的缩放值,用于同步滚轮和按键
void PixItem::setScaleValue(const int &scaleValue)
{
    if (scaleValue > ZOOM_IN_TIMES || scaleValue < ZOOM_OUT_TIMES)
        return;

    m_scaleValue = scaleValue;

    qreal s;
    if(m_scaleValue > 0)
    {
        s = pow(1.1, m_scaleValue);        //放大 计算x的y方次 参数都是double类型
    }
    else
    {
        s = pow(1 / 1.1, -m_scaleValue);      //缩小
    }

    setScale(s);
}

void PixItem::setZoomState(const int &zoomState)
{
    m_zoomState = zoomState;
    if (m_zoomState == RESET)
    {
        m_scaleValue = 0;
        setScale(1);
        setTransformOriginPoint(0, 0);
    }
}

int PixItem::getScaleValue() const
{
    return m_scaleValue;
}
Qtmline.h中是这样的
#pragma once

#include
#include "ui_Qtmline.h"
#include
#include
#include
#include
#include
#include
#include
#include
#include "pixitem.h"
#include
#include
#include


class Qtmline : public QMainWindow
{
	Q_OBJECT

public:
	Qtmline(QWidget *parent = Q_NULLPTR);

private slots:
    int OnBtnStart();
	int OnBtnBig();
	int OnBtnMove();
private:
	Ui::QtmlineClass ui;


	PixItem *m_pixItem;

	QGraphicsScene *m_graphicsScene;

	QGraphicsView *m_graphicsView;
	int m_timerId;
	void timerEvent(QTimerEvent * event);
	int m_flag;
};
Qtmline.cpp是这样的
#include "Qtmline.h"
#include


Qtmline::Qtmline(QWidget *parent)
	: QMainWindow(parent),m_flag(0)
{
	ui.setupUi(this);
	m_timerId = startTimer(60);
	connect(ui.BtnStart, SIGNAL(clicked()), SLOT(OnBtnStart()));
	connect(ui.BtnBig, SIGNAL(clicked()), SLOT(OnBtnBig()));
	connect(ui.BtnMove, SIGNAL(clicked()), SLOT(OnBtnMove()));
}
int Qtmline::OnBtnStart()
{


	QGraphicsScene *m_graphicsScene = new QGraphicsScene;
	m_graphicsScene->setSceneRect(-200, -200, 400, 400);
	QPixmap *pixmap = new  QPixmap("D:\\000.png");
	m_pixItem = new PixItem(pixmap);
	m_graphicsScene->addItem(m_pixItem);
	m_pixItem->setPos(0, 600);

	m_graphicsView = new QGraphicsView;
	m_graphicsView->setScene(m_graphicsScene);
	m_graphicsView->setMinimumSize(400, 400);
	ui.GLayout->addWidget(m_graphicsView);


	//QMessageBox::information(this, "ok", "Successful Connect");

	return 0;
}
int Qtmline::OnBtnBig()
{
	//QMessageBox::information(this, "ok", "Successful Connect");

	m_graphicsView->scale(2, 2);
	return 0;
}

int Qtmline::OnBtnMove()
{
	//QMessageBox::information(this, "ok", "Successful Connect");

	m_flag = 1;
	return 0;
}
void Qtmline::timerEvent(QTimerEvent * event)
{
	// 可以有多个定时器,每个的定时器有不同的处理
	if (event->timerId() == m_timerId&&m_flag==1)
	{
		m_pixItem->moveBy(0, -50);
		update(); // 重绘
	}
}
main.cpp是这样的
#include "Qtmline.h"
#include

int main(int argc, char *argv[])
{
	QApplication a(argc, argv);

	Qtmline w;
	w.show();

	return a.exec();
}
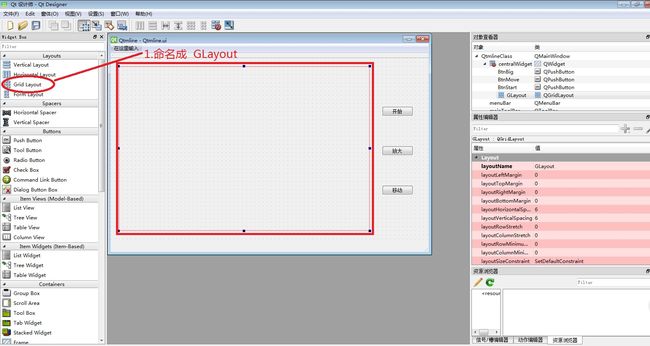
接下来介绍Qtmline.ui文件
这个直接拖进来就行,我命名成了GLayout它是Grid Layout 类中的
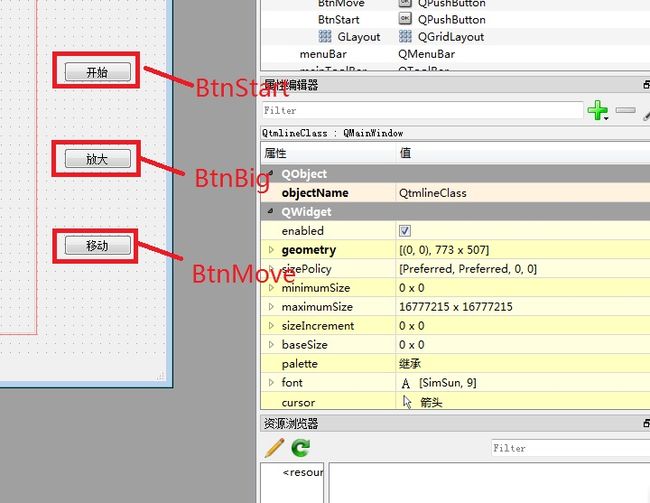
然后是三个按钮
具体的代码仔细看就明白了,显示主要是这个
	QGraphicsScene *m_graphicsScene = new QGraphicsScene;
	m_graphicsScene->setSceneRect(-200, -200, 400, 400);
	QPixmap *pixmap = new  QPixmap("D:\\000.png");
	m_pixItem = new PixItem(pixmap);
	m_graphicsScene->addItem(m_pixItem);
	m_pixItem->setPos(0, 600);

	m_graphicsView = new QGraphicsView;
	m_graphicsView->setScene(m_graphicsScene);
	m_graphicsView->setMinimumSize(400, 400);
	ui.GLayout->addWidget(m_graphicsView);
移动主要是通过Qtime实现的
void Qtmline::timerEvent(QTimerEvent * event)
{
	// 可以有多个定时器,每个的定时器有不同的处理
	if (event->timerId() == m_timerId&&m_flag==1)
	{
		m_pixItem->moveBy(0, -50);
		update(); // 重绘
	}
}
放大缩小是由这个方法
int Qtmline::OnBtnBig()
{
	//QMessageBox::information(this, "ok", "Successful Connect");

	m_graphicsView->scale(2, 2);
	return 0;
}
上面是放大的,缩小就可以这样改
int Qtmline::OnBtnBig()
{
	//QMessageBox::information(this, "ok", "Successful Connect");

	m_graphicsView->scale(0.8, 0.8);
	return 0;
}
可以点击下面的链接下载pixitem类
pixitem类


