Linux-4.9.2内核在mini2440上的移植(九)——LCD驱动移植
本篇目的:添加背光驱动,添加LCD驱动。
本篇参考:
(1)背光添加:http://singleboy.blog.163.com/blog/static/54900194201152183748863/
(2)LCD驱动:http://singleboy.blog.163.com/blog/static/54900194201152113914540/
9.1 背光驱动添加
LCD的背光控制引脚是GPG4,这里我们先用0/1的方式开关LCD背光,以后再修改为PWM控制。
(1)进入到Linux源码文件夹,并在drivers/video/backlight/下建立一个背光驱动。
root@ubuntu:~#cd linux-4.9.2/
root@ubuntu:~/linux-4.9.2#vim drivers/video/backlight/mini2440_backlight.c
(2)添加驱动源码
#include
#include
#include
#include
#include
#include
#include
#include
#include
#include
#include

#include
#include
#include
#include
#include
#include
#include

#define DEVICE_NAME "backlight"
#define DEVICE_MINOR 5

static long mini2440_backlight_ioctl(
                structfile *file,
               unsigned int cmd,
               unsigned long arg)
{
        switch(cmd)
        {
                case 0:

                       gpio_set_value(S3C2410_GPG(4), 0);
                        printk(DEVICE_NAME "turn off!\n");
                       return 0;
                case 1:

                       gpio_set_value(S3C2410_GPG(4), 1);
                       printk(DEVICE_NAME " turn on!\n");
                        return 0;
               default:
                       return -EINVAL;
        }
}
static struct file_operations dev_fops =
{
        .owner =THIS_MODULE,
        .unlocked_ioctl= mini2440_backlight_ioctl,
};

static struct miscdevice misc =
{
        .minor = DEVICE_MINOR,
        .name =DEVICE_NAME,
        .fops =&dev_fops,
};

static int __init dev_init(void)
{
        int ret;
        ret =misc_register(&misc);
        if(ret < 0)
        {
               printk("Register misc device fiald!");
                returnret;
        }
       gpio_direction_output(S3C2410_GPG(4), 1);
        return ret;
}

static void __exit dev_exit(void)
{
       misc_deregister(&misc);
}

module_init(dev_init);
module_exit(dev_exit);

MODULE_LICENSE("GPL");
MODULE_AUTHOR("ubuntu");
MODULE_DESCRIPTION("Backlight control formini2440");
注意,linux4.9的GPIO驱动与linux2.6的GPIO驱动不同,
初始化并设置IO输出模式是:gpio_direction_output(S3C2410_GPG(4), 1);
IO电平状态设置是:gpio_set_value(S3C2410_GPG(4),0);
(3)添加make menu菜单
root@ubuntu:~/linux-4.9.2#vim drivers/video/backlight/Kconfig
定位到第11行,添加红色部分代码
#
# Backlight& LCD drivers configuration
#
menuconfigBACKLIGHT_LCD_SUPPORT
bool "Backlight & LCD devicesupport"
help
Enable this to be able to choose thedrivers for controlling the
backlight and the LCD panel on someplatforms, for example on PDAs.
config BACKLIGHT_MINI2440
tristate"Backlight support for mini2440 from FriendlyARM"
depends onBACKLIGHT_LCD_SUPPORT
help
backlight driver forMINI2440 from FriendlyARM
if BACKLIGHT_LCD_SUPPORT
#
# LCD
#
configLCD_CLASS_DEVICE
(4)修改makefile
root@ubuntu:~/linux-4.9.2#vim drivers/video/backlight/Makefile
在第24行,加入红色部分
obj-$(CONFIG_BACKLIGHT_88PM860X) += 88pm860x_bl.o
obj-$(CONFIG_BACKLIGHT_AAT2870) += aat2870_bl.o
obj-$(CONFIG_BACKLIGHT_ADP5520) += adp5520_bl.o
obj-$(CONFIG_BACKLIGHT_MINI2440) += mini2440_backlight.o
obj-$(CONFIG_BACKLIGHT_ADP8860) += adp8860_bl.o
obj-$(CONFIG_BACKLIGHT_ADP8870) += adp8870_bl.o
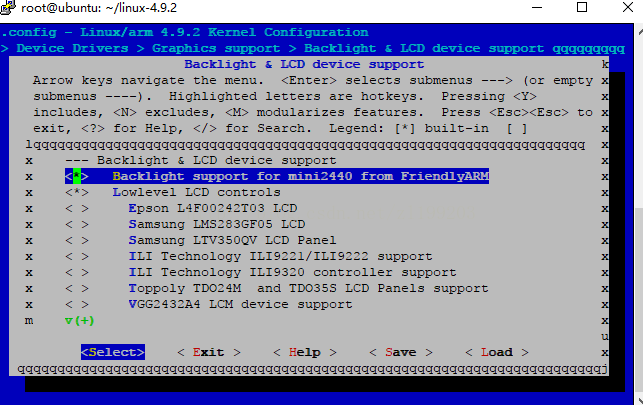
(5)在menuconfig中开启背光驱动。
root@ubuntu:~/linux-4.9.2#make menuconfig
在界面中找到
DeviceDrivers --->
Graphicssupport --->
[*] Backlight & LCD device support --->
就可以找到该配置选项,如图
选中后,保存退出。
9.2 添加LCD驱动
(1)修改mach-mini2440.c
root@ubuntu:~/linux-4.9.2# vim arch/arm/mach-s3c24xx/mach-mini2440.c
将从第112行
taticstruct s3c2410fb_display mini2440_lcd_cfg __initdata = {
开始,到154行
.lpcsel = ((0xCE6) & ~7) | 1<<4,
};
的代码全部删除
添加如下代码
#if defined(CONFIG_FB_S3C2410_N240320)

#define LCD_WIDTH 240
#define LCD_HEIGHT 320
#define LCD_PIXCLOCK 100000

#define LCD_RIGHT_MARGIN 36
#define LCD_LEFT_MARGIN 19
#define LCD_HSYNC_LEN 5

#define LCD_UPPER_MARGIN 1
#define LCD_LOWER_MARGIN 5
#define LCD_VSYNC_LEN 1

#elif defined(CONFIG_FB_S3C2410_W320240)
#define LCD_WIDTH 320
#define LCD_HEIGHT 240
#define LCD_PIXCLOCK 170000

#define LCD_RIGHT_MARGIN 0x44
#define LCD_LEFT_MARGIN 0x04
#define LCD_HSYNC_LEN 0x01

#define LCD_UPPER_MARGIN 10
#define LCD_LOWER_MARGIN 4
#define LCD_VSYNC_LEN 1

#define LCD_CON5 (S3C2410_LCDCON5_FRM565 |S3C2410_LCDCON5_INVVFRAME | S3C2410_LCDCON5_INVVLINE | S3C2410_LCDCON5_HWSWP )

#elif defined(CONFIG_FB_S3C2410_N480272)
#define LCD_WIDTH 480
#define LCD_HEIGHT 272
#define LCD_PIXCLOCK 100000

#define LCD_RIGHT_MARGIN 36
#define LCD_LEFT_MARGIN 19
#define LCD_HSYNC_LEN 5

#define LCD_UPPER_MARGIN 1
#define LCD_LOWER_MARGIN 5
#define LCD_VSYNC_LEN 1

#elif defined(CONFIG_FB_S3C2410_TFT640480)
#define LCD_WIDTH 640
#define LCD_HEIGHT 480
#define LCD_PIXCLOCK 40000

#define LCD_RIGHT_MARGIN 67
#define LCD_LEFT_MARGIN 40
#define LCD_HSYNC_LEN 31

#define LCD_UPPER_MARGIN 5
#define LCD_LOWER_MARGIN 25
#define LCD_VSYNC_LEN 1

#elif defined(CONFIG_FB_S3C2410_T240320)
#define LCD_WIDTH 240
#define LCD_HEIGHT 320
#define LCD_PIXCLOCK 170000
#define LCD_RIGHT_MARGIN 25
#define LCD_LEFT_MARGIN 0
#define LCD_HSYNC_LEN 4
#define LCD_UPPER_MARGIN 1
#define LCD_LOWER_MARGIN 4
#define LCD_VSYNC_LEN 1
#define LCD_CON5 (S3C2410_LCDCON5_FRM565 |S3C2410_LCDCON5_INVVDEN | S3C2410_LCDCON5_INVVFRAME | S3C2410_LCDCON5_INVVLINE| S3C2410_LCDCON5_INVVCLK | S3C2410_LCDCON5_HWSWP )

#elif defined(CONFIG_FB_S3C2410_X240320)
#define LCD_WIDTH 240
#define LCD_HEIGHT 320
#define LCD_PIXCLOCK 170000
#define LCD_RIGHT_MARGIN 25
#define LCD_LEFT_MARGIN 0
#define LCD_HSYNC_LEN 4
#define LCD_UPPER_MARGIN 0
#define LCD_LOWER_MARGIN 4
#define LCD_VSYNC_LEN 9
#define LCD_CON5 (S3C2410_LCDCON5_FRM565 |S3C2410_LCDCON5_INVVDEN | S3C2410_LCDCON5_INVVFRAME | S3C2410_LCDCON5_INVVLINE| S3C2410_LCDCON5_INVVCLK | S3C2410_LCDCON5_HWSWP )

#elif defined(CONFIG_FB_S3C2410_TFT800480)
#define LCD_WIDTH 800
#define LCD_HEIGHT 480
#define LCD_PIXCLOCK 40000

#define LCD_RIGHT_MARGIN 67
#define LCD_LEFT_MARGIN 40
#define LCD_HSYNC_LEN 31

#define LCD_UPPER_MARGIN 25
#define LCD_LOWER_MARGIN 5
#define LCD_VSYNC_LEN 1

#elif defined(CONFIG_FB_S3C2410_VGA1024768)
#define LCD_WIDTH 1024
#define LCD_HEIGHT 768
#define LCD_PIXCLOCK 80000

#define LCD_RIGHT_MARGIN 15
#define LCD_LEFT_MARGIN 199
#define LCD_HSYNC_LEN 15

#define LCD_UPPER_MARGIN 1
#define LCD_LOWER_MARGIN 1
#define LCD_VSYNC_LEN 1
#define LCD_CON5 (S3C2410_LCDCON5_FRM565 |S3C2410_LCDCON5_HWSWP)

#endif
保存退出
(2)修改drivers/video/fbdev/Kconfig
root@ubuntu:~/linux-4.9.2# vim drivers/video/fbdev/Kconfig
在2073行附近加入红色部分代码
config FB_S3C2410_DEBUG
bool "S3C2410 lcddebug messages"
depends on FB_S3C2410
help
Turn on debuggingmessages. Note that you can set/unset at run time
through sysfs
choice
prompt "LCD select"
depends on FB_S3C2410
help
S3C24x0 LCD size select
config FB_S3C2410_W320240
boolean "3.5 inch 320X240 TFT Landscape LCD"
depends on FB_S3C2410
help
3.5 inch 320X240 TFT Landscape LCD
config FB_S3C2410_T240320
boolean "3.5 inch 240X320 Toppoly LCD"
depends on FB_S3C2410
help
3.5 inch 240X320 Toppoly LCD
config FB_S3C2410_X240320
boolean "3.5 inch 240X320 LCD(ACX502BMU)"
depends on FB_S3C2410
help
3.5 inch 240X320 LCD(ACX502BMU)
config FB_S3C2410_N240320
boolean "3.5 inch 240X320 NEC LCD"
depends on FB_S3C2410
help
3.5 inch 240x320 NEC LCD
config FB_S3C2410_N480272
boolean "4.3 inch 480X272 NEC LCD"
depends on FB_S3C2410
help
config FB_S3C2410_TFT640480
boolean "8 inch 640X480 L80 LCD"
depends on FB_S3C2410
help
8inch 640X480 LCD
config FB_S3C2410_TFT800480
boolean "7 inch 800x480 TFT LCD"
depends on FB_S3C2410
help
7inch 800x480 TFT LCD
config FB_S3C2410_VGA1024768
boolean "VGA 1024x768"
depends on FB_S3C2410
help
VGA 1024x768
endchoice
config FB_NUC900
tristate "NUC900LCD framebuffer support"
depends on FB&& ARCH_W90X900
select FB_CFB_FILLRECT
select FB_CFB_COPYAREA
selectFB_CFB_IMAGEBLIT
---help---
Frame buffer driverfor the built-in LCD controller in the Nuvoton
NUC900 processor
保存退出
(3)配置
root@ubuntu:~/linux-4.9.2# make menuconfig
现在,我们在命令行输入:makemenuconfig 进入内核配置,依次按下面的子菜单项选择:
Device Drivers --->
Graphics support --->
Frame buffer devices --->
<*> Support forframe buffer devices ---> //这行选中,不用进入
LCD select (3.5inch 240X320 Toppoly LCD) ---> //进入
(X) 3.5 inch 240X320 LCD(ACX502BMU) //根据自己开发板的屏幕型号选择,我的是X35
按空格或者回车键选择我们需要的 LCD 型号,然后退出保存内核配置。
9.3 编译测试
root@ubuntu:~/linux-4.9.2#make -j8
root@ubuntu:~/linux-4.9.2#./mkuImage.sh
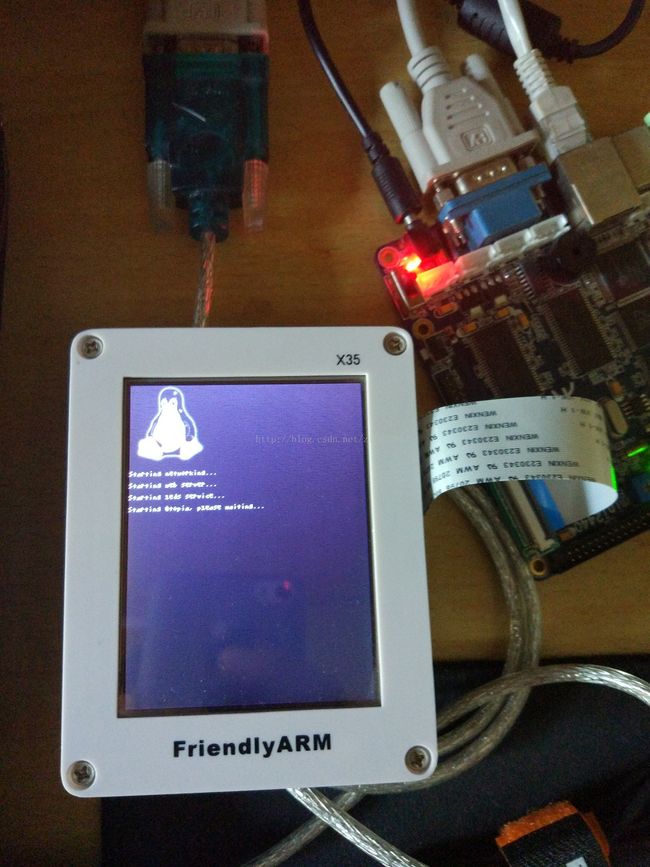
重新启动开发板,可以看到屏幕上出现了小企鹅,并且下面打印了启动信息。

