最简单的Springboot集成Spring Data JPA教程
刚开始使用Springboot开发项目时,ORM框架就用的Spring Data JPA,只是断断续续用了一年有余,没有做一些总结,趁着现在疫情严重,工作不多的情况下,就来做个笔记,记录一下Springboot集成Spring Data JPA的大体步骤。
1、首先新建一个springboot项目,项目名为springdata,springboot的版本就用2.0.5.RELEASE。
    org.springframework.boot
    spring-boot-starter-parent
    2.0.5.RELEASE
2、导入相应的jar包
        org.springframework.boot
        spring-boot-starter


        mysql
        mysql-connector-java


        org.springframework.boot
        spring-boot-starter-data-jpa


        org.springframework.boot
        spring-boot-starter-web


        org.projectlombok
        lombok
        true
3、新建User实体类,并加入注解
import lombok.Data;
import lombok.ToString;
import javax.persistence.*;
import java.io.Serializable;

@Data
@Entity
@Table(name = "user")
@ToString
public class User implements Serializable {
    @Id
    @GeneratedValue(strategy = GenerationType.IDENTITY)
    private Integer id;
    @Column(name = "user_name")
    private String userName;
    @Column(name = "user_age")
    private Integer userAge;
}
注解说明:
@Entity: 标明该类是一个实体类
@Table: 指明数据库的表名
@Id: 指定表的主键
@GeneratedValue:指定主键的生成策略
@Column: 指明类的成员属性和表中字段的对应关系
4、新建UserDao接口,集成JpaRepository类,并新增查询用户sel方法,更新用户update方法
import com.springdata.model.User;
import org.springframework.data.jpa.repository.JpaRepository;
import org.springframework.data.jpa.repository.Modifying;
import org.springframework.data.jpa.repository.Query;
import org.springframework.data.repository.query.Param;
import org.springframework.stereotype.Repository;
import org.springframework.transaction.annotation.Transactional;

@Repository
public interface UserDao extends JpaRepository<User, Integer> {
    @Query(value = "select id, user_name, user_age from user where id = :id", nativeQuery = true)
    User sel(@Param("id") int id);

    @Transactional
    @Modifying
    @Query(value = "update user set user_name = :userName, user_age = :userAge where id = :id", nativeQuery = true)
    void update(@Param("userName") String userName, @Param("userAge") Integer userAge, @Param("id") Integer id);
}
5、在resources目录的application.properties配置文件下新增mysql数据库配置和jpa配置
server.port=8080

# mysql数据库配置
spring.datasource.url=jdbc:mysql://localhost:3306/test
spring.datasource.username=root
spring.datasource.password=root
spring.datasource.driver-class-name=com.mysql.jdbc.Driver

# JPA配置
# 显示执行的sql语句
spring.jpa.show-sql=true
6、创建UserService接口类和实现类UserServiceImpl
import com.springdata.model.User;
import java.util.List;

public interface UserService {
    public User sel(int id);
    public void add(User user);
    public void update(User user);
}

import com.springdata.dao.UserDao;
import com.springdata.model.User;
import com.springdata.service.UserService;
import org.springframework.beans.factory.annotation.Autowired;
import org.springframework.stereotype.Service;
import java.util.List;

@Service
public class UserServiceImpl implements UserService {
    @Autowired
    private UserDao userDao;

    @Override
    public User sel(int id) {
        return userDao.sel(id);
    }

    @Override
    public void add(User user) {
        userDao.save(user);
    }

    @Override
    public void update(User user) {
        userDao.update(user.getUserName(), user.getUserAge(), user.getId());
    }
}
7、创建控制器类UserController
import com.springdata.model.User;
import com.springdata.service.UserService;
import org.springframework.beans.factory.annotation.Autowired;
import org.springframework.web.bind.annotation.*;
import java.util.List;

@RestController
@RequestMapping("/user")
public class UserController {
    @Autowired
    private UserService userService;

    @GetMapping(value = "/getUser/{id}")
    public String getUser(@PathVariable int id) {
        return userService.sel(id).toString();
    }

    @PostMapping(value = "/addUser", produces = "application/json;charset=UTF-8")
    public String addUser(@RequestBody User user) {
        try {
            userService.add(user);
        } catch (Exception e) {
            e.printStackTrace();
            return "error";
        }
        return "success";
    }

    @PostMapping(value = "/updateUser", produces = "application/json;charset=UTF-8")
    public String updateUser(@RequestBody User user) {
        try {
            userService.update(user);
        } catch (Exception e) {
            e.printStackTrace();
            return "error";
        }
        return "success";
    }
}
8、在mysql的test库下创建user表
CREATE TABLE `user` (
	`id` INT(32) NOT NULL AUTO_INCREMENT,
	`user_name` VARCHAR(32) NOT NULL,
	`user_age` INT(3) NOT NULL,
	PRIMARY KEY (`id`) USING BTREE
)
9、启动springdata项目并使用postman测试
新增用户:

修改用户:

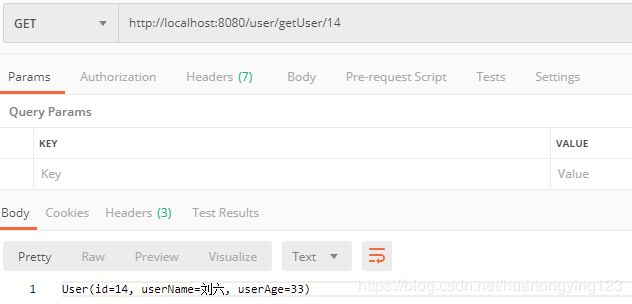
查询用户:

至此Springboot集成Spring Data JPA已经全部完成,测试也非常成功,是不是很简单!
有可以改进的地方希望诸位同学不要吝惜笔墨,加以指正,万分感谢!