SpringBoot + JPA + Thymeleaf快速开发一个查询页面(完整的Web开发流程)
首先简单地介绍一下 JPA
JPA是持久层的技术, 用JPA技术建立数据访问层十分简单方便, 一会儿我们会体会到JPA和SpringBoot结合起来会大大简化Javaweb开发中的配置.
好了,话不多说,开始我们的开发!
一、创建SpringBoot项目
按照往常的习惯创建即可。注意我们要导入四个依赖:SpringDataJPA, Mysql Driver, Thymeleaf, Spring Web Starter。
application.properties:
spring.datasource.url=jdbc:mysql://localhost:3306/exercise_users?useUnicode=true&characterEncoding=UTF-8&serverTimezone=UTC
spring.datasource.username=root
spring.datasource.password=123456
spring.datasource.driver-class-name=com.mysql.jdbc.Driver
spring.jpa.properties.hibernate.hbm2ddl.auto=update
二、进行数据库表的设计
创建一个user表,属性包括id, name, password即可,其中Id作主键。然后往其中随意插入两条数据
完成如图:

三、创建与user表对应的实体类:
在主包下创建一个包,entity。然后创建实体类User。
package com.example.demo.entity;

import javax.persistence.Column;
import javax.persistence.Entity;
import javax.persistence.GeneratedValue;
import javax.persistence.Id;

@Entity
public class User {
	@Id
	@GeneratedValue
	private Integer id;
	@Column(name = "name")
	private String name;
	@Column(name = "password")
	private String password;

	//省略getter、setter、constructor
}
@Entity注解将User类定义为JPA管理的实体,默认直接映射到user表。
@Id注解指明主键,@GeneratedValue注明主键生成策略,默认自增
@Column用于和user表中的属性一一对应,这里不写也可以默认对应上。
四、持久层的开发:
使用JPA,你的持久层将会变得非常简单。
在主包下创建dao包,创建UserRepository继承JpaRepository
package com.example.demo.dao;
import java.util.List;
import org.springframework.data.jpa.repository.JpaRepository;
import org.springframework.data.jpa.repository.Query;
import org.springframework.stereotype.Repository;
import com.example.demo.entity.User;

@Repository
//UserRepository继承JpaRepository这个类,这个类中包括了很多增删改查等方法。
//如果需要加入新的数据库操作方法,那么在UserRepository接口内定义方法即可。
public interface UserRepository extends JpaRepository<User,Integer>{
	//相当于jpql: select p from User p where p.name = ?!
	User findByName(String name);

	//利用@Query注解可以自定义一个方法
	//这个地方User是指那个实体类User,不是表名!
	//?1是指第一个参数
	@Query("select p from User p where p.password=?1")
	List<User> withPasswordQuery(String password);
}
我在这个接口中定义了findByName这个方法,那么JPA内部就会根据命名规则自动检测出findByName这个方法对应的sql语句。说白了,相当于mybatis中的mapper文件,以前在mybatis中的mapper文件里我们会对dao接口中的每一个方法写相应的sql语句实现。而现在,我们直接定义findByName,那么JPA内部它会自动根据命名规则生成相应的JPQL语句。因此,在这里命名不是随便的,要去查一些关键字,比如这里findBy它就是一个关键字。
大多数情况下,JpaRepository内部自带的增删改查都是够用的,除非你有一些特殊的要求,不过也是可以实现的。通过@Query注解我们就可以自定义一个密码检索withPasswordQuery
因此,我们的持久层用这一个类UserRepository就可以了。
五、业务层的开发:
在主包下创建service包,创建UserServiceInterface接口,然后创建UserService类实现之。这种做法在这里看似乎是没有什么意义的,但它是spring种的一种面向接口编程思想,即我们先用接口设计方法,然后再创建相应的类去实现之,设计与实现分开,有利于业务的分离。

UserServiceInterface代码:
package com.example.demo.service;

import java.util.List;

import com.example.demo.entity.User;

//更好地体现面向接口编程的思想
public interface UserServiceInterface {
	//返回表中所有user
	public List<User> findAllUser();
	//按名字返回相应的user
	public User findByName(String name);
	//根据密码查找相应的user
	public List<User> withPasswordQuery(String password);
	//根据删除一个user
	public void deleteById(Integer id);
}
UserService代码:
package com.example.demo.service;

import java.util.List;

import org.springframework.beans.factory.annotation.Autowired;
import org.springframework.stereotype.Service;

import com.example.demo.dao.UserRepository;
import com.example.demo.entity.User;

@Service
public class UserService implements UserServiceInterface{
	//自动注入userRepository,利用其实现业务层的相关操作
	@Autowired
	UserRepository userRepository;

	/**
	 * 查询所有的User并返回
	 * @return
	 */
	public List<User> findAllUser(){
		return userRepository.findAll();
	}

	/**
	 * 根据name来查
	 */
	public User findByName(String name) {
		return userRepository.findByName(name);
	}

	/**
	 * 自定义的一个根据password来查用户的方法
	 */
	public List<User> withPasswordQuery(String password){
		return userRepository.withPasswordQuery(password);
	}

	/**
	 * 根据id删除一个User
	 * @param name
	 * @return
	 */
	public void deleteById(Integer id) {
		userRepository.deleteById(id);
	}
}
六、编写service层的测试
测试的重要性不用再说。实际上每一个maven项目下都有src/test/java目录,这就是给我们写测试的地方。
在src/test/java下创建一个service层的包,内部创建一个TestService的类,用于测试Service层的功能:
结构图:

TestService代码:
package com.example.demo.service;

import static org.junit.Assert.assertEquals;

import java.util.List;

import org.junit.Ignore;
import org.junit.Test;
import org.junit.runner.RunWith;
import org.springframework.beans.factory.annotation.Autowired;
import org.springframework.boot.test.context.SpringBootTest;
import org.springframework.test.context.junit4.SpringRunner;

import com.example.demo.entity.User;

@RunWith(SpringRunner.class)
@SpringBootTest
public class TestService{
	//要对service进行测试,肯定要注入它
	@Autowired
	UserService userService;

	@Test
	public void testfindAllUser() {
		int size = userService.findAllUser().size();
		assertEquals(2, size);
	}

	@Test
	public void testFindByName() {
		User user = userService.findByName("张无忌");
		assertEquals("张无忌", user.getName());
	}

	@Test
	public void testWithPasswordQuery() {
		List<User> list = userService.withPasswordQuery("213123");
		assertEquals(1, list.size());
		assertEquals("灭绝师太", list.get(0).getName());
	}


	//用@Ignore注解可以让一个方法不参与测试
	@Test
	@Ignore
	public void testDeleteById() {
		userService.deleteById(2);
	}
}
@RunWith(SpringRunner.class)
@SpringBootTest
这两个注解是springboot测试中必不可少的。
如果service层代码测试通过,那么恭喜你,离成功不远了。因为很明显,你的数据库可以正常访问了,而且service对象的功能也是正确的,剩下的就是在控制器中使用它们,然后跳转一些页面就可以了。

七、控制器的编写
所谓控制器,就是Controller,负责页面的跳转以及前后台数据交互等功能。
稍微多说一句,三层架构是:展现层+应用层+数据访问层。MVC是:数据模型+视图+控制器(Model,View,Controller)。这两者是不一样的。
其实MVC只存在于三层架构的展现层,springBoot中有一个专门的类Model,用来和View进行数据交互,等会儿我们会见到。V就是很好理解的,像jsp或者thymeleaf都是属于一种视图页面,是动态的。C就是控制器,在springBoot中注解为@Controller的类。
UserController:
package com.example.demo.controller;

import org.springframework.beans.factory.annotation.Autowired;
import org.springframework.stereotype.Controller;
import org.springframework.ui.Model;
import org.springframework.validation.BindingResult;
import org.springframework.web.bind.annotation.ModelAttribute;
import org.springframework.web.bind.annotation.PostMapping;
import org.springframework.web.bind.annotation.RequestAttribute;
import org.springframework.web.bind.annotation.RequestMapping;
import org.springframework.web.bind.annotation.RequestMethod;

import com.example.demo.entity.User;
import com.example.demo.service.UserService;

@Controller
public class UserController {
	@Autowired
	UserService userService;

	//访问index.html页面
	@RequestMapping(value = "/index")
	public String index(Model model) {
		//这样的话,${user}才可在index.html中被取出
		model.addAttribute("user", new User());
		model.addAttribute("userNumber", userService.findAllUser().size());
		return "index";
	}

	//访问show页面
	@PostMapping(value = "/show")
	//@ModelAttribute接受表单提交过来的user对象
	public String show(@ModelAttribute User user, Model model) {
		String name = user.getName();
		User u = userService.findByName(name);
		model.addAttribute("user", u);
		return "show";
	}
}
八、视图页面的编写:
由于springBoot不推荐使用jsp,而推荐使用Thymeleaf,因此我们的视图页面采用Thymeleaf。
经常听人说html和jsp的区别,两者最大的区别就是html是静态页面,jsp是动态的。jsp可以与后台配合,时刻更新页面。Thymeleaf也是一样。
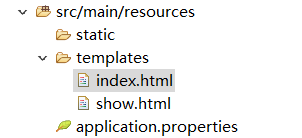
根据我们控制器的编写,那么我们需要两个页面:index.html和show.html。在springboot官方要求中,动态页面我们是放在src/main/resources的templates文件夹下的,于是我们在该文件夹下创建。

index.html:
注意引入Thymeleaf标签
<html xmlns:th="http://www.thymeleaf.org">
<html xmlns:th="http://www.thymeleaf.org">
<head>
<meta charset="UTF-8">
<title>index.htmltitle>
head>
<body>
<h1>欢迎访问学籍管理系统h1>
<h3 th:text="现在数据库中的用户个数为 + ${userNumber} + 人">h3>

<form th:action="@{/show}" th:object="${user}" method="post">
	姓名:<input type="text" th:field="*{name}" /><br/>
	<input type="submit" value="查询" />
form>
body>
html>
简单介绍一下index页面的作用:${userNumber}是从Model对象中取出userNumber属性,在Controller中我们将表里面的人数存放了进去,因此这里会动态显示出数据库中用户个数。
下面是一个表单提交,@{/show}表示访问/show,那么就执行Controller中的show方法。th:Object这里取了index方法中传进来的那个User对象。输入姓名提交之后,调用了该对象的setName方法,然后将该对象提交到show方法那里去。
show.html:
<html xmlns:th="http://www.thymeleaf.org">
<head>
<meta charset="UTF-8">
<title>show.htmltitle>
head>
<body>
<div th:if="${user != null}">
<h1 th:text="您好:  + ${user.name}">h1><br/>
<p th:text="您的密码是 + ${user.password}">p>
<p th:text="您的Id是 + ${user.id}">p>
div>

<h1 th:if="${user == null}">对不起,您要查找的用户不存在!h1>
body>
html>
th:if用于判断,如果条件不成立,那么就不会执行里面的部分
九、测试效果:
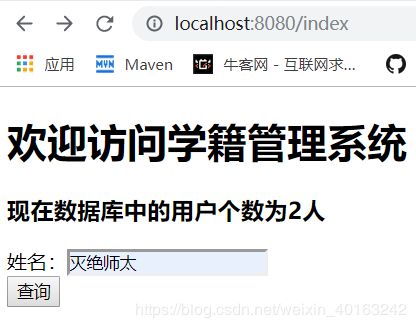
输入index访问,通过控制器访问到index.html,可以看到,首页会动态显示当前数据库中的人数,输入我们要查找的姓名

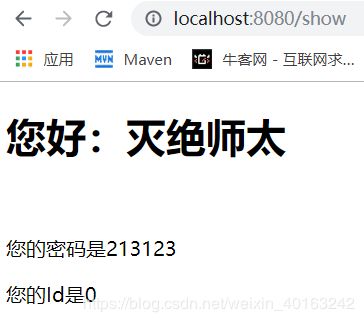
可以看到,已经跳转到了show.html页面,并且正确查找到了该用户的信息。

再尝试一下不存在的用户:

测试结果:

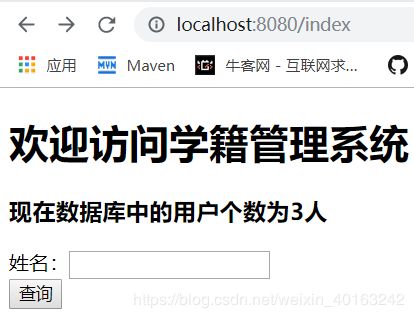
手动增加一条记录“周芷若”之后再访问首页看看,首页应该显示有3个人了:

刷新首页:

可以看到,已经显示有3个人了。