企业级CI/CD流程搭建【Jenkins+pipeline+Docker】
企业级CI/CD流程搭建
一、CI/CD流程
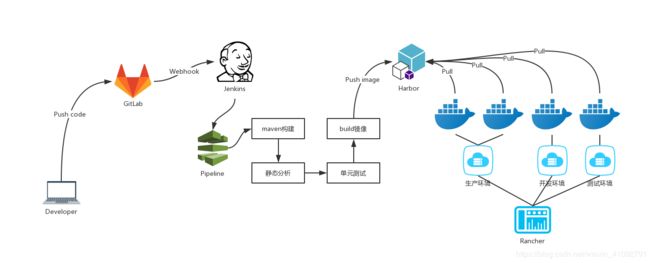
- 开发push代码至GitLab
- GitLab的webhook触发Jenkins的pipeline
- Jenkins pipeline进行构建、打包、生成Docker-image,并且push image至Harbor
- 服务器(生产、开发、测试环境)从Harbor pull image,并且运行 image
- 所有环境使用Rancher来统一进行管理
CI/CD流程图如下
二、环境要求
1. 机器环境
- CentOS 7 64位
- 内核3.10或以上
- 至少1台机器,配置建议8核32G 硬盘2T以上,可适当降低,但是一定要留足够的扩展空间(硬盘、内存、CPU槽),便于后期扩展
[root@ruhr-gitlab workspace]# cat /etc/redhat-release
CentOS Linux release 7.7.1908 (Core)
[root@ruhr-gitlab workspace]# uname -a
Linux ruhr-gitlab 3.10.0-1062.1.2.el7.x86_64 #1 SMP Mon Sep 30 14:19:46 UTC 2019 x86_64 x86_64 x86_64 GNU/Linux
2. 应用环境
规划:所有应用全部安装于1台服务器192.168.0.100
| 应用 | 版本 | 端口 |
|---|---|---|
| JDK | 1.8 | |
| Git | 2.13.1 | |
| Maven | 3.6.0 | |
| docker-ce | 19.03.3 | |
| docker-compose | 1.24.1 | |
| gitlab-ce | 12.3.5 | 10000 |
| Jenkins | 2.190.1 | 10010 |
| SonarQube | 7.3 | 10020 |
| Harbor | 1.9.1 | 10030 |
| Rancher | v2.3.1 | 80 |
三、环境准备
1.机器环境准备
-
CentOS 7 关闭selinux
vim /etc/selinux/config,全部注释,只保留SELINUX=disabled -
CentOS 7 关闭firewalld,开启iptables
[root@localhost /]# systemctl stop firewalld
[root@localhost /]# systemctl disable firewalld
[root@localhost /]# yum install -y iptables-services
[root@localhost /]# systemctl enable iptables
[root@localhost /]# systemctl start iptables
- 安装JDK
从orcale官网下载jdk安装包,直接解压,配置环境变量即可,下载需要注册orcale账号
jdk所有历史版本链接点这里
[root@localhost ~] mkdir -p /usr/java/
[root@localhost ~] cd /usr/java/   #上传jdk包到该路径
[root@localhost ~] tar -xzvf jdk-8u162-linux-x64.tar.gz
配置环境变量
[root@localhost ~] vim /etc/profile
export JAVA_HOME=/usr/java/jdk1.8.0_162
export JAR_HOME=/usr/java/jdk1.8.0_162/jre
export CLASSPATH=/usr/java/jdk1.8.0_162/lib
export PATH=$JAVA_HOME/bin:$PATH

:wq保存退出
[root@localhost ~] source /etc/profile
[root@localhost ~] java -version
java version "1.8.0_162"
Java(TM) SE Runtime Environment (build 1.8.0_162-b12)
Java HotSpot(TM) 64-Bit Server VM (build 25.162-b12, mixed mode)
2.gitlab-ce部署
- 安装Git
yum install -y git
- 安装依赖
[root@localhost ~] yum -y install policycoreutils openssh-server openssh-clients postfix
- 开启postfix
[root@localhost ~] systemctl enable postfix && systemctl start postfix
- 下载gitlab-ce
[root@localhost ~] wget https://mirrors.tuna.tsinghua.edu.cn/gitlab-ce/yum/el7/gitlab-ce-12.3.5-ce.0.el7.x86_64.rpm
- 安装gitlab-ce
[root@localhost ~] rpm -ivh gitlab-ce-12.3.5-ce.0.el7.x86_64.rpm
- 配置IP端口
[root@localhost ~] vim  /etc/gitlab/gitlab.rb
external_url 'http://192.168.0.100:10000'
- 重置gitlab并启动
[root@localhost ~] gitlab-ctl reconfigure
[root@localhost ~] gitlab-ctl restart
GitLab汉化过程不在此记录
3.Jenkins部署
- 下载jenkins.jar
wget http://mirrors.jenkins.io/war-stable/latest/jenkins.war
- 启动jenkins
java -jar jenkins.war --httpPort=10010
访问192.168.0.100:10010,根据提示操作即可
4.Maven部署
- 下载安装
[root@localhost ~] mkdir -p /usr/local/maven
[root@localhost ~] wget http://mirrors.tuna.tsinghua.edu.cn/apache/maven/maven-3/3.6.2/binaries/apache-maven-3.6.2-bin.tar.gz
[root@localhost ~] tar -xzvf apache-maven-3.6.2-bin.tar.gz
- 配置环境变量
export MAVEN_HOME=/usr/local/maven/apache-maven-3.6.2
export PATH=$MAVEN_HOME/bin:$PATH
[root@localhost ~] source /etc/profile
- 更换阿里云镜像仓库(也可以使用默认仓库,忽略此步即可)
在/usr/local/maven/apache-maven-3.6.0/conf/setting.xml中加入以下配置
<mirrors>
    <mirror>
      <id>nexus-aliyun</id>
      <mirrorOf>*</mirrorOf>
      <name>Nexus aliyun</name>
      <url>http://maven.aliyun.com/nexus/content/groups/public</url>
    </mirror>
  </mirrors>
5.docker-ce部署
- 安装所需的软件包
[root@localhost ~] yum install -y yum-utils device-mapper-persistent-data lvm2
- 设置稳定的存储库
[root@localhost ~] yum-config-manager --add-repo https://download.docker.com/linux/centos/docker-ce.repo
- 安装docker-ce
[root@localhost ~] yum install docker-ce
[root@localhost ~] systemctl start docker
- 验证是否安装成功
[root@localhost ~] docker -v
Docker version 19.03.3, build a872fc2f86
[root@localhost /] docker run hello-world
Unable to find image 'hello-world:latest' locally
latest: Pulling from library/hello-world
1b930d010525: Pull complete
Digest: sha256:c3b4ada4687bbaa170745b3e4dd8ac3f194ca95b2d0518b417fb47e5879d9b5f
Status: Downloaded newer image for hello-world:latest

Hello from Docker!
6.docker-compose部署
curl -L "https://github.com/docker/compose/releases/download/1.24.1/docker-compose-$(uname -s)-$(uname -m)" -o /usr/local/bin/docker-compose
chmod +x /usr/local/bin/docker-compose
ln -s /usr/local/bin/docker-compose /usr/bin/docker-compose
- 查看版本
$ docker-compose --version
docker-compose version 1.24.1, build 1110ad01
7.SonarQube部署
- 添加用户
useradd sonar
passwd sonar
- 优化系统参数
sysctl -w  vm.max_map_count=262144
sysctl -w fs.file-max=65536
ulimit -u 4096 sonarqube
ulimit -n 65536 sonarqube
- 安装
注:最新版本 7.9.1需要 java11才能运行
wget https://binaries.sonarsource.com/Distribution/sonarqube/sonarqube-7.3.zip
mv sonarqube-7.3.zip  /usr/local/sonarqube/
chown -R sonar:sonar /usr/local/sonarqube/
su sonar
unzip sonarqube-7.3.zip
启动
./sonar start,可以设置成系统服务,通过service启动
8.Harbor部署
- 下载离线安装包
wget https://storage.googleapis.com/harbor-releases/release-1.9.0/harbor-offline-installer-v1.9.1.tgz
- 解压安装包
tar xvf harbor-offline-installer-v1.9.1.tgz
- 修改配置文件harbor.yml
hostname: 192.168.0.100
http:
  port: 10030
harbor_admin_password: Harbor12345
database:
  password: root123
  max_idle_conns: 50
  max_open_conns: 100
data_volume: /data/harbor
clair:
  updaters_interval: 0
jobservice:
  max_job_workers: 20
notification:
  webhook_job_max_retry: 20
chart:
  absolute_url: disabled
log:
  level: info
  local:
    rotate_count: 50
    rotate_size: 200M
    location: /data/logs/harbor
_version: 1.9.0
proxy:
  http_proxy:
  https_proxy:
  no_proxy: 127.0.0.1,localhost,.local,.internal,log,db,redis,nginx,core,portal,postgresql,jobservice,registry,registryctl,clair
  components:
    - core
    - jobservice
    - clair
关于配置文件的解释,在官方github上能找到:harbor配置文件详解
- 安装harbor
./install.sh
- 启动 / 停止harbor
docker-compose start
docker-compose stop
9.Rancher部署
Rancher部署直接通过Docker启动即可
docker run -d --restart=unless-stopped -p 10040:10040 -p 443:443 rancher/rancher
直接登录http://192.168.0.100访问Rancher
四、pipeline配置
1.Jenkins
Pipeline plugin 安装
- GitLab Plugin
- Pipeline
- Blue Ocean
在系统管理-插件管理中搜索以上插件,勾选直接安装
Global tools配置
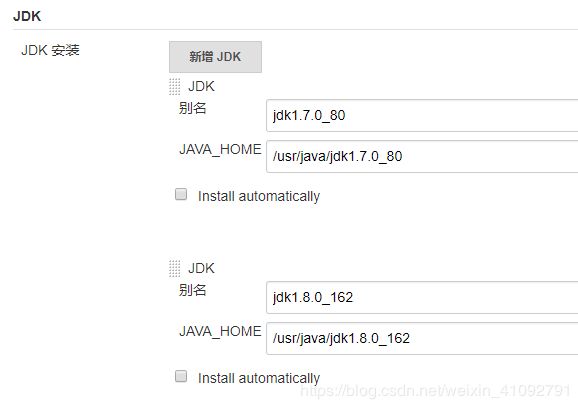
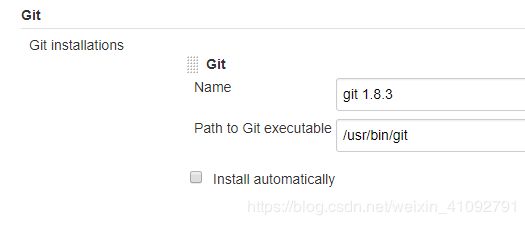
Maven、JDK、Git、Docker都按照服务器上的实际配置进行修改。我配置的截图如下:


创建pipeline
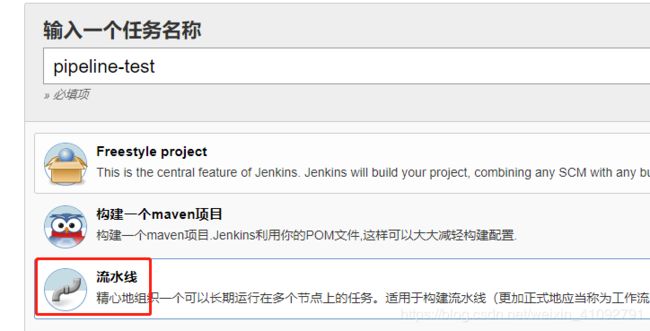
GitLab webhook URL 和 Secret token 要记住,需要填入GitLab的仓库中去

![]()
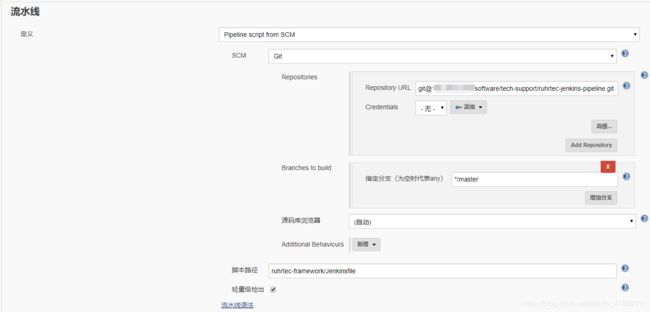
pipeline从这里配置的仓库中获取Jenkinsfile,每个业务仓库一个Jenkinsfile,配置特定路径的Jenkinsfile来完成整个pipeline
重启Jnekins
通过192.168.0.100:10010/restart重启。
2.GitLab
- 创建jenkinsfile仓库
新建一个仓库,用来放所有项目的Jenkinsfile(和业务代码要分开,不建议放到一个仓库,Jenkinsfile仓库由运维来维护,业务代码由开发来维护)。
将该仓库的ssh-git以及分支配置到jenkins的pipeline中。
上传Jenkinsfile文件,按照以下编写,测试成功以后再对每个步骤进行修改。pipeline语法看这里
pipeline {
    agent any

    stages {
        stage('Build') {
            steps {
                echo 'Building..'
            }
        }
        stage('Test') {
            steps {
                echo 'Testing..'
            }
        }
        stage('Deploy') {
            steps {
                echo 'Deploying....'
            }
        }
    }
}
-
webhook 配置
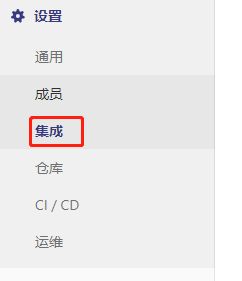
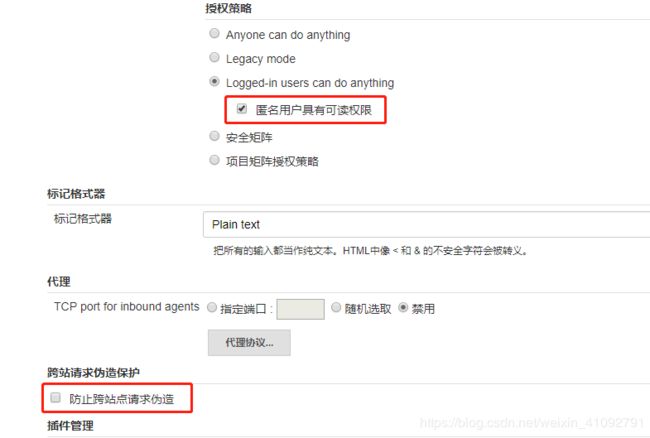
在设置-集成中设置webhook,这里的URL和安全令牌,就是上一步在jenkins记录的GitLab webhook URL和Secret token,触发器就填分支即可。

五、Rancher配置
- 创建集群
选择全局-添加集群-自定义-下一步-勾选Etcd、Control、Worker,复制命令,在需要加入集群的主机上运行即可。
创建时也可设置私有镜像仓库,填写URL、用户名密码即可。


- 安装Rancher-Cli
Rancher右下角下载Rancher-Cli for linux,将解压后的rancher文件通过软链接或者复制到/usr/bin下。
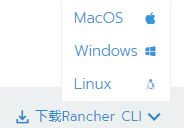
Rancher生成api-key,通过rancher login 登录rancher,跟rancher之间进行交互,完成部署,更新,回滚等操作。

- 登录rancher
rancher login https://192.168.0.100/v3 --token token-nt7gn:jvdldgz2cztrwm8wq9fb24sh2p88vslndztxxvb6fxwttmtbqhc4bg
- 安装kubectl
添加Kubernetes的yum源
cat >> /etc/yum.repos.d/kubernetes.repo <<EOF
[kubernetes]
name=Kubernetes
baseurl=https://mirrors.aliyun.com/kubernetes/yum/repos/kubernetes-el7-x86_64/
enabled=1
gpgcheck=0
EOF
查看可用版本
yum list kubectl –showduplicates
已加载插件:fastestmirror
base                                                     | 3.6 kB     00:00
docker-main                                              | 2.9 kB     00:00
elrepo                                                   | 2.9 kB     00:00
epel/x86_64/metalink                                     | 5.0 kB     00:00
epel                                                     | 4.7 kB     00:00
extras                                                   | 3.4 kB     00:00
kubernetes                                               | 1.3 kB     00:00
updates                                                  | 3.4 kB     00:00
(1/5): epel/x86_64/group_gz                                | 266 kB   00:01
(2/5): epel/x86_64/updateinfo                              | 851 kB   00:00
(3/5): kubernetes/primary                                  | 6.0 kB   00:01
(4/5): updates/7/x86_64/primary_db                         | 3.6 MB   00:03
(5/5): epel/x86_64/primary_db                              | 6.1 MB   00:06
Loading mirror speeds from cached hostfile
 * base: mirrors.neusoft.edu.cn
 * elrepo: mirrors.tuna.tsinghua.edu.cn
 * epel: mirrors.tongji.edu.cn
 * extras: mirrors.neusoft.edu.cn
 * updates: mirrors.aliyun.com
kubernetes                                                                49/49
可安装的软件包
kubectl.x86_64                        1.7.5-0                         kubernetes
安装kubectl
yum install -y kubectl.x86_64
查看node
[root@ruhr-gitlab /]# rancher kubectl get node
NAME           STATUS   ROLES                      AGE   VERSION
ruhr-test-03   Ready    controlplane,etcd,worker   8d    v1.15.5
[root@ruhr-gitlab /]#
查看pod
[root@ruhr-gitlab /] rancher kubectl get pod
NAME                                   READY   STATUS             RESTARTS   AGE
ruhrtec-cloud-api-85db4f8866-xx927     1/1     Running            16         159m
ruhrtec-cloud-bridge-8698bd746-rbtmm   1/1     Running            1          159m
ruhrtec-cloud-build-d5c765488-j9bj9    1/1     Running            1          159m
ruhrtec-cloud-rail-68cdbcd986-984cd    1/1     Running            1          159m
ruhrtec-cloud-user-5989dc45f6-p9th5    0/1     CrashLoopBackOff   32         159m
ruhrtec-config-7fc869b946-jm44c        1/1     Running            0          159m
ruhrtec-gateway-554f9bfc66-57wdj       1/1     Running            1          159m
ruhrtec-initial-778f67df4-zw695        0/1     CrashLoopBackOff   33         159m
ruhrtec-job-748fc76ffd-z8k27           1/1     Running            1          159m
ruhrtec-monitor-5c47f47854-ht5h5       1/1     Running            1          159m
ruhrtec-register-5685d75d84-xr6rd      1/1     Running            0          159m
ruhrtec-uaa-d868c586-dkld2             1/1     Running            15         159m
[root@ruhr-gitlab /]
启动pod
通过yaml文件的方式启动
rancher kubectl create -f yamls/ruhrtec-register.yaml --record
更新pod
rancher kubectl apply -f yamls/ruhrtec-register.yaml --record
查看pod历史
rancher kubectl rollout history deploy/ruhrtec-register
回滚pod至版本2
rancher kubectl rollout undo deploy/ruhrtec-register --to-revision=2
yaml文件
---
kind: Deployment
apiVersion: extensions/v1beta1
metadata:
  name: ruhrtec-register
spec:
  template:
    metadata:
      labels:
        name: ruhrtec-register
    spec:
      containers:
      - name: ruhrtec-register-container
        image: 192.168.0.100:10030/library/ruhrtec-register:latest
        ports:
        - name: register-port
          containerPort: 10010
          hostIP:
          hostPort: 30010
          protocol: TCP
      nodeSelector:
        slave: "test-03"
六、SonarQube配置
等待补充…
感谢阅读,有兴趣的小伙伴可以关注我的公众号DevOps探索之旅,大家一起学习进步
![]()
