Spring Boot从0开始学的个人笔记8 -- 消息RabbitMQ
一、简述
大多应用中,可通过消息服务中间件来提升系统异步通信、扩展解耦能力
- 消息服务中两个重要概念:
消息代理(message broker)和目的地(destination)。当消息发送者发送消息以后,将由消息代理接管,消息代理保证消息传递到指定目的地。 - 消息队列主要有两种形式的目的地:
队列(queue):点对点消息通信(point-to-point)
主题(topic):发布(publish)/订阅(subscribe)消息通信
二、安装
打开虚拟机,运行Linux,打开SmarTTY,输入docker pull rabbitmq:3-management,下载好后

docker run -d -p 5672:5672 -p 15672:15672 --name myrabbitmq d55229deb03e
- -d后台运行
- 其又两个端口,所以就-p两次
- –name名字叫 myrabbitmq
- 后面那堆,是我的rabbitmq的ID,用docker images查的
![]()
然后在浏览器输入http://192.168.0.102:15672/,当然,这个IP是我的SmarTTY连接Linux中的,自己的是什么,看我之前写的docker
进去,登陆账号密码,默认都是是guest

三、RabbitMQ
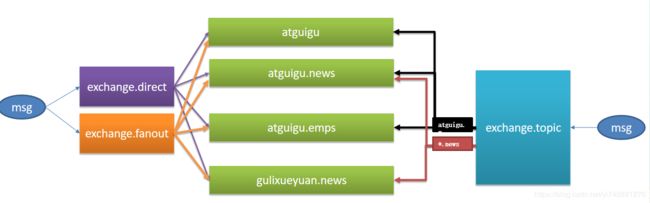
生产者把消息发布到 Exchange 上,消息最终到达队列并被消费者接收,而 Binding 决定交换器的消息应该发送到那个队列。
Exchange分发消息时根据类型的不同分发策略有区别,目前共四种类型:direct、fanout、topic、headers 。
1、topic交换器

topic 交换器通过模式匹配分配消息的路由键属性,将路由键和某个模式进行匹配,此时队列需要绑定到一个模式上。它将路由键和绑定键的字符串切分成单词,这些单词之间用点隔开。它同样也会识别两个通配符:符号“#”和符号“*”。#匹配0个或多个单词,*匹配一个单词。
2、先做测试吧
视频教程的图
跟着视频教程做测试,这在干嘛我也不知道。。。做了几个exchange,然后对队列进行绑定,
3、创建3个exchange

主要就是这些两个框了
那个Durability:的选项,Duiable就是持久化,下次打开后,这个exchange还在,另外一个就是关闭后就消失了

4、添加4个队列


5、对3个exchange都绑定队列

绑哪个选哪个,点进去

- 但是啊,在exchange.topic有点不一样,因为exchange.topic不是绑定所有的,路由名要改,后面有说
看到一开始的图,exchange.direct和exchange.fanout对4个队列都绑定,exchange.topic对atguigu.#绑定(atguigu为头)和*.news绑定(news结尾)

exchange.direct和exchange.fanout都绑定成这样
然后,exchange.topic:

- 这个是什么意思?后面有说
6、测试
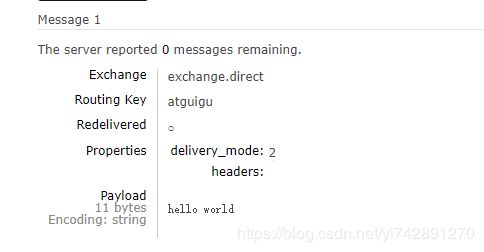
1)`exchange.direct
比如我们在exchange.direct中发atguigu请求,就只有atguigu队列能接受到,因为exchange用到了direct和路由名就是atguigu,指定发信息给这个路由名了,其他的队列,名都不一样,收不到
- 类型为direct,就指定发给谁

2)exchange.fanout
类型为fanout是不管指定什么东西,exchange.fanout里面的队列都会收到的。比如在exchange.fanout里面发请求


- 只有atguigu的ready为2是因为,上面个的例子是atguigu请求
3)exchange.topic
在exchange.topic发送hello.news,看似这个不存在,但是认真看

因为用的是topic类型,所以能够模糊匹配的那种技术。(这个应该理解为绑定,因为队列是一开始写好的,然后exchange与每个队列又有某些绑定)然后atguigu.news队列接受*.news,能接受到。gulixueyuan.news队列接受 *.news,也能接受。


四、项目测试

1、配置
application.yml:
spring:
  rabbitmq:
    host: 192.168.0.102
    username: guest
    password: guest
2、发送消息
可以用@Autowired自动导入
@SpringBootTest
class SpringBootAmqpApplicationTests {

    @Autowired
    RabbitTemplate rabbitTemplate;

    @Test
    void contextLoads() {
//        rabbitTemplate.send(String exchange, String routeKey, Message var3)
//        Message(byte[] body, MessageProperties messageProperties)  Message为一个数组和一个头消息

//        convertAndSend(String var1, String var2, Object var3)
//        其中,Object var3默认为消息体,会自动序列化发送过去的
        Map<String,Object> map = new HashMap<>();
        map.put("msg","这是一个信息");
        rabbitTemplate.convertAndSend("exchange.direct","atguigu.news",map);

    }
send(String exchange, String routeKey, Message var3):exchange名,路由名,还有消息。消息由消息内容和消息头组成convertAndSend(String var1, String var2, Object var3),那个send太麻烦,就有了这个方法,Object var3会自动转成序列化发送消息


3、接受消息
    @Test
    public void test(){
        Message receive = rabbitTemplate.receive("atguigu.news");
        System.out.println(receive);
    }
(Body:’{msg=这是一个信息}’ MessageProperties [headers={}, contentType=application/x-java-serialized-object, contentLength=0, receivedDeliveryMode=PERSISTENT, priority=0, redelivered=true, receivedExchange=exchange.direct, receivedRoutingKey=atguigu.news, deliveryTag=1, messageCount=0])

4、发送消息变为JSON类型
可以看到,发送接受都是序列化和反序列化的,还是转为JSON好点,只需要加一个配置类就可以了
@Configuration
public class MyAMQPConfig {

	@Bean
    public MessageConverter messageConverter(){
//        把消息转化为JSON格式
        return new Jackson2JsonMessageConverter();
    }
}
再次发送

再次接受
class org.springframework.amqp.core.Message
(Body:’{“msg”:“这是一个信息”}’ MessageProperties [headers={ContentTypeId=java.lang.Object, KeyTypeId=java.lang.Object, TypeId=java.util.HashMap}, contentType=application/json, contentEncoding=UTF-8, contentLength=0, receivedDeliveryMode=PERSISTENT, priority=0, redelivered=true, receivedExchange=exchange.direct, receivedRoutingKey=atguigu.news, deliveryTag=1, messageCount=0])
这个发送给exchange.direct是这样,给其他类型的exchange也是一样道理
5、自动接受消息
为了更好地展示,我们创建一个类,里面写toString方法,
public class Person {
    String name;
    int age;
    //xxx
}
创建一个Service层,用来自动接受某个队列的消息
@Service
public class PersonService {

    @RabbitListener(queues = "atguigu.news")
    public void receive(Person person){
        System.out.println("收到消息"+person);
    }
}
@RabbitListener:可以放多个队列,用于自动接受队列的东西,参数的话,写Person,就是如果发送的JSON是Person的话,就可以接收到,没有的话,就是Message类型
在主程序开启自动接受消息的注解
@EnableRabbit
@SpringBootApplication
public class SpringBootAmqpApplication {

    public static void main(String[] args) {
        SpringApplication.run(SpringBootAmqpApplication.class, args);
    }

}
@EnableRabbit:开启自动接受消息的注解
测试类中
@SpringBootTest
class SpringBootAmqpApplicationTests {

    @Autowired
    RabbitTemplate rabbitTemplate;

    @Test
    void contextLoads() {
        rabbitTemplate.convertAndSend("exchange.direct","atguigu.news",new Person("小强",22));

    }
这里发送了一个自定义类的消息
收到消息Person{name=‘小强’, age=22}
因为接受怎么输出什么东西,是service层写的
6、如果自动接受是Message类型
service层的一个方法
    @RabbitListener(queues = "atguigu")
    public void receive2(Message message){
        System.out.println(message.getBody());
        System.out.println(message.getMessageProperties());
    }
还是发送Person对象,但是队列是atguigu,而上面的也是接受atguigu的,但是接受类型为Message
    @Test
    void contextLoads() {
        rabbitTemplate.convertAndSend("exchange.direct","atguigu",new Person("小强",22));

    }
[B@5e012317
MessageProperties [headers={TypeId=com.qiang.Bean.Person}, contentType=application/json, contentEncoding=UTF-8, contentLength=0, receivedDeliveryMode=PERSISTENT, priority=0, redelivered=false, receivedExchange=exchange.direct, receivedRoutingKey=atguigu, deliveryTag=1, consumerTag=amq.ctag-Ws2bRFLJ6Y3d7JXvrKVCTQ, consumerQueue=atguigu]
五、代码取代界面化操作
之前我们做的创建exchange、queue,还有绑定,都可以在Java中实现
继续在测试类里面做
@Test
public void create(){

    amqpAdmin.declareExchange(new DirectExchange("amqpadmin.exchange"));

    amqpAdmin.declareQueue(new Queue("amqpadmin.queue",true));

    amqpAdmin.declareBinding(new Binding("amqpadmin.queue",Binding.DestinationType.QUEUE,"amqpadmin.exchange","amqp.test",null));

}
DirectExchange:该容器最多有DirectExchange(String name, boolean durable, boolean autoDelete, Map,但是也有一个容器,只写第一个就好了。 durable为是否是持久化的,boolean autoDelete是否是自动删除,Map不知道。。。Queue也是一样Binding:Binding(String destination, Binding.DestinationType destinationType, String exchange, String routingKey, @Nullable Map- destination:目的地,就是要绑定哪个队列
- Binding.DestinationType destinationType:跟着写就对了。。。
- exchange:哪个exchange中
- routingKey:路由名是?
- @Nullable Map:不知道。。。。
目前为止的代码:spring-boot-AMQP