《Android群英传》读书笔记(6)第六章:Android绘图机制与处理技巧之二
1.色彩特效处理
1.色彩矩阵分析
在色彩处理中通常从下面三个角度描述一个图像:
- 色调——物体传播的颜色
- 饱和度——颜色的纯度,从0(灰)到100%(饱和)来进行描述
- 亮度——颜色的相对明暗度
Android中使用一个颜色矩阵ColorMatrix来处理这些效果,这个矩阵是一个4x5的数组矩阵,它用力对图片的色彩进行处理。而对于每一个像素点,都有一个颜色分量矩阵用来保存颜色的RGBA值,例如下面就是一个ColorMatrix矩阵A:
| a | b | c | d | e |
|---|---|---|---|---|
| f | g | h | i | j |
| k | l | m | n | o |
| p | q | r | s | t |
另外保存每个像素点的颜色分量矩阵C如下所示:
| R |
|---|
| G |
| B |
| A |
在处理图像时,使用矩阵乘法运算来处理颜色分量矩阵得到新的颜色分量为:
R1=axR+bxG+cxB+dxA+e;
G1=fxR+gxG+hxB+ixA+j;
B1=kxR+lxG+mxB+nxA+o;
A1=pxR+qxG+rxB+sxA+t;ColorMatrix矩阵中的每一行分别决定了新颜色的R、G、B、A的值,同时矩阵的第五列e、j、o、t分别决定每个分量中的offset偏移量。
初始矩阵:
| 1 | 0 | 0 | 0 | 0 |
|---|---|---|---|---|
| 0 | 1 | 0 | 0 | 0 |
| 0 | 0 | 1 | 0 | 0 |
| 0 | 0 | 0 | 1 | 0 |
通过初始矩阵变换的颜色与原来的颜色值相同。
2.改变色光属性
- 色调
改变色调可以通过ColorMatrix类中的setRotate(int axis,float degree)方法来实现,第一个参数分别用0,1,2来代表R、G、B三个颜色通道 ,第二个参数是需要处理的值:
ColorMatrix hueMatrix = new ColorMatrix();
hueMatrix.setRotate(0,hue0);
hueMatrix.setRotate(1,hue1);
hueMatrix.setRotate(2,hue2);- 饱和度
饱和度可以通过setSaturation(float sat)来进行设置
ColorMatrix saturationMatrix = new ColorMatrix();
saturationMatrix.setSaturation(saturation);- 亮度
使用setScale(flaot rScale,float gScale,float bScale,float aScale)来改变亮度:
ColorMatrix lumMatrix = new ColorMatrix();
lumMatrix.setScale(lum,lum,lum,1);- 三种混合
ColorMatrix matrix = new ColorMatrix();
matrix.postConcat(hueMatrix);
matrix.postConcat(saturationMatrix);
matrix.postConcat(lumMatrix);
将矩阵设置到Paint上:
paint.setColorFilter(new ColorMatrixColorFilter(matrix));
canvas.drawBitmap(bm,0,0,paint);
需要注意不能直接在原图上进行修改,需要创建一个和原图一样大小的Bitmap,并将原图绘制到该Bitmap上,下面的代码中,bmp为新创建的,bm为原图:
Bitmap bmp = Bitmap.createBitmap(bm.getWidth(),bm.getHeight(),Bitmap.Config.ARGB_8888);
Canvas canvas = new Canvas(bmp);
canvas.drawBitmap(bm,0,0,paint);
3.常用的处理效果
- 灰度效果
| 0.33F | 0.59F | 0.11F | 0 | 0 |
|---|---|---|---|---|
| 0.33F | 0.59F | 0.11F | 0 | 0 |
| 0.33F | 0.59F | 0.11F | 0 | 0 |
| 0 | 0 | 0 | 0 | 1 |
- 图像反转
| -1 | 0 | 0 | 1 | 1 |
|---|---|---|---|---|
| 0 | -1 | 0 | 1 | 1 |
| 0 | 0 | -1 | 1 | 1 |
| 0 | 0 | 0 | 1 | 0 |
- 怀旧效果
| 0.393F | 0.769F | 0.189F | 0 | 0 |
|---|---|---|---|---|
| 0.349F | 0.686F | 0.168F | 0 | 0 |
| 0.272F | 0.534F | 0.131F | 0 | 0 |
| 0 | 0 | 0 | 1 | 0 |
- 去色效果
| 1.5F | 1.5F | 1.5F | 0 | -1 |
|---|---|---|---|---|
| 1.5F | 1.5F | 1.5F | 0 | -1 |
| 1.5F | 1.5F | 1.5F | 0 | -1 |
| 0 | 0 | 0 | 1 | 0 |
- 高饱和度
| 1.438F | -0.122F | -0.016F | 0 | -0.03F |
|---|---|---|---|---|
| -0.062F | 1.378F | -0.016F | 0 | 0.05F |
| -0.062F | -0.122F | 1.483F | 0 | -0.02F |
| 0 | 0 | 0 | 1 | 0 |
4.像素点分析
Bitmap类中提供了Bitmap.getPixels(int[] pixels,int offset,int stride,int x,int y,int width,int height);这几个参数的含义如下:
pixels——接收位图颜色值的数组offset——写入到pixels[]中的第一个像素的索引值stride——pixels[]中的行间距x——从位图中读取的第一个像素的x坐标值y——从位图中读取的第一个像素的y坐标值width——从每一行中读取的像素宽度height——读取的行数
通常可以使用如下代码:
bitmap.getPixels(oldPxs,0,bm.getWidth(),0,0,bm.getWidth(),bm.getHeight());
然后通过Color类还获取具体每个像素的ARGB值:
int color = oldPxs[i];
int r = Color.red(color);
int g = Color.green(color);
int b = Color.blue(color);
int a = Color.alpha(color);
然后就可以根据相应的算法来修改ARGB值了,例如:
r1 = (int)(0.393*r + 0.769*g + 0.189*b);
g1 = (int)(0.349*r + 0.686*g + 0.168*b);
b1 = (int)(0.272*r + 0.534*g + 0.131*b);
newPxs[i] = Color.argb(a,r1,g1,b1);最后调用bmp.setPixels(newPxs,0,width,0,0,width,height);设置给新的Bitmap。
2.图形特效处理
1.Android变形矩阵——Matrix
图形变换矩阵是一个3x3的矩阵:
| a | b | c |
|---|---|---|
| d | e | f |
| g | h | i |
和每个像素点的坐标信息相乘:
| X1 |
|---|
| Y1 |
| 1 |
就可以得到新的坐标:
X1 = axX + bxY +c;
Y1 = dxX + exY +f;
1 = gxX + hxY + i;
同常会让g=h=0,i=1使下面的等式恒成立,因此只需要关注a、b、c、d、e、f这几个参数就可以了。
初始矩阵:
| 1 | 0 | 0 |
|---|---|---|
| 0 | 1 | 0 |
| 0 | 0 | 1 |
变形处理通常有四种:
- 平移变换
平移变换矩阵:
| 1 | 0 | dx |
|---|---|---|
| 0 | 1 | dy |
| 0 | 0 | 1 |
通过计算可以发现如下等式:
X = X0 + dx;
Y = Y0 + dy;
- 旋转变换
旋转变换矩阵:
| cosθ | -sinθ | 0 |
|---|---|---|
| sinθ | cosθ | 0 |
| 0 | 0 | 1 |
- 缩放变换
缩放变换矩阵:
| K1 | 0 | 0 |
|---|---|---|
| 0 | K2 | 0 |
| 0 | 0 | 1 |
- 错切变换
计算公式:
x=x0 + k1*y0;
y=k2*x0 + y0
矩阵:
| 1 | k1 | 0 |
|---|---|---|
| k2 | 1 | 0 |
| 0 | 0 | 1 |
- 矩阵变换规律
| Scale_X | Skew_Y | Trans_X |
|---|---|---|
| Skew_Y | Scale_Y | Trans_Y |
| 0 | 0 | 1 |
矩阵的使用
private float[] mImageMatrix = new float[9];
Matrix matrix = new Matrix();
matrix.setValues(mImageMatrix);
canvas.drawBitmap(mBitmap,matrix,null);其实Matrix类中已经封装好了这些方法
matrix.setRotate()——旋转变换matrix.setTranslate()——平移变换matrix.setScale()——缩放变换matrix.setSkew()——错切变换pre()和post()——提供矩阵的前乘和后乘
Matrix类中的set方法会充值矩阵中的所有值,但post和pre不会,这两个方法常用来实现矩阵的混合作用。要注意的是,矩阵不满足交换律,所以矩阵乘法的前乘和后乘是两种不同的运算方式。
比如要实现先平移到(300,300)再旋转45度,最后平移到(200,200)
如果使用后乘:
matrix.setRotate(45);
matrix.postTranslate(200,200);
如果使用前乘运算:
matrix.setTranslate(200,200);
matrix.preRotate(45);
2.像素块分析
drawBitmapMesh(Bitmap bitmap,int meshWidth,int meshHeight,float[] verts,float vertOffset,int[] colors,int colorOffset,Paint paint);方法可以把图像分成一个一个的小块进行处理,其中各个参数的含义如下:
- bitmap——将要操作的图像
- meshWidth——需要的横向网格数
- meshHeight——需要的纵向网格数
- verts——网格交叉点坐标数组
- verftOffset——数组中开始跳过的(x,y)坐标数目
其中meshWidth和meshHeight以及verts的对应关系为:
float[] verts = new float[(meshWidth + 1) * (meshHeight + 1)]
下面的代码实现了飘扬的旗帜的效果:
public class FlagView extends View {

    private static final int WIDTH = 40;
    private static final int HEIGHT = 40;
    private float[] orig = new float[(WIDTH + 1) * (HEIGHT + 1) * 2];
    private float[] verts = new float[(WIDTH + 1) * (HEIGHT + 1) * 2];

    public FlagView(Context context) {
        this(context, null);
    }

    public FlagView(Context context, AttributeSet attrs) {
        this(context, attrs, 0);
    }

    public FlagView(Context context, AttributeSet attrs, int defStyleAttr) {
        super(context, attrs, defStyleAttr);
        init();
    }

    private Bitmap bitmap;

    private void init() {
        bitmap = BitmapFactory.decodeResource(getResources(), R.drawable.test2);
        float bitmapWidth = bitmap.getWidth();
        float bitmapHeight = bitmap.getHeight();
        int index = 0;
        for (int y = 0; y <= HEIGHT; y++) {
            float fy = y * bitmapHeight/ HEIGHT;
            for (int x = 0; x <= WIDTH; x++) {
                float fx = x * bitmapWidth / WIDTH;
                orig[index * 2 + 0] = verts[index * 2 + 0] = fx;
                orig[index * 2 + 1] = verts[index * 2 + 1] = fy + 100;
                index += 1;
            }
        }
    }

    private static final int A = 30;

    @Override
    protected void onDraw(Canvas canvas) {
        flagWave();
        k += 0.1f;
        canvas.drawBitmapMesh(bitmap, WIDTH, HEIGHT, verts, 0, null, 0, null);
        postInvalidateDelayed(50);
    }

    private float k = 0;

    private void flagWave() {
        for (int j = 0; j <= HEIGHT; j++) {
            for (int i = 0; i <= WIDTH; i++) {
                float offsetY = (float) Math.sin((float) i / WIDTH * 2 * Math.PI + Math.PI * k);
                verts[(j * (WIDTH + 1) + i) * 2 + 0] += 0;
                verts[(j * (WIDTH + 1) + i) * 2 + 1] =
                        orig[(j * (WIDTH + 1) + i) * 2 + 1] + offsetY * A;
            }
        }
    }
}
3.画笔特效处理
1.PorterDuffXfermode
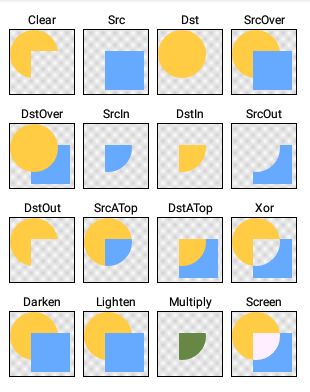
PorterDuffXfermode设置的是两个图层交集区域的显示方式,dst是先画的图,src是后画的图。PorterDuffXfermode的几种模式可以用下图表示:

下面代码展示了使用PorterDuffXfermode绘制圆角矩形图片的方法:
mBitmap = BitmapFactory.decodeResource(getResources(),R.drawable.test1);
mOut = Bitmap.createBitmap(mBitmap.getWidth(),mBitmap.getHeight(),Bitmap.Config.ARGB_8888);
Canvas canvas = new Canvas(mOut);
Paint paint = new Paint();
paint.setAntiAlias(true);
canvas.drawRoundRect(0,0,mBitmap.getWidth(),mBitmap.getHeight(),40,40,paint);
paint.setXferMode(PorterDuff.Mode.SRC_IN);
canvas.drawBitmap(mBitmap,0,0,mPaint);
下面展示使用PorterDuffXfermode实现的刮刮卡效果:
public class LuckyCardView extends View{
    public LuckyCardView(Context context){
        super(context,null);
    }
    public LuckyCardView(Context context,AttributeSet attrs,int defStyleAttr){
        super(context.attrs,0);
        init();
    }
    private Paint mPaint;
    private Path mPath;
    private Canvas mCanvas;
    private Bitmap mBgBitmap;
    private Bitmap mFgBitmap;

    private void init(){
        initPaint();
        mBgBitmap = BitmapFactory.decodeResources(getResources(),R.drawable.test2);
        mFgBitmap = Bitmap.createBitmap(mBgBitmap.getWidth(),mBgBitmap.getHeight().Bitmap.Config.ARGB_8888);
        mCanvas = new Canvas(mFgBitmap);
        mCanvas.drawColor(Color.GRAY);
    }

    @Override
    protected void onDraw(Canvas canvas){
        canvas.drawBitmap(mBgBitmap,0,0,null);
        canvas.drawBitmap(mFgBitmap,0,0,null);
    }

    @Override
    protected boolean onTouchEvent(MotionEvent event){
        switch(event.getAction()){
            case MotionEvent.ACTION_DOWN:
                mPath.reset();
                mPath.moveTo(event.getX(),event.getY());
                break;
            case MotionEvent.ACTION_MOVE:
                mPath.lineTo(event.getX(),event.getY());
                break;
            case MotionEvent.ACTION_UP:
                break;
        }
        mCanvas.drawPath(mPath,mPaint);
        invalidate();
        return true;
    }
    private void initPaint(){
        mPaint = new Paint();
        mPaint.setAntiAlias(true);
        mPaint.setStrokeJoin(Paint.Join.ROUND);
        mPaint.setStrokeCap(Paint.Cap.ROUND);
        mPaint.setStyle(Paint.Style.STROKE);
        mPaint.setStrokeWidth(50);
        mPaint.setXfermode(new PorterDuffXfermode(PorterDuff.Mode.DST_IN));
        mPaint.setAlpha(0);
    }
}
2.Shader
Shader称为着色器、渲染器,它用来实现一系列的渐变、渲染效果,Android中的Shader包括以下几种
- BitmapShader——位图Shader
- LinearGradient——线性Shader
- RadialGradient——光束Shader
- SweepGradient——梯度Shader
- ComposeShader——混合Shader
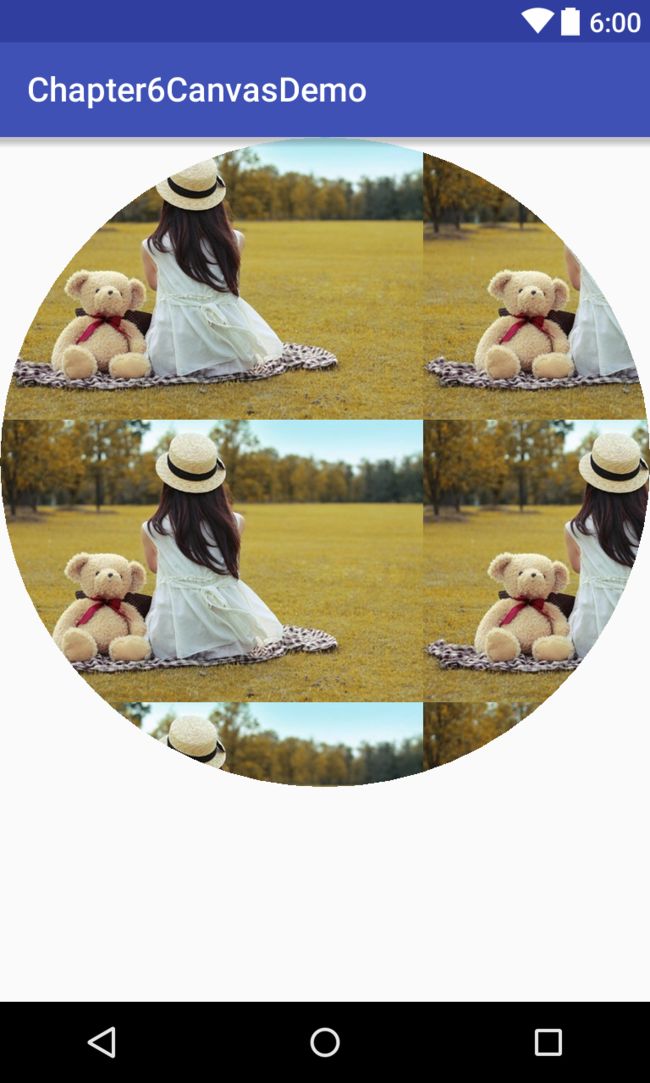
与其他几个不同,BitmapShader产生的是一个图像,它的作用是通过Paint对画布进行指定 Bitmap填充,填充时有以下几种模式选择:
- CLAMP拉伸——拉伸的是图片的最后那一个像素
- REPEAT重复——横向、纵向不断重复
- MIRROR镜像——横向、纵向不断反转重复
下面是BitmapShader的使用示例:
@Override
    protected void onDraw(Canvas canvas) {
        Paint paint = new Paint();
        Bitmap bitmap = BitmapFactory.decodeResource(getResources(), R.drawable.test2);
        Shader shader = new BitmapShader(bitmap,Shader.TileMode.REPEAT,Shader.TileMode.REPEAT);
        paint.setShader(shader);
        canvas.drawCircle(getMeasuredWidth() / 2,384,384,paint);
}3.PathEffect
下面是PathEffect使用示例
public class PathEffectView extends View {
    public PathEffectView(Context context) {
        this(context, null);
    }

    public PathEffectView(Context context, AttributeSet attrs) {
        super(context, attrs);
        init();
    }
    private Paint mPaint;
    private Path mPath;
    private PathEffect mEffects[] = new PathEffect[6];
    private void init() {
        mPaint = new Paint();
        mPaint.setStyle(Paint.Style.STROKE);
        mPaint.setAntiAlias(true);
        mPath = new Path();
        mPath.moveTo(0, 0);
        for (int i = 0; i < 30; i++) {
            mPath.lineTo(i * 30, (float) (Math.random() * 100));
        }
        mEffects[0] = null;
        mEffects[1] = new CornerPathEffect(30);
        mEffects[2] = new DiscretePathEffect(3.0f, 5.0f);
        mEffects[3] = new DashPathEffect(new float[]{15, 10}, 0);
        Path path = new Path();
        path.addRect(0, 0, 8, 8, Path.Direction.CCW);
        mEffects[4] = new PathDashPathEffect(path, 20, 5, PathDashPathEffect.Style.ROTATE);
        mEffects[5] = new ComposePathEffect(mEffects[3], mEffects[1]);

    }

    @Override
    protected void onDraw(Canvas canvas) {

        for (int i = 0; i < mEffects.length; i++) {
            canvas.translate(0, 100);
            mPaint.setPathEffect(mEffects[i]);
            canvas.drawPath(mPath, mPaint);
        }
    }
}
