快速读懂 JS 原型链
看到一篇很nice的文章,转载一下。
理解原型链
Js 中的原型链是一个比较有意思的话题,它采用了一套巧妙的方法,解决了 Js 中的继承问题。
按我的理解,原型链可以拆分成:
- 原型(prototype)
- 链(
__proto__)
原型(prototype)
原型(prototype)是一个普通的对象,它为构造函数的实例共享了属性和方法。在所有的实例中,引用到的原型都是同一个对象。
function Student(name) {
  this.name = name;
  this.study = function () {
    console.log("study js");
  };
}
// 创建 2 个实例
const student1 = new Student("xiaoming");
const student2 = new Student("xiaohong");
student1.study();
student2.study();
上面的代码中,我们创建了 2 个 Student 实例,每个实例都有一个 study 方法,用来打印 "study js"。
这样写会有个问题:2 个实例中的 study 方法都是独立的,虽然功能相同,但在系统中占用的是 2 份内存,如果我创建 100 个 Student 实例,就得占用 100 份内存,这样算下去,将会造成大量的内存浪费。
所以 Js 创造了 prototype。
function Student(name) {
  this.name = name;
}
Student.prototype.study = function () {
  console.log("study js");
};
// 创建 2 个实例
const student1 = new Student("xiaoming");
const student2 = new Student("xiaohong");
student1.study();
student2.study();
使用 prototype 之后, study 方法存放在 Student 的原型中,内存中只会存放一份,所有 Student 实例都会共享它,内存问题就迎刃而解了。
但这里还存在一个问题。
为什么 student1 能够访问到 Student 原型上的属性和方法?
答案在 __proto__ 中,我们接着往下看。
链(__proto__)
链(__proto__)可以理解为一个指针,它是实例对象中的一个属性,指向了构造函数的原型(prototype)。
我们来看一个案例:
function Student(name) {
  this.name = name;
}
Student.prototype.study = function () {
  console.log("study js");
};
const student = new Student("xiaoming");
student.study(); // study js
console.log(student.__proto__ === Student.prototype); // true
从打印结果可以得出:函数实例的 __proto__ 指向了构造函数的 prototype,上文中遗留的问题也就解决了。
但很多同学可能有这个疑问。
为什么调用 student.study 时,访问到的却是 Student.prototype.study 呢?
答案在原型链中,我们接着往下看。
原型链
原型链指的是:一个实例对象,在调用属性或方法时,会依次从实例本身、构造函数原型、构造函数原型的原型... 上去寻找,查看是否有对应的属性或方法。这样的寻找方式就好像一个链条一样,从实例对象,一直找到 Object.prototype ,专业上称之为原型链。
还是来看一个案例:
function Student(name) {
  this.name = name;
}
Student.prototype.study = function () {
  console.log("study js");
};
const student = new Student("xiaoming");
student.study(); // study js。
// 在实例中没找到,在构造函数的原型上找到了。
// 实际调用的是:student.__proto__.say 也就是 Student.prototype.say。

student.toString(); // "[object Object]"
// 在实例中没找到。
// 在构造函数的原型上也没找到。
// 在构造函数的原型的原型上找到了。
// 实际调用的是 student.__proto__.__proto__.toString 也就是 Object.prototype.toString。
可以看到, proto 就像一个链一样,串联起了实例对象和原型。
同样,上面代码中还会存在以下疑问。
为什么
Student.prototype.proto 是 Object.prototype?
这里提供一个推导步骤:
- 先找
proto前面的对象,也就是 Student.prototype 的构造函数。 - 判断 Student.prototype 类型,
typeof Student.prototype是object。 object的构造函数是 Object。- 得出 Student.prototype 的构造函数是 Object。
- 所以
Student.prototype.proto是 Object.prototype。
这个推导方法很实用,除了自定义构造函数对象之外,其他对象都可以推导出正确答案。
原型链常见问题
原型链中的问题很多,这里再列举几个常见的问题。
Function.proto 是什么?
- 找 Function 的构造函数。
- 判断 Function 类型,
typeof Function是function。 - 函数类型的构造函数就是 Function。
- 得出 Function 的构造函数是 Function。
- 所以
Function.proto= Function.prototype。
Number.proto 是什么?
这里只是稍微变了一下,很多同学就不知道了,其实和上面的问题是一样的。
- 找 Number 的构造函数。
- 判断 Number 类型,
typeof Number是function。 - 函数类型的构造函数就是 Function。
- 得出 Number 的构造函数是 Function。
- 所以
Number.proto= Function.prototype。
Object.prototype.proto 是什么?
这是个特例,如果按照常理去推导,Object.prototype.proto 是 Object.prototype,但这是不对的,这样下去原型链就在 Object 处无限循环了。
为了解决这个问题,Js 的造物主就直接在规定了 Object.prototype.proto 为 null,打破了原型链的无线循环。
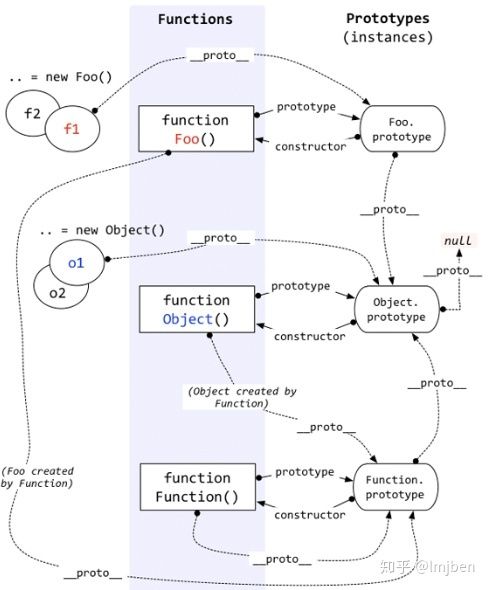
明白了这些问题之后,看一下这张经典的图,我们应该都能理解了。


深入原型链
介绍完传统的原型链判断,我们再从 V8 的层面理解一下。
V8 是怎么创建对象的
Js 代码在执行时,会被 V8 引擎解析,这时 V8 会用不同的模板来处理 Js 中的对象和函数。
例如:
- ObjectTemplate 用来创建对象
- FunctionTemplate 用来创建函数
- PrototypeTemplate 用来创建函数原型


细品一下 V8 中的定义,我们可以得到以下结论。
- Js 中的函数都是 FunctionTemplate 创建出来的,返回值的是 FunctionTemplate 实例。
- Js 中的对象都是 ObjectTemplate 创建出来的,返回值的是 ObjectTemplate 实例。
- Js 中函数的原型(prototype)都是通过 PrototypeTemplate 创建出来的,返回值是 ObjectTemplate 实例。
所以 Js 中的对象的原型可以这样判断:
- 所有的对象的原型都是 Object.prototype,自定义构造函数的实例除外。
- 自定义构造函数的实例,它的原型是对应的构造函数原型。
在 Js 中的函数原型判断就更加简单了。
- 所有的函数原型,都是 Function.prototype。
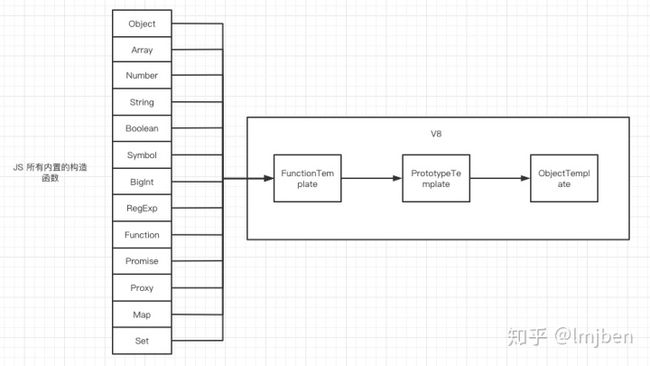
下图展示了所有的内置构造函数,他们的原型都是 Function.prototype。


看到这里,你是否也可以一看就看出任何对象的原型呢?
附:V8 中的函数解析案例
了解完原型链之后,我们看一下 V8 中的函数解析。
function Student(name) {
this.name = name;
}

Student.prototype.study = function () {
console.log(“study js”);
};

const student = new Student(‘xiaoming’)
这段代码在 V8 中会这样执行:
// 创建一个函数
v8::Local<v8::FunctionTemplate> Student = v8::FunctionTemplate::New();
// 获取函数原型
v8::Local<v8::Template> proto_Student = Student->PrototypeTemplate();
// 设置原型上的方法
proto_Student->Set(“study”, v8::FunctionTemplate::New(InvokeCallback));
// 获取函数实例
v8::Local<v8::ObjectTemplate> instance_Student = Student->InstanceTemplate();
// 设置实例的属性
instance_Student->Set(“name”, String::New(‘xiaoming’));
// 返回构造函数
v8::Local<v8::Function> function = Student->GetFunction();
// 返回构造函数实例
v8::Local<v8::Object> instance = function->NewInstance();
以上代码可以分为 4 个步骤:
- 创建函数模板。
- 在函数模板中,拿到函数原型,并赋值。
- 在函数模板中,拿到函数实例,并赋值。
- 返回构造函数。
- 返回构造函数实例。
V8 中的整体执行流程是符合正常预期的,这里了解一下即可。
原文:https://zhuanlan.zhihu.com/p/158212160