Mybatis学习(三):Mybatis注解开发、缓存使用和插件使用的深度分析
Mybatis学习(三):Mybatis注解开发、缓存使用和插件使用的深度分析
- 前言
- 一、Mybatis传统XML配置开发
- 1.1 一对一查询
- 1.1.1 新建作者实体类—Author
- 1.1.2 新建博文实体类—Blog
- 1.1.3 新建BlogMapper接口类
- 1.1.4 新建BlogMapper.xml
- 1.1.5 新建sqlMapConfig.xml配置文件
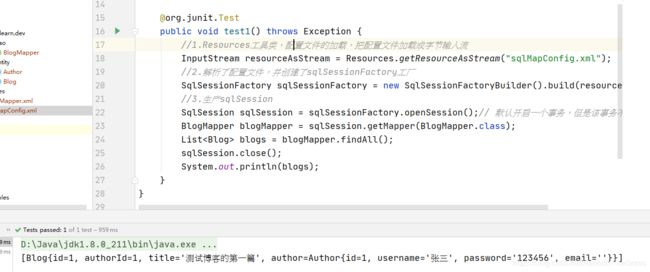
- 1.1.6 新建测试类Test
- 1.1.7 测试结果
- 1.1.8 ==注意==
- 1.2 一对多查询
- 1.2.1 修改作者类
- 1.2.2 新建AuthorMapper接口
- 1.2.3 新建AuthorMapper.xml
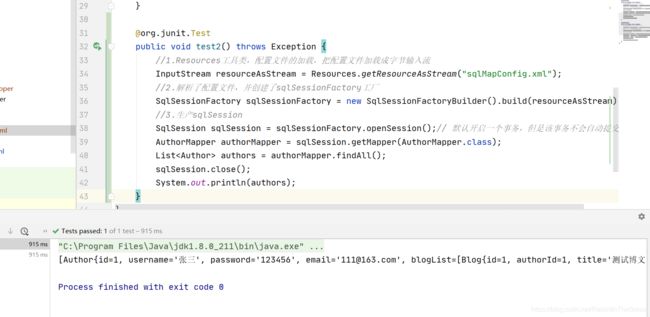
- 1.2.4 新建测试方法
- 1.2.5 测试结果
- 1.3 多对多查询
- 1.3.1 修改博文类
- 1.3.2 新增标签类
- 1.3.3 修改BlogMapper接口
- 1.3.4 修改BlogMapper.xml
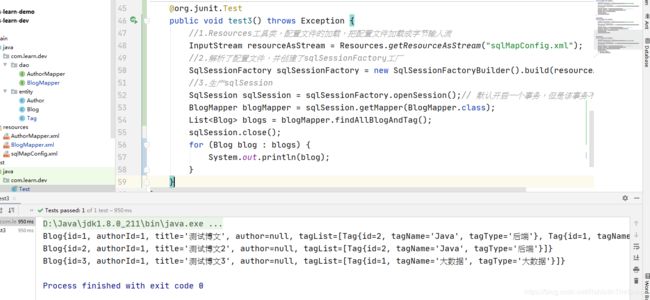
- 1.3.5 新增测试方法
- 1.3.6 测试结果
- 二、Mybatis注解开发
- 2.1 Mybatis注解
- 2.2 Mybatis的CRUD之注解开发
- 2.2.1 新建用户类User2
- 2.2.2 新建UserMapper2接口
- 2.2.3 修改sqlMapConfig.xml
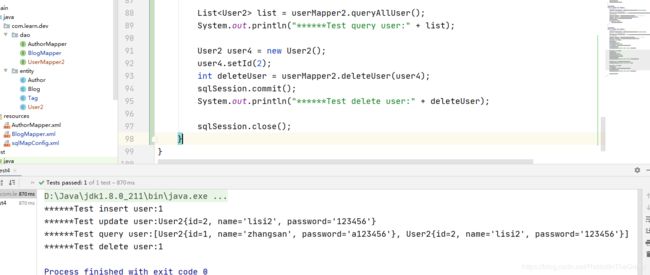
- 2.2.4 新增测试方法
- 2.2.5 测试结果
- 2.3 一对一查询之注解开发
- 2.3.1 修改sqlMapConfig.xml
- 2.3.2 新建AuthorMapper2接口
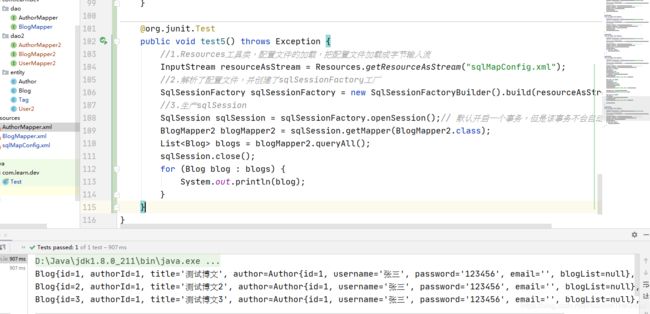
- 2.3.3 新建BlogMapper2接口
- 2.3.4 新建测试方法
- 2.3.5 测试结果
- 2.4 一对多查询之注解开发
- 2.4.1 修改BlogMapper2接口
- 2.4.2 修改AuthorMapper2接口
- 2.4.3 新增测试方法
- 2.4.4 测试结果
- 2.5 多对多查询之注解开发
- 2.5.1 新建TagMapper接口
- 2.5.2 修改BlogMapper2接口
- 2.5.3 新增测试方法
- 2.5.4 测试结果
- 三、Mybatis缓存
- 3.0 mybatis-learn-cache
- 3.1 一级缓存
- 3.1.1 一级缓存的使用
- 3.1.1.1 一级缓存的保存
- 3.1.1.1.1 修改UserMapper接口
- 3.1.1.1.2 修改UserMapper.xml
- 3.1.1.1.3 新增测试方法
- 3.1.1.1.4 测试结果
- 3.1.1.2 一级缓存的清除
- 3.1.1.2.1 修改UserMapper接口
- 3.1.1.2.2 修改UserMapper.xml
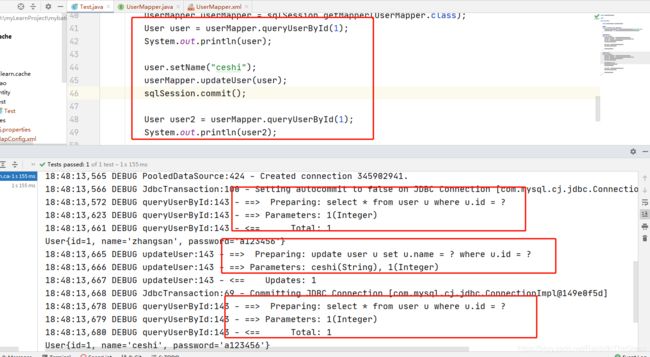
- 3.1.1.2.3 新增测试方法
- 3.1.1.2.4 测试结果
- 3.1.2 一级缓存总结
- 3.1.3 一级缓存原理分析
- 3.2 二级缓存
- 3.2.1 二级缓存的使用
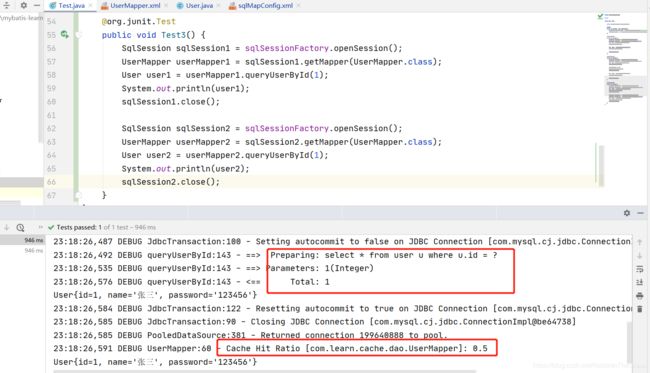
- 3.2.2 测试二级缓存
- 3.2.2.1 测试与SqlSession 无关
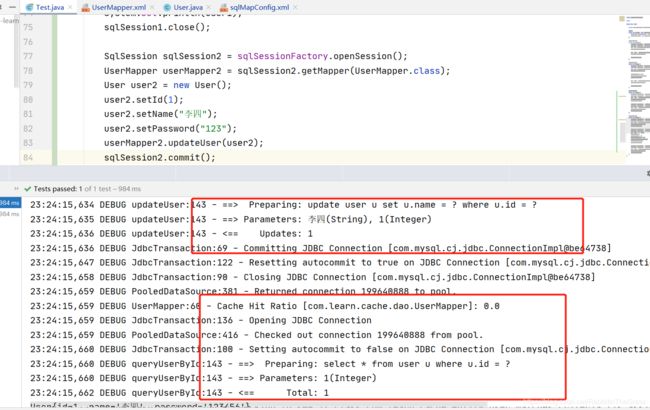
- 3.2.2.2 测试二级缓存的清除
- 3.2.3 useCache和flushCache的配置
- 四、Mybatis插件
- 4.1 Mybatis插件简介
- 4.2 Mybatis插件原理
- 4.3 自定义Mybatis插件
- 4.3.1 修改MyInterceptor类
- 4.3.2 修改sqlMapConfig.xml配置文件
- 4.3.3 新建测试方法
- 4.4 Mybatis插件源码分析
- 4.5 常见Mybatis插件的使用
- 4.5.1 PageHelper分页插件
- 4.5.1.1 引入PageHelper依赖
- 4.5.1.2 修改sqlMapConfig.xml配置
- 4.5.1.3 新增测试方法
- 4.5.2 通用Mapper插件
- 4.5.2.1 引入通用Mapper插件依赖
- 备注
- 五、彩蛋
前言
接上一篇Mybatis学习(二):Mybatis入门教程和简单应用
本篇讲解Mybatis传统XML配置开发、注解开发、缓存使用和插件使用
一、Mybatis传统XML配置开发
在父级项目下新创建一个模块mybatis-learn-dev,可参考我的仓库:mybatis-learning
之前的demo开发已经简单讲解了Mybatis基于XML配置的增删改查功能,本篇继续讲解其他高级功能的使用。
1.1 一对一查询
以博文和作者为例子,一篇博文对应一个作者。查询一篇博文同时查询出作者的信息。
1.1.1 新建作者实体类—Author
public class Author {

    private int id;
    private String username;
    private String password;
    private String email;
    // 省略get和set方法
}
1.1.2 新建博文实体类—Blog
public class Blog {
    private int id;
    private int authorId;
    private String title;
	// 省略get和set方法
}
1.1.3 新建BlogMapper接口类
public interface BlogMapper {

    List<Blog> findAll();
}
1.1.4 新建BlogMapper.xml
<?xml version="1.0" encoding="UTF-8" ?>
<!DOCTYPE mapper
        PUBLIC "-//mybatis.org//DTD Mapper 3.0//EN"
        "http://mybatis.org/dtd/mybatis-3-mapper.dtd">
<mapper namespace="com.learn.dev.dao.BlogMapper">
    <resultMap id="blogMap" type="com.learn.dev.entity.Blog">
        <result property="id" column="id"/>
        <result property="authorId" column="author_id"/>
        <result property="title" column="title"/>
        <result property="author.id" column="author_id"/>
        <result property="author.username" column="user_name"/>
        <result property="author.password" column="password"/>
        <result property="author.email" column="email"/>
    </resultMap>

    <select id="findAll" resultMap="blogMap">
        select b.id,b.author_id,b.title,a.user_name,a.password,a.email
        from blog b,author a where b.author_id = a.id
    </select>
</mapper>
1.1.5 新建sqlMapConfig.xml配置文件
<?xml version="1.0" encoding="UTF-8" ?>
<!DOCTYPE configuration PUBLIC "-//mybatis.org//DTD Config 3.0//EN"
        "http://mybatis.org/dtd/mybatis-3-config.dtd">

<configuration>

    <properties>
        <property name="username" value="root"/>
        <property name="password" value="xijian"/>
    </properties>

    <typeAliases>
        <package name="com.learn.dev.entity"/>
    </typeAliases>

    <!--environments:运行环境-->
    <environments default="dev">
        <environment id="dev">
            <!--当前事务交由JDBC进行管理-->
            <transactionManager type="JDBC"/>
            <!--当前使用mybatis提供的连接池-->
            <dataSource type="POOLED">
                <property name="driver" value="com.mysql.cj.jdbc.Driver"/>
                <property name="url" value="jdbc:mysql:///mybatis?serverTimezone=UTC&characterEncoding=utf8&useUnicode=true&useSSL=false"/>
                <property name="username" value="${username}"/>
                <property name="password" value="${password}"/>
            </dataSource>
        </environment>
    </environments>

<!--引入映射配置文件-->
    <mappers>
        <mapper resource="BlogMapper.xml"/>
    </mappers>

</configuration>
1.1.6 新建测试类Test
    @org.junit.Test
    public void test6() throws Exception {
        //1.Resources工具类,配置文件的加载,把配置文件加载成字节输入流
        InputStream resourceAsStream = Resources.getResourceAsStream("sqlMapConfig.xml");
        //2.解析了配置文件,并创建了sqlSessionFactory工厂
        SqlSessionFactory sqlSessionFactory = new SqlSessionFactoryBuilder().build(resourceAsStream);
        //3.生产sqlSession
        SqlSession sqlSession = sqlSessionFactory.openSession();// 默认开启一个事务,但是该事务不会自动提交
        BlogMapper blogMapper = sqlSession.getMapper(BlogMapper.class);
        List<Blog> blogs = blogMapper.findAll();
        sqlSession.close();
        System.out.println(blogs);
    }
1.1.7 测试结果
1.1.8 注意
resultMap标签也可以定下成下边这种形式:
    <resultMap id="blogMap2" type="com.learn.dev.entity.Blog">
        <result property="id" column="id"/>
        <result property="authorId" column="author_id"/>
        <result property="title" column="title"/>
        <association property="author" javaType="com.learn.dev.entity.Author">
            <result property="id" column="author_id"/>
            <result property="username" column="user_name"/>
            <result property="password" column="password"/>
            <result property="email" column="email"/>
        </association>
    </resultMap>
1.2 一对多查询
以博文和作者为例子,一个作者可以有多篇博文。查询所有作者同时查询出每个作者所写的博文。
1.2.1 修改作者类
public class Author {

    private int id;
    private String username;
    private String password;
    private String email;

    private List<Blog> blogList;
}
1.2.2 新建AuthorMapper接口
public interface AuthorMapper {

    List<Author> findAll();
}
1.2.3 新建AuthorMapper.xml
<?xml version="1.0" encoding="UTF-8" ?>
<!DOCTYPE mapper
        PUBLIC "-//mybatis.org//DTD Mapper 3.0//EN"
        "http://mybatis.org/dtd/mybatis-3-mapper.dtd">
<mapper namespace="com.learn.dev.dao.AuthorMapper">
    <resultMap id="authorMap" type="com.learn.dev.entity.Author">
        <result property="id" column="id"/>
        <result property="username" column="user_name"/>
        <result property="password" column="password"/>
        <result property="email" column="email"/>
        <collection property="blogList" ofType="com.learn.dev.entity.Blog">
            <result property="id" column="blog_id"/>
            <result property="authorId" column="author_id"/>
            <result property="title" column="title"/>
        </collection>
    </resultMap>

    <select id="findAll" resultMap="authorMap">
        select a.id,a.user_name,a.password,a.email,b.id as blog_id ,b.author_id,b.title
        from author a left join blog b on a.id = b.author_id
    </select>
</mapper>
1.2.4 新建测试方法
    @org.junit.Test
    public void test2() throws Exception {
        //1.Resources工具类,配置文件的加载,把配置文件加载成字节输入流
        InputStream resourceAsStream = Resources.getResourceAsStream("sqlMapConfig.xml");
        //2.解析了配置文件,并创建了sqlSessionFactory工厂
        SqlSessionFactory sqlSessionFactory = new SqlSessionFactoryBuilder().build(resourceAsStream);
        //3.生产sqlSession
        SqlSession sqlSession = sqlSessionFactory.openSession();// 默认开启一个事务,但是该事务不会自动提交
        AuthorMapper authorMapper = sqlSession.getMapper(AuthorMapper.class);
        List<Author> authors = authorMapper.findAll();
        sqlSession.close();
        System.out.println(authors);
    }
1.2.5 测试结果
1.3 多对多查询
我们以博文和标签作为例子,一个博文可以配置多个标签,一个标签可以被多个博文使用。(提前建好标签表和博文标签关联关系表)
1.3.1 修改博文类
public class Blog {

    private int id;
    private int authorId;
    private String title;

    private Author author;

    private List<Tag> tagList;
}
1.3.2 新增标签类
public class Tag {
    private int id;
    private String tagName;
    private String tagType;
}
1.3.3 修改BlogMapper接口
public interface BlogMapper {

    List<Blog> findAll();

    List<Blog> findAllBlogAndTag();

}
1.3.4 修改BlogMapper.xml
    <resultMap id="blogMap3" type="com.learn.dev.entity.Blog">
        <result property="id" column="id"/>
        <result property="authorId" column="author_id"/>
        <result property="title" column="title"/>
        <collection property="tagList" ofType="com.learn.dev.entity.Tag">
            <result property="id" column="tag_id"/>
            <result property="tagName" column="tag_name"/>
            <result property="tagType" column="tag_type"/>
        </collection>
    </resultMap>

    <select id="findAllBlogAndTag" resultMap="blogMap3">
        SELECT
            b.id,
            b.author_id,
            b.title,
            t.id AS tag_id,
            t.tag_name,
            t.tag_type
        FROM
            blog b
            LEFT JOIN blog_tag a ON b.id = a.blog_id
            INNER JOIN tag t ON a.tag_id = t.id
    </select>
1.3.5 新增测试方法
    @org.junit.Test
    public void test3() throws Exception {
        //1.Resources工具类,配置文件的加载,把配置文件加载成字节输入流
        InputStream resourceAsStream = Resources.getResourceAsStream("sqlMapConfig.xml");
        //2.解析了配置文件,并创建了sqlSessionFactory工厂
        SqlSessionFactory sqlSessionFactory = new SqlSessionFactoryBuilder().build(resourceAsStream);
        //3.生产sqlSession
        SqlSession sqlSession = sqlSessionFactory.openSession();// 默认开启一个事务,但是该事务不会自动提交
        BlogMapper blogMapper = sqlSession.getMapper(BlogMapper.class);
        List<Blog> blogs = blogMapper.findAllBlogAndTag();
        sqlSession.close();
        for (Blog blog : blogs) {
            System.out.println(blog);
        }
    }
1.3.6 测试结果
二、Mybatis注解开发
2.1 Mybatis注解
举例一些Mybatis的常用注解,
@Insert——新增
@Update——更新
@Delete——删除
@Select——查询
@Result——结果集,替代了<result>标签,
@Results——多个结果集,替代的是<resultMap>,使用格式:@Results(@Result())或者@Results({@Result(),@Result()})
@One——一对一的结果集
@Many——一对多的结果集
2.2 Mybatis的CRUD之注解开发
重新以用户表作为例子,实现注解的形式完成增删改查
2.2.1 新建用户类User2
public class User2 {
    private int id;
    private String name;
    private String password;
}
2.2.2 新建UserMapper2接口
public interface UserMapper2 {

    @Insert("insert into user values(#{id},#{name},#{password})")
    int insertUser(User2 user);

    @Update("update user set name = #{name} where id = #{id}")
    int updateUser(User2 user);

    @Delete("delete from user where id = #{id}")
    int deleteUser(User2 user);

    @Select("select * from user")
    List<User2> queryAllUser();

}
2.2.3 修改sqlMapConfig.xml
    <!--引入映射配置文件-->
    <mappers>
        <!--<mapper resource="BlogMapper.xml"/>-->
        <!--<mapper resource="AuthorMapper.xml"/>-->

        <!--扫描使用注解的类-->
        <mapper class="com.learn.dev.dao.UserMapper2"/>

        <!--扫描使用注解的类所在的包-->
        <!--<package name="com.learn.dev.dao"/>-->
    </mappers>
引入mapper接口所在的类或者引入所在的包,两种都可以。
2.2.4 新增测试方法
    @org.junit.Test
    public void test4() throws Exception {
        //1.Resources工具类,配置文件的加载,把配置文件加载成字节输入流
        InputStream resourceAsStream = Resources.getResourceAsStream("sqlMapConfig.xml");
        //2.解析了配置文件,并创建了sqlSessionFactory工厂
        SqlSessionFactory sqlSessionFactory = new SqlSessionFactoryBuilder().build(resourceAsStream);
        //3.生产sqlSession
        SqlSession sqlSession = sqlSessionFactory.openSession();// 默认开启一个事务,但是该事务不会自动提交
        UserMapper2 userMapper2 = sqlSession.getMapper(UserMapper2.class);
        User2 user2 = new User2();
        user2.setId(2);
        user2.setName("lisi");
        user2.setPassword("123456");
        int insertUser = userMapper2.insertUser(user2);
        sqlSession.commit();
        System.out.println("******Test insert user:" + insertUser);

        User2 user3 = new User2();
        user3.setId(2);
        user3.setName("lisi2");
        user3.setPassword("123456");
        userMapper2.updateUser(user3);
        sqlSession.commit();
        System.out.println("******Test update user:" + user3.toString());

        List<User2> list = userMapper2.queryAllUser();
        System.out.println("******Test query user:" + list);

        User2 user4 = new User2();
        user4.setId(2);
        int deleteUser = userMapper2.deleteUser(user4);
        sqlSession.commit();
        System.out.println("******Test delete user:" + deleteUser);

        sqlSession.close();
    }
2.2.5 测试结果
2.3 一对一查询之注解开发
仍旧以博文和作者为例,一篇博文属于一位作者
2.3.1 修改sqlMapConfig.xml
    <!--引入映射配置文件-->
    <mappers>
        <!--<mapper resource="BlogMapper.xml"/>-->
        <!--<mapper resource="AuthorMapper.xml"/>-->

        <!--扫描使用注解的类-->
        <!--<mapper class="com.learn.dev.dao2.UserMapper2"/>-->

        <!--扫描使用注解的类所在的包-->
       <package name="com.learn.dev.dao2"/>
    </mappers>
新建一个包dao2存放注解开发的mapper 接口
2.3.2 新建AuthorMapper2接口
public interface AuthorMapper2 {

    @Select("select * from author where id = #{id}")
    @Results({
            @Result(id = true,property = "id",column = "id"),
            @Result(property = "username",column = "user_name"),
            @Result(property = "password",column = "password"),
            @Result(property = "email",column = "email")
    })
    Author queryAuthorById(int id);
}
2.3.3 新建BlogMapper2接口
public interface BlogMapper2 {

    @Select("select * from blog")
    @Results({
            @Result(id=true,property = "id",column = "id"),
            @Result(property = "authorId",column = "author_id"),
            @Result(property = "title",column = "title"),
            @Result(property = "author",column = "author_id",
                    javaType = Author.class,
                    one = @One(select = "com.learn.dev.dao2.AuthorMapper2.queryAuthorById"))
    })
    List<Blog> queryAll();
}
2.3.4 新建测试方法
    @org.junit.Test
    public void test5() throws Exception {
        //1.Resources工具类,配置文件的加载,把配置文件加载成字节输入流
        InputStream resourceAsStream = Resources.getResourceAsStream("sqlMapConfig.xml");
        //2.解析了配置文件,并创建了sqlSessionFactory工厂
        SqlSessionFactory sqlSessionFactory = new SqlSessionFactoryBuilder().build(resourceAsStream);
        //3.生产sqlSession
        SqlSession sqlSession = sqlSessionFactory.openSession();// 默认开启一个事务,但是该事务不会自动提交
        BlogMapper2 blogMapper2 = sqlSession.getMapper(BlogMapper2.class);
        List<Blog> blogs = blogMapper2.queryAll();
        sqlSession.close();
        for (Blog blog : blogs) {
            System.out.println(blog);
        }
    }
2.3.5 测试结果
2.4 一对多查询之注解开发
仍旧以博文和作者为例,一个作者有多篇博文,而一篇博文只属于一位作者
2.4.1 修改BlogMapper2接口
    @Select("select * from blog where author_id = #{authorId}")
    @Results({
            @Result(id=true,property = "id",column = "id"),
            @Result(property = "authorId",column = "author_id"),
            @Result(property = "title",column = "title")
    })
    List<Blog> queryAllBlogByAuthorId(int authorId);
2.4.2 修改AuthorMapper2接口
    @Select("select * from author")
    @Results({
            @Result(id = true, property = "id", column = "id"),
            @Result(property = "username", column = "user_name"),
            @Result(property = "password", column = "password"),
            @Result(property = "email", column = "email"),
            @Result(property = "blogList", column = "id",
                    javaType = List.class,
                    many = @Many(select = "com.learn.dev.dao2.BlogMapper2.queryAllBlogByAuthorId"))

    })
    List<Author> queryAllAuthorAndBlog();
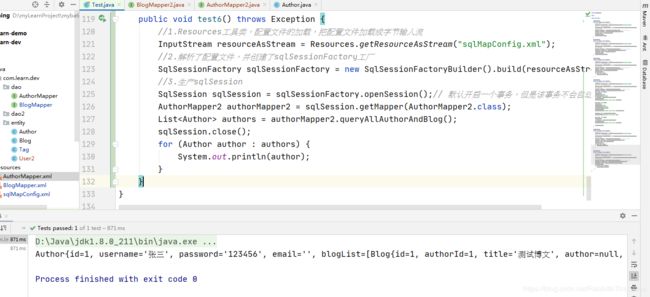
2.4.3 新增测试方法
    public void test6() throws Exception {
        //1.Resources工具类,配置文件的加载,把配置文件加载成字节输入流
        InputStream resourceAsStream = Resources.getResourceAsStream("sqlMapConfig.xml");
        //2.解析了配置文件,并创建了sqlSessionFactory工厂
        SqlSessionFactory sqlSessionFactory = new SqlSessionFactoryBuilder().build(resourceAsStream);
        //3.生产sqlSession
        SqlSession sqlSession = sqlSessionFactory.openSession();// 默认开启一个事务,但是该事务不会自动提交
        AuthorMapper2 authorMapper2 = sqlSession.getMapper(AuthorMapper2.class);
        List<Author> authors = authorMapper2.queryAllAuthorAndBlog();
        sqlSession.close();
        for (Author author : authors) {
            System.out.println(author);
        }
    }
2.4.4 测试结果
2.5 多对多查询之注解开发
仍旧以博文和标签作为例子,一篇博文有多个标签,一个标签也可以配置在多个博文上
2.5.1 新建TagMapper接口
public interface TagMapper {

    @Select("SELECT t.id,t.tag_name,t.tag_type FROM blog_tag a INNER JOIN tag t ON a.tag_id = t.id where a.blog_id = " +
            "#{id}")
    @Results({
            @Result(id = true,property = "id",column = "id"),
            @Result(property = "tagName",column = "tag_name"),
            @Result(property = "tagType",column = "tag_type")
    })
    List<Tag> queryTagByBlogId(int id);
}
2.5.2 修改BlogMapper2接口
    @Select("select * from blog")
    @Results({
            @Result(id=true,property = "id",column = "id"),
            @Result(property = "authorId",column = "author_id"),
            @Result(property = "title",column = "title"),
            @Result(property = "tagList",column = "id",
                    javaType = List.class,
                    many = @Many(select = "com.learn.dev.dao2.TagMapper.queryTagByBlogId"))
    })
    List<Blog> queryAllBlogAndTag();
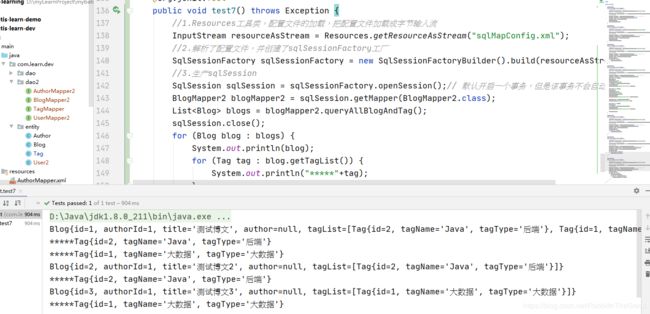
2.5.3 新增测试方法
    @org.junit.Test
    public void test7() throws Exception {
        //1.Resources工具类,配置文件的加载,把配置文件加载成字节输入流
        InputStream resourceAsStream = Resources.getResourceAsStream("sqlMapConfig.xml");
        //2.解析了配置文件,并创建了sqlSessionFactory工厂
        SqlSessionFactory sqlSessionFactory = new SqlSessionFactoryBuilder().build(resourceAsStream);
        //3.生产sqlSession
        SqlSession sqlSession = sqlSessionFactory.openSession();// 默认开启一个事务,但是该事务不会自动提交
        BlogMapper2 blogMapper2 = sqlSession.getMapper(BlogMapper2.class);
        List<Blog> blogs = blogMapper2.queryAllBlogAndTag();
        sqlSession.close();
        for (Blog blog : blogs) {
            System.out.println(blog);
            for (Tag tag : blog.getTagList()) {
                System.out.println("*****"+tag);
            }
        }
    }
2.5.4 测试结果
三、Mybatis缓存
缓存实际上就是存在内存里的数据库执行结果的数据,使用缓存可以提高我们的应用响应效率。 Mybatis提供了一级缓存和二级缓存两种机制。
3.0 mybatis-learn-cache
新建一个名叫mybatis-learn-cache的子工程。
新建User类;
public class User {
    private int id;
    private String name;
    private String password;
}
新建UserMapper接口
public interface UserMapper {

    User queryUserById(int id);
}
新建UserMapper.xml
<?xml version="1.0" encoding="UTF-8" ?>
<!DOCTYPE mapper
        PUBLIC "-//mybatis.org//DTD Mapper 3.0//EN"
        "http://mybatis.org/dtd/mybatis-3-mapper.dtd">
<mapper namespace="com.learn.cache.dao.UserMapper">
    <resultMap id="userMap" type="com.learn.cache.entity.User">
        <result property="id" column="id"/>
        <result property="name" column="name"/>
        <result property="password" column="password"/>
    </resultMap>

    <select id="queryUserById" parameterType="int" resultMap="userMap">
        select * from user u where u.id = #{id}
    </select>
</mapper>
新增log4j.properties配置文件
3.1 一级缓存
Mybatis一级缓存又叫SqlSession缓存,在操作数据库时候会创建一个SqlSession对象,对象中有一个HashMap的数据结构来存储缓存数据。不同SqlSession之间的HashMap互不影响。
3.1.1 一级缓存的使用
3.1.1.1 一级缓存的保存
3.1.1.1.1 修改UserMapper接口
public interface UserMapper {

    User queryUserById(int id);
}
3.1.1.1.2 修改UserMapper.xml
    <resultMap id="userMap" type="com.learn.cache.entity.User">
        <result property="id" column="id"/>
        <result property="name" column="name"/>
        <result property="password" column="password"/>
    </resultMap>

    <select id="queryUserById" parameterType="int" resultMap="userMap">
        select * from user u where u.id = #{id}
    </select>
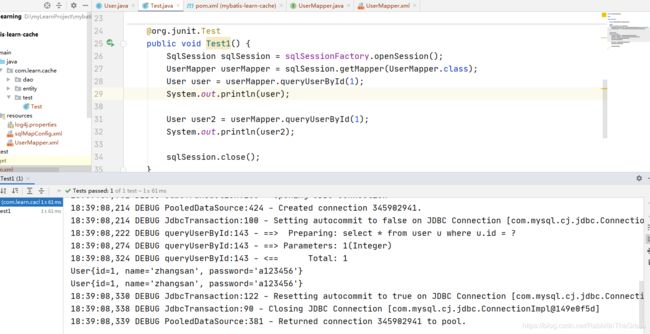
3.1.1.1.3 新增测试方法
public class Test {

    private SqlSessionFactory sqlSessionFactory;

    @Before
    public void before() throws IOException {
        InputStream resourceAsStream = Resources.getResourceAsStream("sqlMapConfig.xml");
        sqlSessionFactory = new SqlSessionFactoryBuilder().build(resourceAsStream);
    }

    @org.junit.Test
    public void Test1() {
        SqlSession sqlSession = sqlSessionFactory.openSession();
        UserMapper userMapper = sqlSession.getMapper(UserMapper.class);
        User user = userMapper.queryUserById(1);
        System.out.println(user);

        User user2 = userMapper.queryUserById(1);
        System.out.println(user2);

        sqlSession.close();
    }
}
3.1.1.1.4 测试结果
3.1.1.2 一级缓存的清除
3.1.1.2.1 修改UserMapper接口
public interface UserMapper {

    User queryUserById(int id);

    int updateUser(User user);
}
3.1.1.2.2 修改UserMapper.xml
    <update id="updateUser" parameterType="com.learn.cache.entity.User">
        update user u set u.name = #{name} where u.id = #{id}
    </update>
3.1.1.2.3 新增测试方法
    @org.junit.Test
    public void Test2() {
        SqlSession sqlSession = sqlSessionFactory.openSession();
        UserMapper userMapper = sqlSession.getMapper(UserMapper.class);
        User user = userMapper.queryUserById(1);
        System.out.println(user);

        user.setName("ceshi");
        userMapper.updateUser(user);
        sqlSession.commit();

        User user2 = userMapper.queryUserById(1);
        System.out.println(user2);

        sqlSession.close();
    }
3.1.1.2.4 测试结果
3.1.2 一级缓存总结
- 查询的时候会先查询缓存,如果缓存中有则返回结果。如果缓存中没有,则查询数据库,并将结果放入缓存中。
- 如果中间有涉及插入、更新、删除等需要
SqlSession执行commit()方法的操作,则会清空SqlSession中的缓存。
3.1.3 一级缓存原理分析
一级缓存离不开SqlSession,所以我们从SqlSession类开始寻找缓存是如何创建的。在SqlSession类中只找到一个叫clearCache();的方法,一步步跟进发现

最终在PerpetualCache发现,缓存其实是private final Map一个HashMap的数据结构。
我们很容易猜想到缓存的创建是在Executor类,我们看一下它的query方法,它的具体实现是在BaseExecutor类
  @Override
  public <E> List<E> query(MappedStatement ms, Object parameter, RowBounds rowBounds, ResultHandler resultHandler) throws SQLException {
    BoundSql boundSql = ms.getBoundSql(parameter);
    CacheKey key = createCacheKey(ms, parameter, rowBounds, boundSql);
    return query(ms, parameter, rowBounds, resultHandler, key, boundSql);
  }
其中createCacheKey就是创建缓存的key。继续向下看,
  @Override
  public <E> List<E> query(MappedStatement ms, Object parameter, RowBounds rowBounds, ResultHandler resultHandler, CacheKey key, BoundSql boundSql) throws SQLException {
    ErrorContext.instance().resource(ms.getResource()).activity("executing a query").object(ms.getId());
    if (closed) {
      throw new ExecutorException("Executor was closed.");
    }
    if (queryStack == 0 && ms.isFlushCacheRequired()) {
      clearLocalCache();
    }
    List<E> list;
    try {
      queryStack++;
      list = resultHandler == null ? (List<E>) localCache.getObject(key) : null;
      if (list != null) {
        handleLocallyCachedOutputParameters(ms, key, parameter, boundSql);
      } else {
        list = queryFromDatabase(ms, parameter, rowBounds, resultHandler, key, boundSql);
      }
    } finally {
      queryStack--;
    }
    if (queryStack == 0) {
      for (DeferredLoad deferredLoad : deferredLoads) {
        deferredLoad.load();
      }
      // issue #601
      deferredLoads.clear();
      if (configuration.getLocalCacheScope() == LocalCacheScope.STATEMENT) {
        // issue #482
        clearLocalCache();
      }
    }
    return list;
  }
如果在list在localCache.getObject(key)查不到的话,就调用queryFromDatabase方法去数据库查询,我们继续看这个方法
  private <E> List<E> queryFromDatabase(MappedStatement ms, Object parameter, RowBounds rowBounds, ResultHandler resultHandler, CacheKey key, BoundSql boundSql) throws SQLException {
    List<E> list;
    localCache.putObject(key, EXECUTION_PLACEHOLDER);
    try {
      list = doQuery(ms, parameter, rowBounds, resultHandler, boundSql);
    } finally {
      localCache.removeObject(key);
    }
    localCache.putObject(key, list);
    if (ms.getStatementType() == StatementType.CALLABLE) {
      localOutputParameterCache.putObject(key, parameter);
    }
    return list;
  }
在这个方法里,执行完数据库查询操作后,会进行localCache的写入putObject
  private final Map<Object, Object> cache = new HashMap<>();

  @Override
  public void putObject(Object key, Object value) {
    cache.put(key, value);
  }
所以最终是Map的put,缓存对象存在这个map中。
同样,我们也可以看看BaseExecutor的update和commit方法
  @Override
  public void commit(boolean required) throws SQLException {
    if (closed) {
      throw new ExecutorException("Cannot commit, transaction is already closed");
    }
    clearLocalCache();
    flushStatements();
    if (required) {
      transaction.commit();
    }
  }

  @Override
  public int update(MappedStatement ms, Object parameter) throws SQLException {
    ErrorContext.instance().resource(ms.getResource()).activity("executing an update").object(ms.getId());
    if (closed) {
      throw new ExecutorException("Executor was closed.");
    }
    clearLocalCache();
    return doUpdate(ms, parameter);
  }
这俩个方法都会执行clearLocalCache();方法。
  @Override
  public void clearLocalCache() {
    if (!closed) {
      localCache.clear();
      localOutputParameterCache.clear();
    }
  }
  @Override
  public void clear() {
    cache.clear();
  }
所以sqlSession涉及到更新、删除、提交的时候会清除一级缓存。
3.2 二级缓存
二级缓存和一级缓存原理一样,不同的是它基于mapper的namespace,也意味着多个sqlSession可以共享同一个mapper的二级缓存。
3.2.1 二级缓存的使用
与一级缓存的默认开启不同,Mybatis的二级缓存需要我们手动开启。
- 修改sqlMapConfig.xml
<!-- 开启二级缓存 --> <settings> <setting name="cacheEnabled" value="true"/> </settings> - 修改UserMapper.xml
<cache/>PerpetualCache类是Mybatis默认实现缓存的类,当然我们也可以实现Cache接口来自定义缓存。所以二级缓存底层其实还是一个Map数据结构。 - 实体类实现序列化接口
public class User implements Serializable {

    private static final long serialVersionUID = 8164800911245107262L;

    private int id;
    private String name;
    private String password;
}
3.2.2 测试二级缓存
3.2.2.1 测试与SqlSession 无关
    @org.junit.Test
    public void Test3() {
        SqlSession sqlSession1 = sqlSessionFactory.openSession();
        UserMapper userMapper1 = sqlSession1.getMapper(UserMapper.class);
        User user1 = userMapper1.queryUserById(1);
        System.out.println(user1);
        sqlSession1.close();

        SqlSession sqlSession2 = sqlSessionFactory.openSession();
        UserMapper userMapper2 = sqlSession2.getMapper(UserMapper.class);
        User user2 = userMapper2.queryUserById(1);
        System.out.println(user2);
        sqlSession2.close();
    }
3.2.2.2 测试二级缓存的清除
    @org.junit.Test
    public void Test4() {
        SqlSession sqlSession1 = sqlSessionFactory.openSession();
        UserMapper userMapper1 = sqlSession1.getMapper(UserMapper.class);
        User user1 = userMapper1.queryUserById(1);
        System.out.println(user1);
        sqlSession1.close();

        SqlSession sqlSession2 = sqlSessionFactory.openSession();
        UserMapper userMapper2 = sqlSession2.getMapper(UserMapper.class);
        User user2 = new User();
        user2.setId(1);
        user2.setName("李四");
        user2.setPassword("123");
        userMapper2.updateUser(user2);
        sqlSession2.commit();
        sqlSession2.close();

        SqlSession sqlSession3 = sqlSessionFactory.openSession();
        UserMapper userMapper3 = sqlSession3.getMapper(UserMapper.class);
        User user3 = userMapper3.queryUserById(1);
        System.out.println(user3);
        sqlSession3.close();
    }
3.2.3 useCache和flushCache的配置
在mapper.xml配置文件中还可以配置userCache和flushCache。
- userCache用来设置是否禁用二级缓存,默认是true。
- flushCache设置是否刷新缓存。
四、Mybatis插件
4.1 Mybatis插件简介
Mybatis在四大组件(Executor̵、StatementHandler̵、ParameterHandler̵、ResultSetHandler)提供了 简单易用的插件扩展机制。支持利用插件对四大核心对象进行拦截,增强核心对象的功能。本质上是借助于底层动态代理实现的。
4.2 Mybatis插件原理
Mybatis的四大对象(Executor̵、StatementHandler̵、ParameterHandler̵、ResultSetHandler)在创建完成后都执行了interceptorChain.pluginAll()方法
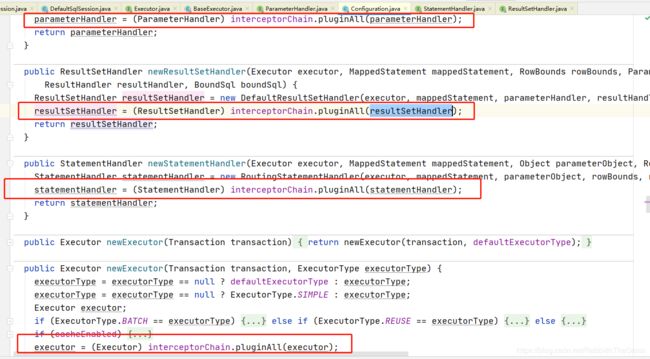
  public Object pluginAll(Object target) {
    for (Interceptor interceptor : interceptors) {
      target = interceptor.plugin(target);
    }
    return target;
  }
获取所有的拦截器,调用interceptor.plugin(target)并返回target对象。我们可以使用AOP的方式创建出代理对象,拦截四大对象的每个操作。
新建一个插件类
@Intercepts({
        @Signature(
                type = Executor.class,
                method = "query",
                args = {MappedStatement.class,Object.class, RowBounds.class, ResultHandler.class}
        )
})
public class MyInterceptor implements Interceptor {

}
修改sqlMapConfig.xml配置文件
    <plugins>
        <plugin interceptor="com.learn.cache.interceptor.MyInterceptor">

        </plugin>
    </plugins>
这样,Mybatis在启动的时候加载插件类并保存在InterceptorChain҅中。我们在执行某条SQL语句时,先创建SqlSession,同时创建了Executor实例,Mybatis会为该实例创建代理对象,这样我们插件的逻辑会在Executor类相关方法调用前执行。
4.3 自定义Mybatis插件
4.3.1 修改MyInterceptor类
@Intercepts({
        @Signature(
                type = Executor.class,//要拦截的接口
                method = "query",//要拦截的接口内的方法
                args = {MappedStatement.class,Object.class, RowBounds.class, ResultHandler.class}//拦截方法的入参
        )
})
public class MyInterceptor implements Interceptor {
    //每次方法的拦截都会进入
    @Override
    public Object intercept(Invocation invocation) throws Throwable {
        System.out.println("*********进入方法增强************");
        //继续执行原方法
        return invocation.proceed();
    }

    @Override
    public Object plugin(Object target) {
        //target要包装的对象,为该拦截器生成代理对象并放入拦截器链中
        return Plugin.wrap(target,this);
    }

    @Override
    public void setProperties(Properties properties) {
        //插件初始化的时候调用,设置在XML文件里配置的属性
        System.out.println(properties);
    }
}
4.3.2 修改sqlMapConfig.xml配置文件
    <plugins>
        <plugin interceptor="com.learn.cache.interceptor.MyInterceptor">
            <property name="pro" value="123"/>
        </plugin>
    </plugins>
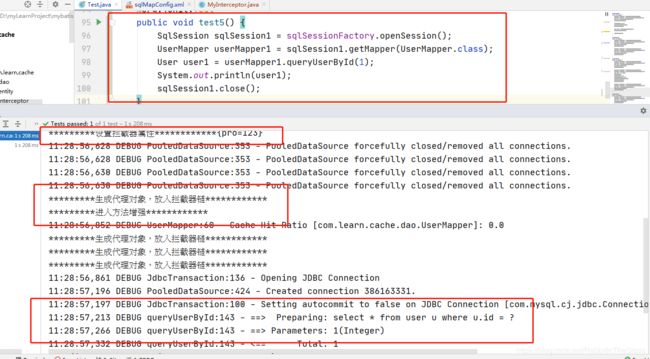
4.3.3 新建测试方法
    @org.junit.Test
    public void test5() {
        SqlSession sqlSession1 = sqlSessionFactory.openSession();
        UserMapper userMapper1 = sqlSession1.getMapper(UserMapper.class);
        User user1 = userMapper1.queryUserById(1);
        System.out.println(user1);
        sqlSession1.close();
    }
4.4 Mybatis插件源码分析
public class Plugin implements InvocationHandler {

  private final Object target;
  private final Interceptor interceptor;
  private final Map<Class<?>, Set<Method>> signatureMap;

  private Plugin(Object target, Interceptor interceptor, Map<Class<?>, Set<Method>> signatureMap) {
    this.target = target;
    this.interceptor = interceptor;
    this.signatureMap = signatureMap;
  }

  public static Object wrap(Object target, Interceptor interceptor) {
    Map<Class<?>, Set<Method>> signatureMap = getSignatureMap(interceptor);
    Class<?> type = target.getClass();
    Class<?>[] interfaces = getAllInterfaces(type, signatureMap);
    if (interfaces.length > 0) {
      return Proxy.newProxyInstance(
          type.getClassLoader(),
          interfaces,
          new Plugin(target, interceptor, signatureMap));
    }
    return target;
  }

  @Override
  public Object invoke(Object proxy, Method method, Object[] args) throws Throwable {
    try {
      Set<Method> methods = signatureMap.get(method.getDeclaringClass());
      if (methods != null && methods.contains(method)) {
        return interceptor.intercept(new Invocation(target, method, args));
      }
      return method.invoke(target, args);
    } catch (Exception e) {
      throw ExceptionUtil.unwrapThrowable(e);
    }
  }

  private static Map<Class<?>, Set<Method>> getSignatureMap(Interceptor interceptor) {
    Intercepts interceptsAnnotation = interceptor.getClass().getAnnotation(Intercepts.class);
    // issue #251
    if (interceptsAnnotation == null) {
      throw new PluginException("No @Intercepts annotation was found in interceptor " + interceptor.getClass().getName());
    }
    Signature[] sigs = interceptsAnnotation.value();
    Map<Class<?>, Set<Method>> signatureMap = new HashMap<>();
    for (Signature sig : sigs) {
      Set<Method> methods = signatureMap.computeIfAbsent(sig.type(), k -> new HashSet<>());
      try {
        Method method = sig.type().getMethod(sig.method(), sig.args());
        methods.add(method);
      } catch (NoSuchMethodException e) {
        throw new PluginException("Could not find method on " + sig.type() + " named " + sig.method() + ". Cause: " + e, e);
      }
    }
    return signatureMap;
  }

  private static Class<?>[] getAllInterfaces(Class<?> type, Map<Class<?>, Set<Method>> signatureMap) {
    Set<Class<?>> interfaces = new HashSet<>();
    while (type != null) {
      for (Class<?> c : type.getInterfaces()) {
        if (signatureMap.containsKey(c)) {
          interfaces.add(c);
        }
      }
      type = type.getSuperclass();
    }
    return interfaces.toArray(new Class<?>[interfaces.size()]);
  }

}
分析:
从这块源码中我们可以看到Plugin实现了InvocationHandler接口,所有它的invoke(Object proxy, Method method, Object[] args)方法会拦截所有方法的调用,在invoke(Object proxy, Method method, Object[] args)方法里,对所拦截的方法进行检测,判断是否执行插件的逻辑。
Set获取所有被拦截的方法列表;methods = signatureMap.get(method.getDeclaringClass()) if (methods != null && methods.contains(method)) {}判断方法列表是否包含被拦截的方法,如果包括则执行插件的逻辑interceptor.intercept(new Invocation(target, method, args));- 最终执行
method.invoke(target, args);
Invocation类存放的是目标类、方法、参数。
4.5 常见Mybatis插件的使用
4.5.1 PageHelper分页插件
参考资料:
PageHelper—GitHub仓库
PageHelper手册
分页助手PageHelper是将分页的复杂操作进行封装。下边演示如何使用:
4.5.1.1 引入PageHelper依赖
<dependency>
   	<groupId>com.github.pagehelper</groupId>
   	<artifactId>pagehelper</artifactId>
   	<version>5.1.11</version>
</dependency>
4.5.1.2 修改sqlMapConfig.xml配置
    <plugins>
        <!--<plugin interceptor="com.learn.cache.interceptor.MyInterceptor">
            <property name="pro" value="123"/>
        </plugin>-->
        <plugin interceptor="com.github.pagehelper.PageInterceptor">
            <property name="dialect" value="com.github.pagehelper.PageHelper"/>
        </plugin>
    </plugins>
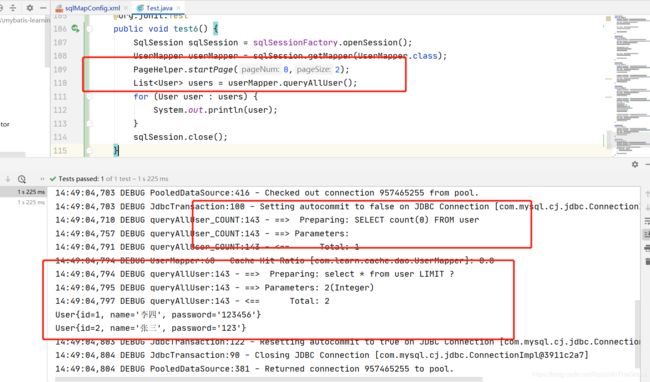
4.5.1.3 新增测试方法
    @org.junit.Test
    public void test6() {
        SqlSession sqlSession = sqlSessionFactory.openSession();
        UserMapper userMapper = sqlSession.getMapper(UserMapper.class);
        PageHelper.startPage(0,2);
        List<User> users = userMapper.queryAllUser();
        for (User user : users) {
            System.out.println(user);
        }
        sqlSession.close();
    }
4.5.2 通用Mapper插件
通用Mapper插件是为了解决单表的增删改查,基于Mybatis的插件机制,不需要写SQL,不需要在dao层增加方法,只需要提供实体类即可。
4.5.2.1 引入通用Mapper插件依赖
        <!--通用mapper插件依赖-->
        <dependency>
            <groupId>tk.mybatis</groupId>
            <artifactId>mapper</artifactId>
            <version>4.1.5</version>
        </dependency>
备注
由于从3.2.0版本开始,该插件移除了MapperInterceptor类,不再支持在mybatis核心配置文件中配置,需要依赖spring或者spring boot 环境。所以此处先不深入学习了,后边我们独立讲解一下。
未完。。。待续~~
五、彩蛋
本篇我们讲解了Mybatis基于XML的开发模式、基于注解的开发模式、Mybatis缓存、Mybatis插件的使用等。
下一篇我们深入学习一下Mybatis的架构设计,源码分析以及涉及到的Java设计模式。
