springboot集成swagger显示自定义header
1、添加 依赖项
完整的pom如下:
<?xml version="1.0" encoding="UTF-8"?>
<project xmlns="http://maven.apache.org/POM/4.0.0" xmlns:xsi="http://www.w3.org/2001/XMLSchema-instance"
         xsi:schemaLocation="http://maven.apache.org/POM/4.0.0 https://maven.apache.org/xsd/maven-4.0.0.xsd">
    <modelVersion>4.0.0</modelVersion>
    <parent>
        <groupId>org.springframework.boot</groupId>
        <artifactId>spring-boot-starter-parent</artifactId>
        <version>2.2.0.RELEASE</version>
        <relativePath/> <!-- lookup parent from repository -->
    </parent>
    <groupId>com.xyzh</groupId>
    <artifactId>swaggerdemo</artifactId>
    <version>0.0.1-SNAPSHOT</version>
    <name>swaggerdemo</name>
    <description>Demo project for Spring Boot</description>

    <properties>
        <java.version>1.8</java.version>
    </properties>

    <dependencies>
        <dependency>
            <groupId>org.springframework.boot</groupId>
            <artifactId>spring-boot-starter-web</artifactId>
        </dependency>

        <dependency>
            <groupId>org.springframework.boot</groupId>
            <artifactId>spring-boot-devtools</artifactId>
            <scope>runtime</scope>
            <optional>true</optional>
        </dependency>
        <dependency>
            <groupId>org.projectlombok</groupId>
            <artifactId>lombok</artifactId>
            <optional>true</optional>
        </dependency>
        <dependency>
            <groupId>org.springframework.boot</groupId>
            <artifactId>spring-boot-starter-test</artifactId>
            <scope>test</scope>
            <exclusions>
                <exclusion>
                    <groupId>org.junit.vintage</groupId>
                    <artifactId>junit-vintage-engine</artifactId>
                </exclusion>
            </exclusions>
        </dependency>
        <dependency>
            <groupId>io.springfox</groupId>
            <artifactId>springfox-swagger2</artifactId>
            <version>2.9.2</version>
        </dependency>
        <dependency>
            <groupId>io.springfox</groupId>
            <artifactId>springfox-swagger-ui</artifactId>
            <version>2.9.2</version>
        </dependency>
    </dependencies>

    <build>
        <plugins>
            <plugin>
                <groupId>org.springframework.boot</groupId>
                <artifactId>spring-boot-maven-plugin</artifactId>
            </plugin>
        </plugins>
    </build>

</project>
2、在controller上增加注释如下:
import com.xyzh.swaggerdemo.entity.UserEntity;
import io.swagger.annotations.Api;
import io.swagger.annotations.ApiOperation;
import org.springframework.web.bind.annotation.RequestBody;
import org.springframework.web.bind.annotation.RequestMapping;
import org.springframework.web.bind.annotation.RequestMethod;
import org.springframework.web.bind.annotation.RestController;

@Api(value = "controller注释",description = " API上的注释", position = 100, protocols = "http")
@RestController
@RequestMapping(value="/hello")
public class HelloController {

@ApiOperation("方法上的注释")
@RequestMapping(value="/hello",method= RequestMethod.GET)
    public String hello(){
        return "hello";
    }
}
3、在启动类上增加注解
import org.springframework.boot.SpringApplication;
import org.springframework.boot.autoconfigure.SpringBootApplication;
import springfox.documentation.swagger2.annotations.EnableSwagger2;

@SpringBootApplication
@EnableSwagger2
public class SwaggerdemoApplication {

    public static void main(String[] args) {
        SpringApplication.run(SwaggerdemoApplication.class, args);
    }

}
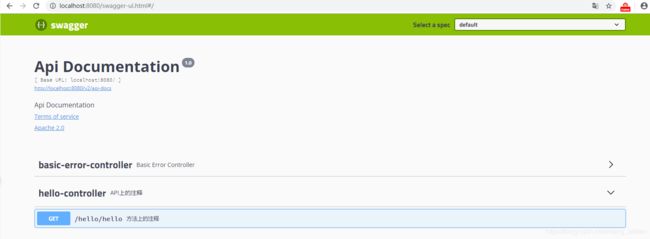
启动后,访问:
http://localhost:8080/swagger-ui.html#/
效果如下:

4、增加header
接下来,打算增加header的验证,和实体类的验证,以及对swagger ui 文档的描述
首先增加实体类:
import io.swagger.annotations.ApiModel;
import io.swagger.annotations.ApiModelProperty;
import lombok.Getter;
import lombok.Setter;

@ApiModel
@Setter
@Getter
public class UserEntity {
    @ApiModelProperty(value="用户名")
    private String userName;
}
然后,需要修改下controller,增加必要参数
import com.xyzh.swaggerdemo.entity.UserEntity;
import io.swagger.annotations.Api;
import io.swagger.annotations.ApiOperation;
import org.springframework.web.bind.annotation.RequestBody;
import org.springframework.web.bind.annotation.RequestMapping;
import org.springframework.web.bind.annotation.RequestMethod;
import org.springframework.web.bind.annotation.RestController;

@Api(value = "controller注释",description = " API上的注释", position = 100, protocols = "http")
@RestController
@RequestMapping(value="/hello")
public class HelloController {

@ApiOperation("方法上的注释")
@RequestMapping(value="/hello",method= RequestMethod.GET)
    public String hello(@RequestBody UserEntity user){
        return "hello";
    }
}
接下来,增加配置类
import io.swagger.annotations.Api;
import io.swagger.annotations.ApiOperation;
import org.springframework.context.annotation.Bean;
import org.springframework.context.annotation.Configuration;
import springfox.documentation.builders.ApiInfoBuilder;
import springfox.documentation.builders.ParameterBuilder;
import springfox.documentation.builders.PathSelectors;
import springfox.documentation.builders.RequestHandlerSelectors;
import springfox.documentation.schema.ModelRef;
import springfox.documentation.service.ApiInfo;
import springfox.documentation.service.Contact;
import springfox.documentation.service.Parameter;
import springfox.documentation.spi.DocumentationType;
import springfox.documentation.spring.web.plugins.Docket;
import springfox.documentation.swagger.web.*;
import springfox.documentation.swagger2.annotations.EnableSwagger2;

import java.util.ArrayList;
import java.util.List;

@Configuration
@EnableSwagger2
public class SwaggerConfig {

    @Bean
    public Docket createRestApi() {
        //=====添加head参数===========
        ParameterBuilder tokenPar = new ParameterBuilder();
        List<Parameter> pars = new ArrayList<Parameter>();
        tokenPar.name("Auth").description("accessToken").modelRef(new ModelRef("string")).parameterType("header")
                .required(false).build();
        pars.add(tokenPar.build());
        // =========添加head参数=============
        return new Docket(DocumentationType.SWAGGER_2)
                .apiInfo(apiInfo())
                .select()
                .apis(RequestHandlerSelectors.basePackage("com.xyzh.swaggerdemo"))
                .apis(RequestHandlerSelectors.withClassAnnotation(Api.class))
                .apis(RequestHandlerSelectors.withMethodAnnotation(ApiOperation.class))
                .paths(PathSelectors.any())
                .build()
                .globalOperationParameters(pars);
    }

    private ApiInfo apiInfo() {
        return new ApiInfoBuilder()
                .title("Hello Controller 全部API")
                .description("Hello Controller接口文档说明")
                .contact(new Contact("adrian", "", "[email protected]"))
                .version("1.0")
                .build();
    }

    @Bean
    UiConfiguration uiConfig() {
        return new UiConfiguration(true, false, -1, -1,
                ModelRendering.MODEL, true, DocExpansion.LIST, null, null,
                OperationsSorter.ALPHA, true, TagsSorter.ALPHA, null);
    }
}
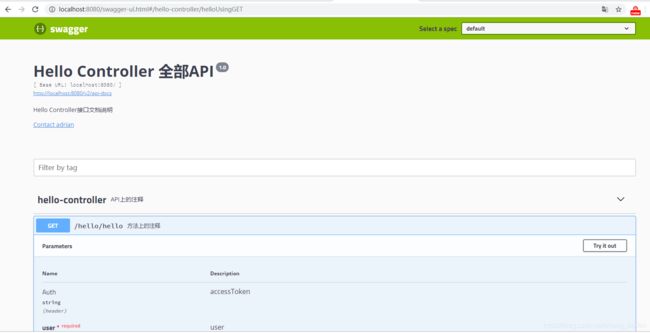
再次启动后访问 http://localhost:8080/swagger-ui.html#/

