Beginning Git and GitHub by Mariot Tsitoara
Beginning Git and GitHub
A Comprehensive Guide to Version Control, Project Management, and Teamwork for the New Developer
Mariot Tsitoara
$ git init # Initialize a new git database
$ git clone # Copy an existing database
$ git status # Check the status of the local project
$ git diff # Review the changes done to the project
$ git add # Tell Git to track a changed file
$ git commit # Save the current state of the project to database
$ git push # Copy the local database to a remote server
$ git pull # Copy a remote database to a local machine
$ git log # Check the history of the project
$ git branch # List, create or delete branches
$ git merge # Merge the history of two branches together
$ git stash # Keep the current changes stashed away to be used later
Basically Git works as follows: you modify the files, add each file you want to include in the snapshot to the staging area (git add), then take the snapshot and add them to the database (git commit). For the terminology, we call a modified file added to the staging area “staged” and a file added to the database “committed.” So, a file goes from “modified” to “staged” to committed.”
You can create a new branch by using the “branch” command and checking it out with the “checkout” command.
git branch add-new-dev-name-to-readme
git checkout add-new-dev-name-to-readme
Navigate back to the master branch by using the “checkout” command.
git checkout master
To get the changes from the remote server (also called origin).
git pull origin master
You can merge your branch with the “merge” command.
git merge add-new-dev-name-to-readme
The PATH environment is a variable that holds a list of directories where executable programs are located in their value. It’s needed so you don’t have to type in the full path to an executable when you want to execute it in the console; you just have to type its name. For example, to launch Visual Studio Code from the console, I should type C:\Program Files (x86)\Microsoft VS Code\bin\code. But since I have C:\Program Files (x86)\Microsoft VS Code\bin in my PATH, I just have to type code to launch it.
To set up Git, open Git Bash (for Windows systems) or the default console window (for Linux/MacOS or Windows systems that modified their PATH environment). In the command prompt, just tell Git your name and email address:
$ git config --global user.name "Mariot Tsitoara"
$ git config --global user.email "[email protected]"
Notice the “global” argument; it means that the setup is for all future Git repositories, so you don’t have to set this up again in the future.
With the config command, you can also change your default editor. If you ever want to change your editor because you found a new one or uninstalled yours, the config command is there to help you. For example, to change the default editor to Nano, you would type
$ git config --global core.editor="nano"
You can find the file recording your Git configuration on your home folder. For Windows, you can find it in :\Users\YourName.gitconfig. For Linux and Mac OS, you can find it in /home/yourname/.gitconfig.
Next to the .gitconfig file, you might find another file called .bash_history that records all the commands you type on the console. You can check this document if you want to check back on a command you forgot.
$ mkdir mynewproject
$ cd mynewproject/
$ git init
mkdir is a command used to create a directory; it is short for “make directory.” cd is the command used to navigate between directories; it is short for “change directory.”Finally, git init means initializing a git repository.
mkdir and cd are system commands; they are managed by the OS,
whereas init is a Git command. Every Git command begins with “git.”
The empty area outside the “.git” directory is called the Working Directory, and the files you will be working on will be stored there. Generally, your most recent version will be on the Working Directory.
touch README.md
// creating a file
Before taking a snapshot of the project, you select which changed files to take account of. A change in a file can be creating, deleting, or editing.
If we wanted to stage a file named README.md, we would use “git add README.md.” Or if you created multiple files, you can add them one after another or together like “git add file1 file2 file3.”
use git rm --cached to unstage
Since a commit is a snapshot from the state of the project, the previous state of the project is another commit called “parent.” The very first commit is created by Git when the repository is created, and it’s the one commit that has no parents. All future commits are then linked to each other via parentage. The ensemble of those commits that are parents to each other is called “branch.”
If a commit has two parents, that means that it was created by merging two branches.
A commit is identified by its name, a 40-character string that is obtained by hashing the commit. It is a simple SHA1 hash so multiple commits with the same information will have the same name.
A reference to a specific commit is called “head,” and it also has a name. And the head you are currently working on is called “HEAD” (see the previous section).
If a file was part of the previous commit and you didn’t modify them, they will automatically be part of the next commit. A modified but unstaged file is considered as unmodified. You have to ask Git to track them by staging those files.
Remember that the .gitignore global file should be placed at the root of your repository. If you put it in a directory, only the matching files in that directory will be ignored. Generally, having multiple .gitignore files in multiple directories is considered as a bad move unless your project is enormous. Prefer listing them into a single .gitignore file placed at the root of your repository.
If you are using a computer language or framework, you can go to https://github.com/github/gitignore to get a template of the .gitignore file you should use.
If your commit history is very long, you can use the keyboard and go
• Forward or backward one line: key up and down OR j and k
• Forward or backward one window: f and b
• At the end of the log: G
• At the beginning of the log: g
• Get help: h
• Quit the log: q

To show and learn what changes have been done to your project, you just use the git show command followed by the name of the commit. You don’t even need to write the full name, just the first seven letters.
$ git show
Checking differences between the last commit and the current working directory is an essential feature of Git. You will use it a lot! The command to check differences is simple: git diff.
$ git diff
Most of the time, you will only need to check the changes made to a single file, not to the entire project. You can pass the name of the file as a parameter to review its differences compared to the last commit.
$ git diff TODO.txt
The main thing to remember is that git diff checks the changes made to the files in the working directory; it doesn’t check staged files! To check changes made to staged files, you have to use the parameter “–staged.”
$ git diff --staged
Git diff is about comparing the current modified files to the files in the last commit, while git log is just a list of all previous commits.
Tracked files can be in three states:
- Modified: You changed the file.
- Staged: You changed the file and prepared it to be snapshotted.
- Committed: You took a snapshot of the entire project and the file was in it.
Untracked files will stay as such until you decide to stage and commit them or explicitly ignore them.
Remember: Git doesn’t track changes, it tracks snapshots. Each time you commit, the state of the entire project is saved, not just the little changes that were made.
When you take a snapshot and a file doesn’t change, it is not stored again; instead, a reference to the file is used.
Staging concerns only changed files you choose, while committing concerns the entire project. You stage a file; then commit the project.
When you want to bring the previous state of the project to the working directory, we have to check out the commit with “git checkout.” Since this changes the files on the working directory, you have to make sure not to have any unstaged files on there.
Untracked files are fine since Git doesn’t track their states yet.
To check a snapshot of the project, we use the “git checkout” command and pass the commit name as a parameter.
$ git checkout
“head” is just a reference to a commit. Instead of saying “name,” when talking about commits, we say “head.” When switching between different commits, we need a way to know which “head” are we on. The current head (the one being checked out) is just called “HEAD.” And that’s it! A head is a reference to a commit (there can be multiple heads in a repository), and the head pointing to the currently checked-out commit is called HEAD.
Undoing a commit is just committing its exact opposite. It’s that simple! To use it, you have to pass the name of the commit to be undone as a parameter.
$ git revert
if you don’t like the way the commit history is shown, you can pass the --oneline parameter to reduce the information shown.
The thing to remember is git revert only creates a new commit containing opposite changes. That means you can revert a revert! Reverting a revert will just reapply your original commit, and the two “reverts” will cancel each other. The commits will, however, stay on your history log as you can’t change the past.
Note actually, you can change the past. But never ever do it. it’s a very bad idea, and it will only bring more problems your way
First, you should remove the last commit from your project with git reset. We will use the --soft option so that the edits we made stay on the working directory. HEAD~1 means the previous commit as HEAD is a reference to the current one.
$ git reset --soft HEAD~1
After this, you can unstage the file with git reset again:
$ git reset HEAD filenottocommit.txt
For simple mistakes like an error in the commit message, there is no need to modify the entire commit. You just need to amend it.
$ git commit --amend
Your commits must be independent, atomic and complete.
The bottom line is that your Git message should tell WHY the changes were made. If someone wants to see WHAT has changed, they would look into the Git diff.
- You should not write messages longer than 50 characters.
- Begin the message by a capital letter.
- Don’t end the message with a period.
- Use the present time and ditch unnecessary articles.
- Commit messages should be consistent.
Remember: your commit message should say what will happen to the project if it is applied. So you should always use a clear, present-time, and imperative language. The best commit messages are usually short, straight to the point, and clear.
So, the commit message must answer the question: if I pick and apply this commit, what will it do? That’s why the commit tense should be in the present form. It is difficult to shake the need to write it in past tense, but after a few weeks, you should be comfortable with it.

But how do the commits look inside the Repository? It’s simple: they look like linked lists. A commit contains many information: the contents and the metadata. The contents are just the project files (changed files and references to unchanged files). The metadata contains other data that are also very important: date of commit, committer identity, and Git messages. Another metadata present in the commit is the parent pointer or reference. It is just the name of the previous commit; and if it’s empty, it means that the commit is the first one. So, each commit is linked to the next with a parent-child relationship.
Caution since the name of a commit is obtained by hashing its contents and metadata, changing one of them will result in a change of name. and if the name changes, the next commit will point to nothing as a parent as it has the parent reference in its metadata. that’s why it’s very dangerous to change history. Never do it.
To be able to interact with a remote repository, the users
must authenticate themselves with each Git operation. A login/password HTTPS type of authentication can be used, but since the authentication must precede each operation, it
would get tiring very fast. A solution to this is to use SSH authentication. The principle of SSH authentication is simple: only the clients that have been predetermined can access
the repository.
With GitHub, the best thing you can do to an Open Source project is now easier than ever: contributing. When you spot a project that you like, you can follow it like on social media and see its progress. If you want to work on a new feature or fix a bug, you just have to make a clone of the project and work on it. That process is called “Forking,” and it’s the backbone of Open Source projects. When you’ve made all the changes to your copy of the project, you can submit a Pull Request (PR) to the maintainer of the project. That means that you are requesting that the changes that you made be pulled and merged into the project. Other contributors will then review your changes and may request some additional changes. Instead of communicating by email or instant messaging, all of this is done on GitHub. After all the parties are in agreement about the
changes, the Pull Request is accepted and your changes are now part of the project!
If git has been correctly installed, then the tutorial can also be read withgit help tutorial, and the documentation of each command with git help .
If you see remotes in your results, you can remove them by using git remote rm [remote_name].
You will also need to create a name for your remote repository. That way, you can have multiple remotes within a single project. It may be necessary in the case where the test and production remotes are different for each other. The default name is “origin” per convention. Although you can choose any name, it is recommended to use origin as the name of the remote where teammates share their work.
The command to add a link to a remote is simple. It’s git remote add [name] [link]
You can check if the remote has been added by executing git remote or git remote -v to get more information.
The command to push changes to remote is simple; you just need the name of the remote repository and the branch to be pushed. Since our only branch is called “master.” The git push command is git push
So, in our case, the command will be $ git push origin master
Each issue has a unique number, and those numbers are not recycled, meaning that even if you delete an issue, its number will never be reused.
The most common way to link a commit to an issue is to mention the issue number in the commit message.
The footer in the commit message is reserved for issue trackers
like GitHub. We use the footer to make references to issues using their numbers. For example, to make a reference to the issue we’re working on, we’re just going to put its number in the footer preceded by “#.” When GitHub sees this, it immediately links the commit with the issue referenced.
No commit should be pushed without being tied to an issue; it’s better for the management of the project.
The keywords to close an issue are
- close
- closes
- closed
- fix
- fixes
- fixed
- resolve
- resolves
- resolved
Using one of these words followed by an issue number will mark it as resolved and close it.
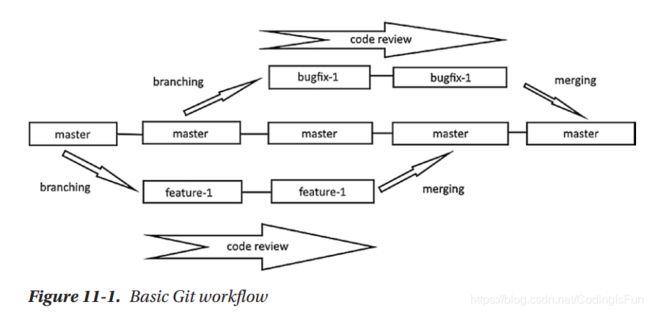
Those copies of the main project are called Branches, and the concept of reproducing changes into another branch is called Merging. You can make as many branches as you like, and you can trade commits between them. When you first create a repository, Git creates a new branch for you; it’s called “master.” Most developers put their main or production version in master and only recreate changes there when they are absolutely sure that it’s okay to do so.
Put simply, a branch is just your own independent copy of the project at a certain time.
The one thing to remember about Git branches is that they just are simple references to commits; that’s why creating and deleting them is so fast. Git stores its commits in chained links. A a branch is just a reference to one of those commits. A commit contains information about the author, the date, the snapshot, and, most importantly, the name of the previous commit. The name of the previous commit is called parent and every commit except the first one has at least a parent.
A branch is just a reference to a commit that is designed to be
the parent of the next one.
But how does Git know on which branch are we one? Well, it uses another reference called HEAD that references the current commit. If you are on a branch, HEAD references the last commit of that branch. But if you are checking out a previous version (like we did when we used git checkout ), the HEAD references that commit, and you are in a state called “detached HEAD.”
For most situation, you can think of HEAD as the reference to the current branch, and every commit you create will use the last commit in that branch as a parent.
When you merge a branch into another, a new commit is created that has two parents: one parent from each branch. So you can recognize the commit type by its number of parents:
- No parents: The very first commit
- One parent: Normal commit in a branch
- Multiple parents: A commit created by the merge of branches
Creating a branch can be done by using the “git branch” command followed by the branch name. Keep in mind that the branch name should only contain alphanumeric values and dashes or underscores; no spaces allowed.
$ git branch
Creating a branch is just about creating a reference to the last
commit of the current branch and nothing else.
Executing the git branch command without any parameters will list out all our current branches $ git branch
This command will give you the list branches you currently have and will put a little star next to the one you’re currently on (the HEAD).
Switching between versions and between branches using the same command. Simply use git checkout with the name of the branch as parameter.
$ git checkout
Tip to immediately switch to a new branch after creating it, use the option “-b” with the git checkout command. For example, “git checkout -b testing” is the same as “git branch testing” and then “git checkout testing.”
To delete a branch, simply use the same command as to create one but with the option “-d.”
$ git branch -d
So, to delete our testing branch, we will use
$ git branch -d testing
Just like a real tree branch, you don’t cut the Git branch you are currently standing on. Check out another branch before deleting the branch; and for this reason, you can’t have less than one branch in a project.
Now that we are satisfied with our fix, let’s merge the branch to the develop branch so we can test it. To merge our branch into develop, we first have to check it out. So, navigate there by using the git checkout command.
$ git checkout develop
Now let’s try to merge the branch into the develop one. Merging just means reproducing all the commits on one branch on another. To do so, we will use the git merge command followed by the name of the branch be merged.
$ git merge
Since we are looking to merge “improve-readme-description” into “develop,” our command to execute on the develop branch is
$ git merge improve-readme-description
This command will recreate your commits from “improve-readme-description” into “develop.”
The command to pushing a branch to remote is (you guessed it!) git push, just like what we learned in a previous chapter. The command is $ git push
The remote name hasn’t changed; it’s still “origin.” It’s the branch name that is different this time. Instead of master, we are going to push the develop branch. So, the command will be
$ git push origin develop
Submitting a Pull Request, or PR, is just asking for permission to apply all the commits in a branch to another branch.
Push takes your branch and copies all its commits to a remote branch and creates the branch if it doesn’t exist on the server yet. Pull is just that, but backward: it looks at a remote branch and copies the commits on it to your local repository. It’s just an
exchange of commits: push if it’s from local to remote and pull if it’s from remote to local.
The syntax is very similar too:
$ git pull
So, for example, if you wanted to get the commits from the master branch on GitHub, you would have to execute the command while checking out the master branch:
$ git pull origin master
Pulling is just copying commits from a remote branch to a local one.
A PR is just asking for permission to execute a pull action on a remote repository.
The patching branch is also called topic branch, because each branch should have its own topic to resolve.
A pull request is just a fancy way of asking for permission to apply commits on a branch.
A merge takes each commit in a branch and applies them on another.
As we’ve seen last chapter, pull and push command work the same way: you just have to pass the remote repository name and remote branch name as parameters. So the command will be $ git pull origin master
Fast-forward means that the commits on the remote branch were on the same timeline as the local branch, so Git only had to move HEAD to the last commit of the origin branch. Remember when we talked about commits being linked to another by parent-child relationships? If Git sees a link between the commits on the first branch and the branch to be merged, a fastforward merge is done, meaning that only a move of pointer is necessary, which makes Git very fast. You should always strive to use fast-forward as a method of merging as it’s the easier and, most importantly, cleanest for the history log.
The history log shown in Figure 13-4 is pretty, but it doesn’t really show the concept of branches and merges. A graph would be more appropriate, and there’s a parameter for that in the git log command. The parameter --graphused with --oneline will produce a graph.
$ git log --oneline --graph
Next, we have the first action being performed by Git. That action is called “fetch,” and its role is to copy the chosen branch from remote to the local repository. This branch is then stored into a temporary storage called FETCH_HEAD. Just like HEAD is a reference to the last commit we are working on, FETCH_HEAD references to the tip of the branch that we just fetched from origin.
The main takeaway concerning pulling is that it’s actually two commands executed one after another:
- Fetching, which copies the remote branch into a temporary branch
- Merging, which merges the temporary branch into the current one
But merging sometimes throws conflicts when the two branches contain edits of the same code. To resolve those conflicts, you have to reopen the concerned file and decide which code to keep. Then, the rest is basic: staging and committing.
Reviewing diff is not reserved for commits only! You can also use it to check differences between two branches, which is very handy in delicate situations like merging. The command is fairly simple:
$ git diff branch1..branch2
Note the two dots between the two branch names. This will show the differences between the two branches in a familiar diff view. Let’s compare develop to master:
$ git diff master..develop
Merges are just a fancy way to create commits containing all the changes in a child branch and appending it to the parent branch.
The command to abort a merge is $ git merge --abort
If you don’t want to use the context menu or can’t, you can open it by opening a Terminal on the location of your Git repository and executing the following command:
$ git gui
gitk is a simple tool to have a simple visual of your project history. You can think of it as an overpowered “git log” command.
Common Git GUI tools:
- GitHub Desktop
- Git GUI
- gitk
- GitKraken
Ceverting a file to a previous state just means to check it out.
The command is thus
$ git checkout --
Use git restore to discard changes in working directory
Stashing means taking any modified tracked file in your Working Directory and put it away for later. That means that
you will have a clean directory and can navigate around your repository, without having to commit your changes. Those changes are stored in a little database called “stash.” You can think of the stash as a temporary repository for your unfinished commits. It’s designed as a last-in first-out database, meaning that the last changes you stashed will be presented to you first.
To do this, you will have to use the stash command, which is very easy:
$ git stash push
Note Just using the command “git stash” is the same as using “git stash push.”
It’s recommended to use the full command because it’s more intuitive and easier to understand.
The stash is just a temporary repository that only has
one branch.
First, let’s show the history log by using the stash list command.
$ git stash list
This will get you a familiar, although a simplified, view of the history log.
Let’s see the detailed view of our stashed change by using the command stash show.
$ git stash show
This simple command will show you the files changed on the tip of the stash, meaning the last changes pushed unto it.
The stash show command will just show you the description of the changes contained in the stash, but not much else. To see the changes, you must apply the stash.
Applying the stash is very simple: just execute the following command.
$ git stash pop
This command will take the latest changes in the stash and apply it to the current branch. And as the name implies, popping the changes will take them out of the stash.
So, if you only had one set of changes in your stash, it would be empty after you popped the tip. If you execute the previous command, the result you get will be the same as if you recreated the changes and then checked the status
Stashing is particularly useful when you want to set aside your current changes to do some quick change elsewhere.
But let’s imagine that you are utterly dissatisfied with that last commit and want to do it over. Your only choice is then to reset the branch back to a previous state. To reset the project, we use the git reset command followed by the state of the project to reset to. You must use the option “–hard” to accomplish that, because it’s a very dangerous command. For example, going back to the same state as the remote branch will require
the following command:
$ git reset --hard origin/separate-code-and-styles
Steps of creating a page:
https://pages.github.com/
First, let’s get some more information about our current remotes. To do so, use the git remote command with the “-v” option.
$ git remote -v
To modify this link, you will need to use the set-url subcommand:
$ git remote set-url
$ git checkout
This command will check out the file as it was on the commit and, thus, will change your Working Directory. Careful not to lose any uncommitted changes!
This is a basic error in Git. After you commit your hard work, you’ll sometimes notice that a little grammatical error found its way into your commit message or that you forgot to stage a file. The solution to these problems is to amend the commit, meaning that you will cancel the immediate commit and make a new one. The command is simple:
$ git commit --amend
That said, if you’ve pushed your commit and are alone on the branch, you can amend a commit and try to push it again. But since the commit name changed, Git won’t allow you to change history without a fight. You will have to erase all the history on the remote branch and replace it with yours, meaning that you will overwrite everything on the remote branch. That’s why you should never amend a commit if you aren’t alone on a branch. To push a branch with amended commits, you have the force it.
$ git push
The “-f” option forces Git to overwrite everything on the remote branch and replace it with your current branch history.
Undo commits If you committed on a branch but then realized it’s the wrong one, you can undo it, but only when you haven’t pushed to a remote branch.
The command is simple but dangerous: it’s the reset command. But contrary to the “hard” reset where everything is cleared, a “soft” reset is necessary to undo the commit but keep the changes.
$ git reset HEAD~ --soft
The commit will then disappear, leaving you with some option to stash the changes and apply them to another branch.
Again, this is rewriting history and should not be used if you’ve already pushed to a remote branch.
When you check out branches, the HEAD will go back and forth between the last commits of the branches. But when you check out a specific commit, you enter a state called “detached HEAD” which means that you are in a state where nothing you will create will be attached to anything. It’s useless then to try to commit during that state as any change will be lost.
Checking out a commit is thus only needed to test something on your software. You can, however, create a branch from that specific commit if you want to keep the commits you intend to make. The command is the same as creating a branch from another branch:
$ git checkout -b
If you modified some files on the wrong branch, you can directly create a new branch (and check it out) to take the current changes there. It’s the same command again:
$ git checkout -b
This will create a new branch with your current changes and check it out. You can then stage your modified files and commit the project.
If you work on a branch for a long time, it’s a good idea to rebase from time to time, so you aren’t left too far behind the parent branch. Of course, you can face merge conflicts, but those are more and more likely to appear the bigger your changes are. And if you delay rebases for a fear of conflicts, you will only set yourself up for failures because those conflicts will appear again when you’ll attempt to merge the branches anyway. It’s better to deal with small conflicts with a rebase from time to time than have to merge a lot of conflicted files at the same time on merge.
When you are starting a new project, you should create a GitHub project just after creating the repository. You need to do this as soon as possible because using Project Boards is the best way to track your evolution. You should at least have one Kanban board to track the “to do” of your project. And you can use other boards to track user feedback or to dress a list of your random ideas. The main takeaway is to always keep what pass through your mind in writing, as you will most likely forget most of it.
Every action starts with an Issue. Issues are a good way to make note of what needs to be done on your project. When you
notice a bug in your program, your first instinct shouldn’t be to open your IDE to fix it but to create an Issue tracking it. The same thing goes with a feature idea, even if you’re not sure if you will work on it in the future. Create an Issue to document your intent and you can close it after if you decide not to implement it.
This ritual implies that everything you do on your local Git should have the resolving of an Issue as goal. So, when you are working on something on your IDE, you should always ask yourself: “What Issue does this resolve?” If the answer is “none,” you should create an Issue for it, no matter how small the task is.