Sqring boot + Mavn + mybatis + sqlite(XML配置的方式)
Sqring boot + Mavn + mybatis + sqlite(XML配置的方式)
网上看了很多Sqring boot + Mavn + mybatis + sqlite的配置,发现了很多坑,尤其是涉及到有增删改查的问题时候,这里整理了一下,希望对大家有帮助,这里用的是Spring boot 2.2.1 release,Intellij Idea的mavn工程,有问题也可以提出,我会补充。
一、 pom.xml配置
    1.8
    2.1.1
    3.27.2.1
    org.xerial
    sqlite-jdbc
    ${sqlite.jdbc.version}


    org.mybatis.spring.boot
    mybatis-spring-boot-starter
    ${mybatis.spring.boot.version}
properties里面是java sdk的版本,mybatis的版本和sqlite的版本
dependency是相关添加的依赖
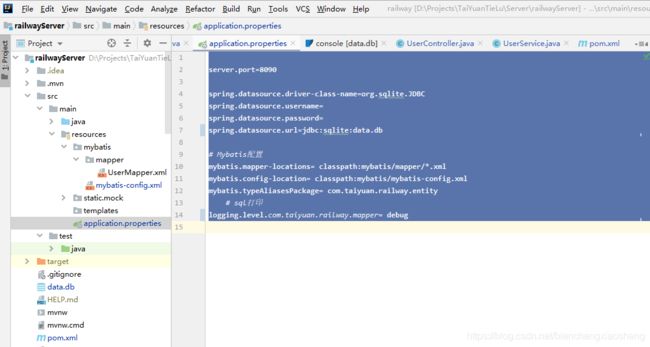
二、 application.properties的配置
yml和这个两个格式不一样,要注意
server.port=8090

spring.datasource.driver-class-name=org.sqlite.JDBC
spring.datasource.username=
spring.datasource.password=
spring.datasource.url=jdbc:sqlite:data.db

# Mybatis配置
mybatis.mapper-locations= classpath:mybatis/mapper/*.xml
mybatis.config-location= classpath:mybatis/mybatis-config.xml
mybatis.typeAliasesPackage= com.taiyuan.railway.entity
# sql打印
logging.level.com.taiyuan.railway.mapper= debug
-
spring.datasource.url=jdbc:sqlite:data.db这句是把数据库放到了项目根目录下,上图可看到.
**注意:**resources目录下千万不要方,放了会导致增删改操作成功了,但是数据库没有看到变动
-
mybatis-config.xml是mybatis的全局配置文件
-
mybatis.mapper-locations= classpath:mybatis/mapper/*.xml指明了要配置的SQL映射文件的目录如上图所示。
-
mybatis.typeAliasesPackage= com.xx.xx.entity为实体所在的包路径(具体根据自己创建的项目包路径填写)
三、mybatis-config.xml配置
**注意:**datasource.driver等属性与第二步中的application.properties中sql的配置属性对应的
四、正式开始创建sqlite、 entity、mapper、service、controller
1、Sqlite创建
自己创建一个sqlite数据库(新键文本文档,将后缀名改为db即可,我这里创建的为data.db)
PRAGMA foreign_keys = false;

-- ----------------------------
-- Table structure for user
-- ----------------------------
DROP TABLE IF EXISTS "user";
CREATE TABLE "user" (
  "user_id" INTEGER NOT NULL PRIMARY KEY AUTOINCREMENT,
  "user_name" varchar(15) NOT NULL,
  "password" varchar(30) NOT NULL,
  "age" int(2) DEFAULT NULL
);

-- ----------------------------
-- Auto increment value for user
-- ----------------------------
UPDATE "sqlite_sequence" SET seq = 14 WHERE name = 'user';

PRAGMA foreign_keys = true;
2、entity
在自己工程包路径下的entity创建一个User实体:
package com.taiyuan.railway.entity;

public class User {
    private Integer userId;
    private String userName;
    private String password;
    private Integer age;

    public User() {
    }

    public User(Integer userId, String userName, String password, Integer age) {
        this.userId = userId;
        this.userName = userName;
        this.password = password;
        this.age = age;
    }

    public Integer getUserId() {
        return userId;
    }

    public void setUserId(Integer userId) {
        this.userId = userId;
    }

    public String getUserName() {
        return userName;
    }

    public void setUserName(String userName) {
        this.userName = userName;
    }

    public String getPassword() {
        return password;
    }

    public void setPassword(String password) {
        this.password = password;
    }

    public Integer getAge() {
        return age;
    }

    public void setAge(Integer age) {
        this.age = age;
    }
}
3、UserMapper
UserMapper的接口定义
package com.taiyuan.railway.mapper;

import com.taiyuan.railway.entity.User;
import org.apache.ibatis.annotations.*;
import org.springframework.stereotype.Component;
import org.springframework.stereotype.Repository;

import java.util.List;
@Mapper
@Component
public interface UserMapper {
    /**
     * 查询所有
     */
    List<User> getAllUsers();

    /**
     * 根据主键查询
     */
    User getUserById(@Param("id") Integer id);

    /**
     * 添加
     */
    int addUser(User user);

    /**
     * 删除
     */
    int deleteUser(@Param("id") Integer id);

    /**
     * 修改
     */
    int updateUser(User user);

}
注意:
@Mapper表示此接口会进行Mapper映射
@Component表示框架可以注册的组件
UserMapper的xml 映射
<mapper namespace="com.taiyuan.railway.mapper.UserMapper" >
    <resultMap id="BaseResultMap" type="com.taiyuan.railway.entity.User" >
        <id column="user_id" property="userId" jdbcType="INTEGER" />
        <result column="user_name" property="userName" jdbcType="VARCHAR" />
        <result column="password" property="password" jdbcType="VARCHAR" />
        <result column="age" property="age" jdbcType="INTEGER" />
    resultMap>


    <select id="getAllUsers" resultMap="BaseResultMap"  >
        select * from user
    select>


    <select id="getUserById" parameterType="java.lang.Integer" resultMap="BaseResultMap" >
        select * from user where user_id = #{id}
    select>


    <insert id="addUser" parameterType="com.taiyuan.railway.entity.User" >
        insert into user values(#{userId},#{userName},#{password},#{age})
    insert>


    <delete id="deleteUser" parameterType="java.lang.Integer" >
        delete from user where user_id = #{id}
    delete>


    <update id="updateUser" parameterType="com.taiyuan.railway.entity.User" >
        update user set user_name=#{userName},password=#{password},age=#{age} where user_id = #{userId}
    update>


mapper>
注意:
- namespace中的包路径要与具体映射的接口对应
- resultMap 中type属性要对应具体的entity,其下的子节点是entity属性的描述
- select insert delete update中的id要与映射的接口函数名对应
4、service
package com.taiyuan.railway.service;

import com.taiyuan.railway.entity.User;
import com.taiyuan.railway.mapper.UserMapper;
import org.apache.ibatis.annotations.Param;
import org.springframework.beans.factory.annotation.Autowired;
import org.springframework.stereotype.Service;
import org.springframework.transaction.annotation.Transactional;

import java.io.PushbackReader;
import java.util.List;

@Service
public class UserService {

    @Autowired
    private UserMapper userMapper;
    public List<User> getAllUsers(){
        return  userMapper.getAllUsers();
    }

    public  User getUserById(@Param("id") Integer id){
        return userMapper.getUserById(id);


    }
//    @Transactional(rollbackFor = Exception.class)
    @Transactional(rollbackFor = {RuntimeException.class,Exception.class})
    public  int addUser(User user) throws  Exception
    {
        return  userMapper.addUser(user);
    }

    public  int deleteUser(@Param("id") Integer id)
    {
        return  userMapper.deleteUser(id);
    }
    public  int updateUser(User user)
    {
        return  userMapper.updateUser(user);
    }
}
注意:
@Transactional为要进行事务的函数标注(这点在这个demo中没有仔细研究,增删改,不加这个标注也能成功)框架事务默认是关闭的,要在程序入口开启@EnableTransactionManagement
我这代码示例如下:
package com.taiyuan.railway;

import org.mybatis.spring.annotation.MapperScan;
import org.springframework.boot.SpringApplication;
import org.springframework.boot.autoconfigure.EnableAutoConfiguration;
import org.springframework.boot.autoconfigure.SpringBootApplication;
import org.springframework.transaction.annotation.EnableTransactionManagement;

@SpringBootApplication
@EnableTransactionManagement
public class RailwayApplication {

    public static void main(String[] args) {
        SpringApplication.run(RailwayApplication.class, args);
    }

}
5、controller
package com.taiyuan.railway.controller;

import com.taiyuan.railway.entity.User;
import com.taiyuan.railway.service.UserService;
import io.swagger.annotations.Api;
import org.springframework.beans.factory.annotation.Autowired;
import org.springframework.http.HttpStatus;
import org.springframework.web.bind.annotation.*;

import java.util.List;

@RestController
@RequestMapping("User")
@Api(tags = "SqlLiteMybatisTest")
public class UserController {
    @Autowired
    private UserService userService;

    @GetMapping("/getAllUsers")
    public List<User> getAllUsers() {
        return userService.getAllUsers();
    }

    @GetMapping("/getUser/{id}")
    public User getUserById(Integer id) {
        return userService.getUserById(id);
    }

    /**
     *
     * 请使用接口测试工具进行测试
     */
    @PostMapping("/addUser")
    @ResponseStatus(HttpStatus.CREATED)
    public Boolean addUser(@RequestBody User user) {
        int temp = 0;
        try{
            temp = userService.addUser(user);
        }catch (Exception e)
        {
            e.printStackTrace();
        }
        return temp > 0;

    }

    @DeleteMapping("/deleteUser")
    public String deleteUser(@RequestParam Integer id){
        int i = userService.deleteUser(id);
        if (i>0){
            return "删除成功";
        }else {
            return "删除失败";
        }
    }

    @PutMapping("/updateUser")
    public String updateUser(){
        User user = userService.getUserById(1);
        user.setUserName("zxp");
        user.setPassword("999");
        user.setAge(24);

        int i = userService.updateUser(user);
        if (i>0){
            return "修改成功";
        }else {
            return "修改失败";
        }

    }
}
select和增加的log结果
2019-11-25 16:49:23.796  INFO 8036 --- [nio-8090-exec-1] com.zaxxer.hikari.HikariDataSource       : HikariPool-2 - Starting...
2019-11-25 16:49:23.797  INFO 8036 --- [nio-8090-exec-1] com.zaxxer.hikari.HikariDataSource       : HikariPool-2 - Start completed.
2019-11-25 16:49:23.797 DEBUG 8036 --- [nio-8090-exec-1] c.t.r.mapper.UserMapper.getAllUsers      : ==>  Preparing: select * from user
2019-11-25 16:49:23.797 DEBUG 8036 --- [nio-8090-exec-1] c.t.r.mapper.UserMapper.getAllUsers      : ==> Parameters:
2019-11-25 16:49:23.798 DEBUG 8036 --- [nio-8090-exec-1] c.t.r.mapper.UserMapper.getAllUsers      : <==      Total: 6
2019-11-25 18:03:33.114 DEBUG 8036 --- [nio-8090-exec-1] c.t.railway.mapper.UserMapper.addUser    : ==>  Preparing: insert into user values(?,?,?,?)
2019-11-25 18:03:33.115 DEBUG 8036 --- [nio-8090-exec-1] c.t.railway.mapper.UserMapper.addUser    : ==> Parameters: 41(Integer), string(String), string(String), 0(Integer)
2019-11-25 18:03:33.115 DEBUG 8036 --- [nio-8090-exec-1] c.t.railway.mapper.UserMapper.addUser    : <==    Updates: 1
