搭建nginx+keepalived双机主备/双主热备高可用集群(附资料)
注: 此文学习自慕课网架构师直通师课程
环境准备:
三台虚拟机:linux(centos7 64位);
** 192.168.237.128;**
192.168.237.129;
** 192.168.237.130;**
一、使用nginx搭建三台tomcat集群
1. 安装nginx
1.1 安装基础环境;
-
安装c++环境:
进入目录cd /opt/basic/gcc_g++/c++授权
chmod +x install.sh执行
./install -
安装gcc环境
进入目录
cd /opt/basic/gcc_g++/gcc授权
chmod +x install执行
./install -
安装zlib包
解压tar -zxvf zlib-1.2.11.tar.gz进入目录
cd zlib-1.2.11/配置
./configure编译安装
make && make install -
安装pcre包
解压tar -zxvf pcre-8.42.tar.gz进入目录
cd pcre-8.42/配置
./configure编译安装
make && make install -
安装openssl (可能会有点慢)
解压tar -zxvf openssl-1.1.0h.tar.gz配置
./config编译
make安装
make install
1.2 安装nginx
使用的版本自己定,这里只是贴出了简单的安装步骤。不同的环境可能会有问题,可自行百度,也可给我留言
-
解压
tar -zxvf nginx-1.14.0.tar.gz -
进入解压目录
cd nginx-1.14... -
配置
--prefix=/usr/local/nginx \ --pid-path=/var/run/nginx/nginx.pid \ --lock-path=/var/lock/nginx.lock \ --error-log-path=/var/log/nginx/error.log \ --http-log-path=/var/log/nginx/access.log \ --with-http_gzip_static_module \ --http-client-body-temp-path=/var/temp/nginx/client \ --http-proxy-temp-path=/var/temp/nginx/proxy \ --http-fastcgi-temp-path=/var/temp/nginx/fastcgi \ --http-uwsgi-temp-path=/var/temp/nginx/uwsgi \ --http-scgi-temp-path=/var/temp/nginx/scgi -
编译
make -
安装
make install -
启动
进入sbin目录./nginx -
启动成功,访问IP加端口即可看到nginx页面
ps -ef |grep nginx -
如果启动报错nginx.pid找不到,请自行建立文件
mkdir /var/run/nginx -p
touch /var/run/nginx/nginx.pid
在重新启动
2.安装tomcat
tomcat安装不在细说,为了方便区分,请在安装时,修改下tomcat默认页面的代码,做好每一台的标识
安装完成以后我的IP分布
nginx   192.168.9.128:80
tomcat1 192.168.9.128:8080
tomcat1 192.168.9.129:8080
tomcat1 192.168.9.130:8080
3.配置nginx
- 进入配置文件目录
cd /usr/local/nginx/conf
- 编辑nginx.conf文件
vim nginx.conf
upstream www.imooc.com{
         server 192.168.237.128:8080;
         server 192.168.237.129:8080;
         server 192.168.237.130:8080;
}
 location / {
      proxy_pass http://www.imooc.com;
 }
- 至此,就配置好了
访问nginx,可看到如下页面,并且,nginx默认采用轮询的负载配置。每次访问都会转到不同的tomcat


- 注意 :如果中间没有错误,但是访问不到,请检查防火墙是否关闭,或者是否开放端口
systemctl status firewalld  # 检查
systemctl stop firewalld  # 关闭
systemctl start firewalld  #开启
#开放防火墙端口
systemctl-cmd --zone=public --add-port=80/tcp --permanent
systemctl-cmd --zone=public --add-port=8080/tcp --permanent
systemctl-cmd --reload
# 检查端口监听
netstat -ntlp
二、搭建nginx+keepalived双击主备高可用集群
这里,我们需要两台nginx,请按照上面安装nginx的步骤,在129这台虚拟机上安装nginx,并且配置需要一样
1. 安装keepalived
./configure --prefix=/usr/local/keepalived --sysconf=/etc
此时,有可能出现如下警告,是因为缺少libnl包,安装即可
***** WARNING - this will not support IPVS with ipv6...........
yum -y install libnl libnl-devel
在进行配置
编译
make && make install
2.配置keepalived(主)
- 修改keepalived.conf配置文件
vim /etc/keepalived/keepalived.conf
这里,我们只需要如下配置,多余的可以删除,也可以留着
! Configuration File for keepalived

global_defs {
   router_id LVS_DEVEL_128  #第一步
}
vrrp_instance VI_1 {
    state MASTER  # 第二步
    interface ens33 # 第三步,注意,一定要和主机的一致,否则无法启动,还不报错
    virtual_router_id 51
    priority 100
    advert_int 1
    authentication {
        auth_type PASS
        auth_pass 1111
    }
    virtual_ipaddress {
        192.168.237.131 #第四步,设置虚拟IP
    }
}
3. 配置keepalived(备)
一样的修改配置文件
! Configuration File for keepalived

global_defs {
   router_id LVS_DEVEL_129 #第一步: 值要全局唯一
}

vrrp_instance VI_1 {
    state BACKUP # 第二步,标识他是备用节点
    interface ens33 # 第三步。设置网卡
    virtual_router_id 51 # 检查和主机一样
    priority 80 #第四步:设置权重,因为时备用节点,所以比主节点低一些,此值是在集群中当主机节点宕机后选取master节点的依据
    advert_int 1
    authentication {
        auth_type PASS
        auth_pass 1111
    }
    virtual_ipaddress {
        192.168.237.131 #第五步:虚拟IP,与master一致
    }
}
4. 启动
至此,配置完成,可以启动
ps -ef | grep keepa

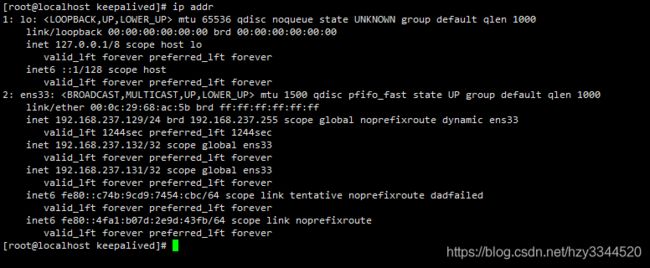
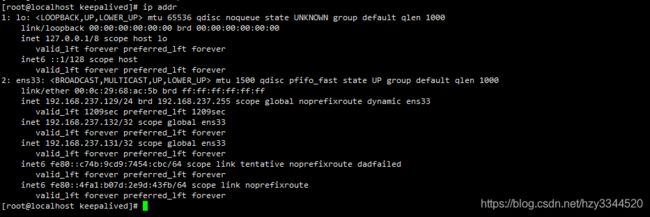
检查虚拟IP,master节点应该有131的ip,而backup节点因为是备用,暂时没有131这个ip
ip addr
这里只需要有131的IP就可以了,因为我们刚才配置的虚拟IP是192.168.9.131

- 此时,访问虚拟IP,成功访问

- 验证,此时,我们将128的keepalived停掉,再次检查backuo节点的ip
ip addr,这时候就会发现,backup节点已经出现了虚拟IP131,当我们再次访问192.168.237.131,还是可以访问到tomcat,就说明搭建的高可用集群已经成功了。
三、搭建双主热备高可用集群
这里原理什么的就不多说了(主要是才学怕说错),搭建双主热备原因在于,如果主备机子一直没问题,那么访问量就会一直在主机上,不会切换到备用机中,造成了备用机的资源浪费(暂时这么理解)
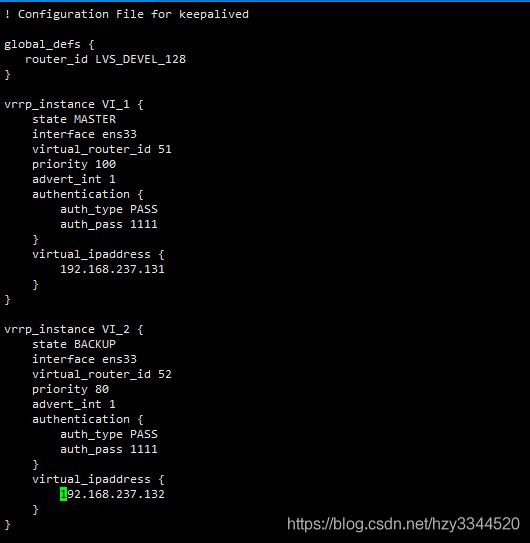
话不多说,直接上配置,原先的主机是128,备用是129
- 主机配置(128)
! Configuration File for keepalived

global_defs {
   router_id LVS_DEVEL_128
}
# 前面主备的配置
vrrp_instance VI_1 {
    state MASTER
    interface ens33
    virtual_router_id 51
    priority 100
    advert_int 1
    authentication {
        auth_type PASS
        auth_pass 1111
    }
    virtual_ipaddress {
        192.168.237.131
    }
}
# 新增的配置,将这个节点配置为备用节点
vrrp_instance VI_2 {
    state BACKUP # 1
    interface ens33
    virtual_router_id 52
    priority 80
    advert_int 1
    authentication {
        auth_type PASS
        auth_pass 1111
    }
    virtual_ipaddress {
        192.168.237.132 #新增一个虚拟IP
    }
}
- 备用机配置(129)、
! Configuration File for keepalived

global_defs {
   router_id LVS_DEVEL_129
}

vrrp_instance VI_1 {
    state BACKUP
    interface ens33
    virtual_router_id 51
    priority 80
    advert_int 1
    authentication {
        auth_type PASS
        auth_pass 1111
    }
    virtual_ipaddress {
        192.168.237.131
    }
}
#新增配置
vrrp_instance VI_2 {
    state MASTER # 改为nmaster节点
    interface ens33
    virtual_router_id 52
    priority 100
    advert_int 1
    authentication {
        auth_type PASS
        auth_pass 1111
    }
    virtual_ipaddress {
        192.168.237.132 # 设置虚拟IP
    }
}
配置完成
ip 192.168.237.131 主机(128)备用(129)
ip 192.168.237.132 主机(129)备用(128)
再次看看IP,就会出现两个虚拟IP


