springboot 负载均衡 nignx+高可用 keepalived
1>搭建redis 主从+哨兵
2>搭建nginx 主从+keepalived 高可用
3>源码:https://github.com/hd19940104/java
4>各个配置
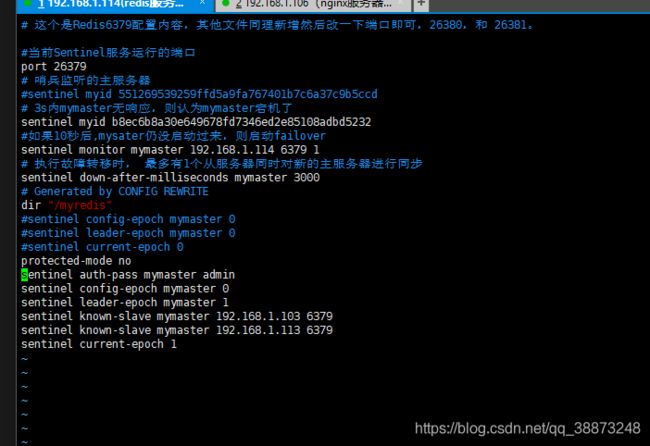
# 这个是Redis6379配置内容,其他文件同理新增然后改一下端口即可,26380,和 26381。
#当前Sentinel服务运行的端口
port 26379
# 哨兵监听的主服务器
#sentinel myid 551269539259ffd5a9fa767401b7c6a37c9b5ccd
# 3s内mymaster无响应,则认为mymaster宕机了
sentinel myid b8ec6b8a30e649678fd7346ed2e85108adbd5232
#如果10秒后,mysater仍没启动过来,则启动failover
sentinel monitor mymaster 192.168.1.114 6379 1
# 执行故障转移时, 最多有1个从服务器同时对新的主服务器进行同步
sentinel down-after-milliseconds mymaster 3000
# Generated by CONFIG REWRITE
dir "/myredis"
#sentinel config-epoch mymaster 0
#sentinel leader-epoch mymaster 0
#sentinel current-epoch 0
protected-mode no
sentinel auth-pass mymaster admin
sentinel config-epoch mymaster 0
sentinel leader-epoch mymaster 1
sentinel known-slave mymaster 192.168.1.103 6379
sentinel known-slave mymaster 192.168.1.113 6379
sentinel current-epoch 1
二:
安装nginx:解压
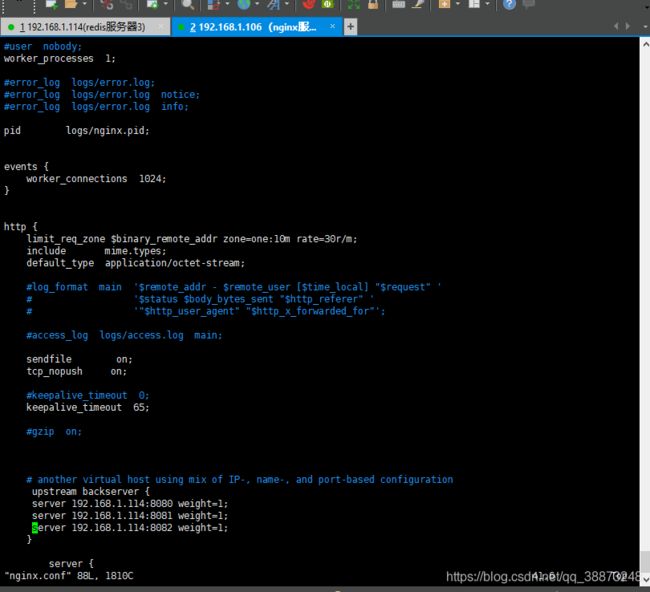
#user nobody;
worker_processes 1;
#error_log logs/error.log;
#error_log logs/error.log notice;
#error_log logs/error.log info;
pid logs/nginx.pid;
events {
worker_connections 1024;
}
http {
limit_req_zone $binary_remote_addr zone=one:10m rate=30r/m;
include mime.types;
default_type application/octet-stream;
#log_format main '$remote_addr - $remote_user [$time_local] "$request" '
# '$status $body_bytes_sent "$http_referer" '
# '"$http_user_agent" "$http_x_forwarded_for"';
#access_log logs/access.log main;
sendfile on;
tcp_nopush on;
#keepalive_timeout 0;
keepalive_timeout 65;
#gzip on;
# another virtual host using mix of IP-, name-, and port-based configuration
upstream backserver {
server 192.168.1.114:8080 weight=1;
server 192.168.1.114:8081 weight=1;
server 192.168.1.114:8082 weight=1;
}
server {
listen 80;
server_name www.test.com;
location / {
proxy_pass http://backserver;
index login.html;
}
}
#server {
# listen 8000;
# listen somename:8080;
# server_name somename alias another.alias;
# location / {
# root html;
# index index.html index.htm;
# }
#}
# HTTPS server
#
#server {
# listen 443 ssl;
# server_name localhost;
# ssl_certificate cert.pem;
# ssl_certificate_key cert.key;
# ssl_session_cache shared:SSL:1m;
# ssl_session_timeout 5m;
# ssl_ciphers HIGH:!aNULL:!MD5;
# ssl_prefer_server_ciphers on;
# location / {
# root html;
# index index.html index.htm;
# }
#}
}
三:安装keepalived(每个nginx服务器安装)
tar -zxvf keepalived-1.2.18.tar.gz -C /usr/local/
yum install -y openssl openssl-devel(需要安装一个软件包)
cd keepalived-1.2.18/ && ./configure --prefix=/usr/local/keepalived
make && make install
将keepalived安装成Linux系统服务,因为没有使用keepalived的默认安装路径(默认路径:/usr/local),安装完成之后,需要做一些修改工作:
首先创建文件夹,将keepalived配置文件进行复制:
mkdir /etc/keepalived
cp /usr/local/keepalived/etc/keepalived/keepalived.conf /etc/keepalived/
然后复制keepalived脚本文件:
cp /usr/local/keepalived/etc/rc.d/init.d/keepalived /etc/init.d/
cp /usr/local/keepalived/etc/sysconfig/keepalived /etc/sysconfig/
ln -s /usr/local/sbin/keepalived /usr/sbin/
ln -s /usr/local/keepalived/sbin/keepalived /sbin/
可以设置开机启动:chkconfig keepalived on
service keepalived start
service keepalived stop
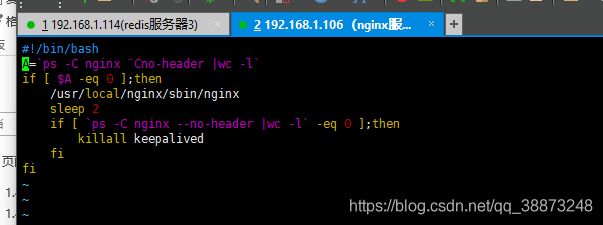
#!/bin/bash
A=`ps -C nginx ¨Cno-header |wc -l`
if [ $A -eq 0 ];then
/usr/local/nginx/sbin/nginx
sleep 2
if [ `ps -C nginx --no-header |wc -l` -eq 0 ];then
killall keepalived
fi
fi
---------------
! Configuration File for keepalived
global_defs {
router_id hadoop106 ##标识节点的字符串,通常为hostname
}
vrrp_script chk_nginx {
script "/etc/keepalived/nginx_check.sh" #运行脚本,脚本内容下面有,就是起到一个nginx宕机以后,自动开启服务
interval 2 #检测时间间隔
weight -20 #如果条件成立的话,则权重 -20
}
# 定义虚拟路由,VI_1 为虚拟路由的标示符,自己定义名称
vrrp_instance VI_1 {
state MASTER #来决定主从
interface eth0 # 绑定虚拟 IP 的网络接口,根据自己的机器填写
virtual_router_id 119 # 虚拟路由的 ID 号, 两个节点设置必须一样
mcast_src_ip 192.168.1.106 #填写本机ip
priority 100 # 节点优先级,主要比从节点优先级高
nopreempt # 优先级高的设置 nopreempt 解决异常恢复后再次抢占的问题
advert_int 1 # 组播信息发送间隔,两个节点设置必须一样,默认 1s
authentication {
auth_type PASS
auth_pass 1111
}
# 将 track_script 块加入 instance 配置块
track_script {
chk_nginx #执行 Nginx 监控的服务
}
virtual_ipaddress {
192.168.1.200 # 虚拟ip,也就是解决写死程序的ip怎么能切换的ip,也可扩展,用途广泛。可配置多个。
}
}


