Android布局优化之与标签使用
merge标签:
使用merge标签可以达到减少布局层级的作用,特别在配合include标签进行使用的时候,通过减少布局的层级数,可以优化APP在加载布局文件时的资源消耗,从而达到提高APP性能的效果。
经典理解merge标签使用场景重现:
现有布局A和布局B,A布局的代码如下:
<LinearLayout xmlns:android="http://schemas.android.com/apk/res/android"
    xmlns:tools="http://schemas.android.com/tools"
    android:layout_width="match_parent"
    android:layout_height="match_parent"
    android:orientation="vertical" >

    <include layout="@layout/B布局" />

    <Button
        android:id="@+id/showBtn"
        android:layout_width="match_parent"
        android:layout_height="wrap_content"
        android:text="展示viewstub布局" />
LinearLayout>
B布局的代码【还没有使用merge标签】:
<LinearLayout xmlns:android="http://schemas.android.com/apk/res/android"
    xmlns:app="http://schemas.android.com/apk/res-auto"
    android:layout_width="match_parent"
    android:layout_height="wrap_content" >

    <android.support.v7.widget.Toolbar
        android:id="@+id/common_toolbar"
        android:layout_width="match_parent"
        android:layout_height="wrap_content"
        android:background="?attr/colorPrimary"
        android:minHeight="?attr/actionBarSize"
        app:popupTheme="@style/ThemeOverlay.AppCompat.Dark"
        app:theme="@style/ThemeOverlay.AppCompat.Dark.ActionBar" />

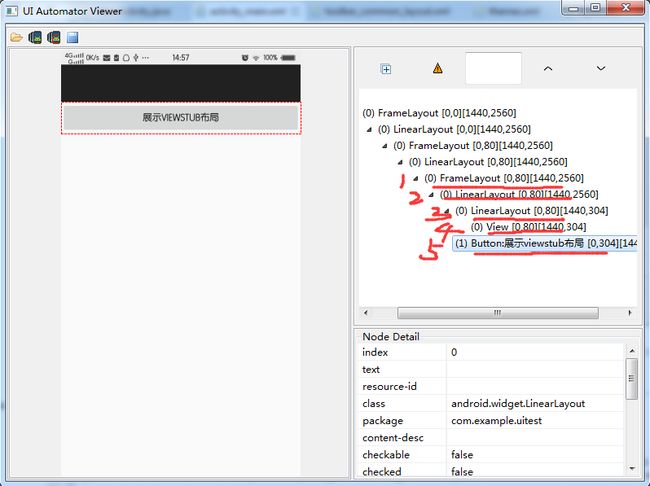
LinearLayout>可以看到在A布局中include了B布局,此时单纯的从最终效果看的话,似乎这样写可以满足我们要实现的效果,但是此时如果我们使用布局分析工具看一下的话【这里使用的是SDK/tools下的uiautomatorviewer工具,因为我用的是非root的真机测试,用布局分析工具hierarchyviewer,结果它识别不到我的手机,所以机智一换,嘿嘿!】,可以发现,里面的布局层级中明显有一个多余的LinearLayout标签【下面的序号3】:

可见,此处是可以将B布局的父布局标签LinearLayout更改成merge标签的,下面我们尝试修改一下B布局代码:
<merge xmlns:android="http://schemas.android.com/apk/res/android"
    xmlns:app="http://schemas.android.com/apk/res-auto"
    android:layout_width="match_parent"
    android:layout_height="wrap_content" >

    <android.support.v7.widget.Toolbar
        android:id="@+id/common_toolbar"
        android:layout_width="match_parent"
        android:layout_height="wrap_content"
        android:background="?attr/colorPrimary"
        android:minHeight="?attr/actionBarSize"
     app:popupTheme="@style/ThemeOverlay.AppCompat.Dark"
 app:theme="@style/ThemeOverlay.AppCompat.Dark.ActionBar" />
merge>
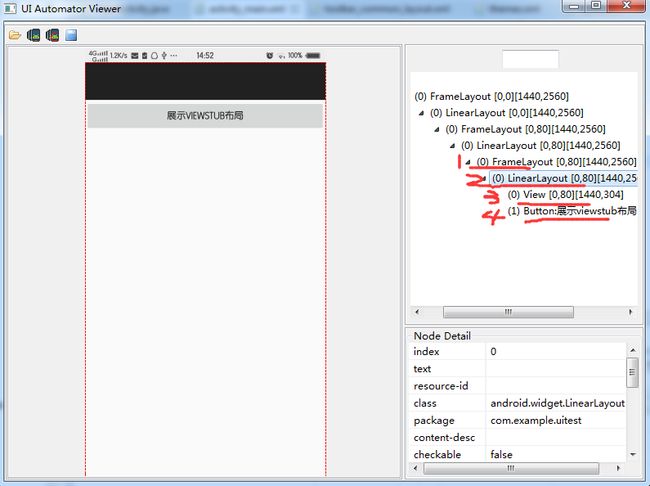
此时,运行代码之后,再次使用分析软件查看现在的布局层级:

可以明显的发现,之前无意义的LinearLayout标签已经没有了。也许这样的一个无用标签难以体现性能上的差异,但是在我们真实的项目中,将有成百上千的页面,此时去除冗余的布局层级,对我们的APP来说是很有必要的。
ViewStub标签:
需要使用时才会展现的布局标签ViewStub,之前我一般会通过先将需要后期展示的布局先绘制在布局文件中,然后通过控制其VISBLE,INVISIBLE,GONE来控制其是否显示出来,这种做法相比于ViewStub标签,更耗设备性能,因为如果采用先绘制,再控制的话,在Inflate布局的时候,即使那些还没有要展示的布局也会被实例化,但是使用轻量级的ViewStub标签的话,一开始Inflate的时候,系统会自动忽视掉它们,直到后面你代码中采用代码的方式手动进行Inflate操作时,才会使用到。
经典理解ViewStub标签使用场景重现:
布局A:
<LinearLayout xmlns:android="http://schemas.android.com/apk/res/android"
    xmlns:tools="http://schemas.android.com/tools"
    android:layout_width="match_parent"
    android:layout_height="match_parent"
    android:orientation="vertical" >

    <include layout="@layout/布局B" />

    <Button
        android:id="@+id/showBtn"
        android:layout_width="match_parent"
        android:layout_height="wrap_content"
        android:text="展示viewstub布局" />

    <ViewStub
        android:id="@+id/view_stub"
        android:layout_width="fill_parent"
        android:layout_height="wrap_content"
        android:layout="@layout/布局C" />
LinearLayout>
布局C:
<TextView xmlns:android="http://schemas.android.com/apk/res/android"
    android:layout_width="match_parent"
    android:layout_height="match_parent"
    android:text="我是ViewStub控制的TextView"
    android:textSize="24sp" />
布局A中使用ViewStub标签包含了布局C,然后我使用了一个Button来控制之后显示出隐藏的布局C,首先来看没有点击Button时的布局分析图:

当点击了Button之后,执行:
((ViewStub)findViewById(R.id.view_stub)).setVisibility(View.VISIBLE);
//或者View view_stub = ((ViewStub) findViewById(R.id.view_stub)).inflate();
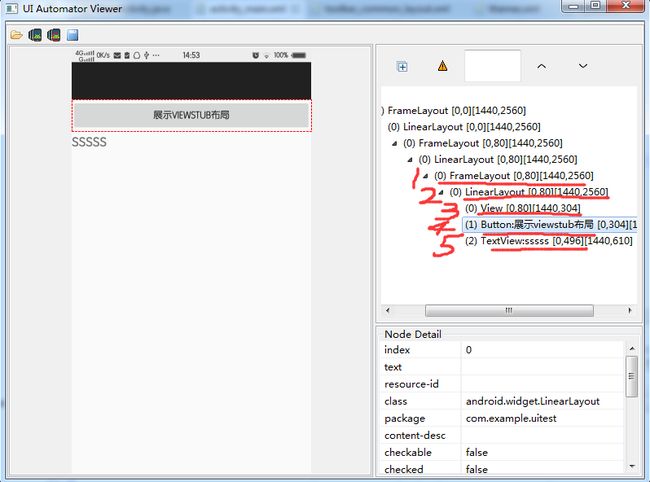
在看一下布局情况:

明显多了一个TextView,这真是我们之前放在ViewStub中的那个布局。
使用ViewStub的一些注意点:
- ViewStub中的layout布局不能使用merge标签,否则会报错;
- ViewStub的inflate只能执行一次,显示了之后,就不能再使用ViewStub控制它了。