Spring之快速开始
接下来就从Spring Core核心模块的使用开始,来学习spring框架的设计思想和使用方式。
spring的使用方法比较简单,大致流程如下:

其实就是先配置IOC容器里面有什么,然后再加载这个容器,拿到想要的对象,需要体会到的是在这个过程中,对象的创建和依赖处理已经完全交给Spring去管理了。
引入jar包
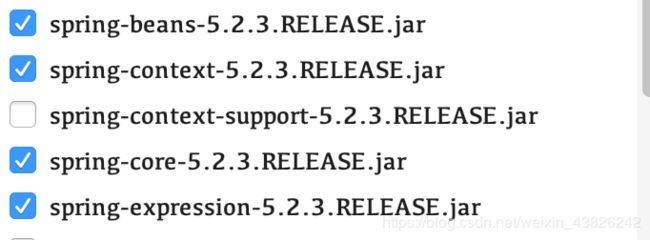
想用Spring Core模块肯定是要引入一些jar包,这里使用IDEA工具来创建项目并且选取所需jar包

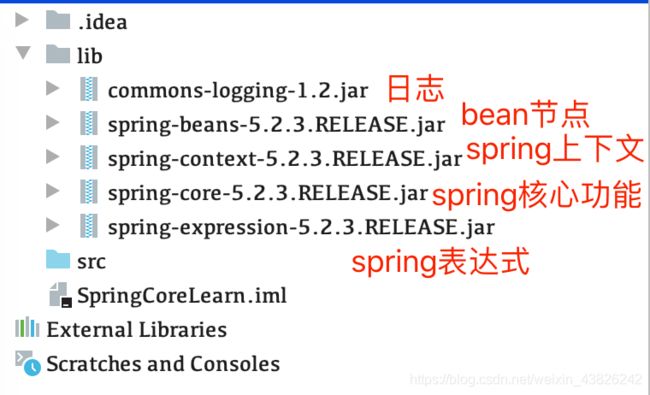
我们只使用Spring Core模块,只需要选择5个jar包:


然后创建项目之后,IDEA会帮我们自动下载并且把jar包放到lib目录下
创建配置文件applicationContext.xml
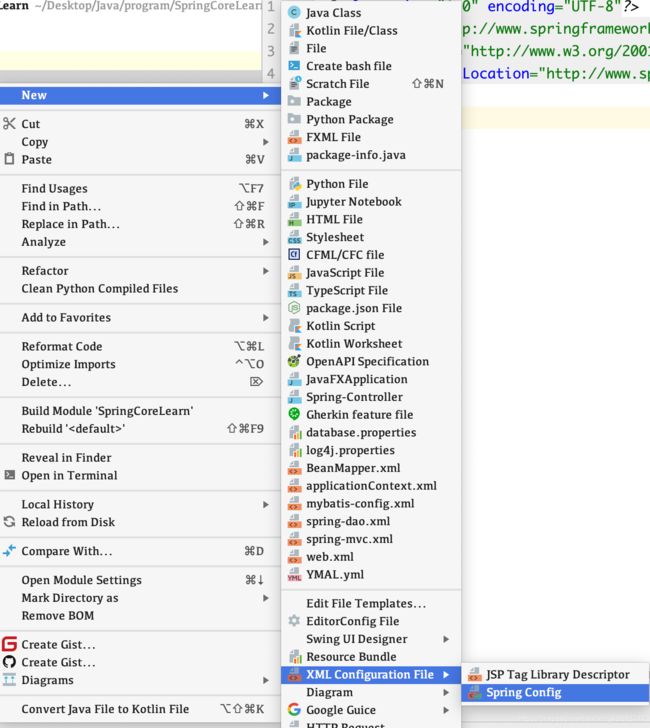
使用IDEA工具可以帮我们快速地创建applicationContext.xml配置文件

创建后的内容如下:
<beans xmlns="http://www.springframework.org/schema/beans"
       xmlns:xsi="http://www.w3.org/2001/XMLSchema-instance"
       xsi:schemaLocation="http://www.springframework.org/schema/beans http://www.springframework.org/schema/beans/spring-beans.xsd">


beans>
那么根据xml的结构和spring的用法来猜测,就是在这个配置文件中配置我们的bean对象和bean对象之间的依赖关系(这个配置文件就相当于一个容器,只不过现在是空的)
获取IOC容器
在使用IOC容器获取bean对象之前,我们首先得获取IOC容器。
Spring的容器类型有两种:
- BeanFactory:Bean工厂
- ApplicationContext:应用上下文(一般用这个)
获取BeanFactory
Spring 5.0版本该方法已经过时
// 使用resource获取beanFactory
// 加载Spring的资源文件
Resource resource = new ClassPathResource("applicationContext.xml");

// 创建IOC容器对象
XmlBeanFactory beanFactory = new XmlBeanFactory(resource);
获取ApplicationContext
ClassPathXmlApplicationContext ac =
                new ClassPathXmlApplicationContext("applicationContext.xml");
配置bean对象
bean对象的配置方法主要有以下三种:
xml配置
xml配置应该是最经典的配置了,我们在applicationContext.xml文件中配置信息,然后IOC容器根据applicationContext.xml文件来创建对象
首先我们先创建一个JavaBean类:User(怎么又是User)
public class User {

    private String id;
    private String username;
    private String password;

    public String getId() {
        return id;
    }

    public void setId(String id) {
        this.id = id;
    }

    public String getUsername() {
        return username;
    }

    public void setUsername(String username) {
        this.username = username;
    }

    public String getPassword() {
        return password;
    }

    public void setPassword(String password) {
        this.password = password;
    }
}
还真是经典的味道啊,User对象一共有3个经典的属性:id,用户名,密码
在没有IOC容器帮我们管理对象之前,我们想要使用User对象,当然是new一个出来了:
User dzzhyk = new User();
System.out.println(dzzhyk.getUsername());
在我们使用了IOC容器之后,使用User的方式变成了下面的样子:
首先在xml文件中配置如下:
<bean id="user" class="User">
    <property name="id" value="1"/>
    <property name="username" value="dzzhyk"/>
    <property name="password" value="123456"/>
bean>
然后在代码中添加如下:
ClassPathXmlApplicationContext ac =		// 获取IOC容器
                new ClassPathXmlApplicationContext("applicationContext.xml");
                // 获取User对象
User dzzhyk =(User)ac.getBean("user");
System.out.println(dzzhyk.getUsername());
可以看到,我们使用了getBean方法就轻易地把xml文件中配置的对象拿出来了,而且拿出来的这个对象还具有我们所配置的属性,就可以正常使用。
使用xml配置对象是最常用的,其具体细节我放在下一篇博文中继续探讨。
注解配置
注解是为了简化代码而生的,因此使用注解配置对象具有更加简洁的效果
想要使用注解开发,首先我们需要配置开启注解支持功能
在xml配置文件中引入context命名空间
<beans xmlns="http://www.springframework.org/schema/beans"
       xmlns:xsi="http://www.w3.org/2001/XMLSchema-instance"
       xmlns:context="http://www.springframework.org/schema/context"
       xsi:schemaLocation="
        http://www.springframework.org/schema/beans
        http://www.springframework.org/schema/beans/spring-beans.xsd
        http://www.springframework.org/schema/context
        http://www.springframework.org/schema/context/spring-context.xsd">
然后在xml配置文件中使用这个命名空间开启注解支持,扫描pojo包下的组件
<context:component-scan base-package="pojo"/>
有以下几个基础注解来配置
- @Component:一个泛化的概念,表示一个组件(Bean),可作用在任何层次
- @Controller:用于对Controller实现类进行标注,目前该功能与Component相同
- @Service:用于对Service实现类进行标注,目前该功能与Component相同
- @Repository:用于对DAO实现类进行标注
@Component("user")		// id是user
public class User {
	@Value("1")
    private String id;
    @Value("dzzhyk")
    private String username;
    @Value("123456")
    private String password;
	...
}
这样再次运行测试程序,仍然可以得到对象
User{id='1', username='dzzhyk', password='123456'}
有关注解更加细致的用法,放在下一篇博文中继续探讨。
JavaConfig
即使使用注解配置,也不能完全摆脱配置xml文件,而使用JavaConfig可以
想要成为JavaConfig类,需要使用@Configuration注解
我们新建一个包命名为config,在config中新增一个PersonConfig类
@Configuration
@ComponentScan
public class PersonConfig {

    @Bean
    public User user(){
        return new User("1", "dzzhyk", "123456");
    }
}
此时我们的XML配置文件可以完全为空了,此时应该使用
AnnotationConfigApplicationContext来获取注解配置
/**
 * 使用JavaConfig配置
 */
AnnotationConfigApplicationContext ac =
                new AnnotationConfigApplicationContext("config");

User dzzhyk = (User)ac.getBean("user");
System.out.println(dzzhyk);
仍然正常输出了结果:
User{id='1', username='dzzhyk', password='123456'}
配置方式的组合
组合使用:
xml配置方式可以在xml文件中使用标签组合不同文件(如果有重名的bean会报错)
<import resource="spring-dao.xml"/>

<import resource="spring-service.xml"/>

<import resource="spring-mvc.xml"/>
JavaConfig方式可以创建一个顶层Config类,然后使用@Import注解来将配置类进行组合
@Configuration
@ComponentScan
@Import(UserConfig.class)
public class RootConfig{

}
混合使用:
- 在xml中引用JavaConfig:直接使用bean标签把配置类作为对象引入即可
- 在JavaConfig中引入xml:使用@ImportResource注解
@Configuration
@ComponentScan
@ImportResource("/applicationContext.xml")
public class UserConfig {
    @Bean(name = "user")
    public User user(){
        return new User("1", "dzzhyk", "123456");
    }
}
