Android音频相关(四)设置铃声流程总结
本文主要介绍的是设置铃声的流程,在流程梳理清楚后解决问题也有大致的方向了。
一、要点概述
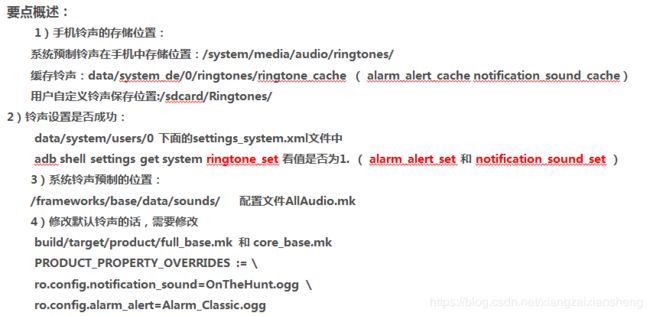
补充知识点:
frameworks/base/packages/SettingProvider/中的生成的数据库文件存储在data/system/users/userid(没有设置多用户userid则为0)。
在生成的Settings_system.xml数据库中记录着ringtone的信息和是否设置成功的ringtone_set值。
![]()
二、设置铃声流程
从安卓N开始,在设置铃声之后会拷贝一份到data/system_de/0/ringtones/ringtone_cache作为铃声的缓存文件(ringtone_cache是文件),因此即使sd卡拔了。依然能播放之前在sd卡中设置的铃声。
当然了正常的铃声存储在data/system/users/0 下面的settings_system.xml文件中。
首先我们来研究一下铃声的ringtone_cache存储是如何实现的,当然了解这个对实现双卡铃声也是有帮助的。
frameworks/base/core/java/android/provider/Settings.java
        /** {@hide} */
        public static final String RINGTONE_CACHE = "ringtone_cache";
        /** {@hide} */
        public static final Uri RINGTONE_CACHE_URI = getUriFor(RINGTONE_CACHE);

.........
        /**
         * The content:// style URL for this table
         */
       //content://settings/system/ringtone_cache
        public static final Uri CONTENT_URI =
            Uri.parse("content://" + AUTHORITY + "/system");

..........
/**
 * Construct the content URI for a particular name/value pair,
 * useful for monitoring changes with a ContentObserver.
 * @param name to look up in the table
 * @return the corresponding content URI, or null if not present
 */
public static Uri getUriFor(String name) {
    if (MOVED_TO_SECURE.contains(name)) {
        Log.w(TAG, "Setting " + name + " has moved from android.provider.Settings.System"
                    + " to android.provider.Settings.Secure, returning Secure URI.");
        return Secure.getUriFor(Secure.CONTENT_URI, name);
    }
    if (MOVED_TO_GLOBAL.contains(name) || MOVED_TO_SECURE_THEN_GLOBAL.contains(name)) {
        Log.w(TAG, "Setting " + name + " has moved from android.provider.Settings.System"
                        + " to android.provider.Settings.Global, returning read-only global URI.");
        return Global.getUriFor(Global.CONTENT_URI, name);
    }
    return getUriFor(CONTENT_URI, name);
}
......
public static Uri getUriFor(Uri uri, String name) {
     return Uri.withAppendedPath(uri, name);
}
1.注意是首次设置铃声会走到下面的方法中。(首次设置铃声流程)
frameworks/base/media/java/android/media/MediaScanner.java

这里需要注意 ringtones是扫描时,判断此文件是否是铃声资源文件。
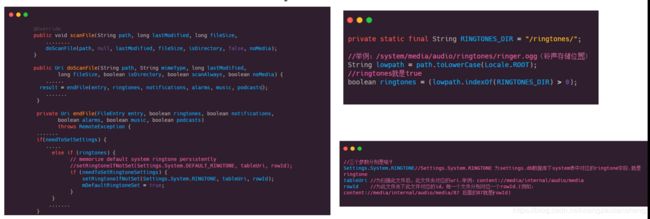 下面要补充的是SettingUri是Settings数据库中的uri形式,ringtoneUri为当前铃声实际的uri。
Settings.System.DEFAULT_NOTIFICATION_URI----content://setting/system/notification_sound
Settings.System.DEFAULT_RINGTONE_URI------content://settings/system/ringtone
Settings.System.DEFAULT_ALARM_ALERT_URI-----content://settings/system/alarm_alert
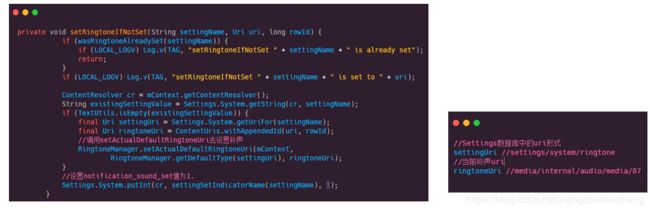
注意在下面的方法里面会设置ringtone_set的值为1.
2.平时我们设置铃声调用的都是下面的方法
frameworks/base/media/java/android/media/RingtoneManager.java
/**
     * Sets the {@link Uri} of the default sound for a given sound type.
     *
     * @param context A context used for querying.
     * @param type The type whose default sound should be set. One of
     *            {@link #TYPE_RINGTONE}, {@link #TYPE_NOTIFICATION}, or
     *            {@link #TYPE_ALARM}.
     * @param ringtoneUri A {@link Uri} pointing to the default sound to set.
     * @see #getActualDefaultRingtoneUri(Context, int)
     */
    public static void setActualDefaultRingtoneUri(Context context, int type, Uri ringtoneUri) {
        String setting = getSettingForType(type);
        if (setting == null) return;

        final ContentResolver resolver = context.getContentResolver();
        if (Settings.Secure.getIntForUser(resolver, Settings.Secure.SYNC_PARENT_SOUNDS, 0,
                    context.getUserId()) == 1) {
            // Parent sound override is enabled. Disable it using the audio service.
            disableSyncFromParent(context);
        }
        if(!isInternalRingtoneUri(ringtoneUri)) {
            ringtoneUri = ContentProvider.maybeAddUserId(ringtoneUri, context.getUserId());
        }
        //将设置的内容写入Setting数据库
        //adb shell settings get system [key](查询setting数据库底下的system表的【key】对应的value)
        Settings.System.putStringForUser(resolver, setting,
                ringtoneUri != null ? ringtoneUri.toString() : null, context.getUserId());

        // Stream selected ringtone into cache so it's available for playback
        // when CE storage is still locked
        if (ringtoneUri != null) {
            final Uri cacheUri = getCacheForType(type, context.getUserId());
            try (InputStream in = openRingtone(context, ringtoneUri);
                    OutputStream out = resolver.openOutputStream(cacheUri)) {
                //将铃声写入data/system_de/ringtones目录下
                Streams.copy(in, out);
            } catch (IOException e) {
                Log.w(TAG, "Failed to cache ringtone: " + e);
            }
        }
    }
/** {@hide} */
public static Uri getCacheForType(int type, int userId) {
if ((type & TYPE_RINGTONE) != 0) {
return ContentProvider.maybeAddUserId(Settings.System.RINGTONE_CACHE_URI, userId);
} else if ((type & TYPE_NOTIFICATION) != 0) {
return ContentProvider.maybeAddUserId(Settings.System.NOTIFICATION_SOUND_CACHE_URI,
userId);
} else if ((type & TYPE_ALARM) != 0) {
return ContentProvider.maybeAddUserId(Settings.System.ALARM_ALERT_CACHE_URI, userId);
}
//add by xiangzaixiansheng for support dual sim card ringtones @{
else if ((type & TYPE_RINGTONE_2) != 0) {
return ContentProvider.maybeAddUserId(Settings.System.RINGTONE_CACHE_URI_2, userId);
//}else if ((type & TYPE_MMS_NOTIFICATION) != 0) {
// return ContentProvider.maybeAddUserId(Settings.System.MMS_NOTIFICATION_SOUND_CACHE_URI, userId);
//add by xiangzaixiansheng for support dual sim card ringtones @}
}
return null;
}三、播放在ringtone_cache中文件
/frameworks/base/media/java/android/media/MediaPlayer.java
这里面我们可以看见RingtoneManager类直接提供了两个方法可以获取URl
 public void setDataSource(@NonNull Context context, @NonNull Uri uri,
            @Nullable Map headers, @Nullable List cookies)
            throws IOException {
        if (context == null) {
            throw new NullPointerException("context param can not be null.");
        }

        if (uri == null) {
            throw new NullPointerException("uri param can not be null.");
        }

        if (cookies != null) {
            CookieHandler cookieHandler = CookieHandler.getDefault();
            if (cookieHandler != null && !(cookieHandler instanceof CookieManager)) {
                throw new IllegalArgumentException("The cookie handler has to be of CookieManager "
                        + "type when cookies are provided.");
            }
        }

        // The context and URI usually belong to the calling user. Get a resolver for that user
        // and strip out the userId from the URI if present.
        final ContentResolver resolver = context.getContentResolver();
        final String scheme = uri.getScheme();
        final String authority = ContentProvider.getAuthorityWithoutUserId(uri.getAuthority());
        /// M: If scheme is null, try to get path from uri and setDataSource with path.
        if (scheme == null || ContentResolver.SCHEME_FILE.equals(scheme)) {
            setDataSource(uri.getPath());
            return;
        } else if (ContentResolver.SCHEME_CONTENT.equals(scheme)
                && Settings.AUTHORITY.equals(authority)) {
            // Try cached ringtone first since the actual provider may not be
            // encryption aware, or it may be stored on CE media storage
            final int type = RingtoneManager.getDefaultType(uri);
            //获取铃声的两个URL
            final Uri cacheUri = RingtoneManager.getCacheForType(type, context.getUserId());
            final Uri actualUri = RingtoneManager.getActualDefaultRingtoneUri(context, type);
            if (attemptDataSource(resolver, cacheUri)) {
                return;
            } else if (attemptDataSource(resolver, actualUri)) {
                return;
            } else {
                setDataSource(uri.toString(), headers, cookies);
            }
        } else {
            // Try requested Uri locally first, or fallback to media server
            if (attemptDataSource(resolver, uri)) {
                return;
            } else {
                setDataSource(uri.toString(), headers, cookies);
            }
        }
    }
四、自定义铃声
1.铃声一般都放在
rameworks/base/data/sounds/
2.修改默认铃声的话,需要修改build/target/product/core_base.mk 和full_base.mk
PRODUCT_PROPERTY_OVERRIDES := \
ro.config.notification_sound=OnTheHunt.ogg \
ro.config.alarm_alert=Alarm_Classic.ogg
3.铃声增减都在mk文件中添加
frameworks/base/data/sounds/AllAudio.mk
五、问题分析
来电无声的问题分析
1.首先需要判断在data/system/users/0/settings_system.xml文件,搜索ringtone,查看ringtone_set和ringtone的值。
1) 若ringtone_set不是1,检查MediaScanner.java文件的endFile的方法。
adb shell settings get system ringtone_set 看值是否为1. ( alarm_alert_set 和 notification_sound_set )
2),若ringtone未设置成功,检查setDefaultRingtoneFileNames(MediaScanner.java)和setRingtoneIfNotSet(MediaScanner.java)。
2,如何查看是否加载成功?
搜索setDataSource,加载成功的log如下:
MediaPlayerService: line:938 setDataSource fd=8 (/system/media/audio/ringtones/Ring_Synth_04.ogg), offset=0, length=576460752303423487
未有setDataSource,检查如下流程:
1)/vendor/mediatek/proprietary/packages/services/Telecomm/src/com/android/server/telecom/Ringer.java
startRinging
==>
2)/vendor/mediatek/proprietary/packages/services/Telecomm/src/com/android/server/telecom/AsyncRingtonePlayer.java
handlePlay
==>
3)/frameworks/base/media/java/android/media/Ringtone.java
play
==>
4)/frameworks/base/media/java/android/media/MediaPlayer.java
setDataSource
3,播放流程是否成功?
播放流程为:new mediaPlayer,setDataSource,prepare,start,搜索以上相关log,查看没有调用的原因。
4,是否被静音?
1)播放音量是否为0?
如下表示铃声(stream type为2)的音量值index是14,若index为0,则调大音量测试
APM_AudioPolicyManager: startOutput() output 13, stream 2, session 289
AudioPolicyManagerCustomImpl: checkAndSetVolume stream = 2 index = 14 mId = 3 device = 0x2(0x2) delayMs = 0 force = 0 [1/0x2/14]
2)是否被mute?
搜索“mute”的关键字,如下被标示的log表示被铃声被mute,muted count>0,就标示被mute
APM::AudioPolicyManager: checkAndSetVolume() stream 2 muted count 1
check被静音的地方,加log:
1,/frameworks/base/services/core/java/com/android/server/audio/AudioService.java
1), public static final boolean DEBUG_VOL = true;//将 Log.isLoggable(TAG + ".VOL", Log.DEBUG) || LOGD修改为true;
2),1180 private void adjustStreamVolume(int streamType, int direction, int flags,
1181 String callingPackage, String caller, int uid) {
1182 if (mUseFixedVolume) {
1183 return;
1184 }
1185 if (DEBUG_VOL) Log.d(TAG, "adjustStreamVolume() stream=" + streamType + ", dir=" + direction
1186 + ", flags=" + flags + ", caller=" + caller,new Exception("CallStack"));//add new Exception("CallStack")
2) ,/frameworks/av/services/audiopolicy/managerdefault/AudioPolicyManager.cpp
(1),#include
(2),5784void AudioPolicyManager::setStreamMute(audio_stream_type_t stream,
5785 bool on,
5786 const sp
5787 int delayMs,
5788 audio_devices_t device)
5789{
5790 const StreamDescriptor& streamDesc = mStreams.valueFor(stream);
5791 if (device == AUDIO_DEVICE_NONE) {
5792 device = outputDesc->device();
5793 }
5794
5795 ALOGD("setStreamMute() stream %d, mute %d, mMuteCount %d device %04x",
5796 stream, on, outputDesc->mMuteCount[stream], device);//change toALOGD
CallStack stack("CSXXX", 1); //add
5,抓取log方式的方式
首先清空mtklog文件夹
进入工模,Hardware Testing -- Audio -- Audio Logger
勾选
Audio Stream Output Dump
Audio Mixer Buffer Dump
Audio Track Buffer Dump
start log
复现问题
来电无声的时候添加adb命令
adb shell cat /sys/kernel/debug/mtksocaudio filename
adb shell cat /sys/kernel/debug/mtksocanaaudio filename
stop log