Android Mifare 卡 读写
最近公司在做一个Mifare卡的读入,以及写初始(即对各扇区数据块初始化,以及将密码区还原成初始密码)。昨天刚刚完成了这个项目,正好趁着周六休息的时候把之前的做过的总结一下。同时加深印象,如果能帮到各位的,也算是意外收获吧。(* ̄︶ ̄)
Mifare卡
Mifare卡俗称M1卡,是IC卡的一种,原装芯片通常被称为NXP卡或飞利浦S50卡。通过内存大小分类,一般会有三种。
1K: 16个扇区(sector),每个分区4个块(block),每个块(block) 16个byte数据
2K: 32个扇区(sector),每个分区4个块(block),每个块(block) 16个byte数据
4K:64个扇区(sector),每个分区4个块(block),每个块(block) 16个byte数据
我们通常用的是Mifare 1K卡,而今天的主角就是它。
首先,我们对每个扇区的每一块进行初步了解。
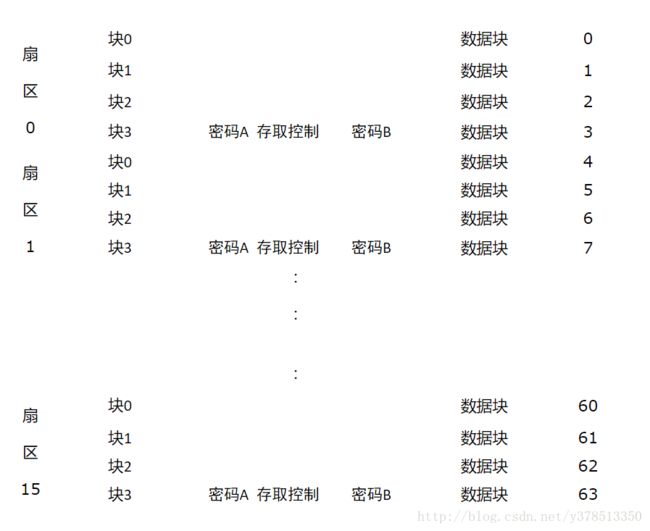
0扇区,这个扇区比较特殊。对于0扇区0块,这一块一般是禁止写入的,可以读。里面存放着Mifare卡的ID,以及卡片厂商的一些固有信息。如果要写数据的话,只能放在1块,和2块。1块,2块是数据的存储位置,如果要写入的0扇区数据的话,只能放在1块和2块上。对于全部基于MifareClassic的卡来说,每一个区最后一个块叫Trailer,16个byte, 主要来存放读写该区的key,能够有A,B两个KEY,每一个key长6byte,默认的key通常是FF 或 0,中间4个byte则是夺取控制。
1-15扇区,则和0扇区差不多,每个扇区的第一块到第三块都可以对数据进行操作,而第四块都是统一的密码区域。
整个Mifare卡的结构如下。
好了,开始步入正题。
1. 添加相关配置
<manifest xmlns:android="http://schemas.android.com/apk/res/android"
    package="cn.qy.demo">

    <uses-sdk android:minSdkVersion="14" />
    //添加NFC相关权限
    <uses-permission android:name="android.permission.NFC" />
    //手机识别NFC时,提供该程序进行选择
    <uses-feature
        android:name="android.hardware.nfc"
        android:required="true" />

    <application
        android:allowBackup="true"
        android:name=".MyApplication"
        android:icon="@mipmap/ic_launcher"
        android:label="@string/app_name"
        android:roundIcon="@mipmap/ic_launcher_round"
        android:supportsRtl="true"
        android:theme="@style/AppTheme">
        <activity
            android:name=".MainActivity"
            //将Activity启动模式设为singleTop避免创建实例
            android:launchMode="singleTop">
            <intent-filter>
                <action android:name="android.intent.action.MAIN" />

                <category android:name="android.intent.category.LAUNCHER" />
            intent-filter>
            //添加过滤
            <intent-filter>
                <action android:name="android.nfc.action.TECH_DISCOVERED" />
            intent-filter>
            //添加过滤数据
            <meta-data
                android:name="android.nfc.action.TECH_DISCOVERED"
                android:resource="@xml/nfc_tech_filter" />
        activity>
    application>

manifest>
在res文件下添加xml/nfc_tech_filter 文件。
<resources xmlns:xliff="urn:oasis:names:tc:xliff:document:1.2">
     <tech-list>
        <tech>android.nfc.tech.NfcAtech>
    tech-list>
    <tech-list>
        <tech>android.nfc.tech.NfcBtech>
    tech-list>
    <tech-list>
        <tech>android.nfc.tech.MifareClassictech>
    tech-list>
    <tech-list>
        <tech>android.nfc.tech.MifareUltralighttech>
    tech-list>
resources>
NFC的类别有很多的,这里只添加一部分。
2.在Activity里编写相关代码
//获取默认的NfcAdapter
NfcAdapter nfcAdapter = NfcAdapter.getDefaultAdapter(this);
//通过判断nfcAdapter是否为空来知晓该手机是否支持NFC功能
nfcAdaper == null;
//NFC是否可用(是否是打开状态)
nfcAdapter.isEnabled;
onCreate 中的部分代码
    nfcAdapter = NfcAdapter.getDefaultAdapter(this);
    pendingIntent = PendingIntent.getActivity(this, 0,new Intent(this, getClass()).addFlags(Intent.FLAG_ACTIVITY_SINGLE_TOP), 0);

   if (nfcAdapter!=null) {
       if(!nfcAdapter.isEnabled()){
         Toast.makeText(this,"请在系统设置中先启用NFC功能!",Toast.LENGTH_SHORT).show();
       }
   }else{
       Toast.makeText(this,"该设备不支持NFC功能",Toast.LENGTH_SHORT).show();
   }
   onNewIntent(getIntent());
onResume代码
if (nfcAdapter != null) {
    String[][] mTechLists = new String[][] {
                    new String[] { NfcF.class.getName()},
                    new String[]{NfcA.class.getName()},
                    new String[]{NfcB.class.getName()},
                    new String[]{NfcV.class.getName()}
            };
     IntentFilter[] filters = null;
        try {
                filters = new IntentFilter[] { new IntentFilter(NfcAdapter.ACTION_TECH_DISCOVERED, "*/*") };
            } catch (IntentFilter.MalformedMimeTypeException e) {
                e.printStackTrace();
            }
           // 这行代码是添加调度,效果是读标签的时候不会弹出候选程序,直接用本程序处理,关于第四个参数,如果设置null也会启动activity并不会在当前页读取
           nfcAdapter.enableForegroundDispatch(this, pendingIntent, filters, mTechLists );
        }
onPause代码
//关闭NFC功能
nfcAdapter.disableForegroundDispatch(this);
onNewIntent代码
        //从intent中获取标签信息
        readTag(intent);
Tag:当刷卡时,生命周期onpause->onnewintent->onresume
读卡操作:
public String readTag(Intent intent) {
        Tag tagFromIntent = intent.getParcelableExtra(NfcAdapter.EXTRA_TAG);
        MifareClassic mfc = MifareClassic.get(tag);
        for (String tech : tag.getTechList()) {
            System.out.println(tech);
        }
        boolean auth = false;
        //读取TAG
        try {
            String metaInfo = "";
            //读取之前必须connect();
            mfc.connect();
            int type = mfc.getType();//获取TAG的类型
            int sectorCount = mfc.getSectorCount();//获取TAG中包含的扇区数
            String typeS = "";
            switch (type) {
                case MifareClassic.TYPE_CLASSIC:
                    typeS = "TYPE_CLASSIC";
                    break;
                case MifareClassic.TYPE_PLUS:
                    typeS = "TYPE_PLUS";
                    break;
                case MifareClassic.TYPE_PRO:
                    typeS = "TYPE_PRO";
                    break;
                case MifareClassic.TYPE_UNKNOWN:
                    typeS = "TYPE_UNKNOWN";
                    break;
            }
            metaInfo += "卡片类型:" + typeS + "\n共" + sectorCount + "个扇区\n共"
                    + mfc.getBlockCount() + "个块\n存储空间: " + mfc.getSize()
                    + "B\n";
            for (int j = 0; j < sectorCount; j++) {
           //通过keyA进行验证
           auth = mfc.authenticateSectorWithKeyA(j,
                      MifareClassic.KEY_DEFAULT);
                int bCount;
                int bIndex;
                if (auth) {
                    metaInfo += "Sector " + j + ":验证成功\n";
                    // 读取扇区中的块
                    bCount = mfc.getBlockCountInSector(j);
                    bIndex = mfc.sectorToBlock(j);
                    for (int i = 0; i < bCount; i++) {
                        byte[] data = mfc.readBlock(bIndex);
                        metaInfo += "Block " + bIndex + " : "
                                + bytesToHexString(data) + "\n";
                        bIndex++;
                    }
                } else {
                    metaInfo += "Sector " + j + ":验证失败\n";
                }
            }
            return metaInfo;
        } catch (Exception e) {
            Toast.makeText(this, e.getMessage(), Toast.LENGTH_LONG).show();
            e.printStackTrace();
        } finally {
            if (mfc != null) {
                try {
                    mfc.close();
                } catch (IOException e) {
                    Toast.makeText(this, e.getMessage(), Toast.LENGTH_LONG)
                            .show();
                }
            }
        }
        return null;
    }
写卡操作:
这里对1扇区的块4进行写操作,将块4的数据初始。
public void writeTag(Intent intent) {
        Tag tagFromIntent = intent.getParcelableExtra(NfcAdapter.EXTRA_TAG);
        MifareClassic mfc = MifareClassic.get(tagFromIntent);
        try {
            mfc.connect();
            boolean auth = false;
            auth = mfc.authenticateSectorWithKeyA(sector, MifareClassic.KEY_DEFAULT);
            if (auth) {
                mfc.writeBlock(4,new byte[16]);
                mfc.close();
            }
         } catch (Exception e) {
            e.printStackTrace();
         } finally {
            try {
                mfc.close();
            } catch (IOException e) {
                // TODO Auto-generated catch block
                 e.printStackTrace();
            }
        }
    }
对于Mifare 卡写入要求必须是16字节。如果数据清空的话,可以直接传入空的byte[16]。
好了,今天就先介绍到这,如果有不对的地方还望各位指出。
ヾ(@^▽^@)ノ
