Apollo学习笔记
Apollo学习笔记
前言
apollo=1.6.2
相关链接:
- Apollo Github 地址:https://github.com/ctripcorp/apollo
- Apollo 下载地址:https://github.com/ctripcorp/apollo/releases
- Java 项目配置 Apollo 指南:https://github.com/ctripcorp/apollo/wiki/Java%E5%AE%A2%E6%88%B7%E7%AB%AF%E4%BD%BF%E7%94%A8%E6%8C%87%E5%8D%97
- Apollo maven 地址:
配置文件
配置多种加载方式:内部硬编码、配置文件、环境变量、启动参数、基于数据库;
配置需要治理:
- 权限控制:
- 不同环境、集群配置管理:
Apollo 工作原理
基础模型
- 用户在配置中心对配置进行修改并发布
- 配置中心通知Apollo客户端有配置更新
- Apollo客户端从配置中心拉取最新的配置、更新本地配置并通知到应用
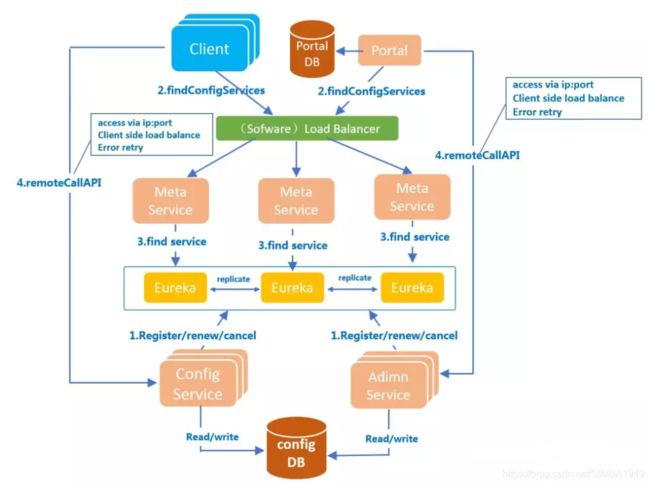
架构模块
四个核心模块及其主要功能
- ConfigService :
- 提供配置获取接口;
- 提供配置推送接口;
- 服务于 Apollo 客户端
- AdminService :
- 提供配置管理接口;
- 提供配置修改发布接口;
- 服务于管理界面 Portal
- Client :
- 为应用获取配置,支持实时更新;
- 通过 MetaServer 获取 ConfigService 的服务列表;
- 使用客户端软负载 SLB 方式调用 ConfigService
- Portal :
- 配置管理界面;
- 通过 MetaServer 获取 AdminService 的服务列表;
- 使用客户端软负载 SLB 方式调用 AdminService
三个辅助服务发现模块
-
Eureka:
- 用于服务发现和注册;
- Config/AdminService 注册实例并定期报心跳;
- 和 ConfigService 住在一起部署
-
MetaServer :
- Portal 通过域名访问 MetaServer 获取 AdminService 的地址列表;
- Client 通过域名访问 MetaServer 获取 ConfigService 的地址列表;
- 相当于一个Eureka Proxy;
- 逻辑角色,和ConfigService住在一起部署;
-
NginxLB
-
- 和域名系统配合,协助 Portal 访问 MetaServer 获取 AdminService 地址列表
- 和域名系统配合,协助 Client 访问 MetaServer 获取 ConfigService 地址列表
- 和域名系统配合,协助用户访问 Portal 进行配置管理
服务端设计
在配置中心中,一个重要的功能就是配置发布后实时推送到客户端。
- 用户在Portal操作配置发布
- Portal调用Admin Service的接口操作发布
- Admin Service发布配置后,发送ReleaseMessage给各个Config Service
- Config Service收到ReleaseMessage后,通知对应的客户端
客户端设计
- 客户端和服务端保持了一个长连接,从而能第一时间获得配置更新的推送。(通过Http Long Polling实现)
- 客户端还会定时从 Apollo 配置中心服务端拉取应用的最新配置。
- 这是一个 fallback 机制,为了防止推送机制失效导致配置不更新
- 客户端定时拉取会上报本地版本,所以一般情况下,对于定时拉取的操作,服务端都会返回304 - Not Modified
- 定时频率默认为每5分钟拉取一次,客户端也可以通过在运行时指定System Property:
apollo.refreshInterval来覆盖,单位为分钟。
- 客户端从 Apollo 配置中心服务端获取到应用的最新配置后,会保存在内存中
- 客户端会把从服务端获取到的配置在本地文件系统缓存一份
- 在遇到服务不可用,或网络不通的时候,依然能从本地恢复配置
- 应用程序可以从 Apollo 客户端获取最新的配置、订阅配置更新通知
Apollo 特性
- 统一管理不同环境、不同集群的配置
- 配置修改实时生效(热发布)
- 版本发布管理
- 灰度发布
- 权限管理、发布审核、操作审计
- 客户端配置信息监控
- 提供开放平台API
- 部署简单:目前唯一的外部依赖是MySQL,所以部署非常简单,只要安装好Java和MySQL就可以让Apollo跑起来
Apollo系统基础使用
创建部门
管理员工具 ——> 系统参数 ——> 搜索 key—— organizations ,按照原有的 JSON 格式即可创建;
创建用户
管理员工具 ——> 用户管理
快速入门
maven 核心依赖
<dependency>
    <groupId>com.ctrip.framework.apollogroupId>
    <artifactId>apollo-clientartifactId>
    <version>1.6.2version>
dependency>
简单入门
package top.simba1949;

import com.ctrip.framework.apollo.Config;
import com.ctrip.framework.apollo.ConfigService;

/**
 * @author Anthony
 * @date 2020/7/24 16:22
 */
public class Application {
    /**
     * 需要在环境参数配置或者配置文件配置
     * 环境参数配置:
     * 需要在 VM Options 指定app.id 、evn、dev_meta地址
     * -Dapp.id=app-learn -Denv=DEV -Ddev_meta=http://192.168.8.12:8080
     *
     * 配置文件配置:
     *
     * @param args
     */
    public static void main(String[] args) {
        while (true){
            try {
                Thread.sleep(5000L);
            } catch (InterruptedException e) {
                e.printStackTrace();
            }

            Config config = ConfigService.getAppConfig();
            Boolean smsEnable = config.getBooleanProperty("sms.enable", null);
            System.out.println("smsEnable is " + smsEnable);
        }
    }
}
与 SpringBoot 集成
集群不推荐使用配置文件,推荐使用 VM Options
maven 核心依赖
<dependency>
    <groupId>com.ctrip.framework.apollogroupId>
    <artifactId>apollo-clientartifactId>
    <version>1.6.2version>
dependency>
application.properties配置
server.port=8082
# 指定 appid
app.id = apollo-integrated-spring-boot
# 集成 spring-boot 开启 apollo
apollo.bootstrap.enable = true
# 指定 namespace (多个使用英文逗号分隔)
apollo.boootstrap.namespaces = application
apollo-env.properties 配置
# 指定 mete-server
uat.meta = http://192.168.8.10:8080
fat.meta = http://192.168.8.11:8080
pro.meta = http://192.168.8.12:8080
测试代码
package top.simba1949.controller;

import org.springframework.beans.factory.annotation.Value;
import org.springframework.web.bind.annotation.GetMapping;
import org.springframework.web.bind.annotation.RequestMapping;
import org.springframework.web.bind.annotation.RestController;

/**
 * @author Anthony
 * @date 2020/7/25 15:27
 */
@RestController
@RequestMapping("test")
public class TestController {

    @Value("${sms.enable}")
    private Boolean smsEnable;

    @GetMapping("sms")
    public Boolean getSmsEnableStr(){
        return smsEnable;
    }

    @GetMapping("value")
    public String getValueByKey(@Value("${test.key}")String value){
        System.out.println("value is " + value);
        return value;
    }
}
启动类
package top.simba1949;

import com.ctrip.framework.apollo.spring.annotation.EnableApolloConfig;
import org.springframework.boot.SpringApplication;
import org.springframework.boot.autoconfigure.SpringBootApplication;

/**
 * @EnableApolloConfig : 开启 apollo
 * @author Anthony
 * @date 2020/7/25 15:10
 */
@EnableApolloConfig
@SpringBootApplication
public class Application {
    public static void main(String[] args) {
        SpringApplication.run(Application.class, args);
    }
}
运行 VM Options 选项:用于指定环境
-Denv=dev
