Spring--Spring IOC(一)容器装配Bean的简单使用
目录
一、Spring简介
二、Hello Spring 实例
三、认识 spring 容器和 Bean
四、Spring容器装配Bean的三种方式
4.1 在 XML 中进行装配
基本使用
依赖注入
4.2 自动装配 bean(常用)
基本使用
依赖注入
4.3 通过 java 代码进行装配
基本使用
依赖注入
写在后面
以下文章来源于https://www.cnblogs.com/joy99/p/10842218.html,作者SharpCJ
一、Spring简介
Spring是一个开源框架,Spring是于2003年兴起的一个轻量级的Java开发框架,由Rod Johnson在其著作Expert One-On-One J2EE Development and Design中阐述的部分理念和原型衍生而来。它是为了解决企业应用开发的复杂性而创建的。框架的主要优势之一就是其分层架构,分层架构允许使用者选择使用哪一个组件。Spring提供了约20多个组件,开发者可以根据自己需要选择组件。Spring的核心是控制反转(IoC)和面向切面编程(AOP)
- IoC:控制反转。
控制反转(Inversion of Control),又叫依赖注入(Dependency Injection)。举例来说,在之前的操作中,比方说有一个类,我们想要调用类里面的方法(不是静态方法),就要创建类的对象,使用对象调用方法实现。对于Spring来说,Spring创建对象的过程,不是在代码里面实现的,而是交给Spring来进行配置实现的。- AOP:面向切面编程。
面向切面编程(Aspect Orient Programming)支持允许将一些通用的任务如安全、事物、日志、缓存等进行集中式处理,从而提供了更好的复用,AOP通常用来处理一些具有横切性质的系统级服务。
二、Hello Spring 实例
从最简单的 Hello,Spring 例子来体会一下使用 Spring 框架。首先看看不使用 Spring 框架的代码:
HelloSpring.java 类:
package com.sharpcj;

public class HelloSpring {
    private String name;

    public void sayHello() {
        System.out.println("Hello," + name + "!");
    }

    public String getName() {
        return name;
    }

    public void setName(String name) {
        this.name = name;
    }
}
Test.java 类:
package com.sharpcj;

public class Test {
    public static void main(String[] args) {
        HelloSpring hs = new HelloSpring();
        hs.setName("Spring");
        hs.sayHello();
    }
}
输出结果:
Hello,Spring!
下面我们用 Spring 框架来实现这个例子。
Spring 框架官方下载地址: http://repo.springsource.org/libs-release-local/
Spring 框架阿里云下载地址:http://maven.aliyun.com/nexus/content/groups/public/springframework/
Spring 框架核心 JAR 文件:
- commons-logging-1.1.1
- spring-aop-5.0.6.RELEASE
- spring-aspects-5.0.6.RELEASE
- spring-beans-5.0.6.RELEASE
- spring-context-5.0.6.RELEASE
- spring-context-support-5.0.6.RELEASE
- spring-core-5.0.6.RELEASE
- spring-expression-5.0.6.RELEASE
- spring-instrument-5.0.6.RELEASE
- spring-instrument-tomcat-5.0.6.RELEASE
- spring-jdbc-5.0.6.RELEASE
- spring-jms-5.0.6.RELEASE
- spring-messaging-5.0.6.RELEASE
- spring-orm-5.0.6.RELEASE
- spring-oxm-5.0.6.RELEASE
- spring-test-5.0.6.RELEASE
- spring-tx-5.0.6.RELEASE
- spring-web-5.0.6.RELEASE
- spring-webmvc-5.0.6.RELEASE
- spring-webmvc-portlet-5.0.6.RELEASE
- spring-websocket-5.0.6.RELEASE
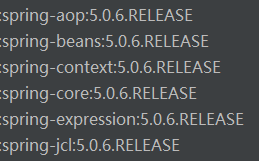
这里只是使用Spring的基本功能,所以需要添加使用到下面的这几个Jar包:
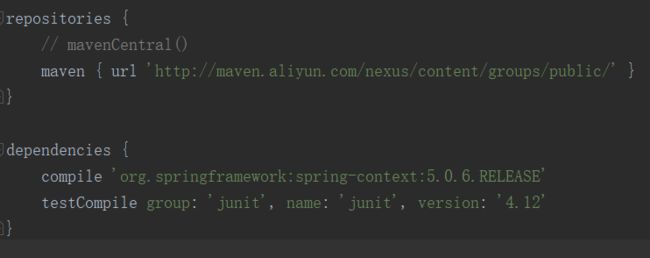
这里我使用的 idea,用 gradle 编译的(用 maven 过程类似)。为了提高下载速度,我使用了阿里云的 maven 仓库,然后添加依赖,最新稳定版本是 5.0.6 , build.gradle文件部分截图:
代码更改如下:
HelloSpring.java 类
package com.sharpcj;

public class HelloSpring {
    private String name;

    public void sayHello() {
        System.out.println("Hello," + name + "!");
    }

    public String getName() {
        return name;
    }

    public void setName(String name) {
        this.name = name;
    }
}
Test.java 类
package com.sharpcj;

import org.springframework.context.ApplicationContext;
import org.springframework.context.support.FileSystemXmlApplicationContext;

public class Test {
    public static void main(String[] args) {
        ApplicationContext context = new FileSystemXmlApplicationContext("src/beans.xml");
        HelloSpring hs = context.getBean("helloSpring", HelloSpring.class);
        hs.sayHello();
    }
}
此时在 src 目录下新建了一个文件 beans.xml :
此时运行 Test.java 的 main 方法,打印结果如下:
Hello,Spring!
这样我们就用 Spring 框架实现了最简单的 Hello Spring 程序。
三、认识 spring 容器和 Bean
上面用 Spring 框架实现的代码中,我们在 Test.java 类中,并没有通过 “new HelloSpring()” 这样的调用 Spring 构造方法去创建 HelloSpring 的对象,而是使用 Spring 核心容器创建的。
- 第一步是我们使用框架 API FileSystemXmlApplicationContext() 来创建应用程序的上下文。这个 API 加载 beans 的配置文件并最终基于所提供的 API,它处理创建并初始化所有的对象,即在配置文件中提到的 beans。
- 第二步是使用已创建的上下文的 getBean() 方法来获得所需的 bean。这个方法使用 bean 的 ID 返回一个最终可以转换为实际对象的通用对象。一旦有了对象,你就可以使用这个对象调用任何类的方法。能通过这种方式创建的对象,一定是在 beans.xml 文件中配置的。
Spring 核心容器就好像是一个超级大的工厂,在配置文件中配置过的对象都会被当成 Spring 容器管理的对象。Spring 把容器中的一切对象统称为 Bean 。 Spring 中的 Bean 与传统的 java Bean 不同,对 Spring 而言,任何一个 java 类,都可以当成是 Bean 来处理。
四、Spring容器装配Bean的三种方式
- 在XML中进行装配
- 自动装配 bean
- 在Java中进行装配
还是用上面 HelloSpring 的例子,该例子实在过于简单,只有一个 bean, 没有涉及到两个 bean 之间的依赖关系,不过还是可以用它来理解Spring容器装配Bean的三种装配方式。为了说明依赖注入的场景,举个其它例子:
人用笔写字。伪代码如下:
Pen 类:
public class Pen {
    // property 暂不关心
}
Person 类:
public class Person {
    private Pen pen;

    public Person(Pen pen) {
        this.pen = pen;
    }

    public Pen getPen() {
        return this.pen;
    }

    public void setPen(Pen pen) {
        this.pen = pen;
    }

    // 这里我们暂不关心该方法
    public void write() {

    }
}
下面对于这种依赖关系,将分别用伪代码来说明构造注入和设置注入。
4.1 在 XML 中进行装配
基本使用
上面例子即是,不再赘述。
依赖注入
如果存在多个Bean, 之间有依赖关系:
构造注入:
设值注入:
4.2 自动装配 bean(常用)
基本使用
com.sharpcj.HelloSpring.java 代码如下:
package com.sharpcj;

import org.springframework.beans.factory.annotation.Value;
import org.springframework.stereotype.Component;

@Component
public class HelloSpring {
    private String name;

    public void sayHello() {
        System.out.println("Hello," + name + "!");
    }

    public String getName() {
        return name;
    }

    @Value("Spring")
    public void setName(String name) {
        this.name = name;
    }
}
创建类 com.sharpcj.HelloConfig.java用来开启组件扫描:
package com.sharpcj;

import org.springframework.context.annotation.ComponentScan;
import org.springframework.context.annotation.Configuration;

@Configuration
@ComponentScan
public class HelloConfig {
}
修改com.sharpcj.Test.java
package com.sharpcj;

import org.springframework.context.ApplicationContext;
import org.springframework.context.annotation.AnnotationConfigApplicationContext;

public class Test {
    public static void main(String[] args) {
        ApplicationContext context = new AnnotationConfigApplicationContext(com.sharpcj.HelloConfig.class);
        HelloSpring hello = context.getBean("helloSpring", HelloSpring.class);
        hello.sayHello();
    }
}
@Component 注解的类即为 Bean 。 @Configuration 注解的即为配置文件,@ComponentScan 注解表示开启自动扫描,默认扫描该配置类所在的包,如果扫描其它包,多个包,形式如下:
@Configuration
@ComponentScan(basePackageClasses = {com.a.A.class, com.b.B.class})
也可以每个包内配置之后,再配置一个总的配置文件:
@Configuration
@Import({com.a.AConfig.class, com.b.BConfig.class})
public class TotalConfig {
}
依赖注入
如果存在多个Bean, 之间有依赖关系:
// pen 类:
@Component
public class Pen {
    // property 暂不关心
}
构造注入:
@Component
public class Person {

    private Pen pen;

    @Autowired
    public Person(Pen pen) {
        this.pen = pen;
    }

    public Pen getPen() {
        return this.pen;
    }

    public void setPen(Pen pen) {
        this.pen = pen;
    }

    // 这里我们暂不关心该方法
    public void write() {

    }
}
设值注入:
@Component
public class Person {

    private Pen pen;

    public Pen getPen() {
        return this.pen;
    }

    @Autowired
    public void setPen(Pen pen) {
        this.pen = pen;
    }

    // 这里我们暂不关心该方法
    public void write() {

    }
}
4.3 通过 java 代码进行装配
基本使用
此时 java 类无需使用注解。
同样创建一个类,com.sharpcj.HelloConfig.java来进行装配 Bean。
package com.sharpcj;

import org.springframework.context.annotation.Bean;
import org.springframework.context.annotation.Configuration;

@Configuration
public class HelloConfig {
    @Bean
    public HelloSpring helloSpring(){
        return new HelloSpring();
    }
}
被 @Bean 标注的方法返回的即为唯一 Bean(默认单例模式),方法名随便取。
Test:
ApplicationContext context=new AnnotationConfigApplicationContext(com.sharpcj.HelloConfig.class);
HelloSpring hs = context.getBean(HelloSpring.class);
hs.sayHello();
依赖注入
如果存在多个Bean, 之间有依赖关系:
构造注入:
@Configuration
public class PConfig {
    @Bean
    public GPen hehe() {
        return new GPen();
    }

    @Bean
    public QPen haha() {
        return new QPen();
    }

    @Bean
    public Person xixi() {
        Person person = new Person(hehe());
        return person;
    }
}
设值注入:
@Configuration
public class PConfig {
    @Bean
    public GPen hehe() {
        return new GPen();
    }

    @Bean
    public QPen haha() {
        return new QPen();
    }

    @Bean
    public Person xixi() {
        Person person = new Person();
        person.setPen(hehe());
        return person;
    }
}
写在后面
这篇文章记录了Spring容器和Bean的概念,Spring 的基本使用,以及Spring容器装配Bean的三种方式。关于Spring 容器的知识点比较多,下篇文章接着写点 Spring 容器装配 Bean 的高级知识点。