第一个springboot项目
关于springboot的介绍百度有很多不再赘述。我们快速搭建一下。
springboot环境准备
1.安装jdk,并设置环境变量。
2.安装maven,并设置环境变量。
3.安装sts3、sts4、idea、eclipse都可以,其中sts3官网表示已经不再更新了,建议下载用的最多的sts4和idea。因为这两种工具默认集成了springboot和springcloud,eclipse可能需要安装插件才可以运行。
好了,我们开始吧。
搭建第一个springboot项目
两个方式搭建第一个springboot项目
1.可以直接输入https://start.spring.io,进行下载。
2.我这边采用Spring Initializr方式。步骤如下:
idea界面中,单击File->new->project->Spring lnitializr,如果你的Project SDK为空,请添加你的jdk,配置好了的话,下一步。
设置好你的项目groupId和artifactId,再下一步,搜索并选择spring web下一步,设置好你的项目地址,完成。
新建controller并新建立controller类,编写如下:
@RestController("/")
public class IndexController {
    @GetMapping("index")
    public String index(){
        return "hello springboot";
    }
}
找到你的Appliction右键运行,游览器输入http://localhost:8080/,看到hello springboot就ok了。下面附上效果图。
自此第一个springboot项目搭建完成。
springboot文件目录介绍
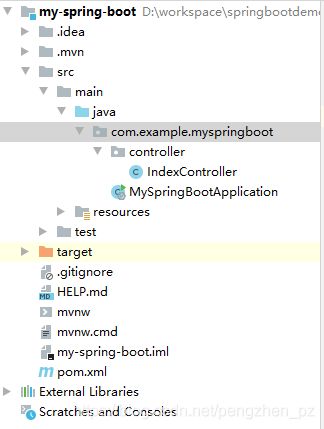
下图就是springboot文件的目录,当然如果你的工程是其他工具搭建的,结构可能有所不同。
/src/main/java: 目录下放置所有的java文件(源代码文件)
/src/main/resources:用于存放所有的资源文件,包括静态资源文件、配置文件、页面文件等。
/src/main/resources/statci:用于存放各类静态资源。
/src/main/resources/application.properties:springboot的配置文件,默认支持两个后缀名,分别是.proerties和.yml.
/src/main/resources/templates:用于存放模板文件,如Thymeleaf、freemark等
/src/test/java:放置单元测试类java代码。
/target:放置编译后的.class文件、配置文件等。
两种配置文件的优先级问题
在appliction.properties和application.yml同级目录中,分别编写server.port=8089和server.port:8090
分别打开http://localhost:8089/index和http://localhost:8090/index
结果是8089端口号运行成功,自此得到结论:properties优先级大于yml文件的。
注解相关:
值得注意的两个注解:RestController和SpringBootApplication注解
@RestController注解其实是@Controller注解+@ResponseBody
@SpringBootApplication注解其实是包含了三个注解:
@EnableAutoConfiguration 表示自动配置
@ComponentScan 自动扫描
@SpringBootConfiguration 表示是Springboot的配置类
@GetMapping注解其实就是RequestMapping(method=RequestMethod.GET),这个不用多说。spring4的新注解。

