【Linux裸机开发】-C语言点灯
裸机开发流程
一、启动汇编代码
1.1 设置运行模式
1.2 设置SP指针
1.3 跳转到C语言
二、C代码编写
2.1 寄存器定义头文件编写
2.2 初始化驱动代码编写
三、Makefile编写
四、连接文件
一、启动汇编代码
1.1设置运行模式
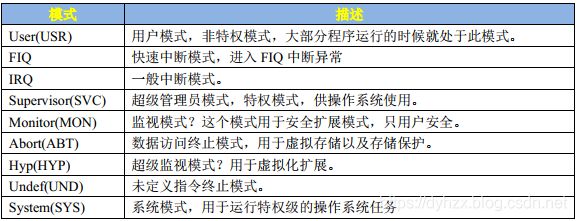
I.MX6ULL芯片有 九种运行模式

程序状态寄存器(CPSR)
所有的处理器模式都共用一个 CPSR 物理寄存器,因此 CPSR 可以在任何模式下被访问。CPSR 是当前程序状态寄存器,该寄存器包含了条件标志位、中断禁止位、当前处理器模式标志等一些状态位以及一些控制位。所有的处理器模式都共用一个 CPSR 必然会导致冲突,为此,除了 User 和 Sys 这两个模式以外,其他 7 个模式每个都配备了一个专用的物理状态寄存器,叫做 SPSR(备份程序状态寄存器),当特定的异常中断发生时, SPSR 寄存器用来保存当前程序状态寄存器(CPSR)的值,当异常退出以后可以用 SPSR 中保存的值来恢复 CPSR。

程序开发中设置SVC模式有权限访问使用内部资源,配置程序状态寄存器(CPSR)设置模式,MSR 和 MRS 两个寄存器用于读写特殊寄存器。

1.2设置SP指针
阿尔法开发板设置Sp指向DDR(512M),范围0x80000000~0x9FFFFFFF。我设置的栈大小是2MB。A7处理器栈的增长方式是向下增长的。即设置sp指向0x80200000.
1.3跳转到C语言
代码start.S
.global _start

_start:
    /* 设置处理器进入SVC模式 */
    mrs r0,cpsr     /* 读取cpsr到R0 */
    bic r0,r0,#0x1f /* 清除cpsr的bit-0-4 */
    orr r0,r0,#0x13 /* 使用SVC模式 */
    msr cpsr,r0     /* 将r0写入到cpsr */

    /* 设置Sp指针 */
    ldr sp ,=0x80200000
    b main          /* 跳转到C语言main函数 */
二、C代码编写
2.1寄存器定义头文件编写
main.h
#ifndef __MAIN_H
#define __MAIN_H

/* 定义要使用的寄存器 */

/*
 * CCM相关寄存器 使能时钟
 */
#define CCM_CCGR0 *((volatile unsigned int *)0X020c4068)
#define CCM_CCGR1 *((volatile unsigned int *)0X020c406C)
#define CCM_CCGR2 *((volatile unsigned int *)0X020c4070)
#define CCM_CCGR3 *((volatile unsigned int *)0X020c4074)
#define CCM_CCGR4 *((volatile unsigned int *)0X020c4078)
#define CCM_CCGR5 *((volatile unsigned int *)0X020c407C)
#define CCM_CCGR6 *((volatile unsigned int *)0X020c4080)

/*
 *  IOMUX相关寄存器
 */
#define SW_MUX_GPIO1_IO03 *((volatile unsigned int *)0X20E0068)//复用
#define SW_PAD_GPIO1_IO03 *((volatile unsigned int *)0X20E02F4)//IO属性

/*
 *  GPIO_1相关寄存器地址
 */
#define GPIO1_DR    *((volatile unsigned int *)0x0209c000)//高低电平
#define GPIO1_GDIR  *((volatile unsigned int *)0x0209c004)//输入输出模式
#define GPIO1_PSR   *((volatile unsigned int *)0x0209c008)
#define GPIO1_ICR1  *((volatile unsigned int *)0x0209c00C)
#define GPIO1_ICR2  *((volatile unsigned int *)0x0209c010)
#define GPIO1_IMR   *((volatile unsigned int *)0x0209c014)
#define GPIO1_ISR   *((volatile unsigned int *)0x0209c018)
#define GPIO1_EDGE_SEL *((volatile unsigned int *)0x0209c01c)

#endif
2.2 初始化驱动代码编写
main.c
#include "main.h"

/* 使能外设是时钟 */
void clk_enable(void)
{
    CCM_CCGR0 = 0xffffffff;
    CCM_CCGR1 = 0xffffffff;
    CCM_CCGR2 = 0xffffffff;
    CCM_CCGR3 = 0xffffffff;
    CCM_CCGR4 = 0xffffffff;
    CCM_CCGR5 = 0xffffffff;
    CCM_CCGR6 = 0xffffffff;
}
/* 初始化LED */
void led_init(void)
{
    SW_MUX_GPIO1_IO03 = 0x5;     /* 复用为GPIO */
    SW_PAD_GPIO1_IO03 = 0x10B0;  /* 设置GPIO_IO03电器特性*/

    GPIO1_GDIR = 0x8;           /* 设置为输出 */
    GPIO1_DR = 0;
}
/* 短延时 */
void delay_short(volatile unsigned int n)
{
    while(n--);
}
/* 延时 */
void delay(volatile unsigned int n)//延时ms
{
    while(n--)
    {
        delay_short(0x7ff);
    }
}
void led_on(void)
{
    GPIO1_DR &= ~(1<<3);
}
void led_off(void)
{
    GPIO1_DR |= (1<<3);
}
int main(void)
{
    /* 初始化LED */
    clk_enable();
    led_init();

    /* 设置LED闪烁 */
    while(1)
    {
        led_on();
        delay(500);
        led_off();
        delay(500);
    }
    return 0;
}
2.3寄存器结构体的编写
1.定义结构体,寄存器组
/** GPIO - Register Layout Typedef */
typedef struct {
  __IO uint32_t DR;          /**< GPIO data register, offset: 0x0 */
  __IO uint32_t GDIR;        /**< GPIO direction register, offset: 0x4 */
  __I  uint32_t PSR;         /**< GPIO pad status register, offset: 0x8 */
  __IO uint32_t ICR1;        /**< GPIO interrupt configuration register1, offset: 0xC */
  __IO uint32_t ICR2;        /**< GPIO interrupt configuration register2, offset: 0x10 */
  __IO uint32_t IMR;         /**< GPIO interrupt mask register, offset: 0x14 */
  __IO uint32_t ISR;         /**< GPIO interrupt status register, offset: 0x18 */
  __IO uint32_t EDGE_SEL;    /**< GPIO edge select register, offset: 0x1C */
} GPIO_Type;
2.定义基地址、定义宏
/** Peripheral GPIO1 base address */
#define GPIO1_BASE                               (0x209C000u)
/** Peripheral GPIO1 base pointer */
#define GPIO1                                    ((GPIO_Type *)GPIO1_BASE)
/** Peripheral GPIO2 base address */
#define GPIO2_BASE                               (0x20A0000u)
/** Peripheral GPIO2 base pointer */
#define GPIO2                                    ((GPIO_Type *)GPIO2_BASE)
/** Peripheral GPIO3 base address */
#define GPIO3_BASE                               (0x20A4000u)
/** Peripheral GPIO3 base pointer */
#define GPIO3                                    ((GPIO_Type *)GPIO3_BASE)
/** Peripheral GPIO4 base address */
#define GPIO4_BASE                               (0x20A8000u)
/** Peripheral GPIO4 base pointer */
#define GPIO4                                    ((GPIO_Type *)GPIO4_BASE)
/** Peripheral GPIO5 base address */
#define GPIO5_BASE                               (0x20AC000u)
/** Peripheral GPIO5 base pointer */
#define GPIO5                                    ((GPIO_Type *)GPIO5_BASE)
三、Makefile编写
Makefile
objs:=start.o main.o

ledc.bin:$(objs)
	arm-linux-gnueabihf-ld -Timx6ull.lds $^ -o ledc.elf
	arm-linux-gnueabihf-objcopy -O binary -S ledc.elf $@
	arm-linux-gnueabihf-objdump -D -m arm ledc.elf > ledc.dis

%.o:%.S
	arm-linux-gnueabihf-gcc -Wall -nostdlib -c -O2 -o $@ $<
%.o:%.c
	arm-linux-gnueabihf-gcc -Wall -nostdlib -c -O2 -o $@ $<

clean:
	rm -rf *.o ledc.bin ledc.elf ledc.dis
四、连接文件
用于描述文件应该如何被链接在一起形成最终的可执行文件。其主要目的是描述输入文件中的段如何被映射到输出文件中,并且控制输出文件中的内存排布。最简单的链接脚本可以只包含一个命令“SECTIONS”,我们可以在这一个“SECTIONS”里面来描述输出文件的内存布局。我们一般编译出来的代码都包含在 text、 data、 bss 和 rodata 这四个段内。
SECTIONS{
    . = 0x87800000;
    .text :
    {
        start.o
        *(.text)
    }
    .rodata ALIGN(4) : {*(.rodata)}
    .data ALIGN(4) : {*(.data)}
    . = ALIGN(4);
    __bss_start = . ;
    .bss ALIGN(4) : {*(bss) *(COMMON)}
    __bss_end = . ;
}

