OpenGL&CG技术之Render To Texture
作者:i_dovelemon
日期:2015/12/26
来源:CSDN
主题:OpenGL,CG,FBO,Render To Texture
引言
最近一段时间,一直在研究OpenGL+CG编写各种各样的效果。由于需要,需要掌握”如何将场景渲染到一个贴图上来,然后供后续使用“这样的技术。为此,特意上网搜索了一番。在OpenGL中,可以通过使用一个名为Frame Buffer Object的对象来完成这样的任务。下面我们就一步一步的解决所有的问题,并且最终实现这个效果。
Frame Buffer Object是什么?
第一步,我们需要弄明白这个Frame Buffer Object是个什么东西。如果不明白它是什么,就盲目的摘抄网上给出的代码,总觉得很别扭,心里不舒服。为此,特意去Wiki了解了一下Frame Buffer Object的概念。
在3D图形学中,不管我们在前期进行如何的处理,最终实际上都是要显示在屏幕上的。而在屏幕上显示的东西是一个一个的像素,也就是说必然存在一块内存,这块内存容纳了所有的屏幕上的像素点。在OpenGL中,默认情况下它最终输出到的地方是一个由Windows自行创建管理的一块内存,我们称之为帧缓存(Frame Buffer)。而对于我们现在的要求,我们并不需要将最终处理完毕的数据输出到这个帧缓存中去,而是需要输入到一块由我们自己指定的缓存中去。这就是FBO需要使用的地方。
当然,FBO的结构十分的复杂,它是各种缓存如Color Buffer, Depth Buffer, Stencil Buffer等等的集合。当我们不想要向系统默认的缓存中输出这些值的时候,我们就可以通过指定我们自己创建FBO,然后输出数据到指定的地方。
同时需要注意的一点就是,FBO是各个缓存的集合,但并不是说我们指定了一个FBO,系统就会将各个Buffer的值输出到这个FBO中去。由于类似的的buffer有很多,但是在实际使用的过程中往往不需要全部都使用到,也就是说我们可以有选择的指定哪些buffer是我们想要的,然后通过FBO将这些buffer输出到指定的地方。所以FBO更像是一个过滤器,它会将用户指定的缓存发送到用户指定的地方去,如Texture或者Render Buffer。
而指定到底要输出那些缓存以及要输出到什么地方的操作被称为Attachment(附加)。在FBO中存在这很多的附加点,我们只要将我们创建的用于容纳缓存的对象附加到FBO的指定附加点,那么就能够从那里接受到对应的缓存数据。
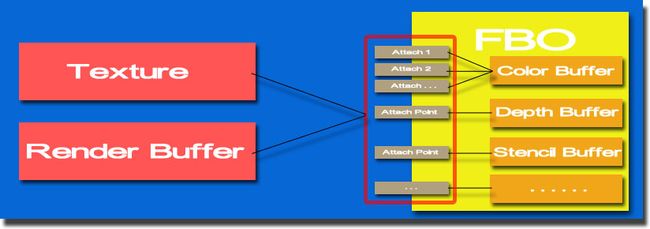
为了更加形象的讲解这个附加的概念,给出下面的图,供大家理解:
上图说明了一个FBO提供了多个Attach Point给外面的Texture和Render Buffer进行连接,并且FBO的Color Buffer可以有多个输出附加点以保存多个Color Buffer。上图简要的讲述了FBO的结构,可能并不是符合实际,但已经足够说明他们之间的关系。
在OpenGL中使用Frame Buffer Object
在明白了Frame Buffer Object的结构和相关概念之后,那么我们如何使用Frame Buffer Object了?在OpenGL中,提供了相关的函数来进行。下面我们来一一的进行介绍,并且给出实例说明。
当我们想要创建一个Frame Buffer Object的时候,我们需要和创建其他的OpenGL Object一样,需要先申请一个Object ID。可以通过调用glGenFramebuffers函数来申请一个或者多个Frame Buffer Object的ID,保存起来,如:
glGenFramebuffers(1, &g_FBO)
我们申请ID之后,需要实际的为这个FBO分配内存,初始化相关的数据,而这个操作是通过glBindFramebuffer来进行的。如可以通过如下代码初始化:
glBindFramebuffer(GL_FRAMEBUFFER, g_FBO)
这里需要说明的第一个参数有多种选择,分别是GL_DRAW_FRAMEBUFFER, GL_READ_FRAMEBUFFER和GL_FRAMEBUFFER。他们分别代表不同的意义。具体的使用可以查看相关的书籍和资料来了解。当我们第一次调用glBindFramebuffer的时候才会进行内存的分配和初始化操作,后面的调用就不会在进行内存分配的工作了。
接下来,我们需要创建一个Texture或者Render Buffer。创建方法与Frame Buffer Object一致。这里不再赘述。
当我们创建好了Texture之后,我们就可以通过调用glFramebufferTexture2D函数,来为FBO中的某个附加点绑定一个纹理,如下代码所示:
glFramebufferTexture2D(GL_FRAMEBUFFER, GL_COLOR_ATTACHMENT0, GL_TEXTURE_2D, g_FBOTex, 0);
好了,上面就是基本的关于Frame Buffer Object的使用。下面给出最终的实际例子,讲述了整个Render To Texture(RTT)的流程和相关的操作。
OpenGL + CG 实现 Render To Texture(RTT)
我的实现是基于OpenGL和CG语言进行的。实现很简单,旨在向大家讲解RTT的流程,更多其他的注意点会在今后分享给大家!
FileName:main.cpp#ifndef GLUT_DISABLE_ATEXIT_HACK
#define GLUT_DISABLE_ATEXIT_HACK
#endif
#include
#include
#include "math.h"
#include "../../glew/include/GL/glew.h"
#include
#include
#include
#pragma comment(lib,"glew32.lib")
static CGcontext g_Context;
static CGprofile g_VertexProfile;
static CGprofile g_FragmentProfile;
static CGprogram g_2DVsProgram;
static CGprogram g_BasicPsProgram;
static CGprogram g_PostEffectPsProgram;
static CGparameter g_FBOTexParam;
static GLuint g_FBO;
static GLuint g_FBOTex;
void checkError(const char* situation)
{
CGerror error;
const char* str = cgGetLastErrorString(&error);
if(error != CG_NO_ERROR)
{
printf("%s\r\n", str);
if(error == CG_COMPILER_ERROR)
{
printf("%s:%s\r\n", situation, cgGetLastListing(g_Context));
}
_asm
{
int 3
}
}
}
void display();
void keyboard(unsigned char c, int x, int y);
void idle();
int main()
{
// GLUT init
glutInitWindowSize(400, 400);
glutInitDisplayMode(GLUT_RGBA | GLUT_DOUBLE | GLUT_DEPTH);
glutCreateWindow("RenderToTexture");
glutDisplayFunc(display);
glutKeyboardFunc(keyboard);
glutIdleFunc(idle);
// GLEW init
glewInit();
// OpenGL init
glClearColor(0.0f, 0.0f, 0.0f, 0.0f);
glGenFramebuffers(1, &g_FBO);
glBindFramebuffer(GL_FRAMEBUFFER, g_FBO);
glGenTextures(1, &g_FBOTex); // Create a empty texture as the render target
glBindTexture(GL_TEXTURE_2D, g_FBOTex);
glTexImage2D(GL_TEXTURE_2D, 0, GL_RGBA8, 400, 400, 0, GL_RGBA, GL_UNSIGNED_BYTE, NULL);
// Attach the texture object to frame buffer object
glFramebufferTexture2D(GL_FRAMEBUFFER, GL_COLOR_ATTACHMENT0, GL_TEXTURE_2D, g_FBOTex, 0);
glBindFramebuffer(GL_FRAMEBUFFER, 0); // Unbind the frame buffer
// CG init
g_Context = cgCreateContext();
checkError("Create CG Context");
g_VertexProfile = cgGLGetLatestProfile(CG_GL_VERTEX);
checkError("Get Latest Vertex Profile");
g_FragmentProfile = cgGLGetLatestProfile(CG_GL_FRAGMENT);
checkError("Get Latest Fragment Profile");
g_2DVsProgram = cgCreateProgramFromFile(g_Context, CG_SOURCE, "2D.vs", g_VertexProfile, "mainVS", NULL);
checkError("Create Vertex Program");
cgGLLoadProgram(g_2DVsProgram);
g_BasicPsProgram = cgCreateProgramFromFile(g_Context, CG_SOURCE, "Basic.ps", g_FragmentProfile, "mainPS", NULL);
checkError("Create Baisc Fragment Program");
cgGLLoadProgram(g_BasicPsProgram);
g_PostEffectPsProgram = cgCreateProgramFromFile(g_Context, CG_SOURCE, "PostEffect.ps", g_FragmentProfile, "mainPS", NULL);
checkError("Create PostEffect Fragment Program");
cgGLLoadProgram(g_PostEffectPsProgram);
g_FBOTexParam = cgGetNamedParameter(g_PostEffectPsProgram, "uTex");
// The loop of the openGL context
glutMainLoop();
return 0;
}
void RenderSceneToTexture()
{
glBindFramebuffer(GL_FRAMEBUFFER, g_FBO); // Bind the frame buffer to render the scene to the texture
glClear(GL_COLOR_BUFFER_BIT | GL_DEPTH_BUFFER_BIT);
cgGLBindProgram(g_2DVsProgram);
cgGLBindProgram(g_BasicPsProgram);
cgGLEnableProfile(g_VertexProfile);
cgGLEnableProfile(g_FragmentProfile);
glBegin(GL_TRIANGLES);
glVertex2f(-1.0f, 1.0f);
glVertex2f(1.0f, 1.0f);
glVertex2f(0.0f, -1.0f);
glEnd();
cgGLDisableProfile(g_VertexProfile);
cgGLDisableProfile(g_FragmentProfile);
}
void RenderTexture()
{
glBindFramebuffer(GL_FRAMEBUFFER, 0); // Unbind the frame buffer to get the texture
glEnable(GL_TEXTURE_2D);
glGenerateMipmap(GL_TEXTURE_2D);
glClear(GL_COLOR_BUFFER_BIT | GL_DEPTH_BUFFER_BIT);
cgGLBindProgram(g_2DVsProgram);
cgGLBindProgram(g_PostEffectPsProgram);
cgGLEnableProfile(g_VertexProfile);
cgGLEnableProfile(g_FragmentProfile);
glBegin(GL_QUADS); // Render the texture as the quad
glTexCoord2f(0.0f, 1.0f); glVertex2f(-1.0f, 1.0f);
glTexCoord2f(1.0f, 1.0f); glVertex2f(1.0f, 1.0f);
glTexCoord2f(1.0f, 0.0f); glVertex2f(1.0f, -1.0f);
glTexCoord2f(0.0f, 0.0f); glVertex2f(-1.0f, -1.0f);
glEnd();
cgGLDisableProfile(g_VertexProfile);
cgGLDisableProfile(g_FragmentProfile);
}
void display()
{
RenderSceneToTexture();
RenderTexture();
glutSwapBuffers();
}
void keyboard(unsigned char c, int x, int y)
{
switch(c)
{
case 27:
cgDestroyProgram(g_2DVsProgram);
cgDestroyProgram(g_BasicPsProgram);
cgDestroyProgram(g_PostEffectPsProgram);
cgDestroyParameter(g_FBOTexParam);
cgDestroyContext(g_Context);
glDeleteFramebuffers(1, &g_FBO);
glDeleteTextures(1, &g_FBOTex);
exit(0);
}
}
void idle()
{
glutPostRedisplay();
} FileName:2D.vs // The vertex shader, just do a 2d transformstruct Output
{
float4 oPos:POSITION;
float2 oTexCoord:TEXCOORD0;
};
Output mainVS(float2 iPos:POSITION,
float2 iTexCoord:TEXCOORD0)
{
Output oupt;
oupt.oPos = float4(iPos, 0.0, 1.0);
oupt.oTexCoord = float2(iTexCoord);
return oupt;
}FileName:Basic.ps // The Fragment Shader, just set the color to greenstruct Output
{
float4 oColor:COLOR;
};
Output mainPS()
{
Output oupt;
oupt.oColor = float4(0.0, 1.0, 0.0, 1.0);
return oupt;
}FileName:PostEffect.ps // The Fragment Shader, deal with the texture and inverse the texturestruct Output
{
float4 oColor:COLOR;
};
Output mainPS(float2 iTexCoord:TEXCOORD0,
uniform sampler2D uTex)
{
Output oupt;
iTexCoord.y = 1.0 - iTexCoord.y;
oupt.oColor = tex2D(uTex, iTexCoord);
return oupt;
}Render To Texture流程分析
在上面的代码已经讲解了如何进行RTT。现在来简要的说明下如何进行。
第一步,我们要创建一个Frame Buffer Object
第二步,创建一个Texture Object
第三步,将Texture Object附加到Frame Buffer Object的Color Buffer附加点上
第四步,绑定激活Frame Buffer Object作为输出目的地,正常绘制你要绘制的场景
第五步,解除绑定Frame Buffer Object,绑定默认系统帧缓存,即Frame Buffer Object的ID为0的buffer,让系统buffer作为输出目的地
第六步,绑定激活上面保存了场景渲染图的纹理,传递到Shader中去
第七步,绘制一个和屏幕一样大小的四边形,并且在Shader中处理该纹理,然后输出到系统buffer中,从而显示出来。
有了这些步骤,然后在对照这代码了解这个过程,是不是就发现RTT十分的简单!
好了,今天就讲解到这里,接下来会陆陆续续讲解一些使用OpenGL+CG的内容,敬请期待!
