sharding-jdbc读写分离(一)--Spring Boot集成实现
前言
本文主要分享spring boot工程使用mybatis和sharding-jdbc实现mysql数据库的读写分离。
本文demo工程已上传github:https://github.com/hubSKH/sharding-jdbc-demo
关于mysql数据库主从复制设置,可以参考我另外一篇文章:https://blog.csdn.net/u012786993/article/details/89201161
sharding-jdbc更多介绍与用法,可以上官网查阅相关文档:http://shardingsphere.apache.org/index_zh.html
工程版本
| 框架 | 版本 |
|---|---|
| spring boot | 2.0.3.RELEASE(或者1.5.18.RELEASE) |
| mybatis | 1.3.2 |
| sharding-jdbc | 3.0.0.M3 |
这里,使用的sharding-jdbc是3.X版本,pom配置:
	3.0.0.M3


	    io.shardingsphere
	    sharding-jdbc-spring-boot-starter
	    ${sharding-sphere.version}


	    io.shardingsphere
	    sharding-jdbc-spring-namespace
	    ${sharding-sphere.version}
mybatis使用1.3.2版本,pom:
            org.mybatis.spring.boot
            mybatis-spring-boot-starter
            1.3.2
spring boot的版本最好是1.5.x或以上,本次以1.5.18.RELEASE为例,pom:
        org.springframework.boot
        spring-boot-starter-parent
        1.5.18.RELEASE
本文使用的是spring boot集成sharding-jdbc,官网的数据源配置是写在propertis文件中,而本文配置写在yml文件中也是同样效果,yml如下:
server:
  port: 9090

spring:
  application:
    name: sharding_jdbc

#sharding-jdbc的配置
sharding.jdbc:
  datasource:
    names: ds_master,ds_slave_0,ds_slave_1
    ds_master:
      type: com.alibaba.druid.pool.DruidDataSource
      driver-class-name: com.mysql.jdbc.Driver
      url: jdbc:mysql://localhost:3306/db1
      username: root
      password: root
    ds_slave_0:
      type: com.alibaba.druid.pool.DruidDataSource
      driver-class-name: com.mysql.jdbc.Driver
      url: jdbc:mysql://localhost:3306/db0
      username: root
      password: root
    ds_slave_1:
      type: com.alibaba.druid.pool.DruidDataSource
      driver-class-name: com.mysql.jdbc.Driver
      url: jdbc:mysql://localhost:3306/db2
      username: root
      password: root
  config:
    masterslave:
      name: ds_ms
      master-data-source-name: ds_master
      slave-data-source-names: ds_slave_0,ds_slave_1
      load-balance-algorithm-type: round_robin
  props:
    sql.show: true
#mybatis的配置
mybatis:
  config-location: classpath:mybatis/config.xml
  mapper-locations:
  - classpath:mybatis/mappers/*.xml
这里我配置的是一主两从,目的是为了验证数据库查询的负载均衡算法round_robin,即轮询。
mybatis的config.xml配置。注意:这里注意用了配置文件,就不能再application里面配置configlcation属性。
然后配置spring boot启动类
@SpringBootApplication
@MapperScan(basePackages = "com.skh.dao")
public class Application  extends WebMvcConfigurerAdapter {

    public static void main(String[] args) throws Exception {
        SpringApplication.run(Application.class, args);
    }

}
数据库表对象映射类(po)
@Data
public class User implements Serializable {
    private  Integer id;

    private  String name;

    private  Integer age;
}
dao层接口类
@Mapper
public interface UserMapper {
    int insert(User record);

    User selectByPrimaryKey(int id);
}
对应UserMapper.xml配置,xml文件可通过mybatis generator工具生成。
id, name, age
delete from user
where id = #{id,jdbcType=INTEGER}
insert into user (id, name, age)
values (#{id,jdbcType=INTEGER}, #{name,jdbcType=INTEGER}, #{age,jdbcType=INTEGER}
)
insert into user
id,
name,
age,
#{id,jdbcType=INTEGER},
#{name,jdbcType=INTEGER},
#{age,jdbcType=INTEGER},
update user
name = #{name,jdbcType=INTEGER},
age = #{age,jdbcType=INTEGER},
where id = #{id,jdbcType=INTEGER}
update user
set name = #{name,jdbcType=INTEGER},
age = #{age,jdbcType=INTEGER},
where id = #{id,jdbcType=INTEGER}
接下来是service层接口类
public interface UserService {

    User getUser(int id);

    Integer saveUser(User user);
}
service的实现类
@Service
public class UserServiceImpl implements UserService {
    /**
     * 注入数据接口
     */
    @Autowired
    private UserMapper vtsUserMapper;


    @Override
    public User getUser(int id) {
        User user = vtsUserMapper.selectByPrimaryKey(id);
        System.out.println(user);
        return user;
    }

    @Override
    public Integer saveUser(User user) {
        vtsUserMapper.insert(user);
        return user.getId ();
    }

}
最后是controller类
@RestController
@RequestMapping("user")
public class UserController {

    @Resource
    private UserService userService;

    @RequestMapping("select")
    public User getuser(@RequestParam("id")int id){

        return userService.getUser (id);

    }
}
运行application的main方法启动工程后,即可通过接口测试工具,验证读写分离配置。
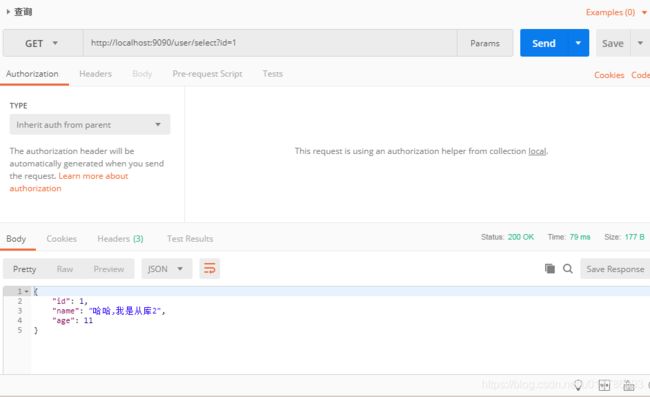
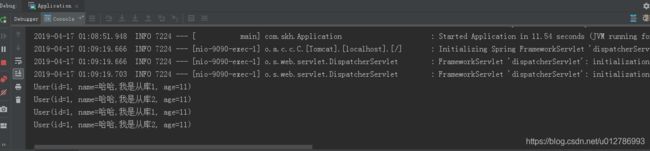
为了更好体现出数据的读写分离,从库中的数据改变数据值以做区分。从下图多次调用可以看出,配置的读写分离已生效,读取操作不会使用主数据库数据源,而且数据读取也按照轮询的从库访问策略使用从库数据源。
参考文献
1、https://blog.csdn.net/zhuwei_clark/article/details/82898497