阿里云PAI在线模型部署与调用
最近在做毕业设计,需要用到阿里云PAI上训练好的模型,并在java工程中调用解析。
本文就以官方文档给出的例子,来具体实践。
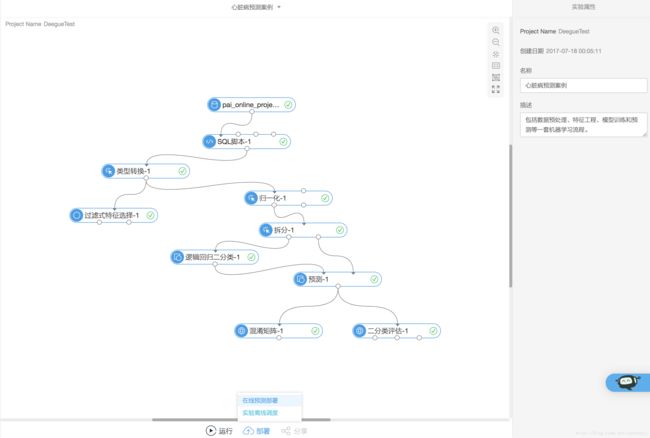
首先将跑通的模型在线部署:
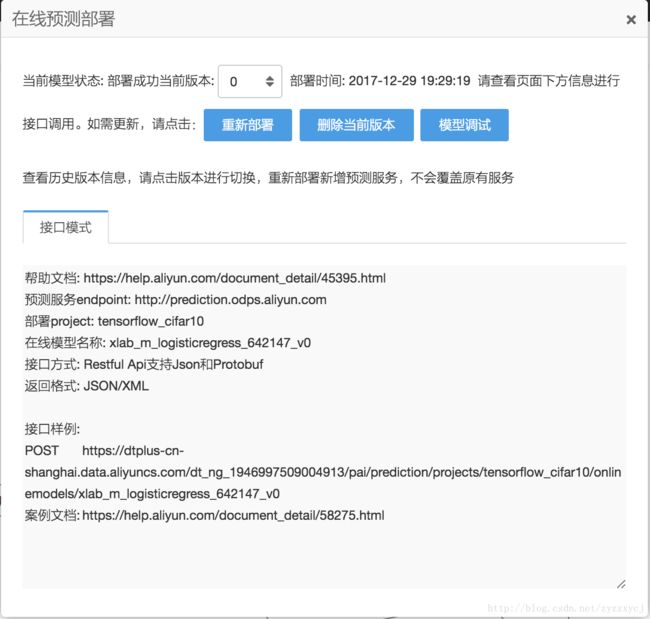
部署成功后,会在左侧“模型-已部署的在线模型”中找到对应的模型:
(注意:在线的模型调用测试 可以查看官方文档,已经写的非常详细了 https://help.aliyun.com/document_detail/45395.html)
接下来就是在java工程中的配置:
首先配置工具类 predictionUtil:
package main.utils;

import sun.misc.BASE64Encoder;

import javax.crypto.Mac;
import javax.crypto.spec.SecretKeySpec;
import java.security.MessageDigest;
import java.text.SimpleDateFormat;
import java.util.Date;
import java.util.Locale;

public class predictionUtil {

    /*
     * 计算MD5+BASE64
     */
    public static String MD5Base64(String s) {
        if (s == null)
            return null;
        String encodeStr = "";
        byte[] utfBytes = s.getBytes();
        MessageDigest mdTemp;
        try {
            mdTemp = MessageDigest.getInstance("MD5");
            mdTemp.update(utfBytes);
            byte[] md5Bytes = mdTemp.digest();
            BASE64Encoder b64Encoder = new BASE64Encoder();
            encodeStr = b64Encoder.encode(md5Bytes);
        } catch (Exception e) {
            throw new Error("Failed to generate MD5 : " + e.getMessage());
        }
        return encodeStr;
    }

    /*
     * 计算 HMAC-SHA1
     */
    public static String HMACSha1(String data, String key) {
        String result;
        try {
            SecretKeySpec signingKey = new SecretKeySpec(key.getBytes(), "HmacSHA1");
            Mac mac = Mac.getInstance("HmacSHA1");
            mac.init(signingKey);
            byte[] rawHmac = mac.doFinal(data.getBytes());
            result = (new BASE64Encoder()).encode(rawHmac);
        } catch (Exception e) {
            throw new Error("Failed to generate HMAC : " + e.getMessage());
        }
        return result;
    }

    /*
     * 等同于javaScript中的 new Date().toUTCString();
     */
    public static String toGMTString(Date date) {
        SimpleDateFormat df = new SimpleDateFormat("E, dd MMM yyyy HH:mm:ss z", Locale.UK);
        df.setTimeZone(new java.util.SimpleTimeZone(0, "GMT"));
        return df.format(date);
    }

}
然后配置predictionService:(本文只用到了post请求)
package main.services;

import java.io.BufferedReader;
import java.io.IOException;
import java.io.InputStreamReader;
import java.io.PrintWriter;
import java.net.HttpURLConnection;
import java.net.URL;
import java.net.URLConnection;
import java.util.Date;

import static main.utils.predictionUtil.*;

public class predictionService {

    /*
     * 发送POST请求
     */
    public static String sendPost(String url, String body, String ak_id, String ak_secret) throws Exception {
        PrintWriter out = null;
        BufferedReader in = null;
        String result = "";
        int statusCode = 200;
        try {
            URL realUrl = new URL(url);
            /*
             * http header 参数
             */
            String method = "POST";
            String accept = "application/json";
            String content_type = "application/json";
            String path = realUrl.getFile();
            String date = toGMTString(new Date());
            // 1.对body做MD5+BASE64加密
            String bodyMd5 = MD5Base64(body);
            String stringToSign = method + "\n" + accept + "\n" + bodyMd5 + "\n" + content_type + "\n" + date + "\n"
                    + path;
            // 2.计算 HMAC-SHA1
            String signature = HMACSha1(stringToSign, ak_secret);
            // 3.得到 authorization header
            String authHeader = "Dataplus " + ak_id + ":" + signature;
            // 打开和URL之间的连接
            URLConnection conn = realUrl.openConnection();
            // 设置通用的请求属性
            conn.setRequestProperty("accept", accept);
            conn.setRequestProperty("content-type", content_type);
            conn.setRequestProperty("date", date);
            conn.setRequestProperty("Authorization", authHeader);
            // 发送POST请求必须设置如下两行
            conn.setDoOutput(true);
            conn.setDoInput(true);
            // 获取URLConnection对象对应的输出流
            out = new PrintWriter(conn.getOutputStream());
            // 发送请求参数
            out.print(body);
            // flush输出流的缓冲
            out.flush();
            // 定义BufferedReader输入流来读取URL的响应
            statusCode = ((HttpURLConnection) conn).getResponseCode();
            if (statusCode != 200) {
                in = new BufferedReader(new InputStreamReader(((HttpURLConnection) conn).getErrorStream()));
            } else {
                in = new BufferedReader(new InputStreamReader(conn.getInputStream()));
            }
            String line;
            while ((line = in.readLine()) != null) {
                result += line;
            }
        } catch (Exception e) {
            e.printStackTrace();
        } finally {
            try {
                if (out != null) {
                    out.close();
                }
                if (in != null) {
                    in.close();
                }
            } catch (IOException ex) {
                ex.printStackTrace();
            }
        }
        if (statusCode != 200) {
            throw new IOException("\nHttp StatusCode: " + statusCode + "\nErrorMessage: " + result);
        }
        return result;
    }

    /*
     * GET请求
     */
    public static String sendGet(String url, String ak_id, String ak_secret) throws Exception {
        String result = "";
        BufferedReader in = null;
        int statusCode = 200;
        try {
            URL realUrl = new URL(url);
            /*
             * http header 参数
             */
            String method = "GET";
            String accept = "application/json";
            String content_type = "application/json";
            String path = realUrl.getFile();
            String date = toGMTString(new Date());
            // 1.对body做MD5+BASE64加密
            // String bodyMd5 = MD5Base64(body);
            String stringToSign = method + "\n" + accept + "\n" + "" + "\n" + content_type + "\n" + date + "\n" + path;
            // 2.计算 HMAC-SHA1
            String signature = HMACSha1(stringToSign, ak_secret);
            // 3.得到 authorization header
            String authHeader = "Dataplus " + ak_id + ":" + signature;
            // 打开和URL之间的连接
            URLConnection connection = realUrl.openConnection();
            // 设置通用的请求属性
            connection.setRequestProperty("accept", accept);
            connection.setRequestProperty("content-type", content_type);
            connection.setRequestProperty("date", date);
            connection.setRequestProperty("Authorization", authHeader);
            connection.setRequestProperty("Connection", "keep-alive");
            // 建立实际的连接
            connection.connect();
            // 定义 BufferedReader输入流来读取URL的响应
            statusCode = ((HttpURLConnection) connection).getResponseCode();
            if (statusCode != 200) {
                in = new BufferedReader(new InputStreamReader(((HttpURLConnection) connection).getErrorStream()));
            } else {
                in = new BufferedReader(new InputStreamReader(connection.getInputStream()));
            }
            String line;
            while ((line = in.readLine()) != null) {
                result += line;
            }
        } catch (Exception e) {
            e.printStackTrace();
        } finally {
            try {
                if (in != null) {
                    in.close();
                }
            } catch (Exception e) {
                e.printStackTrace();
            }
        }
        if (statusCode != 200) {
            throw new IOException("\nHttp StatusCode: " + statusCode + "\nErrorMessage: " + result);
        }
        return result;
    }
}
最后是配置调用层predictionController :
注意!!先去阿里云控制台首页获取你的access_id & access_secret,并在以下代码中替换!
url则是模型查看页面中的Post接口样例,body则是需要发送的json请求。以下代码中是我的地址,请自行修改,不然是没有权限访问的。
package main.controllers;

import static main.services.predictionService.sendPost;

public class predictionController {

    public static void main(String[] args) throws Exception {
        // 发送POST请求
        String ak_id = "你的access_id";
        String ak_secret = "你的access_secret";
        String url = "https://dtplus-cn-shanghai.data.aliyuncs.com/dt_ng_1946997509004913/pai/prediction/projects/tensorflow_cifar10/onlinemodels/xlab_m_logisticregress_642147_v1";
        String body = "{\n" +
                "    \"inputs\": [\n" +
                "        {\n" +
                "            \"sex\": {\n" +
                "                \"dataType\": 40,\n" +
                "                \"dataValue\": 1\n" +
                "            },\n" +
                "            \"cp\": {\n" +
                "                \"dataType\": 40,\n" +
                "                \"dataValue\": 1\n" +
                "            },\n" +
                "            \"fbs\": {\n" +
                "                \"dataType\": 40,\n" +
                "                \"dataValue\": 1\n" +
                "            },\n" +
                "            \"restecg\": {\n" +
                "                \"dataType\": 40,\n" +
                "                \"dataValue\": 1\n" +
                "            },\n" +
                "            \"exang\": {\n" +
                "                \"dataType\": 40,\n" +
                "                \"dataValue\": 1\n" +
                "            },\n" +
                "            \"slop\": {\n" +
                "                \"dataType\": 40,\n" +
                "                \"dataValue\": 1\n" +
                "            },\n" +
                "            \"thal\": {\n" +
                "                \"dataType\": 40,\n" +
                "                \"dataValue\": 1\n" +
                "            },\n" +
                "            \"age\": {\n" +
                "                \"dataType\": 40,\n" +
                "                \"dataValue\": 1\n" +
                "            },\n" +
                "            \"trestbps\": {\n" +
                "                \"dataType\": 40,\n" +
                "                \"dataValue\": 1\n" +
                "            },\n" +
                "            \"chol\": {\n" +
                "                \"dataType\": 40,\n" +
                "                \"dataValue\": 1\n" +
                "            },\n" +
                "            \"thalach\": {\n" +
                "                \"dataType\": 40,\n" +
                "                \"dataValue\": 1\n" +
                "            }\n" +
                "        }\n" +
                "    ]\n" +
                "}";

        //发送post请求
        System.out.println("response body:" + sendPost(url, body, ak_id, ak_secret));

    }
}
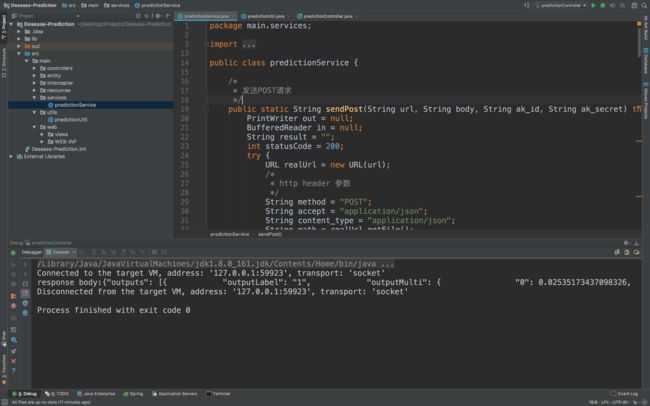
运行得到结果:
response body:{"outputs": [{ "outputLabel": "1", "outputMulti": { "0": 0.02535173437098326, "1": 0.9746482656290167}, "outputValue": { "dataType": 40, "dataValue": 0.9746482656290167}}]}

