QT远程调试的部署及问题的解决
之前QT程序的调试都是通过TFTP传输的模式来进行,很不方便,并且无法做到单步调试, 之后搭建了NFS共享文件夹,略微简化,但是还是无法做到细致的调试,因此搭建QT远程调试是非常好的选择,网上很多教程都比较老旧,因此有了此文。
平台:
主机:ubuntu 14.04 LTS
开发板:树梅派3 b
Qtcreator:3.0.1
QT :4.8.7
GDB: gdb 7.7.1
在开始之前,我们需要建立nfs共享文件夹,保证开发板和PC在一个网段内。
一、编译安装GDB
sudo apt-get install texinfo libncurses5-dev m4 flex bison
1、下载gdb7.7.1 链接:https://mirrors.tuna.tsinghua.edu.cn/gnu/gdb/
tar -zxvf gdb-7.4.tar.gz
2、编译arm-linux-gdb
进入解压后的gdb-7.7.1下
cd gdb-7.7.1
$./configure --target=arm-linux --prefix=/usr/local/arm-gdb7.7.1 --with-python (Qtcreator3.1版本开始,需要python模块支持)
make -j4make install
安装目录为 /usr/local/arm-gdb7.7.1
3、编译gdbserver (开发板运行的东西,开发板和PC通过gdbserver和gdb对接起来)
进入解压出来的gdb-7.7.1目录,
cd gdb/gdbserver
sudo mkdir obj(建个文件夹,起来方便些,个人习惯)
cd obj
../configure --target=arm-linux --host=arm-linux
make -j4
make成功,生成gdbserver
4、将gdbserver 放到开发板上,并且随便写个简单的测试代码mygdbtest,也放到开发板上去。
mygdbtest.c
#include
main()
{
printf("West Wind Electronics/n");
}
在开发板上运行 ./gdbserver 192.168.1.114:1234 mygdbtest
bash: ./gdbserver: cannot execute binary file:Exec format error ,
报错格式不对, 运行./gdbtest 无误,gdbserver格式不对,回到主机运行gdbserver发现能够运行,因此需要重新编译arm版本的gdbserver.
先执行sudo make distclean 清除。 执行./configure -h仔细查看参数设置, 查看README:
Configuring GDBserver you should specify the same machine for host and target (which are the machine that GDBserver is going to run on. This is not the same as the machine that GDB is going to run on; building GDBserver automatically as part of building a whole tree of tools does not currently work if cross-compilation is involved (we don't get the right CC in the Makefile, to start with)).
这边说需要修改Makefile文件当中的CC,将其改为自己的交叉编译工具。
If you prefer to cross-compile to your target, then you can also build
GDBserver that way. In a Bourne shell, for example:
% export CC=your-cross-compiler
% path-to-gdbserver-sources/configure your-target-name
% make
依照上面所说,在执行:
export CC=arm-linux-gnueabihf-gcc (自己的交叉编译器,我的是这个)
然后在gdb-7.7.1/gdb/gdbserver/下面建立一个自己的文件夹(看起来方便些,个人习惯)
sudo mkdir obj
cd obj
../configure --target=arm-linux --host=arm-linux
make -j4
make成功,生成gdbserver
我们运行一下测试是否是arm格式:
xufeng@xufeng-Rev-1-0:~/下载/fuck/gdb-7.7.1/gdb/gdbserver/obj$ ./gdbserver
bash: ./gdbserver: cannot execute binary file: 可执行文件格式错误
终于编译成功了,将gdbserver再次放到开发板。
运行如下
./gdbserver 192.168.1.114:1234 mygdbtest
Process gdbtest created; pid = 1914
Listening on port 1234
正确了
5、上一步的gdbserver成功后,接下来测试主机的gdb,进入GDB安装目录的bin文件夹,主机运行:
#./arm-linux-gdb mygdbtest
(gdb)target remote 192.168.1.116:1234 ----》连接板子刚才开设的端口
出现Remote ‘g’ packet reply is too long 的错误
百度了下好多人出现这个情况,需要更改源码里面的remote。c文件的process_g_packet (struct regcache *regcache)函数:
// if (buf_len > 2 * rsa->sizeof_g_packet)
// error (_("Remote 'g' packet reply is too long: %s"), rs->buf);
这两行注释掉,改为:
if(buf_len > 2 * rsa->sizeof_g_packet) {
rsa->sizeof_g_packet = buf_len;
for (i = 0; i < gdbarch_num_regs (gdbarch); i++)
{
if (rsa->regs[i].pnum == -1)
continue;
if (rsa->regs[i].offset >= rsa->sizeof_g_packet)
rsa->regs[i].in_g_packet = 0;
else
rsa->regs[i].in_g_packet = 1;
}
}
保存之后,重新编译即可解决Remote ‘g’ packet reply is too long的错误。
继续 ,主机运行
#./arm-linux-gdb mygdbtest
(gdb)target remote 192.168.1.116:1234 ----》连接板子刚才开设的端口
连接成功。(显示的XML等warning可暂时不用理会)
至此,GDB调试通了,接下来部署QTcreator上的远程调试了。
二、 QTcreator 远程调试部署:
打开QTcreator,新建一个项目
Name:demo1
Creat in:/home/xifeng/nfsboot (自己之前搭建好的nfs共享文件夹,我的开发板的对应挂载位置是/mnt/mynfs)
kits : QtEmbedded-arm (选择arm版本的套件,需要在开发板上运行的)
Qt-pc (这个套件也可以选上,主要测试运行下程序无误)
然后:
在project里面选择Qt-pc,主机运行demo1,出来QT界面,运行无误,代码没问题。
1、在project里面切换到QtEmbedded-arm套件,点击构建,生成程序demo1。
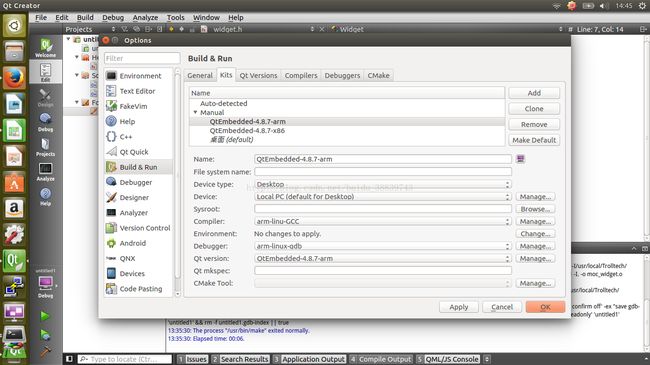
2、设置tools-->Options-->Build&Run-->Debuggers ,点击右边的add新建一个debugger,取名arm-linux-gdb ,在path里面选择自己编译出来的gdb(我的是/usr/local/arm-gdb_7.7/bin/arm-linux-gdb)
3、再点击kits设置arm套件使用的debugger,将默认使用的系统自带的debugger改为刚才添加的arm-linux-gdb,如下图。
4、在开发板上执行 ./gdbserver 192.168.1.114:2223 /mnt/mymnt/build-demo1-QtEmbedded-arm-Debug/demo1
出现Listeing on port 2223 就说明执行无误了,接下来要在pc端接受这个debugging
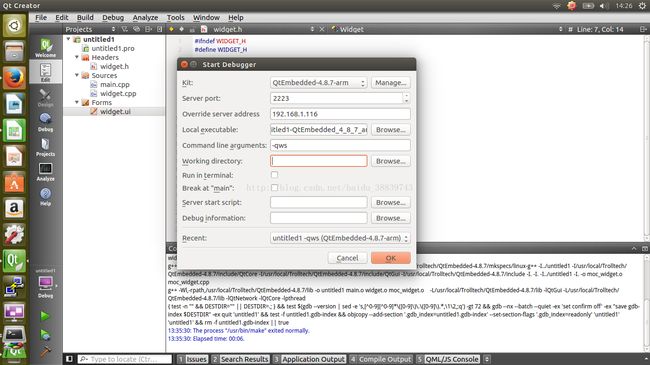
5、执行 debug-->start debugging->attach to running debugger server``` 如下图:
kit: arm版本QT套件
Server port :2223 (上一步显示的2223port)
address :192。168.1.116 (开发板的IP,可以在开发板上运行ifconfig查看IP)
Local executable: 选择在nfs共享文件夹里生成的程序,我的在 /home/xifeng/nfsboot/build-demo1-QtEmbedded-arm-Debug/demo1
arguments : -qws
点击OK
6、不出意外的话,联调就成功了。
(1)如果显示:Remote ‘g’ packet reply is too long:000000000000000000xfss00000000000000000000asf
0000000000000000sadfef 00000000000000000000000000```
可能是debugger 没有选择arm-linux-gdb,需要按以上操作设置
(2)如果显示: The selected build of GDB dose not support Python scripting. It cannot be used in QT Creator.
应该是GDB没有编译进python的原因,因为QT creator3.1版本开始,调试必须有Python功能,
需要重新编译GDB 并且在./configure 后面加上--with-python 。

