gdb和qtcreator远程调试(远程调试电脑和嵌入式linux)
最近在嵌入式平台里面跑程序,出现段错误,由于用的是release版,没有相关调试信息,因此,学会用debug版本进行远程调试调试就是当前需要学习的.
1.实验1 两台linux系统远程调试
首先有台台式机名字为pc,笔记本名字为notebook.
将pc作为服务器
1.1gdb安装和gdbserver安装
由于两台电脑都安装的ubantu14,因此自带了gdb
1.2新建测试工程
新建remotedebug工程,工程目的是在调试的时候设置断点查看下变量k.
main.cpp
#include CMakeLists.txt加上debug选项add_compile_options(-g)
project(remotedebug)
cmake_minimum_required(VERSION 2.8)
add_compile_options(-g)
aux_source_directory(. SRC_LIST)
add_executable(${PROJECT_NAME} ${SRC_LIST})
1.3远程调试
1.3.1使用qtcreator进行远程调试
参考博客
https://blog.csdn.net/aristolto/article/details/52045217
注意,我在pc机上进行以下操作,远程控制notebook
(1)首先获取ip地址
ifconfig
pc机ip 为192.168.233.138 notebook ip 为192.168.233.115
(2)切换到编译好的程序文件目录,把编译好的程序romotedebug放到notebook的主文件夹/home/rootroot/下
scp remotedebug rootroot@192.168.233.115:/home/rootroot/(3)使用ssh登录到notebook
ssh rootroot@192.168.233.115发现能够成功.
(4)在notebook中启动gdb server
gdbserver 192.168.233.138:8888 /home/rootroot/remotedebug
192.168.233.138是pc的IP,8888是通信端口/home/rootroot/remotedebug是要调试的可执行程序.
提示没有安装gdbserver
notebook安装gdbserver
sudo apt-get install gdbserver4.在Qtcreator中进行设置
Debug—>Start Debugging—>Attach to Rmote Debug Server..

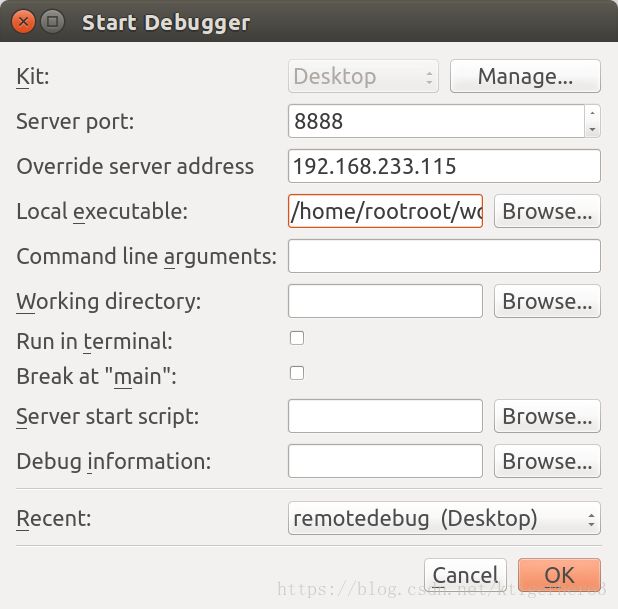
server port填入端口,override server address填入notebook ip地址,local executable填入本地的编译好的文件remotedebug
点击调试后就可以开始调试了
2.实验2 嵌入式系统OpenWRT远程调试
参考https://blog.csdn.net/srf1986/article/details/47428021
在嵌入式中开发过程中使用gdb远程调试一定要分清楚gdb的类型
gdb有三种:
(1) 安装到目标机上,在目标机上运行的gdb。(通过SSH在目标机上运行gdb调试)
(2)运行在开发机上,用于调试目标机上程序的。(通过SSH在目标机上运行gdbserver开启调试服务,在开发机上启动平台对应的gdb连接gdbserver进行调试)
(3)运行在开发机上,用于调试开发机程序的(ubantu14.04LTS自带的)。
我的ubantu14.04LTS自带的版本为gdb-7.7.1
而OpenWRT 中的版本为gdb-7.10.1,因此不能使用自带的版本来调试,版本不对应会出现Connecting to remote server failed: Remote ‘g’ packet reply is too long错误.
注意:本实验我的目标机为OpenWRT,开发机为pc
2.1开发机上gdb和gdbserver安装
2.1.1 下载gdb-7.10.1.tar.gz
wget http://ftp.gnu.org/gnu/gdb/gdb-7.10.1.tar.gz
2.1.2编译安装pc版本的gdb
(1) tar xvzf gdb-7.10.1.tar.gz
(2)./configure –target=arm-openwrt-linux –prefix==/home/rootroot/ProgramFiles/gdbOpenwrt
(其中编译、安装后的可执行文件放到/home/rootroot/ProgramFiles/gdbOpenwrt,这个目录可自定义)
(3)make
(4)make install
编译安装完后在/home/rootroot/ProgramFiles/gdbOpenwrt/bin/看到文件arm-openwrt-linux-gdb
2.1.3编译openwrt上运行的gdb和gdbserver
由于我没有编译通过openwrt上运行的gdb和gdbserver,用的是别人编译好的这个版本,所以以下步骤仅供参考
(1)还是进入解压完的gdb-7.10.1下的gdb/gdbserver/
(2)./configure –target=arm-openwrt-linux –prefix=/home/rootroot/ProgramFiles/gdbOpenwrtR16
(3)make CC=arm-openwrt-linux-gcc(其中arm-openwrt-linux-gcc为我的编译器)
(4)make install 安装到gdbOpenwrtR16中
(5)将 gdb和gdbserver拷贝到OpenWRT
2.2新建测试工程
测试工程threaddebugtest启动两个线程,World()线程当k==10时,给一个空地址赋值,出现个段错误.目标是远程调试时发现程序死的位置.
main.cpp
#include lock(mymutex);
}
cout<"hello"<1);
}
}
class World{
public:
World();
~World();
void RunSayWorld();
};
World::World(){
};
void World::RunSayWorld()
{
int k=0;
while(1)
{
{
unique_lock lock(mymutex);
}
cout<"k= "<" world"<if(k==10)
{
char *p;
p = NULL;
*p = 'x';
printf("%c", *p);
}
sleep(1);
}
}
int main()
{
Hello* hello=new Hello();
World* world=new World();
thread threadHello(&Hello::RunSayHello,hello);
thread threadWorld(&World::RunSayWorld,world);
threadHello.join();
threadWorld.join();
return 0;
} CMakeLists.txt 加上嵌入式编译器参数
project(threaddebugtest)
cmake_minimum_required(VERSION 2.8)
SET(CMAKE_C_COMPILER arm-openwrt-linux-gcc)
SET(CMAKE_CXX_COMPILER arm-openwrt-linux-g++)
add_compile_options(-Os -pipe -march=armv7-a -mtune=cortex-a7 -mfpu=neon -fno-caller-saves -fno-plt -mfloat-abi=hard
-Wformat -Werror=format-security -fstack-protector -D_FORTIFY_SOURCE=1 -Wl,-z,now -Wl,-z,relro -Wno-virtual-dtor -std=c++11
 -D__ANDROID__ -pthread -g)
aux_source_directory(. SRC_LIST)
add_executable(${PROJECT_NAME} ${SRC_LIST})
2.3嵌入式远程调试
2.3.1 gdb调试
(1)首先获取ip地址
ifconfig
pc机ip 为192.168.233.138 arm ip 为192.168.233.103
(2)编译工程,切换到编译好的程序文件目录,把编译好的程序threaddebugtest放到openwrt的文件夹/mnt/UDISK/下
scp threaddebugtest root@192.168.233.103:/mnt/UDISK/(3)使用ssh登录到openwrt
ssh rootroot@192.168.233.103发现能够成功.
(4)在openwrt中启动gdb server
gdbserver 192.168.233.138:8888 /mnt/UDISK/threaddebugtest192.168.233.138是pc的IP,8888是通信端口,/mnt/UDISK/threaddebugtest是要调试的可执行程序.
输出为
Process /mnt/UDISK/threaddebugtest created; pid = 708
Listening on port 8888
(5)在pc中启动gdb 远程调试程序
切换到pc机的threaddebugtest目录,
执行pc机上的arm-openwrt-linux-gdb
~/ProgramFiles/gdbOpenwrt/bin/arm-openwrt-linux-gdb threaddebugtest在gdb中输入
target remote 192.168.233.103:8888192.168.233.103为openwrt ip地址

在gdb中输入continue运行程序
如图可以看到k=9是出现错误信息

2.3.2使用Qtcreator调试
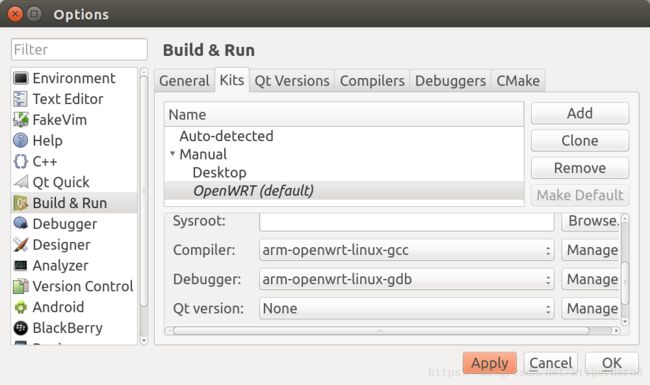
(1)首先要增加一个kits

如图,add 一个名字为OpenWRT的kit, 设置编译器为
arm-openwrt-linux-gcc
调试器为刚刚在电脑上编译的gdb
arm-openwrt-linux-gdb
注意下面的
Qt version一定要选NONE否则kit增加失败,前面会是红色警告
(2)进行远程调试
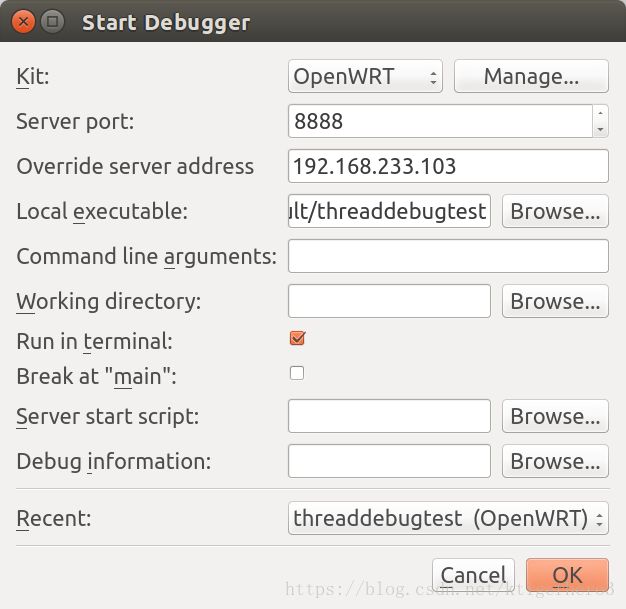
选择Debug—>Start Debugging—>Attach to Rmote Debug Server..
kit 选择OpenWRT ,server port填入端口,override server address填入openwrt ip地址,local executable填入本地的编译好的文件threaddebugtest
如图

