微信小程序开发手记之五:组件
icon
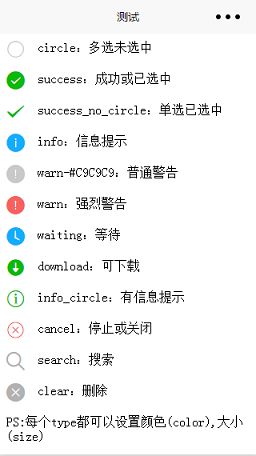
icon组件有3个属性,如下:
- type,可选值:success, success_no_circle, info, info_circle,warn, waiting, cancel, download, search, clear
- color,如#C9C9C9。
- size,默认为23px。
class="demo-view-4">
    class="view-1">
        class = "margin" type="circle" />
        class="margin">circle:多选未选中

    class="view-1">
        class = "margin" type="success" />
        class="margin">success:成功或已选中

    class="view-1">
        class = "margin" type="success_no_circle" />
        class="margin">success_no_circle:单选已选中

    class="view-1">
        class = "margin" type="info" />
        class="margin">info:信息提示

    class="view-1">
        class = "margin" type="warn" color="#C9C9C9" />
        class="margin">warn-#C9C9C9:普通警告

    class="view-1">
        class = "margin" type="warn" />
        class="margin">warn:强烈警告

    class="view-1">
        class = "margin" type="waiting" />
        class="margin">waiting:等待

    class="view-1">
        class = "margin" type="download" />
        class="margin">download:可下载

    class="view-1">
        class = "margin" type="info_circle" />
        class="margin">info_circle:有信息提示

    class="view-1">
        class = "margin" type="cancel" />
        class="margin">cancel:停止或关闭

    class="view-1">
        class = "margin" type="search" />
        class="margin">search:搜索


    class="view-1">
        class = "margin" type="clear" />
        class="margin">clear:删除


    class="view-1">
        class="margin">PS:每个type都可以设置颜色(color),大小(size)
.demo-view-4{
    display:flex;
    height: 100%;
    flex-direction: column;
}

.view-1{
    display:flex;
    height: 100%;
    flex-direction: row;
}

.margin{
    margin: 20rpx;
}
text
<text>My name is wisely。\n I am a Androider!text>progress
progress组件的属性如下:
| 属性名 | 类型 | 默认值 | 说明 |
|---|---|---|---|
| percent | Float | 无 | 百分比0~100 |
| show-info | Boolean | false | 在进度条右侧显示百分比 |
| stroke-width | Number | 6 | 进度条线的宽度,单位px |
| activeColor | Color | 已选择的进度条的颜色 | |
| backgroundColor | Color | 未选择的进度条的颜色 | |
| active | Boolean | false | 进度条从左往右的动画 |
<view class="demo-view-4">

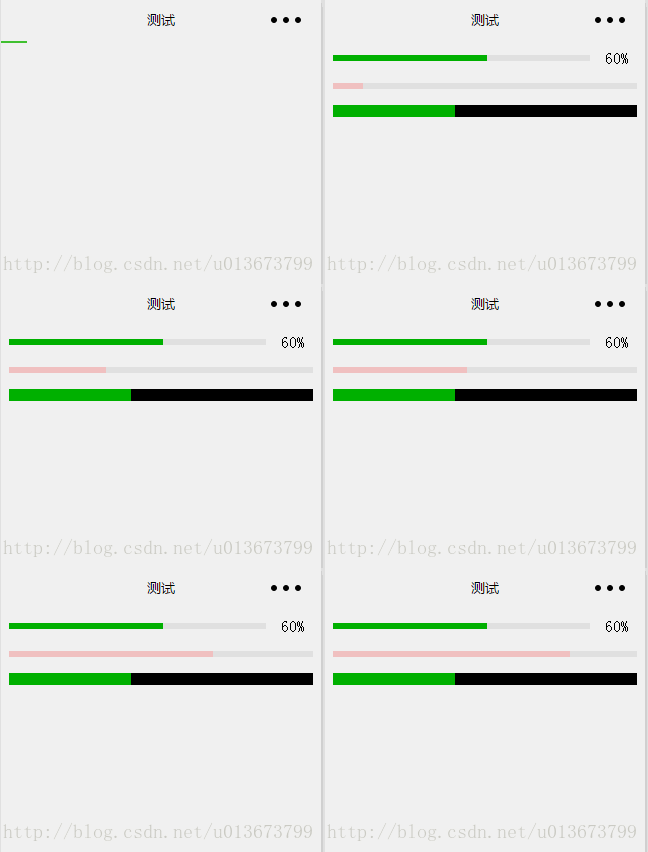
    <progress class = "margin" percent="60" show-info/>

    <progress class = "margin" percent = "80" active activeColor = "pink"/>

    <progress class = "margin" percent="40" stroke-width="12" backgroundColor = "black"/>
view>.demo-view-4{
display:flex;
height: 100%;
flex-direction: column;
}
.margin{
margin: 20rpx;
}button
button组件的属性如下
| 属性名 | 类型 | 默认值 | 说明 |
|---|---|---|---|
| size | String | default | 有效值 default, mini |
| type | String | default | 按钮的样式类型,有效值 primary, default, warn |
| plain | Boolean | false | 按钮是否镂空,背景色透明 |
| disabled | Boolean | false | 是否禁用 |
| loading | Boolean | false | 名称前是否带 loading 图标 |
| form-type | String | 无 | 有效值:submit, reset,用于 组件,点击分别会触发 submit/reset 事件 |
| open-type | String | 无 | 有效值:contact,打开客服会话 |
| hover-class | String | button-hover | 指定按钮按下去的样式类。当 |
| hover-start-time | Number | 20 | 按住后多久出现点击态,单位毫秒 |
| hover-stay-time | Number | 70 | 手指松开后点击态保留时间,单位毫秒 |
Page({
  data:{
    "defaultSize":"default",
    "primarySize":"default",
    "warnSize":"default",
    "plain":false,
    "loading":false,
    "disabled":false
  },
  setPlain:function(){
      this.setData({
        "plain":!this.data.plain
      })
  },
  setLoading:function(){
      this.setData({
        "loading":!this.data.loading
      })
  },
  setDisabled:function(){
      this.setData({
        "disabled":!this.data.disabled
      })
  }
})
再来看wxml
<view class="demo-view-4">
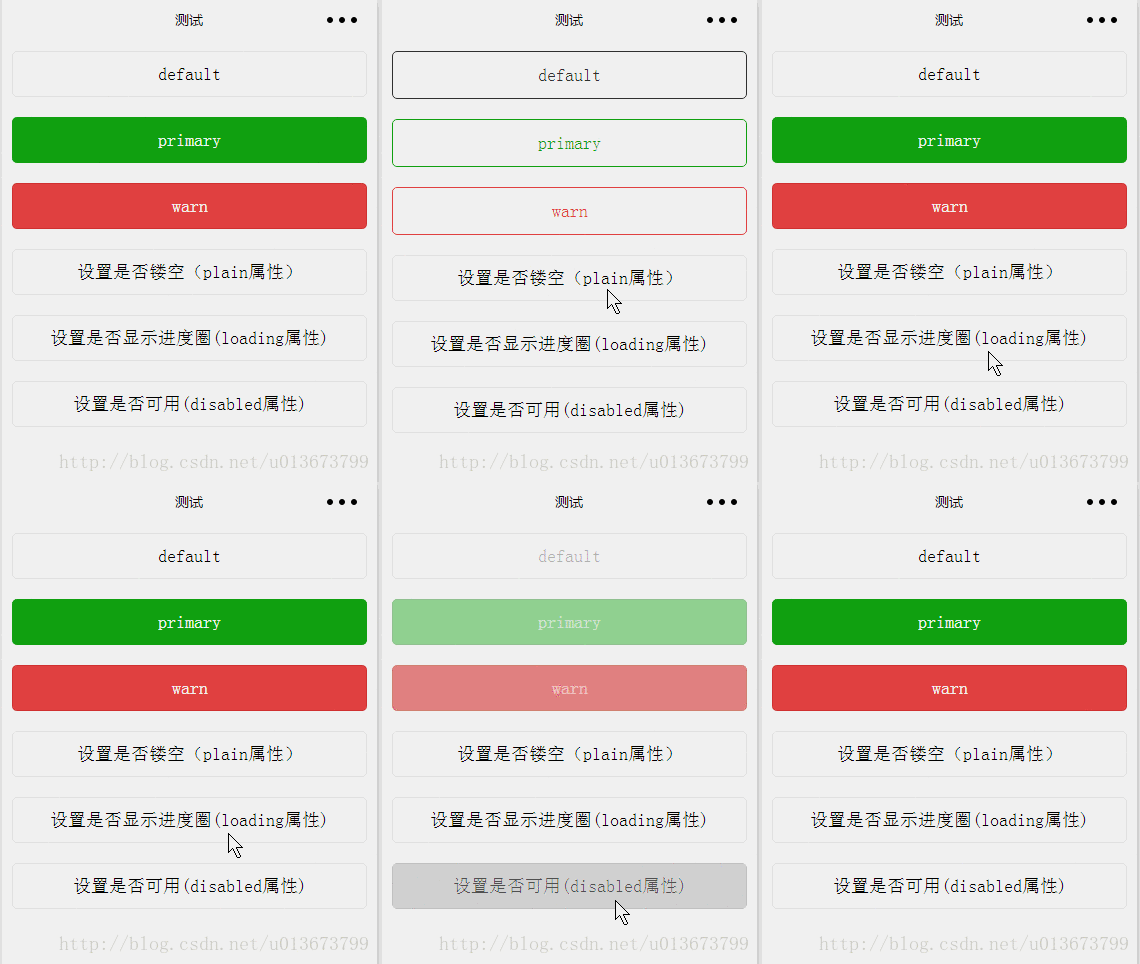
    <button class="margin" type="default" size="{{defaultSize}}" plain="{{plain}}" loading="{{loading}}" disabled="{{disabled}}">defaultbutton>

    <button class="margin" type="primary" size="{{primarySize}}"plain="{{plain}}" loading="{{loading}}" disabled="{{disabled}}">primarybutton>

    <button class="margin" type="warn" size="{{warnSize}}" plain="{{plain}}" loading="{{loading}}" disabled="{{disabled}}">warnbutton>

    <button class = "margin" bindtap="setPlain">设置是否镂空(plain属性)button>

    <button class="margin" bindtap="setLoading">设置是否显示进度圈(loading属性)button>

    <button class="margin" bindtap="setDisabled">设置是否可用(disabled属性)button>

view>.demo-view-4{
display:flex;
height: 100%;
flex-direction: column;
}
.margin{
margin: 20rpx;
}checkbox
checkbox是放在checkbox-group中使用的,checkbox-group内部可以有多个checkbox,它的属性如下
| 属性名 | 类型 | 默认值 | 说明 |
|---|---|---|---|
| bindchange | EventHandle | 中选中项发生改变是触发 change 事件,detail = {value:[选中的checkbox的value的数组]} |
checkbox的属性如下
| 属性名 | 类型 | 默认值 | 说明 |
|---|---|---|---|
| value | String | 标识,选中时触发的 change 事件,并携带 的 value | |
| disabled | Boolean | false | 是否禁用 |
| checked | Boolean | false | 当前是否选中,可用来设置默认选中 |
| color | Color | checkbox的颜色,同css的color,比如:color=”#FF0000”,可以将框内的对勾颜色设置为红色 |
Page({
  data:{

    items:[
      {"name":"china","value":"中国","checked":true},
      {"name":"US","value":"英国","checked":false},
      {"name":"USA","value":"美国","checked":false}
    ]
  },
  checkboxChanage:function(e){
      console.log(e.detail.value)
  }
})<checkbox-group class="demo-view-4" bindchange="checkboxChanage">
<label wx:for="{{items}}">
<checkbox class = "margin" value="{{item.name}}" checked="{{item.checked}}" >{{item.value}}checkbox>
label>
checkbox-group>.demo-view-4{
display:flex;
height: 100%;
flex-direction: column;
}
.margin{
margin: 20rpx;
}需要注意的地方
如果直接在wxml中为checkbox设置checked属性,那么无论设置true还是false,都会显示选中,这点与下面的radio有些类似,应该都是一个bug。
input
input属性如下:
| 属性名 | 类型 | 默认值 | 说明 |
|---|---|---|---|
| value | String | 输入框的初始内容 | |
| type | String | “text” | input 的类型,有效值:”text”, “number”, “idcard”, “digit” |
| password | Boolean | false 是否是密码类型 | |
| placeholder | String | 输入框为空时占位符 | |
| placeholder-style | String | 指定 placeholder 的样式 | |
| placeholder-class | String | “input-placeholder” 指定 placeholder 的样式类 | |
| disabled | Boolean | false | 是否禁用 |
| maxlength | Number | 140 | 最大输入长度,设置为 -1 的时候不限制最大长度 |
| cursor-spacing | Number | 0 | 指定光标与键盘的距离,单位 px 。取 input 距离底部的距离和 cursor-spacing 指定的距离的最小值作为光标与键盘的距离 |
| auto-focus | Boolean | false | (即将废弃,请直接使用 focus )自动聚焦,拉起键盘 |
| focus | Boolean | false | 获取焦点 |
| confirm-type | String | “done” | 设置键盘右下角按钮的文字,有效值: “send”,”search”,”next”,”go”,”done” |
| confirm-hold | Boolean | false | 点击键盘右下角按钮时是否保持键盘不收起 |
| bindinput | EventHandle | 当键盘输入时,触发input事件,event.detail = {value: value},处理函数可以直接 return 一个字符串,将替换输入框的内容。 | |
| bindfocus | EventHandle | 输入框聚焦时触发,event.detail = {value: value} | |
| bindblur | EventHandle | 输入框失去焦点时触发,event.detail = {value: value} | |
| bindconfirm | EventHandle | 点击完成按钮时触发,event.detail = {value: value} |
wxml和wxss如下
<view class="demo-view-5">

    <text class="bc_text">{{word}}text>

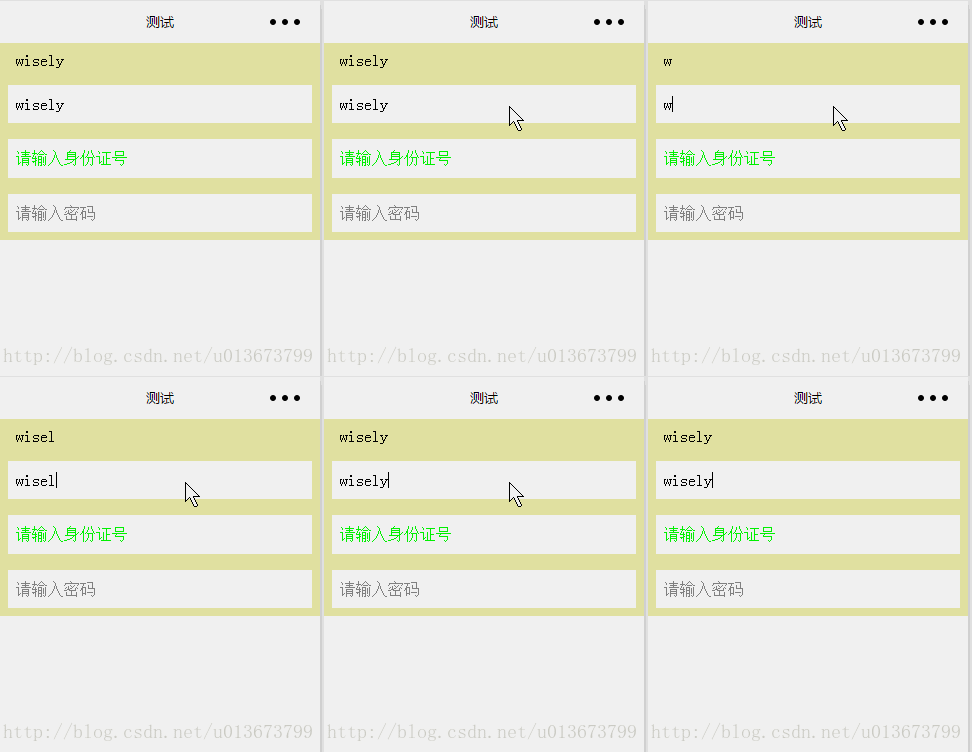
    <input class="bc_input" type="text" placeholder="请输入用户名" placeholder-style="color:#FF0000" value="wisely" confirm-type="next"focus="true" bindinput="bindinput"/>

    <input class="bc_input" type="idcard" placeholder="请输入身份证号" placeholder-class="placeholder_style" maxlength="18" confirm-type="next"/>

    <input class="bc_input" type="password" placeholder="请输入密码" confirm-type="send" confirm-hold="true"/>


view>.demo-view-5{
display:flex;
height: 100%;
flex-direction: column;
background-color: palegoldenrod;
}
.bc_input{
margin: 20rpx;
background-color: #FFFFFF;
padding: 20rpx;
}
.bc_text{
margin: 20rpx;
padding-left: 20rpx;
}
.placeholder_style{
color: #00ff00;
}picker
picker分3种模式
- selector,默认值
- date,日期选择器
- time,时间选择器
selector模式时的属性如下
| 属性名 | 类型 | 默认值 | 说明 |
|---|---|---|---|
| range | Array / Object Array | [] | mode为 selector 时,range 有效 |
| range-key | String | 当 range 是一个 Object Array 时,通过 range-key 来指定 Object 中 key 的值作为选择器显示内容 | |
| value | Number | 0 | value 的值表示表示选择了 range 中的第几个(下标从 0 开始)。 |
| bindchange | EventHandle | value 改变时触发 change 事件,event.detail = {value: value} | |
| disabled | Boolean | false | 是否禁用 |
date模式下的属性,如下
| 属性名 | 类型 | 默认值 | 说明 |
|---|---|---|---|
| value | String | 0 | 表示选中的日期,格式为”YYYY-MM-DD” |
| start | String | 表示有效日期范围的开始,字符串格式为”YYYY-MM-DD” | |
| end | String | 表示有效日期范围的结束,字符串格式为”YYYY-MM-DD” | |
| fields | String | day | 有效值 year,month,day,表示选择器的粒度 |
| bindchange | EventHandle | value 改变时触发 change 事件,event.detail = {value: value} | |
| disabled | Boolean | false | 是否禁用 |
time模式下的属性
| 属性名 | 类型 | 默认值 | 说明 |
|---|---|---|---|
| value | String | 表示选中的时间,格式为”hh:mm” | |
| start | String | 表示有效时间范围的开始,字符串格式为”hh:mm” | |
| end | String | 表示有效时间范围的结束,字符串格式为”hh:mm” | |
| bindchange | EventHandle | value 改变时触发 change 事件,event.detail = {value: value} | |
| disabled | Boolean | false | 是否禁用 |
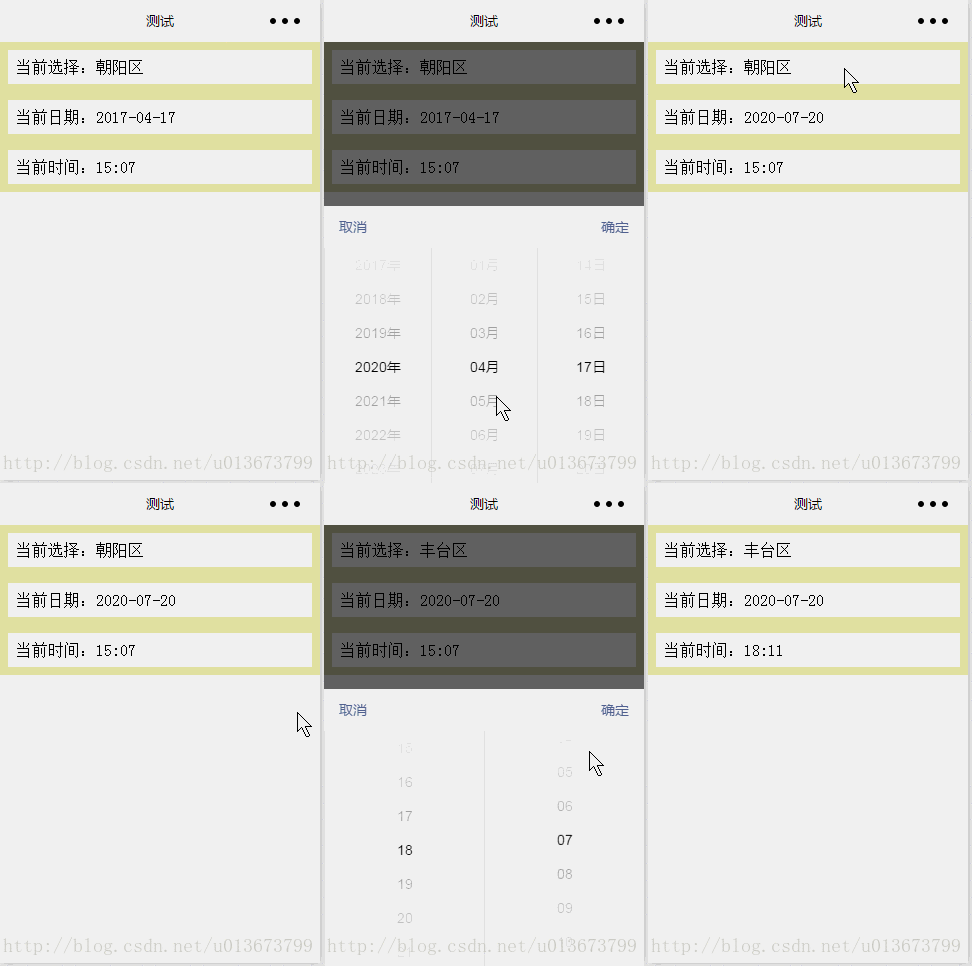
Page({
  data:{
    array:[
      "海淀区",
      "朝阳区",
      "昌平区",
      "东城区",
      "西城区",
      "丰台区",
      "石景山区",
      "大兴区",
      "顺义区",
      "通州区",
      "房山区",
      "密云区",
      "怀柔区",
      "平谷区",
      "延庆区"
    ],
    index:1,
    date:'2017-04-17',
    time:'15:07'
  },
  bindchanges:function(e){//方法名不能与属性名相同
    this.setData({
      index:e.detail.value
    })

  },
  bindDateChange:function(e){
    this.setData({
      date:e.detail.value

    })
  },
  bindTimeChange:function(e){
    this.setData({
      time:e.detail.value
    })
  }
})<view class="demo-view-5">
<picker bindchange="bindchanges" value="{{index}}" range="{{array}}">
<view class="bc_text">
当前选择:{{array[index]}}
view>
picker>
<picker mode="date" value="{{date}}" start="2015-09-09" end="2020-09-09" bindchange="bindDateChange">
<view class="bc_text">
当前日期:{{date}}
view>
picker>
<picker mode="time" value="{{time}}" start="00:00" end="23:59" bindchange="bindTimeChange">
<view class="bc_text">
当前时间:{{time}}
view>
picker>
view>.demo-view-5{
display:flex;
height: 100%;
flex-direction: column;
background-color: palegoldenrod;
}
.bc_text{
margin: 20rpx;
padding: 20rpx;
background-color: #FFFFFF;
}picker-view
picker-view的属性如下
| 属性名 | 类型 | 默认值 | 说明 |
|---|---|---|---|
| value | Number Array | 数组中的数字依次表示 picker-view 内的 picker-view-colume 选择的第几项(下标从 0 开始),数字大于 picker-view-column 可选项长度时,选择最后一项。 | |
| indicator-style | String | 设置选择器中间选中框的样式 | |
| indicator-class | String | 设置选择器中间选中框的类名 | |
| bindchange | EventHandle | 当滚动选择,value 改变时触发 change 事件,event.detail = {value: value};value为数组,表示 picker-view 内的 picker-view-column 当前选择的是第几项(下标从 0 开始) |
const date = new Date()
const years = []
const months = []
const days = []
for(let i=1990;i<=date.getFullYear();i++){//之前一直不显示年,原因是这里getFullYear()方法没有加()
  years.push(i)
}

for(let i=1;i<=12;i++){
  months.push(i)
}

for(let i=1;i<=31;i++){
  days.push(i)
}


Page({
  data:{
    years:years,
    months:months,
    days:days,
    year:date.getFullYear(),
    month:2,
    day:2,
    value:[9999,1,1]
  },
  bindchange:function(e){//方法名不能与属性名相同

    const val = e.detail.value
    this.setData({
      year:this.data.years[val[0]],
      month:this.data.months[val[1]],
      day:this.data.days[val[2]]

    })

  }

})<view class="demo-view-5">
<view class="bc_text">{{year}}年{{month}}月{{day}}日view>
<picker-view style="width:100%;height:300px;margin-left:100rpx" value="{{value}}" bindchange="bindchange" indicator-style="height:50px;">
<picker-view-column >
<view wx:for="{{years}}" style="line-height:50px">{{item}}年view>
picker-view-column>
<picker-view-column>
<view wx:for="{{months}}" style="line-height:50px">{{item}}月view>
picker-view-column>
<picker-view-column>
<view wx:for="{{days}}" style="line-height:50px">{{item}}日view>
picker-view-column>
picker-view>
view>.demo-view-5{
display:flex;
height: 100%;
flex-direction: column;
background-color: #FFFFFF;
justify-content: center;
align-items: center;
}
.bc_text{
margin: 20rpx;
padding: 20rpx;
background-color: #FFFFFF;
}radio
radio一般与radio-group一起使用,radio-group的属性如下
| 属性名 | 类型 | 默认值 | 说明 |
|---|---|---|---|
| bindchange | EventHandle | 中的选中项发生变化时触发 change 事件,event.detail = {value: 选中项radio的value} |
radio的属性如下
| 属性名 | 类型 | 默认值 | 说明 |
|---|---|---|---|
| value | String | 标识。当该 选中时, 的 change 事件会携带的value | |
| checked | Boolean | false | 当前是否选中 |
| disabled | Boolean | false | 是否禁用 |
| color | Color | radio的颜色,同css的color |
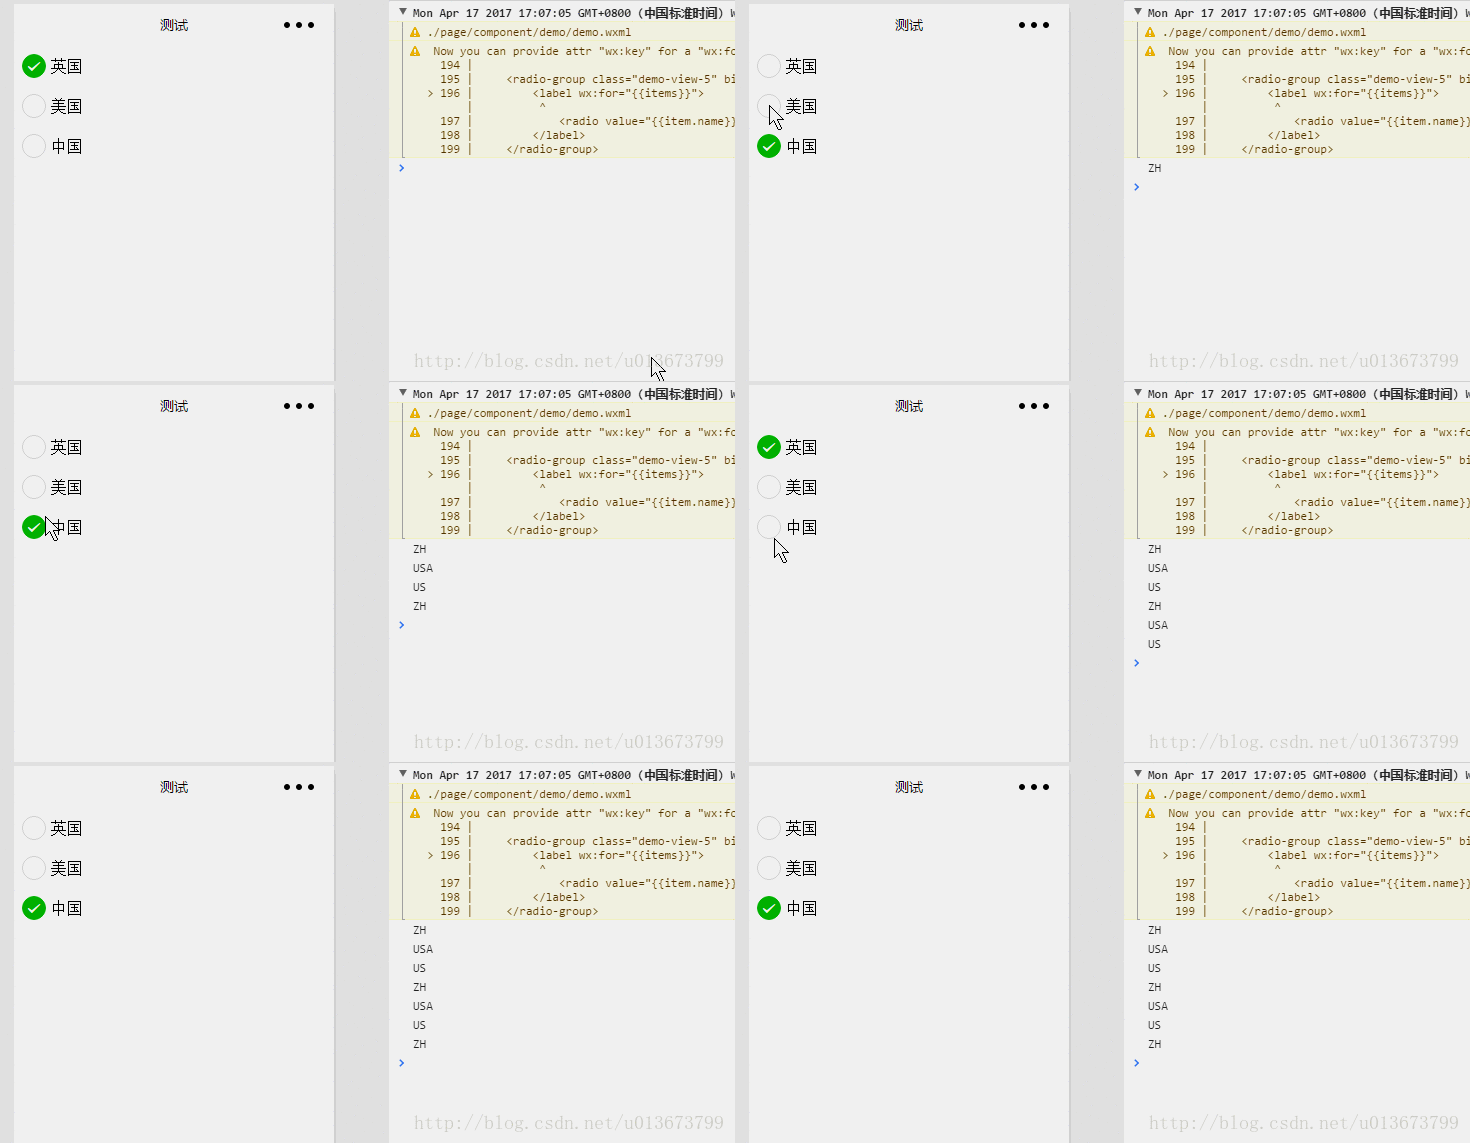
Page({
  data:{
    items:[
      {"name":"US","value":"英国",checked:true},
      {"name":"USA","value":"美国"},
      {"name":"ZH","value":"中国"}
    ]
  },
  bindchange:function(e){
    console.log(e.detail.value)
  }

})<radio-group class="demo-view-5" bindchange="bindchange">
<label wx:for="{{items}}">
<radio value="{{item.name}}" checked="{{item.checked}}" style="margin:20rpx;" >{{item.value}}radio>
label>
radio-group>.demo-view-5{
display:flex;
height:100%;
flex-direction: column;
}需要注意的地方:
在设置默认选中的项时,设置checked时需要注意它后面的值,不能是字符串true或false,否则会出问题,比如将上面js中的data数据稍作修改,如下:
{"name":"US","value":"英国",checked:"true"},
{"name":"USA","value":"美国",checked:"false"},
{"name":"ZH","value":"中国",checked:"false"}
似乎并没有改变什么,但运行时发现,默认选择的不是第一个,而是最后一个。只要将数据改成boolean类型,而不是字符串类型即可。
同样的,在wxml中直接为radio的checked属性设置常量,而不是变量,如下面:
<radio-group name="radiogroup">
    <label>
            <radio value="USA"  />美国
            <radio value="ZH" checked="false"/>中国
    label>
radio-group>
那么,默认选中的就是第2个中国,只要设置了checked属性,不管是true还是false,都是选中状态。
- 如果2个radio都设置了checked属性,那么就会选中第2个
- 如果第1个设置了checked属性,选中第1个。
这应该是微信小程序的一个bug。
另外需要注意的一点,如果radio-group中只设置了一个radio,那么选中后,是无法取消的。即便radio-group中有多个radio,主要选中了一个,以后也必然会有一个被选中,不会出现没有radio选中的情况发生。
slider
slider的属性如下
| 属性名 | 类型 | 默认值 | 说明 |
|---|---|---|---|
| min | Number | 0 | 最小值 |
| max | Number | 100 | 最大值 |
| step | Number | 1 | 步长,取值必须大于 0,并且可被(max - min)整除 |
| disabled | Boolean | false | 是否禁用 |
| value | Number | 0 | 当前取值 |
| color | Color | e9e9e9 | 背景条的颜色(请使用 backgroundColor) |
| selected-color | Color | 1aad19 | 已选择的颜色(请使用 activeColor) |
| activeColor | Color | 1aad19 | 已选择的颜色 |
| backgroundColor | Color | e9e9e9 | 背景条的颜色 |
| show-value | Boolean | false | 是否显示当前 value |
| bindchange | EventHandle | 完成一次拖动后触发的事件,event.detail = {value: value} |
Page({
  data:{

  },
  bindchange:function(e){
    console.log(e.detail.value)
  }

})<view class="demo-view-5">
<slider value = "20" step="1" show-value bindchange="bindchange"/>
<slider value="100" min="10" max="200" show-value color="#FF0000" activeColor="#0000FF"/>
view>.demo-view-5{
display:flex;
height:100%;
flex-direction: column;
margin: 40rpx;
}switch
switch的属性如下
| 属性名 | 类型 | 默认值 | 说明 |
|---|---|---|---|
| checked | Boolean | false | 是否选中 |
| type | String | switch | 样式,有效值:switch, checkbox |
| bindchange | EventHandle | checked 改变时触发 change 事件,event.detail={ value:checked} | |
| color | Color | switch 的颜色,同 css 的 color |
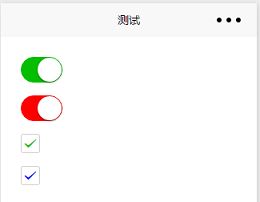
<view class="demo-view-5">
    <switch type="switch" checked bindchange="bindchange"style="margin:20rpx" />

    <switch color="#FF0000" checked style="margin:20rpx" />

    <switch type="checkbox" checked style="margin:20rpx"/>

    <switch type="checkbox" checked color="#0000FF" style="margin:20rpx" />

view>.demo-view-5{
display:flex;
height:100%;
flex-direction: column;
margin: 40rpx;
}当选中时,console.log(e.detail.value)打印的是true,取消选中时,打印的是false。
textarea
textarea属性如下
| 属性名 | 类型 | 默认值 | 说明 |
|---|---|---|---|
| value | String | 输入框的内容 | |
| placeholder | String | 输入框为空时占位符 | |
| placeholder-style | String | 指定 placeholder 的样式 | |
| placeholder-class | String | textarea-placeholder | 指定 placeholder 的样式类 |
| disabled | Boolean | false | 是否禁用 |
| maxlength | Number | 140 | 最大输入长度,设置为 -1 的时候不限制最大长度 |
| auto-focus | Boolean | false | 自动聚焦,拉起键盘。 |
| focus | Boolean | false | 获取焦点 |
| auto-height | Boolean | false | 是否自动增高,设置auto-height时,style.height不生效 |
| fixed | Boolean | false | 如果 textarea 是在一个 position:fixed 的区域,需要显示指定属性 fixed 为 true |
| cursor-spacing | Number | 0 | 指定光标与键盘的距离,单位 px 。取 textarea 距离底部的距离和 cursor-spacing 指定的距离的最小值作为光标与键盘的距离 |
| bindfocus | EventHandle | 输入框聚焦时触发,event.detail = {value: value} | |
| bindblur | EventHandle | 输入框失去焦点时触发,event.detail = {value: value} | |
| bindlinechange | EventHandle | 输入框行数变化时调用,event.detail = {height: 0, heightRpx: 0, lineCount: 0} | |
| bindinput | EventHandle | 当键盘输入时,触发 input 事件,event.detail = {value: value}, bindinput 处理函数的返回值并不会反映到 textarea 上 | |
| bindconfirm | EventHandle | 点击完成时, 触发 confirm 事件,event.detail = {value: value} |
<view class="demo-view-5">
    <textarea  placeholder="placeholder是红色的" placeholder-style="color:red;" style="padding:30rpx;background-color:#FFFFFF" auto-height maxlength="-1"/>

    <button style="margin-top:30rpx;width:700rpx;" type="primary">保存button>

view>.demo-view-5{
display:flex;
height:1000rpx;
flex-direction: column;
margin-top: 40rpx;
background-color: #F8F8F8;
align-items: center;
}form
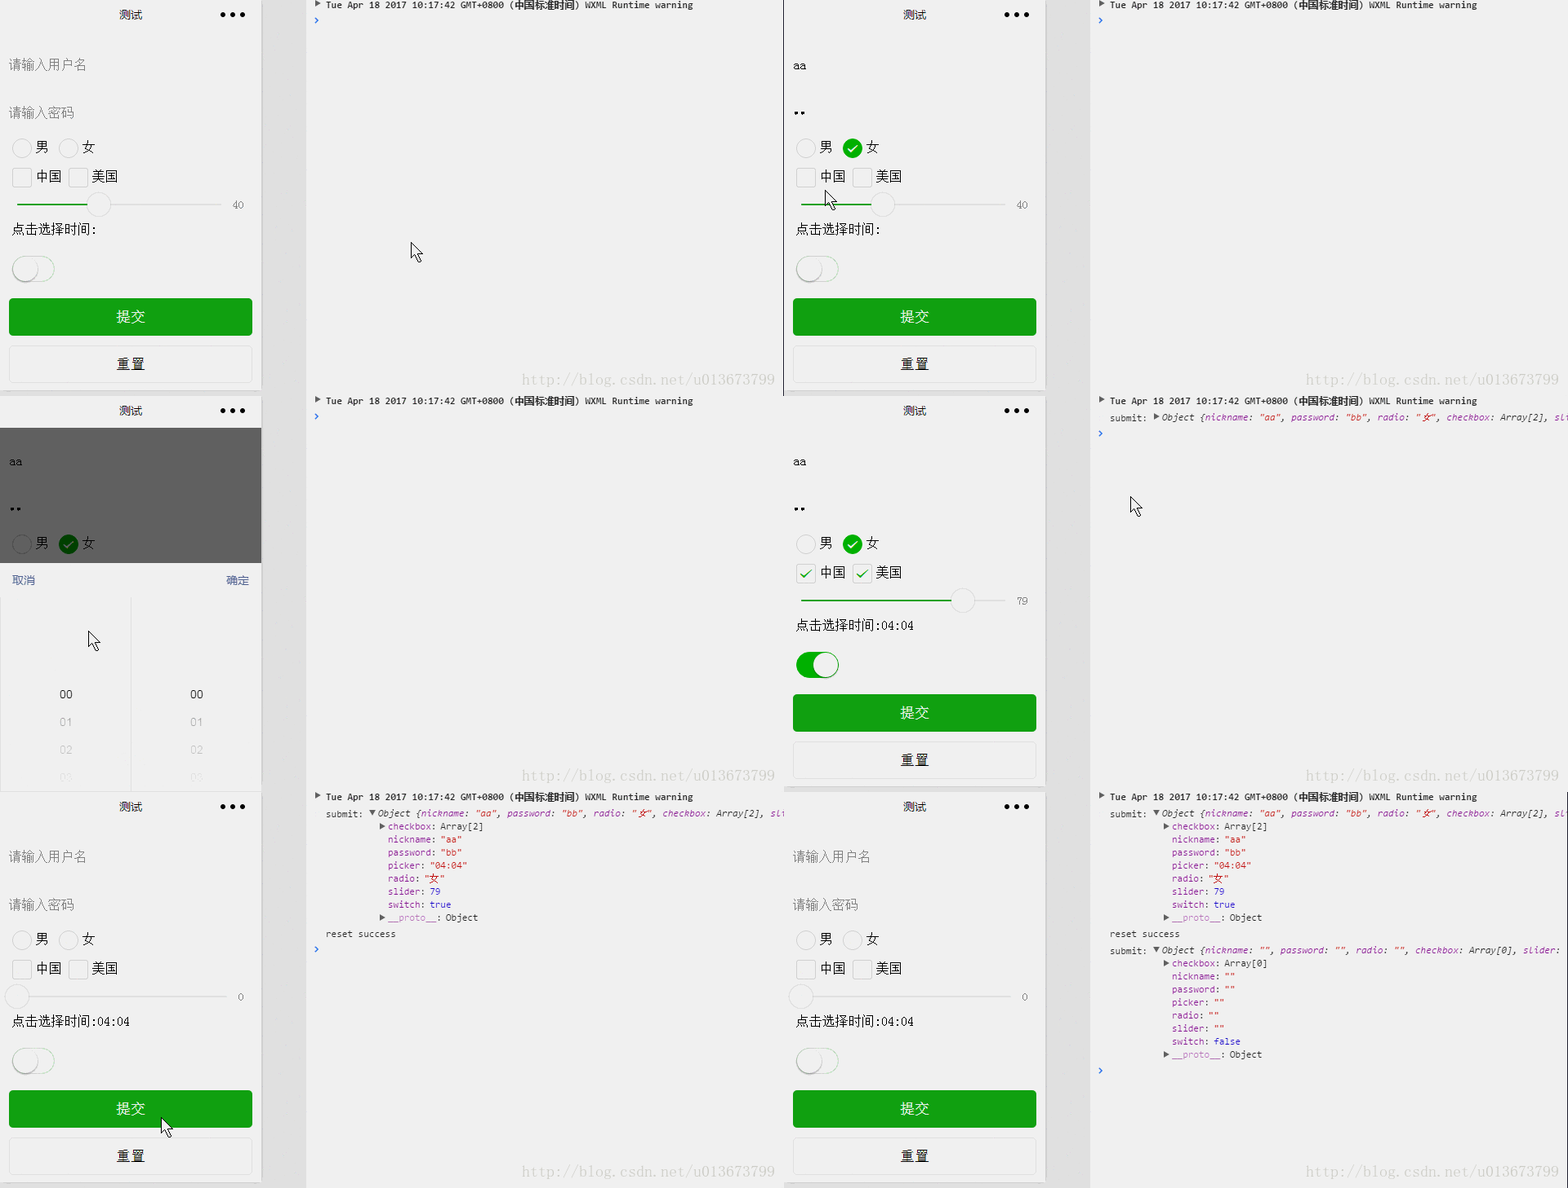
这是一个表单组件
将组件内的用户输入的switch, input,checkbox,slider,radio, picker标签内的内容 提交。
当点击 form 表单中 formType 为 submit 的 button 组件时,会将表单组件中的 value 值进行提交,需要在表单组件中加上 name 来作为 key。
属性如下
| 属性名 | 类型 | 说明 |
|---|---|---|
| report-submit | Boolean | 是否返回 formId 用于发送模板消息 |
| bindsubmit | EventHandle | 携带 form 中的数据触发 submit 事件,event.detail = {value : {‘name’: ‘value’} , formId: ”} |
| bindreset | EventHandle | 表单重置时会触发 reset 事件 |
Page({
  data:{
    items:[
      {"name":"ZH","checked":false,"value":"中国"},
      {"name":"USA","checked":true,"value":"美国"}
    ],
    time:""
  },
  bindsubmit:function(e){

  },
  bindPickerChange:function(e){
    this.setData({
      time:e.detail.value
    })
  },
  submit:function(e){
    console.log("submit:",e.detail.value)
  },
  reset:function(e){
    console.log("reset success")
  }

})<view class="demo-view-5">
<form bindsubmit="submit" bindreset="reset">
<input name="nickname" placeholder="请输入用户名" style="background-color:#FFFFFF;padding:20rpx;margin-top:50rpx" />
<input name="password" type="password" placeholder="请输入密码" style="margin-top:50rpx;width:700rpx;background-color:#FFFFFF;padding:20rpx;" />
<radio-group name="radio">
<label><radio value="男" style="margin-left:30rpx;margin-top:30rpx;" />男label>
<label><radio value="女" style="margin-left:30rpx;margin-top:30rpx;" />女label>
radio-group>
<checkbox-group name="checkbox" style="margin:30rpx;">
<label wx:for="{{items}}">
<checkbox value="{{item.name}}"/>{{item.value}}
label>
checkbox-group>
<slider name="slider" value="40" show-value/>
<picker name="picker" mode="time" style="margin:30rpx;" bindchange="bindPickerChange">点击选择时间:{{time}}picker>
<switch name="switch" type="switch" style="margin:30rpx;" />
<button form-type="submit" type="primary" style="margin-top:20rpx;width:700rpx;">提交button>
<button form-type="reset" style="margin-top:30rpx;width:700rpx;">重置button>
form>
view>.demo-view-5{
display:flex;
height:1000rpx;
background-color: #F8F8F8;
}需要注意的地方
form表单内部,所有的组件都要加上name属性,这样提交的时候才会将该组件添加进去。
navigator
属性如下
| 属性名 | 类型 | 默认值 | 说明 |
|---|---|---|---|
| url | String | 应用内的跳转链接 | |
| open-type | String | navigate | 跳转方式 |
| delta | Number | 当 open-type 为 ‘navigateBack’ 时有效,表示回退的层数 | |
| hover-class | String | navigator-hover | 指定点击时的样式类,当hover-class=”none”时,没有点击态效果 |
| hover-start-time | Number | 50 | 按住后多久出现点击态,单位毫秒 |
| hover-stay-time | Number | 600 | 手指松开后点击态保留时间,单位毫秒 |
open-type的各个属性值如下
| 值 | 说明 | 最低版本 |
|---|---|---|
| navigate | 对应 wx.navigateTo 的功能 | |
| redirect | 对应 wx.redirectTo 的功能 | |
| switchTab | 对应 wx.switchTab 的功能 | |
| reLaunch | 对应 wx.reLaunch 的功能 | 1.1.0 |
| navigateBack | 对应 wx.navigateBack 的功能 | 1.1.0 |
<view class="demo-view-5">
    <navigator url="../addrocord/addrocord?title=navigate"    class="navigation" hover-class="navigator-hover">使用navigate跳转navigator>

    <navigator url="../addrocord/addrocord?title=redirect" class="navigation" open-type="redirect">使用redirect跳转navigator>

    <navigator url="../addrocord/addrocord?title=reLaunch" class="navigation" open-type="reLaunch">使用reLaunch跳转navigator>

    <navigator url="../addrocord/addrocord?title=switchTab" class="navigation" open-type="switchTab">使用switchTab跳转navigator>

    <navigator url="../addrocord/addrocord?title=navigateBack" class="navigation" open-type="navigateBack">使用navigateBack跳转navigator>

view>.navigation{
background-color:#FFFFFF;
width:700rpx;
text-align:center;
padding:30rpx;
margin-top: 50rpx;
}
.navigator-hover{
color: blue;
}
.demo-view-5{
display:flex;
height:1000rpx;
flex-direction: column;
background-color: #F8F8F8;
align-items: center;
}跳转进的界面的js如下
Page({
  data:{
    title:""
  },
  onLoad:function(options){
    // 页面初始化 options为页面跳转所带来的参数
    this.setData({
      title:options.title
    })
  }
})
总结
1,navigate为默认跳转方式,跳转进另一页面
2,redirect,在当前页面打开将要打开的page,也就是说,当前跳转页会消失。
3,navigateBack,后退
4,switchTab和reLaunch不知道有什么作用。
audio
属性值如下
| 属性名 | 类型 | 默认值 | 说明 |
|---|---|---|---|
| id | String | audio 组件的唯一标识符 | |
| src | String | 要播放音频的资源地址 | |
| loop | Boolean | false | 是否循环播放 |
| controls | Boolean | true | 是否显示默认控件 |
| poster | String | 默认控件上的音频封面的图片资源地址,如果 controls 属性值为 false 则设置 poster 无效 | |
| name | String | 未知音频 | 默认控件上的音频名字,如果 controls 属性值为 false 则设置 name 无效 |
| author | String | 未知作者 | 默认控件上的作者名字,如果 controls 属性值为 false 则设置 author 无效 |
| binderror | EventHandle | 当发生错误时触发 error 事件,detail = {errMsg: MediaError.code} | |
| bindplay | EventHandle | 当开始/继续播放时触发play事件 | |
| bindpause | EventHandle | 当暂停播放时触发 pause 事件 | |
| bindtimeupdate | EventHandle | 当播放进度改变时触发 timeupdate 事件,detail = {currentTime, duration} | |
| bindended | EventHandle | 当播放到末尾时触发 ended 事件 |
MediaError.code
| 返回错误码 | 描述 |
|---|---|
| MEDIA_ERR_ABORTED | 获取资源被用户禁止 |
| MEDIA_ERR_NETWORD | 网络错误 |
| MEDIA_ERR_DECODE | 解码错误 |
| MEDIA_ERR_SRC_NOT_SUPPOERTED | 不合适资源 |
Page({

  onReady:function(e){
    this.audioCtx = wx.createAudioContext('wisely')
  },

  data:{

    src:"http://ws.stream.qqmusic.qq.com/M500001VfvsJ21xFqb.mp3?guid=ffffffff82def4af4b12b3cd9337d5e7&uin=346897220&vkey=6292F51E1E384E06DCBDC9AB7C49FD713D632D313AC4858BACB8DDD29067D3C601481D36E62053BF8DFEAF74C0A5CCFADD6471160CAF3E6A&fromtag=46",
    poster:"http://y.gtimg.cn/music/photo_new/T002R300x300M000003rsKF44GyaSk.jpg?max_age=2592000",
    name:"此时此刻",
    author:"许巍"

  },

  start:function(){
    this.audioCtx.play()
  },
  pause:function(){
    this.audioCtx.pause()
  },
  restart:function(){
    this.audioCtx.seek(0)
  },
  seek:function(){
    this.audioCtx.seek(20)
  }

})<view class="demo-view-5">
<audio id="wisely" src="{{src}}" poster="{{poster}}" name="{{name}}" author="{{author}}" controls loop>audio>
<button class="audio" bindtap="start">开始播放button>
<button class="audio" bindtap="pause">停止播放button>
<button class="audio" bindtap="restart">回到开始button>
<button class="audio" bindtap="seek">跳转到第20秒button>
view>.demo-view-5{
display:flex;
height:1000rpx;
flex-direction: column;
background-color: #F8F8F8;
align-items: center;
}image
属性如下
| 属性名 | 类型 | 默认值 | 说明 |
|---|---|---|---|
| src | String | 图片资源地址 | |
| mode | String | ‘scaleToFill’ | 图片裁剪、缩放的模式 |
| binderror | HandleEvent | 当错误发生时,发布到 AppService 的事件名,事件对象event.detail = {errMsg: ‘something wrong’} | |
| bindload | HandleEvent | 当图片载入完毕时,发布到 AppService 的事件名,事件对象event.detail = {height:’图片高度px’, width:’图片宽度px’} |
注:image组件默认宽度300px、高度225px
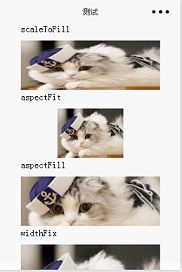
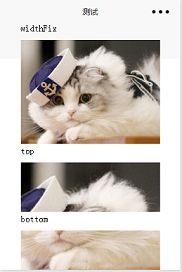
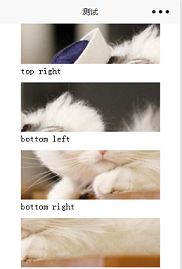
mode,有 13 种模式,其中 4 种是缩放模式,9 种是裁剪模式。
| 模式 | 值 | 说明 |
|---|---|---|
| 缩放 | scaleToFill | 不保持纵横比缩放图片,使图片的宽高完全拉伸至填满 image 元素 |
| 缩放 | aspectFit | 保持纵横比缩放图片,使图片的长边能完全显示出来。也就是说,可以完整地将图片显示出来。 |
| 缩放 | aspectFill | 保持纵横比缩放图片,只保证图片的短边能完全显示出来。也就是说,图片通常只在水平或垂直方向是完整的,另一个方向将会发生截取。 |
| 缩放 | widthFix | 宽度不变,高度自动变化,保持原图宽高比不变 |
| 裁剪 | top | 不缩放图片,只显示图片的顶部区域 |
| 裁剪 | bottom | 不缩放图片,只显示图片的底部区域 |
| 裁剪 | center | 不缩放图片,只显示图片的中间区域 |
| 裁剪 | left | 不缩放图片,只显示图片的左边区域 |
| 裁剪 | right | 不缩放图片,只显示图片的右边区域 |
| 裁剪 | top left | 不缩放图片,只显示图片的左上边区域 |
| 裁剪 | top right | 不缩放图片,只显示图片的右上边区域 |
| 裁剪 | bottom left | 不缩放图片,只显示图片的左下边区域 |
| 裁剪 | bottom right | 不缩放图片,只显示图片的右下边区域 |
先来看原图,再看各种mode的效果图
Page({

  data:{

    items:[
      {"mode":"scaleToFill","name":"scaleToFill"},
      {"mode":"aspectFit","name":"aspectFit"},
      {"mode":"aspectFill","name":"aspectFill"},
      {"mode":"widthFix","name":"widthFix"},
      {"mode":"top","name":"top"},
      {"mode":"bottom","name":"bottom"},
      {"mode":"center","name":"center"},
      {"mode":"left","name":"left"},
      {"mode":"right","name":"right"},
      {"mode":"top left","name":"top left"},
      {"mode":"top right","name":"top right"},
      {"mode":"bottom left","name":"bottom left"},
      {"mode":"bottom right","name":"bottom right"}

    ],
    "src":"../../../image/cat.jpg"
  }

})<view class="demo-view-5">
<view wx:for="{{items}}" wx:key="item">
<view>{{item.name}}view>
<image class="image" src="{{src}}" mode="{{item.mode}}">image>
view>
view>.demo-view-5{
display:flex;
height:1000rpx;
flex-direction: column;
background-color: #F8F8F8;
align-items: center;
}
.image {
margin-top: 30rpx;
width: 580rpx;
height: 208rpx;
}video
属性如下
| 属性名 | 类型 | 默认值 | 说明 | 最低版本 |
|---|---|---|---|---|
| src | String | 要播放视频的资源地址 | ||
| duration | Number | 指定视频时长 | 1.1.0 | |
| controls | Boolean | true | 是否显示默认播放控件(播放/暂停按钮、播放进度、时间) | |
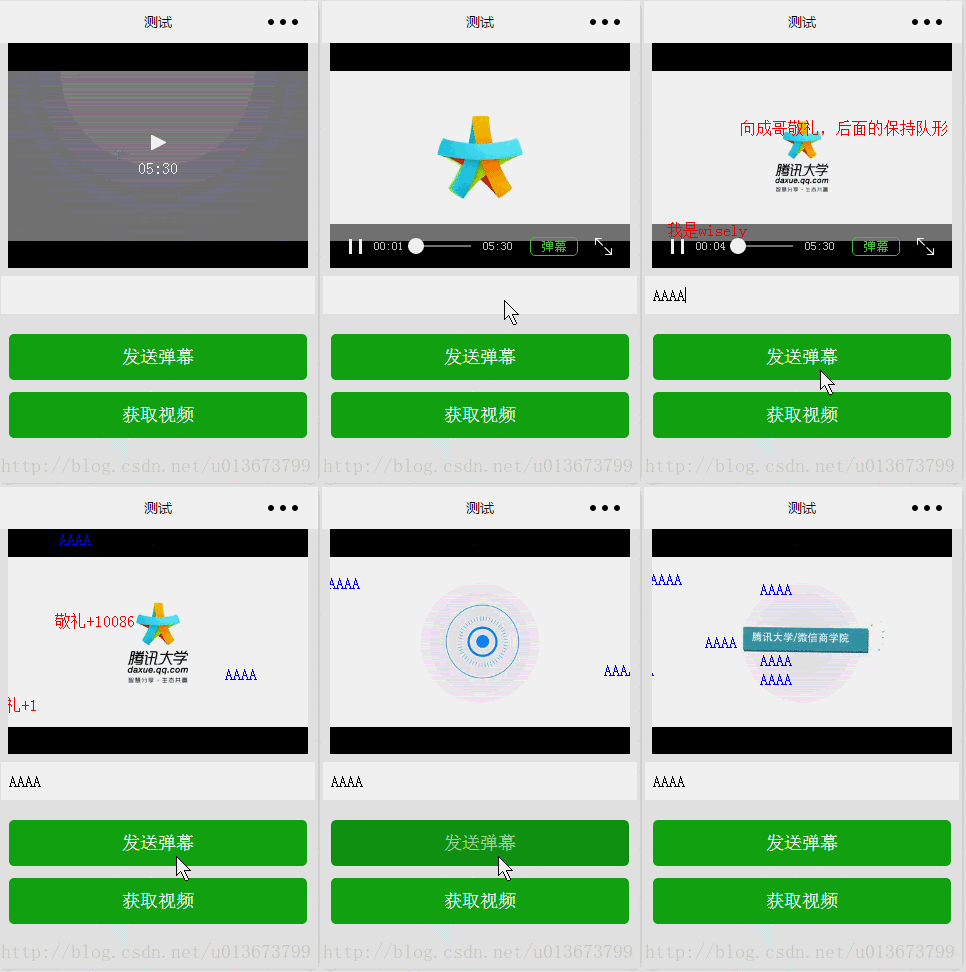
| danmu-list | Object Array | 弹幕列表 | ||
| danmu-btn | Boolean | false | 是否显示弹幕按钮,只在初始化时有效,不能动态变更 | |
| enable-danmu | Boolean | false | 是否展示弹幕,只在初始化时有效,不能动态变更 | |
| autoplay | Boolean | false | 是否自动播放 | |
| bindplay | EventHandle | 当开始/继续播放时触发play事件 | ||
| bindpause | EventHandle | 当暂停播放时触发 pause 事件 | ||
| bindended | EventHandle | 当播放到末尾时触发 ended 事件 | ||
| bindtimeupdate | EventHandle | 播放进度变化时触发,event.detail = {currentTime: ‘当前播放时间’} 。触发频率应该在 250ms 一次 | ||
| objectFit | String | contain | 当视频大小与 video 容器大小不一致时,视频的表现形式。contain:包含,fill:填充,cover:覆盖 |
Page({

  onReady:function(e){
    this.vedioCtx = wx.createVideoContext("wisely")
  },

  data:{

    danmulist:[
      {text:"我是wisely",color:"#FF0000",time:2},
      {text:"向成哥敬礼,后面的保持队形",color:"#FF0000",time:3},
      {text:"敬礼+1",color:"#FF0000",time:4},
      {text:"敬礼+10086",color:"#FF0000",time:5}

    ],
    src:"http://wxsnsdy.tc.qq.com/105/20210/snsdyvideodownload?filekey=30280201010421301f0201690402534804102ca905ce620b1241b726bc41dcff44e00204012882540400&bizid=1023&hy=SH&fileparam=302c020101042530230204136ffd93020457e3c4ff02024ef202031e8d7f02030f42400204045a320a0201000400"
  },
  inputValue:"",
  bindBlur:function(e){
    this.inputValue=e.detail.value;
  },
  sendDanmu:function(e){
    this.vedioCtx.sendDanmu({
      text:this.inputValue,
      color:"#0000FF"
    })
  },
  getVedio:function(e){
    var that = this
    wx.chooseVideo({
      sourceType: ['album', 'camera'], // album 从相册选视频,camera 使用相机拍摄
      maxDuration: 60, // 拍摄视频最长拍摄时间,单位秒。最长支持60秒
      camera: ['front', 'back'],
      success: function(res){
        // success
        that.setData({
          src:res.tempFilePath
        })
      },
      fail: function(res) {
        // fail
      },
      complete: function(res) {
        // complete
      }
    })
  }

})<view class="demo-view-5">
<video id = "wisely" src="{{src}}" danmu-list="{{danmulist}}" enable-danmu danmu-btn>video>
<input class="bc_text" bindblur="bindBlur"/>
<button bindtap="sendDanmu" style="margin-top:30rpx;width:700rpx" type="primary">发送弹幕button>
<button bindtap="getVedio" style="margin:30rpx;width:700rpx" type="primary">获取视频button>
view>.demo-view-5{
display:flex;
height:1500rpx;
flex-direction: column;
background-color: #E8E8E8;
align-items: center;
}
.bc_text{
margin: 20rpx;
padding: 20rpx;
background-color: #FFFFFF;
width:700rpx;
}wx.chooseVideo方法在手机上运行时,是可以正常选择的。
map
map的属性很多,详见这里。
Page({

  data:{
    longitude:113.324520,
    latitude:23.099994,
    markers:[{
      longitude:113.324520,
      latitude:23.099994,
      title:"后花园",
      iconPath:"../../../image/location.png",
      width:40,
      height:40,
    }],
    polyline: [{
      points: [{
        longitude: 113.3245211,
        latitude: 23.10229
      }, {
        longitude: 113.324520,
        latitude: 23.099994
      }],
      color:"#FF0000DD",
      width: 2,
      dottedLine: true
    }],
    controls: [{
      id: 1,
      iconPath: '../../../image/cat.jpg',
      position: {
        left: 0,
        top: 300 - 50,
        width: 50,
        height: 50
      },
      clickable: true
    }]


  },
  bindcontroltap:function(e){
     console.log("click one time")
     wx.showToast({
       title:"ok"
     })
  },
  bindmarkertap:function(e){
    console.log("marker click")
  },
  bindregionchange:function(e){
    console.log("region change")
  }

})
<map class="demo-view-6" longitude="{{longitude}}" latitude="{{latitude}}" markers="{{markers}}" polyline="{{polyline}}" controls="{{controls}}" bindcontroltap="bindcontroltap" bindmarkertap="bindmarkertap" bindregionchange="bindregionchange"/>.demo-view-6{
width: 750rpx;
height: 1000rpx;
}canvas
详细属性在这里。
Page({
  onReady: function () {
    this.position = {
      x: 150,
      y: 150,
      vx: 2,
      vy: 2
    }

    this.drawBall()
    this.interval = setInterval(this.drawBall, 17)
  },
  drawBall: function () {
    var p = this.position
    p.x += p.vx
    p.y += p.vy
    if (p.x >= 300) {
      p.vx = -2
    }
    if (p.x <= 7) {
      p.vx = 2
    }
    if (p.y >= 300) {
      p.vy = -2
    }
    if (p.y <= 7) {
      p.vy = 2
    }

    var context = wx.createContext()

    function ball(x, y) {
      context.beginPath(0)
      context.arc(x, y, 5, 0, Math.PI * 2)
      context.setFillStyle('#1aad19')
      context.setStrokeStyle('rgba(1,1,1,0)')
      context.fill()
      context.stroke()
    }

    ball(p.x, 150)
    ball(150, p.y)
    ball(300 - p.x, 150)
    ball(150, 300 - p.y)
    ball(p.x, p.y)
    ball(300 - p.x, 300 - p.y)
    ball(p.x, 300 - p.y)
    ball(300 - p.x, p.y)

    wx.drawCanvas({
      canvasId: 'canvas',
      actions: context.getActions()
    })
  },
  onUnload: function () {
    clearInterval(this.interval)
  }
})<view class="demo-view-5">
<canvas canvas-id="canvas" class="canvas" />
view>.demo-view-5{
display:flex;
height:1500rpx;
flex-direction: column;
background-color: #E8E8E8;
align-items: center;
}
.canvas {
width: 305px;
height: 305px;
background-color: #fff;
}