springboot+redisTemplate实现消息队列(pub/sub,list,监听键过期)
redis实现方式主流的有两种,一种是lpush rpop,一种是pub/sub机制,下面来做个演示的例子
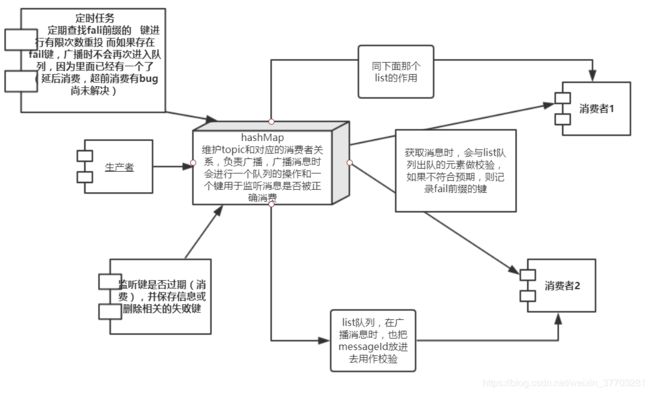
大概的分为两个角色,生产者和消费者,然后大概结构是这样的:
主要的角色就是维护主题和消费者关系的一个表,生产者、消费者、监听键过期机制,还有定时任务,这次写出来的例子只是支持滞后消费的重投,超前消费的情况没有得到很好解决。
首先是生产者,生产者主要是根据主题发布消息
package com.gdut.redisdemo.producer;

import com.gdut.redisdemo.VO.MessageVO;
import com.gdut.redisdemo.config.PubSubTable;
import com.google.gson.Gson;
import io.netty.util.CharsetUtil;
import org.springframework.beans.factory.annotation.Autowired;
import org.springframework.data.redis.core.StringRedisTemplate;
import org.springframework.stereotype.Component;

/**
 * @author lulu
 * @Date 2019/6/22 16:47
 */
@Component
public class Producer {

    @Autowired
    private Gson gson;
    @Autowired
    private StringRedisTemplate redisTemplate;
    @Autowired
    private PubSubTable pubSubTable;


    public void sendMessage(String topic, MessageVO messageVO) {
        //这里给订阅该主题的链接的每个队列进行广播该消息
        pubSubTable.boradCast(topic, messageVO.getMessageId());
        redisTemplate.getConnectionFactory().getConnection().publish(topic.getBytes(CharsetUtil.UTF_8), gson.toJson(messageVO).getBytes());
    }
}
而维护他们关系的表,这个主要是用来发布list和监听键
package com.gdut.redisdemo.config;

import org.springframework.beans.factory.annotation.Autowired;
import org.springframework.data.redis.connection.RedisConnection;
import org.springframework.data.redis.core.StringRedisTemplate;
import org.springframework.stereotype.Component;

import java.util.*;

/**
 * @author lulu
 * @Date 2019/6/22 17:39
 */

public class PubSubTable {
    //Map的key为主题,Set里面的元素为队列里面的消费者的队列key,该队列用来检测消息是否被正确接受
    private Map> pubSubMap = new HashMap();

    @Autowired
    private StringRedisTemplate redisTemplate;
//添加关系
    public Boolean addComsumer(String topic, String comsumer) {
        Set comsumerList = pubSubMap.get(topic);

        if (comsumerList == null) {
            comsumerList = new HashSet<>();
        }
        Boolean b = comsumerList.add(comsumer);
        pubSubMap.put(topic, comsumerList);
        return b;
    }
//删除关系
    public Boolean removeComsumer(String topic, String comsumer) {
        Set comsumerList = pubSubMap.get(topic);
        Boolean b =false;
        if(comsumerList!=null){
           b= comsumerList.remove(comsumer);
            pubSubMap.put(topic, comsumerList);
        }
        return b;
    }


    //广播消息
    public void boradCast(String topic, String messageId) {
        if(pubSubMap.get(topic)!=null){
            for (String comsumer : pubSubMap.get(topic)) {
                //这里不再次进行入队和设监听键的原因是已经有了(对应滞后消费的情况)
                if(!redisTemplate.hasKey("fail_"+topic+"_"+comsumer+"_"+messageId)){
                    //设置监听键
                    redisTemplate.opsForValue().set(topic+"_"+comsumer + "_" + messageId, messageId);
                    //为该队列传入消息id,为后面校验使用
                    redisTemplate.opsForList().leftPush(topic+"_"+comsumer, topic + "_" + messageId);
                }
            }
        }

    }

}
消费者,这里的订阅要对监听容器操作,该容器(RedisMessageListenerContainer)有订阅频道和取消订阅的方法,一开始没找到。。
package com.gdut.redisdemo.comsumer;

import com.gdut.redisdemo.VO.MessageVO;
import com.gdut.redisdemo.VO.UserVO;
import com.gdut.redisdemo.config.PubSubTable;
import com.google.gson.Gson;
import org.springframework.beans.factory.annotation.Autowired;
import org.springframework.data.redis.connection.Message;
import org.springframework.data.redis.connection.MessageListener;
import org.springframework.data.redis.connection.RedisConnection;
import org.springframework.data.redis.core.StringRedisTemplate;
import org.springframework.lang.Nullable;
import org.springframework.stereotype.Component;

import java.util.concurrent.TimeUnit;

/**
 * @author lulu
 * @Date 2019/6/22 16:54
 */
@Component
public class Comsumer1 implements MessageListener {
    @Autowired
    private Gson gson;

    @Autowired
    private PubSubTable pubSubTable;
    @Autowired
    private StringRedisTemplate redisTemplate;

    public void addChannel(String topic) {

        pubSubTable.addComsumer(topic, this.getClass().getSimpleName());
        System.out.printf("%s 订阅一个主题%s%n", this.getClass().getSimpleName(), topic);

    }


    @Override
    public void onMessage(Message message, @Nullable byte[] pattern) {
        String name = this.getClass().getSimpleName();
        String topic = new String(message.getChannel());
        String content = new String(message.getBody());
        MessageVO messageVO = gson.fromJson(content, MessageVO.class);
        //如果这个取出来的不是正确的id,丢弃并记录。
        String b = redisTemplate.opsForList().rightPop(topic + "_" + name);
        if (b != null && b.equals(topic + "_" + messageVO.getMessageId())) {
            UserVO userVO = gson.fromJson(messageVO.getContent(), UserVO.class);
            System.out.printf("%s从主题%s收到消息:%s%n", name, topic, content);//业务处理
            System.out.printf("消息内容:%s%n", userVO.toString());
            redisTemplate.expire(topic + "_" + name + "_" + messageVO.getMessageId(), 1, TimeUnit.NANOSECONDS);
        } else {
            //把他设为fail,准备重新处理
            redisTemplate.opsForValue().set("fail_" + topic + "_" + name + "_" + messageVO.getMessageId(), content);
        }
    }
}
监听器:使用这个的前提是配置文件要开启事件监听:notify-keyspace-events Ex
package com.gdut.redisdemo.comsumer;

import org.springframework.beans.factory.annotation.Autowired;
import org.springframework.data.redis.connection.Message;
import org.springframework.data.redis.connection.MessageListener;
import org.springframework.data.redis.core.RedisTemplate;
import org.springframework.data.redis.core.StringRedisTemplate;
import org.springframework.data.redis.listener.KeyExpirationEventMessageListener;
import org.springframework.data.redis.listener.KeyspaceEventMessageListener;
import org.springframework.data.redis.listener.RedisMessageListenerContainer;
import org.springframework.stereotype.Component;

/**
 * @author lulu
 * @Date 2019/6/22 18:40
 */
public class CheckKeyExpire extends KeyspaceEventMessageListener {
    @Autowired
    private StringRedisTemplate redisTemplate;

    /**
     * Creates new {@link MessageListener} for {@code __keyevent@*__:expired} messages.
     *
     * @param listenerContainer must not be {@literal null}.
     */
    public CheckKeyExpire(RedisMessageListenerContainer listenerContainer) {
        super(listenerContainer);
    }

    @Override
    protected void doHandleMessage(Message message) {
        String channel = new String(message.getChannel());
        if (channel.equals("__keyevent@0__:expired")) {

            String body = new String(message.getBody());
            System.out.println("消息id为:" + body + "成功处理");
            redisTemplate.delete("fail_" + new String(message.getChannel())+"_"+ body);
            //如果这里有状态改变为接受成功的消息之类的,可以在这里操作数据库
        }
    }
}
大概的几个核心部分就是这样,然后配置方面,因为不同的消费者不能公用同一个client所以把获取连接的bean设为多例的。
这里一开始做的时候遇到好多坑,后来发现template构造函数有个factory了,然后试着注入到配置类里面,果然可以,解决了一开始的bug
package com.gdut.redisdemo.config;

import com.gdut.redisdemo.comsumer.CheckKeyExpire;
import org.springframework.beans.factory.annotation.Autowired;
import org.springframework.beans.factory.config.BeanDefinition;
import org.springframework.context.annotation.Bean;
import org.springframework.context.annotation.Configuration;
import org.springframework.context.annotation.Scope;
import org.springframework.data.redis.connection.RedisConnection;
import org.springframework.data.redis.connection.RedisConnectionFactory;
import org.springframework.data.redis.core.StringRedisTemplate;
import org.springframework.data.redis.listener.RedisMessageListenerContainer;

import java.util.HashMap;
import java.util.List;
import java.util.Map;

/**
 * @author lulu
 * @Date 2019/6/22 17:31
 */
@Configuration
public class RedisConfig {
@Autowired
RedisConnectionFactory redisConnectionFactory;

    @Bean
    @Scope(BeanDefinition.SCOPE_PROTOTYPE)
    public RedisConnection redisConnection() {
        return redisConnectionFactory.getConnection();
    }

    @Bean
    public RedisMessageListenerContainer container() {
        RedisMessageListenerContainer container = new RedisMessageListenerContainer();
        container.setConnectionFactory(redisConnectionFactory);
        return container;
    }

    @Bean
    public PubSubTable pubSubTable() {
        return new PubSubTable();
    }

    @Bean
    public CheckKeyExpire checkKeyExpire(
    ) {
        return new CheckKeyExpire(container());
    }

}
下面看一下正常的演示,此时消费者1和消费者2均订阅了user这个主题,如果匹配模式的话要用监听容器的PatternTopic这个类。
然后进行广播:
遍历关系表,设置监听键和消息id确认的队列。此时有这四个键
然后执行onMessage的方法操作数据
结果如下
由于消息被消费完了,会把监听键设置过期,然后执行监听过期的方法,这里是对0数据库的过期事件才进行操作,打印出消息,并删除相关键如果有的话
 protected void doHandleMessage(Message message) {
        String channel = new String(message.getChannel());
        if (channel.equals("__keyevent@0__:expired")) {
            String body = new String(message.getBody());
            System.out.println("消息id为:" + body + "成功处理");
            redisTemplate.delete("fail_" + new String(message.getChannel())+"_"+ body);
            //如果这里有状态改变为接受成功的消息之类的,可以在这里操作数据库
        }
    }
此时redis的数据为空
那么看一下消息滞后的情况,就是队列里面多了几个奇怪的元素,然后里面的消息没有被及时消费,下面模拟一下这个情况:
这里我预先创好存放i消息d的队列,该队列主要是用来查看当前消息是否和收到的内容是一致的,如果不一致,则认为该消息发送失败了,这里先放四个元素。
然后向消费者1发送消息:
这个注解的意思是每15秒执行一次,延迟20s执行
@Scheduled(initialDelay = 20000,fixedRate = 15000)结果:
重投三次之后,没有再投递了,此时还消息id队列还有这个值,会被下次消息获取时去掉
然后看取消订阅的例子:
订阅主题:
http://localhost:8080/subTopic/1?topic=test
发送消息:
http://localhost:8080/sendMessage/test?name=lele&age=21
业务处理:
消息确认:
![]() 通过队列的消息校验和经过业务处理后,会使监听键过期,否则设为失败的消息投递,进行重投
通过队列的消息校验和经过业务处理后,会使监听键过期,否则设为失败的消息投递,进行重投
![]()
取消订阅:这里面不仅仅要把hashMap里的关系去掉,还要移出监听容器
http://localhost:8080/unSubTopic/1?topic=test
再次发消息,没有结果。可见取消订阅成功了
其实这个例子一开始写的不是很好,第一天做的过程也有很多坑,好像那个配置那些都是迷迷糊糊弄出来的,后来发现也不对,整个设计的也有待完善,但是就当对spring-data-redis一个实操吧,就瞎鼓捣,一些尝试啥的,感觉用起来很多坑,为什么这么说呢,因为用一开始的版本的话,从配置还有监听容器上面和取消订阅有挺多问题的,当时没有仔细考虑这个东西,然后就出现了消费者两个以上出现read timeout的情况,我怀疑是哪里锁住了,第二天把他放到监听容器上就没有了,还可以取消订阅,其实这里对于消息投递失败的处理也不是很正宗,都是收到消息才丢弃的消息,从某种意义看消息投递其实是成功了的,我github的other分支里面就用了一个监听成功、一个监听失败的键(默认5s,即5s消息没有成功就进行重投)的做法,写得不是那么好和完善,就当随便看看吧,这个例子就只是拿来熟悉下redisTemplate,听说还有5.0以上stream也可以实现消息队列,到时候看看。完整代码已放上github。
如何实现简单的延时队列?这里要用到sorted set结构,拿时间戳作为score,消息id作为key,至于消息的内容可以存放在redis或者其他数据库上,计算n秒前的时间戳,再用zrangebyscore获取当前时间戳-ns前的时间戳的消息id集合进行消费


