android N拨打电话流程
本文主要分析从拨号盘拨号发出Intent开始,最终到RIL.java中执行拨号操作的过程。

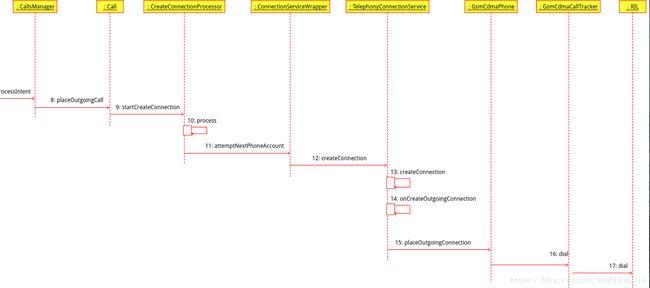
(1)首先拨号盘应用发送了action为android.intent.action.CALL的Intent,被UserCallActivity接收处理,UserCallActivity调用UserCallIntentProcessor来处理:
 @Override
    protected void onCreate(Bundle bundle) {
        super.onCreate(bundle);
        Log.startSession("UCA.oC");
        try {
            Intent intent = getIntent();
            verifyCallAction(intent);
            final UserManager userManager = (UserManager) getSystemService(Context.USER_SERVICE);
            final UserHandle userHandle = new UserHandle(userManager.getUserHandle());
            new UserCallIntentProcessor(this, userHandle).processIntent(getIntent(),
                    getCallingPackage(), true /* hasCallAppOp*/);
        } finally {
            Log.endSession();
        }
        finish();
(2)UserCallIntentProcessor通过processOutgoingCallIntent(),sendBroadcastToReceiver()调用PrimaryCallReceiver来处理:
    private boolean sendBroadcastToReceiver(Intent intent) {
        intent.putExtra(CallIntentProcessor.KEY_IS_INCOMING_CALL, false);
        intent.setFlags(Intent.FLAG_RECEIVER_FOREGROUND);
        intent.setClass(mContext, PrimaryCallReceiver.class);
        Log.d(this, "Sending broadcast as user to CallReceiver");
        mContext.sendBroadcastAsUser(intent, UserHandle.SYSTEM);
        return true;
}(3)PrimaryCallReceiver中处理:
    public void onReceive(Context context, Intent intent) {
        Log.startSession("PCR.oR");
        synchronized (getTelecomSystem().getLock()) {
            getTelecomSystem().getCallIntentProcessor().processIntent(intent);
        }
        Log.endSession();
}(3)CallIntentProcessor中处理:
    public void processIntent(Intent intent) {
        final boolean isUnknownCall = intent.getBooleanExtra(KEY_IS_UNKNOWN_CALL, false);
        Log.i(this, "onReceive - isUnknownCall: %s", isUnknownCall);

        Trace.beginSection("processNewCallCallIntent");
        if (isUnknownCall) {
            processUnknownCallIntent(mCallsManager, intent);
        } else {
            processOutgoingCallIntent(mContext, mCallsManager, intent);
        }
        Trace.endSection();
    }
在processOutgoingCallIntent中主要的跳转逻辑
        Call call = callsManager
                .startOutgoingCall(handle, phoneAccountHandle, clientExtras, initiatingUser);

        if (call != null) {
            NewOutgoingCallIntentBroadcaster broadcaster = new NewOutgoingCallIntentBroadcaster(
                    context, callsManager, call, intent, callsManager.getPhoneNumberUtilsAdapter(),
                    isPrivilegedDialer);
            final int result = broadcaster.processIntent();
            final boolean success = result == DisconnectCause.NOT_DISCONNECTED;

            if (!success && call != null) {
                callsManager.clearPendingMOEmergencyCall();
                disconnectCallAndShowErrorDialog(context, call, result);
            }
        }
其中重点通过CallManager的startOutgoingCall方法构造了一个Call对象,其中重点会为该Call设置PhoneAccountHandle
Call startOutgoingCall(Uri handle, PhoneAccountHandle phoneAccountHandle, Bundle extras,
            UserHandle initiatingUser) {
        boolean isReusedCall = true;
        Call call = reuseOutgoingCall(handle);

        // Create a call with original handle. The handle may be changed when the call is attached
        // to a connection service, but in most cases will remain the same.
        if (call == null) {
            call = new Call(getNextCallId(), mContext,
                    this,
                    mLock,
                    mConnectionServiceRepository,
                    mContactsAsyncHelper,
                    mCallerInfoAsyncQueryFactory,
                    mPhoneNumberUtilsAdapter,
                    handle,
                    null /* gatewayInfo */,
                    null /* connectionManagerPhoneAccount */,
                    null /* phoneAccountHandle */,
                    Call.CALL_DIRECTION_OUTGOING /* callDirection */,
                    false /* forceAttachToExistingConnection */,
                    false /* isConference */
            );
            if ((extras != null) &&
                    extras.getBoolean(TelephonyProperties.EXTRA_DIAL_CONFERENCE_URI, false)) {
                //Reset PostDialDigits with empty string for ConfURI call.
                call.setPostDialDigits("");
            }

            call.initAnalytics();

            call.setInitiatingUser(initiatingUser);

            isReusedCall = false;
        }


        ...


        List accounts =
                constructPossiblePhoneAccounts(handle, initiatingUser, scheme);
        if (phoneAccountHandle != null) {
            if (!accounts.contains(phoneAccountHandle)) {
                phoneAccountHandle = null;
            }
        }

        if (phoneAccountHandle == null && accounts.size() > 0) {

            if(accounts.size() > 1) {
                PhoneAccountHandle defaultPhoneAccountHandle =
                        mPhoneAccountRegistrar.getOutgoingPhoneAccountForScheme(scheme,
                                initiatingUser);
                if (defaultPhoneAccountHandle != null &&
                        accounts.contains(defaultPhoneAccountHandle)) {
                    phoneAccountHandle = defaultPhoneAccountHandle;
                }
            } else {

                phoneAccountHandle = accounts.get(0);
            }
        }

        call.setTargetPhoneAccount(phoneAccountHandle);


        ...


        boolean needsAccountSelection = phoneAccountHandle == null && accounts.size() > 1 &&
                !call.isEmergencyCall();
        if (needsAccountSelection) {
            call.setState(CallState.SELECT_PHONE_ACCOUNT, "needs account selection");
            // Create our own instance to modify (since extras may be Bundle.EMPTY)
            extras = new Bundle(extras);
            extras.putParcelableList(android.telecom.Call.AVAILABLE_PHONE_ACCOUNTS, accounts);
        } else {
            call.setState(
                    CallState.CONNECTING,
                    phoneAccountHandle == null ? "no-handle" : phoneAccountHandle.toString());
        }


        ...


        return call;
} (3)NewOutgoingCallIntentBroadcaster中主要逻辑:
        if (callImmediately) {
            String scheme = isUriNumber ? PhoneAccount.SCHEME_SIP : PhoneAccount.SCHEME_TEL;
            boolean speakerphoneOn = mIntent.getBooleanExtra(
                    TelecomManager.EXTRA_START_CALL_WITH_SPEAKERPHONE, false);
            int videoState = mIntent.getIntExtra(
                    TelecomManager.EXTRA_START_CALL_WITH_VIDEO_STATE,
                    VideoProfile.STATE_AUDIO_ONLY);

            mCall.setNewOutgoingCallIntentBroadcastIsDone();
            mCallsManager.placeOutgoingCall(mCall, Uri.fromParts(scheme, number, null), null,
                    speakerphoneOn, videoState);
        }
重点调用CallsManager的placeOutgoingCal()方法
在placeOutgoingCal中核心调用了call.startCreateConnection(mPhoneAccountRegistrar);
        if (call.getTargetPhoneAccount() != null || call.isEmergencyCall()) {
            if (!call.isEmergencyCall()) {
                updateLchStatus(call.getTargetPhoneAccount().getId());
            }
            if (mPendingMOEmerCall == null) {
                call.startCreateConnection(mPhoneAccountRegistrar);
            }
        } else if (mPhoneAccountRegistrar.getCallCapablePhoneAccounts(
                requireCallCapableAccountByHandle ? call.getHandle().getScheme() : null, false,
                call.getInitiatingUser()).isEmpty()) {
            markCallAsDisconnected(call, new DisconnectCause(DisconnectCause.CANCELED,
                    "No registered PhoneAccounts"));
            markCallAsRemoved(call);
}(4)startCreateConnection中处理:
    void startCreateConnection(PhoneAccountRegistrar phoneAccountRegistrar) {
        if (mCreateConnectionProcessor != null) {
            Log.w(this, "mCreateConnectionProcessor in startCreateConnection is not null. This is" +
                    " due to a race between NewOutgoingCallIntentBroadcaster and " +
                    "phoneAccountSelected, but is harmlessly resolved by ignoring the second " +
                    "invocation.");
            return;
        }
        mCreateConnectionProcessor = new CreateConnectionProcessor(this, mRepository, this,
                phoneAccountRegistrar, mContext);
        mCreateConnectionProcessor.process();
} public void process() {
Log.v(this, "process");
clearTimeout();
mAttemptRecords = new ArrayList<>();
if (mCall.getTargetPhoneAccount() != null) {
mAttemptRecords.add(new CallAttemptRecord(
mCall.getTargetPhoneAccount(), mCall.getTargetPhoneAccount()));
}
adjustAttemptsForConnectionManager();
adjustAttemptsForEmergency(mCall.getTargetPhoneAccount());
mAttemptRecordIterator = mAttemptRecords.iterator();
attemptNextPhoneAccount();
}其中重点逻辑在attemptNextPhoneAccount();
    private void attemptNextPhoneAccount() {
        CallAttemptRecord attempt = null;
        if (mAttemptRecordIterator.hasNext()) {
            attempt = mAttemptRecordIterator.next();

            if (!mPhoneAccountRegistrar.phoneAccountRequiresBindPermission(
                    attempt.connectionManagerPhoneAccount)) {
                attemptNextPhoneAccount();
                return;
            }
            if (!attempt.connectionManagerPhoneAccount.equals(attempt.targetPhoneAccount) &&
                    !mPhoneAccountRegistrar.phoneAccountRequiresBindPermission(
                            attempt.targetPhoneAccount)) {
                attemptNextPhoneAccount();
                return;
            }
        }

        if (mCallResponse != null && attempt != null) {
            PhoneAccountHandle phoneAccount = attempt.connectionManagerPhoneAccount;
            mService = mRepository.getService(phoneAccount.getComponentName(),
                    phoneAccount.getUserHandle());
            if (mService == null) {
                Log.i(this, "Found no connection service for attempt %s", attempt);
                attemptNextPhoneAccount();
            } else {
                mConnectionAttempt++;
                mCall.setConnectionManagerPhoneAccount(attempt.connectionManagerPhoneAccount);
                mCall.setTargetPhoneAccount(attempt.targetPhoneAccount);
                mCall.setConnectionService(mService);
                setTimeoutIfNeeded(mService, attempt);

                mService.createConnection(mCall, this);
            }
        } else {
            DisconnectCause disconnectCause = mLastErrorDisconnectCause != null ?
                    mLastErrorDisconnectCause : new DisconnectCause(DisconnectCause.ERROR);
            notifyCallConnectionFailure(disconnectCause);
        }
其中主要逻辑是找到一个正确的PhoneAccount然后通过调用mService.createConnection(mCall, this),其中mService为ConnectionServiceWrapper类型的对象。
(6)ConnectionServiceWrapper中处理:
    public void createConnection(final Call call, final CreateConnectionResponse response) {
        BindCallback callback = new BindCallback() {
            @Override
            public void onSuccess() {
                String callId = mCallIdMapper.getCallId(call);
                mPendingResponses.put(callId, response);

                GatewayInfo gatewayInfo = call.getGatewayInfo();
                Bundle extras = call.getIntentExtras();
                if (gatewayInfo != null && gatewayInfo.getGatewayProviderPackageName() != null &&
                        gatewayInfo.getOriginalAddress() != null) {
                    extras = (Bundle) extras.clone();
                    extras.putString(
                            TelecomManager.GATEWAY_PROVIDER_PACKAGE,
                            gatewayInfo.getGatewayProviderPackageName());
                    extras.putParcelable(
                            TelecomManager.GATEWAY_ORIGINAL_ADDRESS,
                            gatewayInfo.getOriginalAddress());
                }
                try {
                    mServiceInterface.createConnection(
                            call.getConnectionManagerPhoneAccount(),
                            callId,
                            new ConnectionRequest(
                                    call.getTargetPhoneAccount(),
                                    call.getHandle(),
                                    extras,
                                    call.getVideoState(),
                                    callId),
                            call.shouldAttachToExistingConnection(),
                            call.isUnknown());
                } catch (RemoteException e) {
                    Log.e(this, e, "Failure to createConnection -- %s", getComponentName());
                    mPendingResponses.remove(callId).handleCreateConnectionFailure(
                            new DisconnectCause(DisconnectCause.ERROR, e.toString()));
                }
            }
        };

        mBinder.bind(callback, call);
    }
其中最主要的一步还是下面的代码
                    mServiceInterface.createConnection(
                            call.getConnectionManagerPhoneAccount(),
                            callId,
                            new ConnectionRequest(
                                    call.getTargetPhoneAccount(),
                                    call.getHandle(),
                                    extras,
                                    call.getVideoState(),
                                    callId),
                            call.shouldAttachToExistingConnection(),
                            call.isUnknown());
那么问题来了mServiceInterface到底是什么东西,上面所有的分析都是在Telecomm中发生的,众所周知,android中的phone是运行在自己单独的进程中的,到此为止,以后的流程都是发生在phone进程中的,马上分析一下mServiceInterface是一个什么东西。
可以看出上面的代码是在调用mBinder.bind(callback, call)后回调函数中调用的(mBinder是ConnectionServiceWrapper的父类ServiceBinder中的一个内部类),所以才可应该是bind操作后对mServiceInterface进行了赋值。
        void bind(BindCallback callback, Call call) {
            Log.d(ServiceBinder.this, "bind()");

            // Reset any abort request if we're asked to bind again.
            clearAbort();

            if (!mCallbacks.isEmpty()) {
                // Binding already in progress, append to the list of callbacks and bail out.
                mCallbacks.add(callback);
                return;
            }

            mCallbacks.add(callback);
            if (mServiceConnection == null) {
                Intent serviceIntent = new Intent(mServiceAction).setComponent(mComponentName);
                ServiceConnection connection = new ServiceBinderConnection(call);

                Log.event(call, Log.Events.BIND_CS, mComponentName);
                final int bindingFlags = Context.BIND_AUTO_CREATE | Context.BIND_FOREGROUND_SERVICE;
                final boolean isBound;
                if (mUserHandle != null) {
                    isBound = mContext.bindServiceAsUser(serviceIntent, connection, bindingFlags,
                            mUserHandle);
                } else {
                    isBound = mContext.bindService(serviceIntent, connection, bindingFlags);
                }
                if (!isBound) {
                    handleFailedConnection();
                    return;
                }
            } else {
                Log.d(ServiceBinder.this, "Service is already bound.");
                Preconditions.checkNotNull(mBinder);
                handleSuccessfulConnection();
            }
        }
可以看出果然去bind了service,然后绑定成功后,应该会回调ServiceBinderConnection的onServiceConnected:
        public void onServiceConnected(ComponentName componentName, IBinder binder) {
            try {
                synchronized (mLock) {
                    mCall = null;
                    if (mIsBindingAborted) {
                        clearAbort();
                        logServiceDisconnected("onServiceConnected");
                        mContext.unbindService(this);
                        handleFailedConnection();
                        return;
                    }
                    mServiceConnection = this;
                    setBinder(binder);
                    handleSuccessfulConnection();
                }
            } finally {
                Log.endSession();
            }
        }
可以看出在绑定成功后回调用setBinder(binder)来保存获取到的远程Binder对象,看看setBinder的实现:
    private void setBinder(IBinder binder) {
        if (mBinder != binder) {
            if (binder == null) {
                removeServiceInterface();
                mBinder = null;
                for (Listener l : mListeners) {
                    l.onUnbind(this);
                }
            } else {
                mBinder = binder;
                setServiceInterface(binder);
            }
        }
    }
可以看出如果绑定成功的话会调用setServiceInterface方法,该方法是ServiceBinder的一个抽象函数,看看ServiceBinder的子类ConnectionServiceWrapper的实现:
    @Override
    protected void setServiceInterface(IBinder binder) {
        mServiceInterface = IConnectionService.Stub.asInterface(binder);
        Log.v(this, "Adding Connection Service Adapter.");
        addConnectionServiceAdapter(mAdapter);
    }
真相大白,原来mServiceInterface就是mBinder.bind(callback, call)中绑定服务返回的远程Binder对象,下面分析到底bind了那个服务,在bind函数中明确指定了Intent的ComponentName。
               Intent serviceIntent = new Intent(mServiceAction).setComponent(mComponentName);
ServiceConnection connection = new ServiceBinderConnection(call);mComponentName是从哪里来的?
public class ConnectionServiceWrapper extends ServiceBinder{
    ConnectionServiceWrapper(
            ComponentName componentName,
            ConnectionServiceRepository connectionServiceRepository,
            PhoneAccountRegistrar phoneAccountRegistrar,
            CallsManager callsManager,
            Context context,
            TelecomSystem.SyncRoot lock,
            UserHandle userHandle) {
        super(ConnectionService.SERVICE_INTERFACE, componentName, context, lock, userHandle);
        mConnectionServiceRepository = connectionServiceRepository;
        phoneAccountRegistrar.addListener(new PhoneAccountRegistrar.Listener() {
        });
        mPhoneAccountRegistrar = phoneAccountRegistrar;
        mCallsManager = callsManager;
        mAppOpsManager = (AppOpsManager) context.getSystemService(Context.APP_OPS_SERVICE);
    }
}
protected ServiceBinder(String serviceAction, ComponentName componentName, Context context,
TelecomSystem.SyncRoot lock, UserHandle userHandle) {
Preconditions.checkState(!TextUtils.isEmpty(serviceAction));
Preconditions.checkNotNull(componentName);
mContext = context;
mLock = lock;
mServiceAction = serviceAction;
mComponentName = componentName;
mUserHandle = userHandle;
}可以看出mComponentName是在构造ConnectionServiceWrapper对象时候传入的。回到attemptNextPhoneAccount方法中:
    private ConnectionServiceWrapper mService;

    mService = mRepository.getService(phoneAccount.getComponentName(),
                    phoneAccount.getUserHandle());
    public ConnectionServiceWrapper getService(ComponentName componentName, UserHandle userHandle) {
        Pair cacheKey = Pair.create(componentName, userHandle);
        ConnectionServiceWrapper service = mServiceCache.get(cacheKey);
        if (service == null) {
            service = new ConnectionServiceWrapper(
                    componentName,
                    this,
                    mPhoneAccountRegistrar,
                    mCallsManager,
                    mContext,
                    mLock,
                    userHandle);
            service.addListener(mUnbindListener);
            mServiceCache.put(cacheKey, service);
        }
        return service;
} 可以看出mComponentName来源于phoneAccount.getComponentName()(PhoneAccount为PhoneAccountHandle类型变量,PhoneAccount类中有个成员变量PhoneAccountHandle,android有时候起得变量名容易让人混淆,PhoneAccountHandle主要是保存了创建链接的服务的包名类名信息,PhoneAccount中包含了PhoneAccountHandle,还有最关键的该Account的Capabilities,支持不支持语音通话等),现在问题又来了phoneAccount是怎么来的。对于PhoneAccount我理解就是可以安卓为了打电话功能可以扩展新加的东西,现在我们手机大部分情况通过SIM卡打电话,走的是运营商网络,但是还有其他电话类型比如VOIP,具体我也不了解,所以系统可能也可以有很多的PhoneAccount。当然现在我们还是走的标准的打电话流程,我们去看看SIM卡的PhoneAccount是在哪里创建的。
在TelecomAccountRegistry中注册了PhoneAccount
        private PhoneAccount registerPstnPhoneAccount(boolean isEmergency, boolean isDummyAccount) {
            String dummyPrefix = isDummyAccount ? "Dummy " : "";
            PhoneAccountHandle phoneAccountHandle =
                    PhoneUtils.makePstnPhoneAccountHandleWithPrefix(
                            mPhone, dummyPrefix, isEmergency);

            PhoneAccount account = PhoneAccount.builder(phoneAccountHandle, label)
                    .setAddress(Uri.fromParts(PhoneAccount.SCHEME_TEL, line1Number, null))
                    .setSubscriptionAddress(
                            Uri.fromParts(PhoneAccount.SCHEME_TEL, subNumber, null))
                    .setCapabilities(capabilities)
                    .setIcon(icon)
                    .setHighlightColor(color)
                    .setShortDescription(description)
                    .setSupportedUriSchemes(Arrays.asList(
                            PhoneAccount.SCHEME_TEL, PhoneAccount.SCHEME_VOICEMAIL))
                    .setExtras(instantLetteringExtras)
                    .setGroupId(groupId)
                    .build();
            mTelecomManager.registerPhoneAccount(account);

            return account;
}此时我们关心的mComponentName就是在下面代码中创建的:
            PhoneAccountHandle phoneAccountHandle =
                    PhoneUtils.makePstnPhoneAccountHandleWithPrefix(
                            mPhone, dummyPrefix, isEmergency);
在PhoneUtils中:
    private static final ComponentName PSTN_CONNECTION_SERVICE_COMPONENT =
            new ComponentName("com.android.phone",
"com.android.services.telephony.TelephonyConnectionService");可以看出是在phone进程中的一个服务,所以回到最上面的代码mServiceInterface.createConnection(),其实调用的是TelephonyConnectionService的createConnection方法,好,继续往下走(注意,此时后已经进入phone进程了,上面的所有操作都不是在phone进程中的),发现TelephonyConnectionService没有实现该方法,用的父类ConnectionService的方法。该类代码路径为frameworks/base/telecomm/java/android/telecom/ConnectionService.java.给我们一个启示,我们想扩展电话功能需要继承实现该类,并注册我们自己的PhoneAccount。
private void createConnection(
            final PhoneAccountHandle callManagerAccount,
            final String callId,
            final ConnectionRequest request,
            boolean isIncoming,
            boolean isUnknown) {

        Connection connection = isUnknown ? onCreateUnknownConnection(callManagerAccount, request)
                : isIncoming ? onCreateIncomingConnection(callManagerAccount, request)
                : onCreateOutgoingConnection(callManagerAccount, request);

    }
我们现在是呼出,所以调用的是onCreateOutgoingConnection,该方法在ConnectionService中是空的实现,所以又回到了TelephonyConnectionService中,在onCreateOutgoingConnection中,代码很长我就不贴了,主要是创建了一个链接:
            Connection resultConnection = getTelephonyConnection(request, numberToDial,
                    isEmergencyNumber, handle, phone);
然后处理该链接
placeOutgoingConnection((TelephonyConnection) resultConnection, phone, request);重点就在该方法
 private void placeOutgoingConnection(
            TelephonyConnection connection, Phone phone, int videoState, Bundle extras,
            ConnectionRequest request) {

        com.android.internal.telephony.Connection originalConnection = null;
        try {
            if (phone != null) {
                if (isAddParticipant) {
                    phone.addParticipant(number);
                    return;
                } else {
                    originalConnection = phone.dial(number, null, request.getVideoState(), bundle);
                }
            }
        }
    }