教你编译调试Elasticsearch 6.3.2源码
前言
想深入理解 Elasticsearch,阅读它的源码是很有必要的,一来可以了解它内部的具体实现,有助于调优,二来可以了解优秀开源项目的代码架构,提高我们的代码架构能力等
阅读Elasticsearch源码的第一步是搭建调试环境,然后作者在这个过程中遇到很多麻烦,在网上找不到想要的答案,历经千辛最后一一解决,所以记录下,帮助有需要的童鞋
软件环境
- 操作系统:win7
- Elasticsearch 源码版本: 6.3.2
- JDK版本: 10.0.2
- Gradle版本: 4.7
- Intellij Idea版本: 2018.2
环境准备及工程导入
1.安装JDK
Elasticsearch 6.3.2需要JDK1.9编译,否则后面步骤会报错。
Java SE Downloads 地址:
http://www.oracle.com/technetwork/java/javase/downloads/index.html
作者装的是 JDK 10.0.2
2.下载Elasticsearch源码,并且切换到6.3.2分支
Elasticsearch github源码托管地址:
https://github.com/elastic/elasticsearch.git
git checkout v6.3.2也可直接下载源码包,地址在 https://github.com/elastic/elasticsearch/releases
3.下载gradle的安装包
查看 elasticsearch\gradle\wrapper\gradle-wrapper.properties 发现如下配置:
distributionUrl=https://services.gradle.org/distributions/gradle-4.5-all.zipElasticsearch 6.3.2需要安装gradle-4.5,官方下载地址:
https://services.gradle.org/distributions/gradle-4.5-all.zip
注意:由于国内网速问题,为了加快速度,进行第4步操作
4.拷贝文件
将下载的gradle-4.5-all.zip包放到 elasticsearch\gradle\wrapper 目录下,
确保和 elasticsearch\gradle\wrapper\gradle-wrapper.properties 在同级目录,
然后修改 elasticsearch\gradle\wrapper\gradle-wrapper.properties 配置如下:
distributionUrl=gradle-4.5-all.zip5.修改源码Maven仓库地址
国内下载国外仓库的jar包速度慢,需要替换Maven地址,设置为本地或者国内可用的Maven仓库。
需要修改下列文件的 maven URL 配置:
- elasticsearch\benchmarks\build.gradle
- elasticsearch\client\benchmark\build.gradle
修改源码中上面build.gradle文件里面的repositories-maven-url的值,
配置为可用的仓库地址,譬如修改为阿里云maven地址 http://maven.aliyun.com/nexus/content/groups/public/,修改示例如下:
buildscript {
    repositories {
        maven {
            url 'http://maven.aliyun.com/nexus/content/groups/public/'
        }
    }
    dependencies {
        classpath 'com.github.jengelman.gradle.plugins:shadow:2.0.2'
    }
}
6.修改全局Maven仓库地址
在USER_HOME/.gradle/下面创建新文件 init.gradle,输入下面的内容并保存。
allprojects{
    repositories {
        def REPOSITORY_URL = 'http://maven.aliyun.com/nexus/content/groups/public/'
        all {
            ArtifactRepository repo ->
    if (repo instanceof MavenArtifactRepository) {
                def url = repo.url.toString()
                if (url.startsWith('https://repo.maven.org/maven2') || url.startsWith('https://jcenter.bintray.com/')) {
                    project.logger.lifecycle "Repository ${repo.url} replaced by $REPOSITORY_URL."
                    remove repo
                }
            }
        }
        maven {
            url REPOSITORY_URL
        }
    }
}其中USER_HOME/.gradle/是自己的gradle安装目录,示例值:C:\Users\Administrator\.gradle,
如果没有.gradle目录,可用自己创建,或者先执行第7步,等gradle安装后再回来修改。
上面脚本把url匹配到的仓库都替换成了阿里云的仓库,
如果有未匹配到的导致编译失败,可用自己仿照着添加匹配条件。
7.gradle编译源码
windows运行cmd,进入DOS命令行,然后切换到elasticsearch源码的根目录,执行如下命令,把elasticsearch编译为 idea 工程:
gradlew idea编译失败则按照错误信息解决问题,可用使用如下命令帮助定位问题:
gradlew idea -info
gradlew idea -debug
一般是Maven仓库地址不可用导致jar包无法下载,从而编译失败,此时请参考步骤5和6修改相关的仓库地址。
编译成功后打印日志:
BUILD SUCCESSFUL in 1m 23s8. idea 导入elasticsearch工程
idea 中 File -> New Project From Existing Sources 选择你下载的 Elasticsearch 根目录,然后点 open ,之后 Import project from external model -> Gradle , 选中 Use auto-import, 然后就可以了
导入进去后,gradle 又会编译一遍,需要等一会,好了之后如下:
运行,开始 solve error 模式
前面的步骤都挺顺利,接下来遇到的 ERROR & EXCEPTION 让作者耗费了好几天,心力交瘁,好在最终运行成功
在 elasticsearch/server/src/main/org/elasticsearch/bootstrap 下找到Elasticsearch的启动类 Elasticsearch.java,打开文件,右键 Run Elasticsearch.main(),运行main方法
1、 报错如下:
ERROR: the system property [es.path.conf] must be set这是需要配置 es.path.conf 参数,我们先在 elasticsearch 源码目录下新建一个 home 目录,然后在 https://www.elastic.co/downloads/elasticsearch 下载一个同版本号的 Elasticsearch6.3.2 发行版,解压,将 config 目录拷贝到 home 目录中
然后打开 Edit Configurations,在 VM options 加入如下配置:
-Des.path.conf=D:\elasticsearch-6.3.2\home\config再次运行 Run Elasticsearch.main()
2、报错如下:
Exception in thread "main" java.lang.IllegalStateException: path.home is not configured
    at org.elasticsearch.env.Environment.(Environment.java:103)
...
需要配置 path.home 这个参数,在 VM options 中添加如下配置:
-Des.path.home=D:\elasticsearch-6.3.2再次RUN
3、报错如下:
2018-08-22 15:07:17,094 main ERROR Could not register mbeans java.security.AccessControlException: access denied ("javax.management.MBeanTrustPermission" "register")
...

Caused by: java.nio.file.NoSuchFileException: D:\elasticsearch-6.3.2\modules\aggs-matrix-stats\plugin-descriptor.properties
...
在 VM options 中把 path.home 的值修改为如下:
-Des.path.home=D:\elasticsearch-6.3.2\home然后把 ES6.3.2 发行版中的 modules 文件夹复制到 home 目录下,然后再次RUN
4、报错如下:
2018-08-22 15:12:29,876 main ERROR Could not register mbeans java.security.AccessControlException: access denied ("javax.management.MBeanTrustPermission" "register")
...
在 VM options 中加入
-Dlog4j2.disable.jmx=true1、2、3、4 的配置最终如下:
再次RUN
5、报错如下:
[2018-08-23T00:53:17,003][ERROR][o.e.b.ElasticsearchUncaughtExceptionHandler] [] fatal error in thread [main], exiting
java.lang.NoClassDefFoundError: org/elasticsearch/plugins/ExtendedPluginsClassLoader
    at org.elasticsearch.plugins.PluginsService.loadBundle(PluginsService.java:632) ~[main/:?]
    at org.elasticsearch.plugins.PluginsService.loadBundles(PluginsService.java:557) ~[main/:?]
    at org.elasticsearch.plugins.PluginsService.(PluginsService.java:162) ~[main/:?]
    at org.elasticsearch.node.Node.(Node.java:311) ~[main/:?]
    at org.elasticsearch.node.Node.(Node.java:252) ~[main/:?]
    at org.elasticsearch.bootstrap.Bootstrap$5.(Bootstrap.java:213) ~[main/:?]
    at org.elasticsearch.bootstrap.Bootstrap.setup(Bootstrap.java:213) ~[main/:?]
    at org.elasticsearch.bootstrap.Bootstrap.init(Bootstrap.java:326) ~[main/:?]
    at org.elasticsearch.bootstrap.Elasticsearch.init(Elasticsearch.java:136) ~[main/:?]
    at org.elasticsearch.bootstrap.Elasticsearch.execute(Elasticsearch.java:127) ~[main/:?]
    at org.elasticsearch.cli.EnvironmentAwareCommand.execute(EnvironmentAwareCommand.java:86) ~[main/:?]
    at org.elasticsearch.cli.Command.mainWithoutErrorHandling(Command.java:124) ~[main/:?]
    at org.elasticsearch.cli.Command.main(Command.java:90) ~[main/:?]
    at org.elasticsearch.bootstrap.Elasticsearch.main(Elasticsearch.java:93) ~[main/:?]
    at org.elasticsearch.bootstrap.Elasticsearch.main(Elasticsearch.java:86) ~[main/:?]
Caused by: java.lang.ClassNotFoundException: org.elasticsearch.plugins.ExtendedPluginsClassLoader
    at jdk.internal.loader.BuiltinClassLoader.loadClass(BuiltinClassLoader.java:582) ~[?:?]
    at jdk.internal.loader.ClassLoaders$AppClassLoader.loadClass(ClassLoaders.java:190) ~[?:?]
    at java.lang.ClassLoader.loadClass(ClassLoader.java:499) ~[?:?]
    ... 15 more
这个问题其实不算真正的问题,但是说起来挺好笑,为了解决这个问题耗费了作者好几天,当最后发现问题所在的时候,哭笑不得 \~_\~ 正是所谓的 踏破铁鞋无觅处,得来全不费工夫
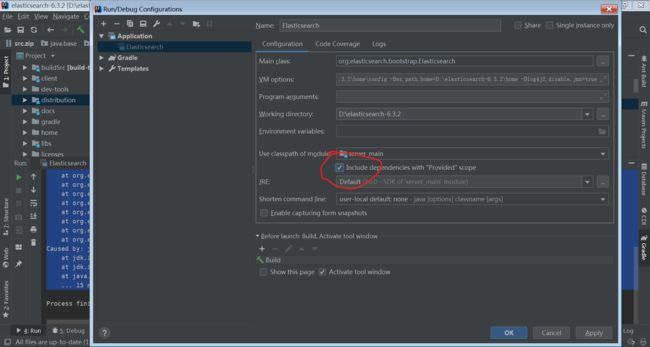
解决方法: 打开 IDEA Edit Configurations ,给 Include dependencies with Provided scope 打上勾即可解决,很简单吧!!
继续RUN,又来一个 Exception
6、报错如下:
[2018-08-23T01:13:38,551][WARN ][o.e.b.ElasticsearchUncaughtExceptionHandler] [] uncaught exception in thread [main]
org.elasticsearch.bootstrap.StartupException: java.security.AccessControlException: access denied ("java.lang.RuntimePermission" "createClassLoader")
    at org.elasticsearch.bootstrap.Elasticsearch.init(Elasticsearch.java:140) ~[main/:?]
    at org.elasticsearch.bootstrap.Elasticsearch.execute(Elasticsearch.java:127) ~[main/:?]
    at org.elasticsearch.cli.EnvironmentAwareCommand.execute(EnvironmentAwareCommand.java:86) ~[main/:?]
    at org.elasticsearch.cli.Command.mainWithoutErrorHandling(Command.java:124) ~[main/:?]
    at org.elasticsearch.cli.Command.main(Command.java:90) ~[main/:?]
    at org.elasticsearch.bootstrap.Elasticsearch.main(Elasticsearch.java:93) ~[main/:?]
    at org.elasticsearch.bootstrap.Elasticsearch.main(Elasticsearch.java:86) ~[main/:?]
Caused by: java.security.AccessControlException: access denied ("java.lang.RuntimePermission" "createClassLoader")
    at java.security.AccessControlContext.checkPermission(AccessControlContext.java:472) ~[?:?]
    at java.security.AccessController.checkPermission(AccessController.java:895) ~[?:?]
    at java.lang.SecurityManager.checkPermission(SecurityManager.java:335) ~[?:?]
    at java.lang.SecurityManager.checkCreateClassLoader(SecurityManager.java:397) ~[?:?]
...

Exception: java.security.AccessControlException thrown from the UncaughtExceptionHandler in thread "Thread-2"
这个问题也找了挺久,最终才发现解决方法(两种):
第一种: 在 home/config 目录下新建 java.policy 文件,填入下面内容
grant {
    permission java.lang.RuntimePermission "createClassLoader";
};
然后在 VM options 加入 java.security.policy 的设置,指向该文件即可
-Djava.security.policy=D:\elasticsearch-6.3.2\home\config\java.policy第二种: 就是在 %JAVA_HOME%/conf/security 目录下(JDK10是这个路径,之前的版本不确定),我的目录是 C:\Program Files\Java\jdk-10.0.2\conf\security,打开 java.policy 文件,在 grant 中加入下面这句,赋予权限
permission java.lang.RuntimePermission "createClassLoader";效果如下:
再RUN,这次可终于运行起来了!!!
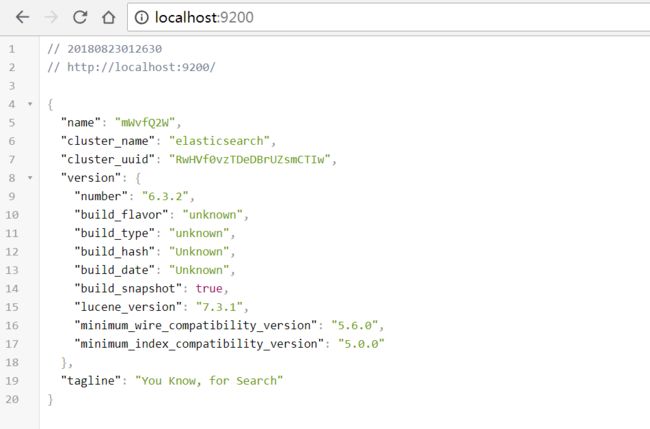
来看一下效果,浏览器访问 http://localhost:9200/
浏览器访问 http://localhost:9200/_cat/health?v
一切正常,终于可以愉快的 DEBUG 源码啦!!!
另一种源码调试方式:远程调试
如果上面第五个报错之后解决不了无法继续进行,可以选择这种方式:
在 Elasticsearch 源码目录下打开 CMD,输入下面的命令启动一个 debug 实例
gradlew run --debug-jvm如果启动失败可能需要先执行 gradlew clean 再 gradlew run --debug-jvm 或者 先退出 IDEA
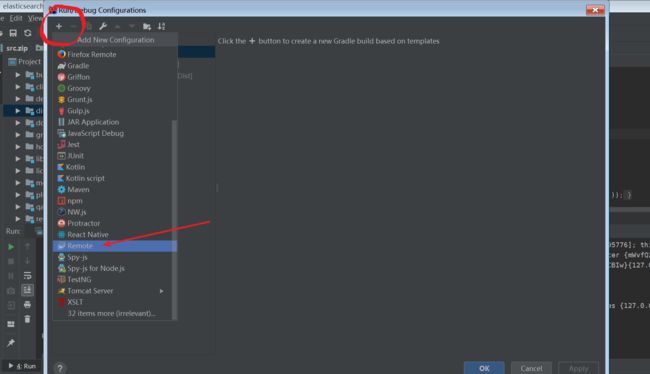
在 IDEA 中打开 Edit Configurations,添加 remote
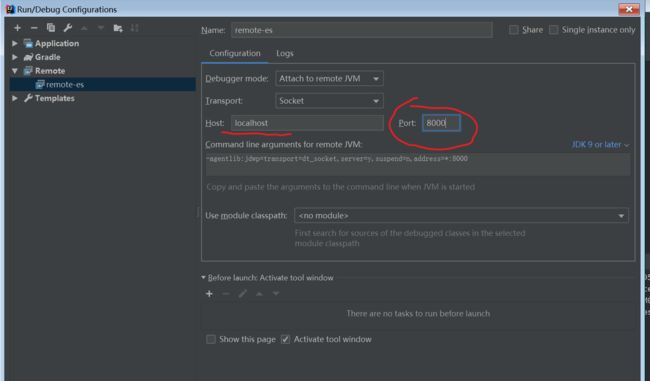
配置 host 和 port
点击 debug,浏览器访问 http://localhost:9200/,即可看到ES返回的信息
随机调试一下, 打开 elasticsearch/server/src/main/org/elasticsearch/rest/action/cat 下的 RestHealthAction 类,在第 54 行出设置一个断点,然后浏览器访问 http://localhost:9200/_cat/health,可以看到断点已经捕获到该请求了
运行成功,可以开始设置断点进行其他调试
其他可能遇到的问题
1. 错误信息如下
JAVA8_HOME required to run tasks gradle配置环境变量 JAVA8_HOME,值为 JDK8 的安装目录
2. 错误信息如下
[2018-08-22T13:07:23,197][INFO ][o.e.t.TransportService   ] [EFQliuV] publish_address {10.100.99.118:9300}, bound_addresses {[::]:9300}
[2018-08-22T13:07:23,211][INFO ][o.e.b.BootstrapChecks    ] [EFQliuV] bound or publishing to a non-loopback address, enforcing bootstrap checks
ERROR: [1] bootstrap checks failed
[1]: initial heap size [268435456] not equal to maximum heap size [4273995776]; this can cause resize pauses and prevents mlockall from locking the entire heap
[2018-08-22T13:07:23,219][INFO ][o.e.n.Node               ] [EFQliuV] stopping ...
2018-08-22 13:07:23,269 Thread-2 ERROR No log4j2 configuration file found. Using default configuration: logging only errors to the console. Set system property 'log4j2.debug' to show Log4j2 internal initialization logging.
Disconnected from the target VM, address: '127.0.0.1:5272', transport: 'socket'
在 Edit Configurations 的 VM options 加入下面配置
-Xms2g
-Xmx2g
欢迎访问我的个人博客:http://laijianfeng.org
参考文档:
1. Eclipse导入Elasticsearch源码
2. Elasticsearch源码分析—环境准备(一)
3. 渣渣菜鸡的 ElasticSearch 源码解析 —— 环境搭建
4. 教你如何在 IDEA 远程 Debug ElasticSearch
欢迎访问我的个人博客:http://laijianfeng.org
打开微信扫一扫,关注【小旋锋】微信公众号,及时接收博文推送
![]()


