Spring和CXF整合发布WebService(服务端、客户端)
服务端
建立Maven项目,引入依赖
- 依赖
<dependency>
      <groupId>junit</groupId>
      <artifactId>junit</artifactId>
      <version>4.11</version>
      <scope>test</scope>
    </dependency>
    <!-- https://mvnrepository.com/artifact/org.springframework/spring-web -->
    <dependency>
      <groupId>org.springframework</groupId>
      <artifactId>spring-web</artifactId>
      <version>5.2.2.RELEASE</version>
    </dependency>

    <!-- https://mvnrepository.com/artifact/org.springframework/spring-context -->
    <dependency>
      <groupId>org.springframework</groupId>
      <artifactId>spring-context</artifactId>
      <version>5.2.2.RELEASE</version>
    </dependency>

    <dependency>
      <groupId>org.apache.cxf</groupId>
      <artifactId>cxf-core</artifactId>
      <version>3.1.4</version>
    </dependency>
    <dependency>
      <groupId>org.apache.cxf</groupId>
      <artifactId>cxf-rt-transports-http</artifactId>
      <version>3.1.4</version>
    </dependency>
    <dependency>
      <groupId>org.apache.cxf</groupId>
      <artifactId>cxf-rt-frontend-jaxws</artifactId>
      <version>3.1.4</version>
    </dependency>
编写java服务
创建一个接口,记得加上@WebService注解,表示你要“暴露”的接口(服务类)。
@WebService
public interface HelloService {

	public String sayHello(String name) ;

}
实现类:
//因为接口上添加了@Webservice,实现类上可以不添加@Webservice注解
public class HelloServiceImp implements HelloService {

	@Override
	public String sayHello(String name) {
		return "大家好,我是"+name;
	}
}
配置
对spring和CXF进行配置
新建文件spring.xml:
<?xml version="1.0" encoding="UTF-8"?>
<beans xmlns="http://www.springframework.org/schema/beans"
       xmlns:xsi="http://www.w3.org/2001/XMLSchema-instance"
       xmlns:context="http://www.springframework.org/schema/context"
       xsi:schemaLocation="http://www.springframework.org/schema/beans
                    http://www.springframework.org/schema/beans/spring-beans-3.0.xsd
                    http://www.springframework.org/schema/context
                    http://www.springframework.org/schema/context/spring-context-3.0.xsd">

    <import resource="spring-cxf.xml" />

</beans>
新建文件spring-cxf.xml:
<?xml version="1.0" encoding="UTF-8"?>
<beans xmlns="http://www.springframework.org/schema/beans"
       xmlns:xsi="http://www.w3.org/2001/XMLSchema-instance"
       xmlns:context="http://www.springframework.org/schema/context"
       xmlns:jaxws="http://cxf.apache.org/jaxws"
        xsi:schemaLocation="http://www.springframework.org/schema/beans
        http://www.springframework.org/schema/beans/spring-beans-3.0.xsd
        http://www.springframework.org/schema/context
        http://www.springframework.org/schema/context/spring-context-3.0.xsd
        http://cxf.apache.org/jaxws
        http://cxf.apache.org/schemas/jaxws.xsd">

        <!--其中id是自己定义的,implementor是接口实现类,address就是访问的地址 -->
        <!-- 相当于Endpoint.publish("http://localhost:8080/service", newHelloServiceImp()); -->

    <jaxws:endpoint id="helloService" implementor="com.xr.impl.HelloServiceImpl" address="/hello"/>

</beans>
最后配置web.xml:
<!DOCTYPE web-app PUBLIC
 "-//Sun Microsystems, Inc.//DTD Web Application 2.3//EN"
 "http://java.sun.com/dtd/web-app_2_3.dtd" >

<web-app>
  <display-name>Archetype Created Web Application</display-name>

  <context-param>
    <param-name>contextConfigLocation</param-name>
    <param-value>classpath:spring.xml</param-value>
  </context-param>
  <listener>
    <listener-class>org.springframework.web.context.ContextLoaderListener</listener-class>
  </listener>
  <servlet>
    <servlet-name>cxf</servlet-name>
    <servlet-class>org.apache.cxf.transport.servlet.CXFServlet</servlet-class>
    <load-on-startup>1</load-on-startup>
  </servlet>
  <servlet-mapping>
    <servlet-name>cxf</servlet-name>
    <url-pattern>/service/*
测试
然后我们将该项目部署在tomcat上并运行
访问我们配置好的地址/service/*

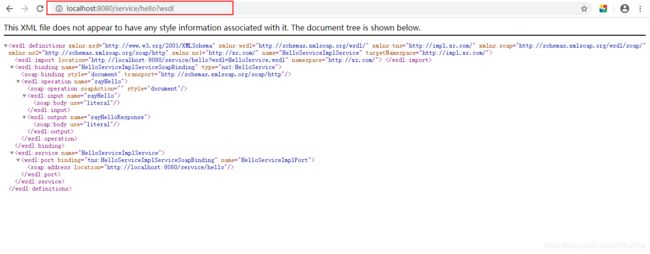
点击页面上的WSDL的超链接进入如下页面:

客户端
在编写客户端之前需要先安装CXF的服务
CXF
下载CXF
进入官方地址http://cxf.apache.org/download.html

==因为我得电脑是windows的所以我安装的windows版本 ==
下载完之后直接安装(解压)。
配置CXF的环境变量
环境变量:
新建 CXF_HOME 然后把CXF的安装路径加上
CXF_HOME = CXF安装路径
在path中加入%CXF_HOME%\bin;
Path = %CXF_HOME%\bin;
新建 CLASSPATH 然后添加%CXF_HOME%\lib\cxf-manifest.jar
CLASSPATH = .;%CXF_HOME%\lib\cxf-manifest.jar
测试CXF配置正确:执行下cxf的bin下的命令,有反应就行。
生成客户端
CXF提供的根据wsdl生成客户端代码的命令。
在cmd命令中输入:wsdl2java -d 指定代码生成目录 -client webservice的访问地址url或者本地的wsdl文件目录地址就是服务端点击WSDL超链接后页面的url地址
示例:wsdl2java -d F:\ideaworkspace\webservicespring2\src\java\ -client http://localhost:8080/service/hello?wsdl
注意中间的空格!!!
具体用法自行百度,这里只对上面的用法做解释:
-d 指定要产生代码所在目录
-client 生成客户端测试web service的代码
生成代码后:

测试
首先启动服务端的tomcat服务
然后找到CXF帮我们生成的文件

从类名上可以确定HelloService_HelloServiceImplPort_Client就是客户端的类
package com.xr;

/**
 * Please modify this class to meet your needs
 * This class is not complete
 */

import java.io.File;
import java.net.MalformedURLException;
import java.net.URL;
import javax.xml.namespace.QName;
import com.xr.impl.HelloServiceImplService;
import javax.jws.WebMethod;
import javax.jws.WebParam;
import javax.jws.WebResult;
import javax.jws.WebService;
import javax.xml.bind.annotation.XmlSeeAlso;
import javax.xml.ws.RequestWrapper;
import javax.xml.ws.ResponseWrapper;

/**
 * This class was generated by Apache CXF 3.3.5
 * 2020-02-11T16:28:14.665+08:00
 * Generated source version: 3.3.5
 *
 */
public final class HelloService_HelloServiceImplPort_Client {

    private static final QName SERVICE_NAME = new QName("http://impl.xr.com/", "HelloServiceImplService");

    private HelloService_HelloServiceImplPort_Client() {
    }

    public static void main(String args[]) throws java.lang.Exception {
        URL wsdlURL = HelloServiceImplService.WSDL_LOCATION;
        if (args.length > 0 && args[0] != null && !"".equals(args[0])) {
            File wsdlFile = new File(args[0]);
            try {
                if (wsdlFile.exists()) {
                    wsdlURL = wsdlFile.toURI().toURL();
                } else {
                    wsdlURL = new URL(args[0]);
                }
            } catch (MalformedURLException e) {
                e.printStackTrace();
            }
        }

        HelloServiceImplService ss = new HelloServiceImplService(wsdlURL, SERVICE_NAME);
        HelloService port = ss.getHelloServiceImplPort();

        {
        System.out.println("Invoking sayHello...");
        java.lang.String _sayHello_arg0 = "CXF";
        java.lang.String _sayHello__return = port.sayHello(_sayHello_arg0);
        System.out.println("sayHello.result=" + _sayHello__return);


        }

        System.exit(0);
    }

}
