Android控件架构与自定义控件详解
一、Android控件架构
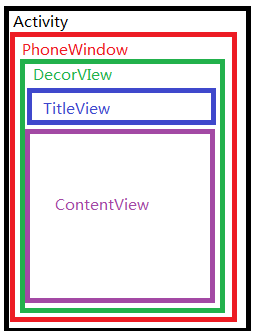
如图所示啦,上面就是我们常见的控件树,上层控件负责下层子控件的测量与绘制,并传递交互事件。
通常在Activity中使用 findViewById() 的方法在控件树中以树的深度优先遍历来查找对应的元素。
每棵树的顶部其实还有一个ViewParent对象,它是整棵树的控制核心,图中并没有标识出来,所有的交互管理事件都由它来统一调度和分配,从而可以对整个视图进行整体控制。
通常情况下,在Activity中使用setContentView()方法来设置一个布局,在调用该方法后,布局内容才真正的显示出来。
这是Android界面的架构图:
1、其中DecorView作为窗口界面的顶层视图,封装了一些窗口操作的通用方法。
可以说,DecorView将要显示的具体内容呈现在了PhoneWindow上,这里面的所有的View的监听事件,都通过WindowManagerService进行接收,并通过Activity对象来回调相应的onClickListener。
2、其中ContentView,是一个ID为content的FrameLayout,activity_main.xml 就是设置在这样一个FrameLayout里,所以之前在布局优化中讲过,最外层是一个FrameLayout,所以当activity_main.xml最外层是一个FrameLayout会造成层次层叠,用merge来代替FrameLayout进行布局的优化。
3、所以这也就说明了,用户通过设置 requestWindowFeature(Window.FEATURE_NO_TITLE); 来设置全屏显示的时候,它一定要放在 setContentView() 方法之前才能生效。
4、在代码中,当程序在 onCreat() 方法中调用 setContentView()方法后,ActivityManagerService会回调 onResume()方法,此时系统才会把整个DecorView添加到 PhoneWindow中,并让其显示出来,从而最终完成界面的绘制。
5、在源码中ViewGroup是继承自View的!!!!!
二、ViewRoot和DecorView介绍
1、ViewRoot简介:
(1)ViewRoot对应于ViewRootImpl 类,它是连接 WindowManager 和 DecorView的纽带,View的三大流程(measure测量、layout布局、draw绘制)都是通过ViewRoot来完成的。
(2)在ActivityThread 中,当Activity对象被创建完毕后,会将 DecorView 添加到Window中,同时会创建 ViewRootImpl对象,并将 ViewRootImpl对象和DecorView建立关联,看源码(没找到呀,惭愧):
root = new ViewRootImpl(view.getContext(), display);
root.setView(view, wparams, panelParentView);它经过 measure、layout和draw三个过程才能最终将一个View绘制出来,
其中measure用来测量View的宽高,
layout用来确定View在父容器中的放置位置,
draw负责将View绘制在屏幕上。
(4)下面是performTraversals 的大致流程:
源码位置:sources\android\view\ViewRootImpl.java
在onMeasure方法中会对所有的子元素进行measure过程,这个时候measure流程就从父容器传递到子元素中了,这样就完成了一次measure过程。接着子元素又会重复父容器的measure过程,如此反复就完成了整个View树的遍历。
performDraw的传递过程是在draw方法中通过dispatchDraw来实现的。
(4)Measure完成后,可以通过 getMeasuredWidth 和getMeasuredHeight 方法来获取到 View 测量后的宽高。
Layout完成后,可以通过 getTop、getBottom、getLeft和getRight 来拿到View的四个顶点的位置,并可以通过 getWidth 和getHeight方法来拿到View的最终宽高。
Draw完成后,View显示在屏幕上。
2、DecorView简介:
(1)DecorView作为顶级View,它内部是一个竖直的LinearLayout,其中包含TitleBar和Content。
(2)其中Activity中设置 setContentView 就是将布局文件加载到内容栏的。
(3)内容栏是一个FrameLayout,可以布局优化。
(4)如何获得Content?
ViewGroup content = findViewById(R.android.id.content);
(5)如何获得View?
content.getChildAt(0);
三、View的测量
1、MeasureSpec简介:
(1)源码位置:sources\android\view\View.java
(2)Android系统在绘制View前,必须对View进行测量,这个过程在onMeasure()方法中进行,借助的是 MeasureSpec 类。
MeasureSpec类是一个32位的值,其中高2位为测量的模式SpecMode,低30位为测量的大小SpecSize。
public static class MeasureSpec {
// 移位用的,后面表示大小的30位
private static final int MODE_SHIFT = 30;
private static final int MODE_MASK = 0x3 << MODE_SHIFT;
/**
* Measure specification mode: The parent has not imposed any constraint
* on the child. It can be whatever size it wants.
*/
/*
* dp/px
* 父容器对子元素没有任何约束,子元素可以是任意大小
* */
public static final int UNSPECIFIED = 0 << MODE_SHIFT;
/**
* Measure specification mode: The parent has determined an exact size
* for the child. The child is going to be given those bounds regardless
* of how big it wants to be.
*/
/*
* match_parent
* 父容器决定了子元素的大小,子元素和父元素一样大
* */
public static final int EXACTLY = 1 << MODE_SHIFT;
/**
* Measure specification mode: The child can be as large as it wants up
* to the specified size.
*/
/*
* wrap_content
* 子元素不可以超过父容器的大小。
* 通常的控件对这个值都会设定一个默认值来表示wrap_content。
* */
public static final int AT_MOST = 2 << MODE_SHIFT;
/**
* Creates a measure specification based on the supplied size and mode.
*
* The mode must always be one of the following:
*
* - {@link android.view.View.MeasureSpec#UNSPECIFIED}
* - {@link android.view.View.MeasureSpec#EXACTLY}
* - {@link android.view.View.MeasureSpec#AT_MOST}
*
*
* Note: On API level 17 and lower, makeMeasureSpec's
* implementation was such that the order of arguments did not matter
* and overflow in either value could impact the resulting MeasureSpec.
* {@link android.widget.RelativeLayout} was affected by this bug.
* Apps targeting API levels greater than 17 will get the fixed, more strict
* behavior.
*
* @param size the size of the measure specification
* @param mode the mode of the measure specification
* @return the measure specification based on size and mode
*/
/*
* 将size和mode打包成一个32位的int值返回:
* */
public static int makeMeasureSpec(int size, int mode) {
if (sUseBrokenMakeMeasureSpec) {
return size + mode;
} else {
return (size & ~MODE_MASK) | (mode & MODE_MASK);
}
}
/**
* Extracts the mode from the supplied measure specification.
*
* @param measureSpec the measure specification to extract the mode from
* @return {@link android.view.View.MeasureSpec#UNSPECIFIED},
* {@link android.view.View.MeasureSpec#AT_MOST} or
* {@link android.view.View.MeasureSpec#EXACTLY}
*/
public static int getMode(int measureSpec) {
return (measureSpec & MODE_MASK);
}
/**
* Extracts the size from the supplied measure specification.
*
* @param measureSpec the measure specification to extract the size from
* @return the size in pixels defined in the supplied measure specification
*/
public static int getSize(int measureSpec) {
return (measureSpec & ~MODE_MASK);
}
static int adjust(int measureSpec, int delta) {
return makeMeasureSpec(getSize(measureSpec + delta), getMode(measureSpec));
}
/**
* Returns a String representation of the specified measure
* specification.
*
* @param measureSpec the measure specification to convert to a String
* @return a String with the following format: "MeasureSpec: MODE SIZE"
*/
public static String toString(int measureSpec) {
int mode = getMode(measureSpec);
int size = getSize(measureSpec);
StringBuilder sb = new StringBuilder("MeasureSpec: ");
if (mode == UNSPECIFIED)
sb.append("UNSPECIFIED ");
else if (mode == EXACTLY)
sb.append("EXACTLY ");
else if (mode == AT_MOST)
sb.append("AT_MOST ");
else
sb.append(mode).append(" ");
sb.append(size);
return sb.toString();
}
}MeasureSpec的测量模式有三种:
(1)EXACTLY:具体值或者 match_parent。onMeasure()方法默认情况下只支持这种模式。
(2)AT_MOST:wrap_content。不可以比父容器大就可以了,不过通常控件都会有一个默认值。
(3)UNSPECIFIED:View想多大就多大,通常自定义View时使用。
注意点:要让自定义View支持 wrap_content 属性,就必须重写onMeasure()方法来指定wrap_content时的大小。
2、MeasureSpec和LayoutParams的对应关系:
下面来看看顶级View即DecorView在ViewRootImpl中的源码:
(1)DecorView的MeasureSpec创建过程。在measureHierarchy函数中有如下的语句:
            if (baseSize != 0 && desiredWindowWidth > baseSize) {
                childWidthMeasureSpec = getRootMeasureSpec(baseSize, lp.width);
                childHeightMeasureSpec = getRootMeasureSpec(desiredWindowHeight, lp.height);
performMeasure(childWidthMeasureSpec, childHeightMeasureSpec);......if下面的两句的作用是获得宽高,第三句就是通过performMeasure来设置宽高了。
(2)接下来看看里面的getRootMeasureSpec 方法:
    /**
     * Figures out the measure spec for the root view in a window based on it's
     * layout params.
     *
     * @param windowSize
     *            The available width or height of the window
     *
     * @param rootDimension
     *            The layout params for one dimension (width or height) of the
     *            window.
     *
     * @return The measure spec to use to measure the root view.
     */
    private static int getRootMeasureSpec(int windowSize, int rootDimension) {
        int measureSpec;
        switch (rootDimension) {

        case ViewGroup.LayoutParams.MATCH_PARENT:
            // Window can't resize. Force root view to be windowSize.
            measureSpec = MeasureSpec.makeMeasureSpec(windowSize, MeasureSpec.EXACTLY);
            break;
        case ViewGroup.LayoutParams.WRAP_CONTENT:
            // Window can resize. Set max size for root view.
            measureSpec = MeasureSpec.makeMeasureSpec(windowSize, MeasureSpec.AT_MOST);
            break;
        default:
            // Window wants to be an exact size. Force root view to be that size.
            measureSpec = MeasureSpec.makeMeasureSpec(rootDimension, MeasureSpec.EXACTLY);
            break;
        }
        return measureSpec;
}下面看看普通的View,这里是指我们布局中的View:
(1)View的measure过程由ViewGroup传递而来,先看一下ViewGroup的measureChildWithMargins 方法:
/**
 * Ask one of the children of this view to measure itself, taking into
 * account both the MeasureSpec requirements for this view and its padding
 * and margins. The child must have MarginLayoutParams The heavy lifting is
 * done in getChildMeasureSpec.
 *
 * @param child The child to measure
 * @param parentWidthMeasureSpec The width requirements for this view
 * @param widthUsed Extra space that has been used up by the parent
 *        horizontally (possibly by other children of the parent)
 * @param parentHeightMeasureSpec The height requirements for this view
 * @param heightUsed Extra space that has been used up by the parent
 *        vertically (possibly by other children of the parent)
 */
protected void measureChildWithMargins(View child,
        int parentWidthMeasureSpec, int widthUsed,
        int parentHeightMeasureSpec, int heightUsed) {
    final MarginLayoutParams lp = (MarginLayoutParams) child.getLayoutParams();

    /* 也是先获取子元素的MeasureSpec,
     * getChildMeasureSpec这里的参数,第一个就变成了父类的大小,
     * 第二个参数是上下左右的边距
     * 第三个参数是LinearLayout的宽高
     */
    final int childWidthMeasureSpec = getChildMeasureSpec(parentWidthMeasureSpec,
            mPaddingLeft + mPaddingRight + lp.leftMargin + lp.rightMargin
                    + widthUsed, lp.width);
    final int childHeightMeasureSpec = getChildMeasureSpec(parentHeightMeasureSpec,
            mPaddingTop + mPaddingBottom + lp.topMargin + lp.bottomMargin
                    + heightUsed, lp.height);

    /*
     * 得到子元素的MeasureSpec后,调用子元素的measure来设置宽高。
     * */
    child.measure(childWidthMeasureSpec, childHeightMeasureSpec);
}/**
* Does the hard part of measureChildren: figuring out the MeasureSpec to
* pass to a particular child. This method figures out the right MeasureSpec
* for one dimension (height or width) of one child view.
*
* The goal is to combine information from our MeasureSpec with the
* LayoutParams of the child to get the best possible results. For example,
* if the this view knows its size (because its MeasureSpec has a mode of
* EXACTLY), and the child has indicated in its LayoutParams that it wants
* to be the same size as the parent, the parent should ask the child to
* layout given an exact size.
*
* @param spec The requirements for this view
* @param padding The padding of this view for the current dimension and
* margins, if applicable
* @param childDimension How big the child wants to be in the current
* dimension
* @return a MeasureSpec integer for the child
*/
public static int getChildMeasureSpec(int spec, int padding, int childDimension) {
/*
* 第一个参数是父类的MeasureSpec,所以获取的模式也就是父容器的:
* */
int specMode = MeasureSpec.getMode(spec);
int specSize = MeasureSpec.getSize(spec);
//子元素可用大小为父容器尺寸减去padding:
int size = Math.max(0, specSize - padding);
int resultSize = 0;
int resultMode = 0;
/*
* 这里的这个specMode是父类容器的:
* */
switch (specMode) {
// Parent has imposed an exact size on us
case MeasureSpec.EXACTLY:
if (childDimension >= 0) {
resultSize = childDimension;
resultMode = MeasureSpec.EXACTLY;
/*
* 这里的LayoutParams.MATCH_PARENT就是子元素它的LinearLayout
* */
} else if (childDimension == LayoutParams.MATCH_PARENT) {
// Child wants to be our size. So be it.
resultSize = size;
resultMode = MeasureSpec.EXACTLY;
} else if (childDimension == LayoutParams.WRAP_CONTENT) {
// Child wants to determine its own size. It can't be
// bigger than us.
resultSize = size;
resultMode = MeasureSpec.AT_MOST;
}
break;
// Parent has imposed a maximum size on us
case MeasureSpec.AT_MOST:
if (childDimension >= 0) {
// Child wants a specific size... so be it
resultSize = childDimension;
resultMode = MeasureSpec.EXACTLY;
} else if (childDimension == LayoutParams.MATCH_PARENT) {
// Child wants to be our size, but our size is not fixed.
// Constrain child to not be bigger than us.
resultSize = size;
resultMode = MeasureSpec.AT_MOST;
} else if (childDimension == LayoutParams.WRAP_CONTENT) {
// Child wants to determine its own size. It can't be
// bigger than us.
resultSize = size;
resultMode = MeasureSpec.AT_MOST;
}
break;
// Parent asked to see how big we want to be
case MeasureSpec.UNSPECIFIED:
if (childDimension >= 0) {
// Child wants a specific size... let him have it
resultSize = childDimension;
resultMode = MeasureSpec.EXACTLY;
} else if (childDimension == LayoutParams.MATCH_PARENT) {
// Child wants to be our size... find out how big it should
// be
resultSize = 0;
resultMode = MeasureSpec.UNSPECIFIED;
} else if (childDimension == LayoutParams.WRAP_CONTENT) {
// Child wants to determine its own size.... find out how
// big it should be
resultSize = 0;
resultMode = MeasureSpec.UNSPECIFIED;
}
break;
}
return MeasureSpec.makeMeasureSpec(resultSize, resultMode);
}就是说只要子元素的LinearLayout是精确值,那子元素就是精确值。
子元素如果是match_parent,那子元素就和父容器一样大小。
子元素如果是wrap_content,那子元素就不能超过父容器的剩余空间大小。
3、看看具体的onMeasure实现和如何重写这个方法:
(1)原始的onMeasure在源码中是这样的,也就是重写时它自动构成这样:
	@Override
	protected void onMeasure(int widthMeasureSpec, int heightMeasureSpec) {
		super.onMeasure(widthMeasureSpec, heightMeasureSpec);
} protected void onMeasure(int widthMeasureSpec, int heightMeasureSpec) {
setMeasuredDimension(getDefaultSize(getSuggestedMinimumWidth(), widthMeasureSpec),
getDefaultSize(getSuggestedMinimumHeight(), heightMeasureSpec));
}可以发现超类中调用了setMeasuredDimension()方法,它的两个参数是 MeasureSpec 类型变量,这个方法将测量后的宽高值设置进去,从而完成测量工作。
(3)所以当我们想要重写onMeasure()方法时,可以直接重写超类中的setMeasuredDimension()方法,同时自定义两个测量宽高的方法 measureWidth() 和 measureHeight() 来处理 MeasureSpec 类型变量,返回宽高值Size:
在超类中是以getDefaultSize()来处理 MeasureSpec 类型变量的,这里我们换成自己写的 measureWidth() 和 measureHeight() 方法:
(注意啦,这里getDefaultSize返回的是size大小,也就是说将MeasureSpec中的size部分返回。)
@Override
protected void onMeasure(int widthMeasureSpec, int heightMeasureSpec) {
setMeasuredDimension(
measureWidth(widthMeasureSpec),
measureHeight(heightMeasureSpec));
}(4)下面就看看需要编写的measureWidth()方法如何实现的:
private int measureWidth(int measureSpec) {
int result = 0;
// 首先从MeasureSpec对象中提取出具体的测量模式和大小:
int specMode = MeasureSpec.getMode(measureSpec);
int specSize = MeasureSpec.getSize(measureSpec);
// 直接返回精确值
if (specMode == MeasureSpec.EXACTLY) {
result = specSize;
} else {
// 另外两种模式,200是默认大小
result = 200;
// 但如果是AT_MOST即wrap_content时,还需要取两者的最小值。
// 所以通常情况下,如果我们不重写onMeasure()方法时,都会给这个控件一个默认的比如说200的大小
// 但如果重写了,这里就可以为wrap_content设置一个其他的默认大小。
if (specMode == MeasureSpec.AT_MOST) {
result = Math.min(result, specSize);
}
}
return result;
}四、View的measure过程
1、View的measure过程:
/**
*
* Measure the view and its content to determine the measured width and the
* measured height. This method is invoked by {@link #measure(int, int)} and
* should be overriden by subclasses to provide accurate and efficient
* measurement of their contents.
*
*
*
* CONTRACT: When overriding this method, you
* must call {@link #setMeasuredDimension(int, int)} to store the
* measured width and height of this view. Failure to do so will trigger an
* IllegalStateException, thrown by
* {@link #measure(int, int)}. Calling the superclass'
* {@link #onMeasure(int, int)} is a valid use.
*
*
*
* The base class implementation of measure defaults to the background size,
* unless a larger size is allowed by the MeasureSpec. Subclasses should
* override {@link #onMeasure(int, int)} to provide better measurements of
* their content.
*
*
*
* If this method is overridden, it is the subclass's responsibility to make
* sure the measured height and width are at least the view's minimum height
* and width ({@link #getSuggestedMinimumHeight()} and
* {@link #getSuggestedMinimumWidth()}).
*
*
* @param widthMeasureSpec horizontal space requirements as imposed by the parent.
* The requirements are encoded with
* {@link android.view.View.MeasureSpec}.
* @param heightMeasureSpec vertical space requirements as imposed by the parent.
* The requirements are encoded with
* {@link android.view.View.MeasureSpec}.
*
* @see #getMeasuredWidth()
* @see #getMeasuredHeight()
* @see #setMeasuredDimension(int, int)
* @see #getSuggestedMinimumHeight()
* @see #getSuggestedMinimumWidth()
* @see android.view.View.MeasureSpec#getMode(int)
* @see android.view.View.MeasureSpec#getSize(int)
*/
    protected void onMeasure(int widthMeasureSpec, int heightMeasureSpec) {
        setMeasuredDimension(getDefaultSize(getSuggestedMinimumWidth(), widthMeasureSpec),
                getDefaultSize(getSuggestedMinimumHeight(), heightMeasureSpec));
} /**
* Utility to return a default size. Uses the supplied size if the
* MeasureSpec imposed no constraints. Will get larger if allowed
* by the MeasureSpec.
*
* @param size Default size for this view
* @param measureSpec Constraints imposed by the parent
* @return The size this view should be.
*/
public static int getDefaultSize(int size, int measureSpec) {
int result = size;
int specMode = MeasureSpec.getMode(measureSpec);
int specSize = MeasureSpec.getSize(measureSpec);
switch (specMode) {
case MeasureSpec.UNSPECIFIED:
result = size;//下面(3)对这个size做了解释
break;
case MeasureSpec.AT_MOST:
case MeasureSpec.EXACTLY:
result = specSize;//这两种情况下返回的是测量值大小
break;
}
return result;
}@Override
protected void onMeasure(int widthMeasureSpec, int heightMeasureSpec) {
super.onMeasure(widthMeasureSpec, heightMeasureSpec);
int widthSpaceSize = MeasureSpec.getSize(widthMeasureSpec);
int widthSpecMode = MeasureSpec.getMode(widthMeasureSpec);
int heightSpaceSize = MeasureSpec.getSize(heightMeasureSpec);
int heightSpecMode = MeasureSpec.getMode(heightMeasureSpec);
if (widthSpecMode == MeasureSpec.AT_MOST && heightSpecMode == MeasureSpec.AT_MOST) {
setMeasuredDimension(mWidth, mHight);
} else if (widthSpecMode == MeasureSpec.AT_MOST) {
setMeasuredDimension(mWidth, heightSpaceSize);
} else if (heightSpecMode == MeasureSpec.AT_MOST){
setMeasuredDimension(widthSpaceSize, mHight);
}
} /**
* Returns the suggested minimum width that the view should use. This
* returns the maximum of the view's minimum width)
* and the background's minimum width
* ({@link android.graphics.drawable.Drawable#getMinimumWidth()}).
*
* When being used in {@link #onMeasure(int, int)}, the caller should still
* ensure the returned width is within the requirements of the parent.
*
* @return The suggested minimum width of the view.
*/
protected int getSuggestedMinimumWidth() {
return (mBackground == null) ? mMinWidth : max(mMinWidth, mBackground.getMinimumWidth());
}
    /**
     * Returns the minimum width suggested by this Drawable. If a View uses this
     * Drawable as a background, it is suggested that the View use at least this
     * value for its width. (There will be some scenarios where this will not be
     * possible.) This value should INCLUDE any padding.
     *
     * @return The minimum width suggested by this Drawable. If this Drawable
     *         doesn't have a suggested minimum width, 0 is returned.
     */
    public int getMinimumWidth() {
        final int intrinsicWidth = getIntrinsicWidth();
        return intrinsicWidth > 0 ? intrinsicWidth : 0;
}2、ViewGroup的measure过程:
    /**
     * Ask all of the children of this view to measure themselves, taking into
     * account both the MeasureSpec requirements for this view and its padding.
     * We skip children that are in the GONE state The heavy lifting is done in
     * getChildMeasureSpec.
     *
     * @param widthMeasureSpec The width requirements for this view
     * @param heightMeasureSpec The height requirements for this view
     */
    protected void measureChildren(int widthMeasureSpec, int heightMeasureSpec) {
        final int size = mChildrenCount;
        final View[] children = mChildren;
        for (int i = 0; i < size; ++i) {
            final View child = children[i];
            if ((child.mViewFlags & VISIBILITY_MASK) != GONE) {
                measureChild(child, widthMeasureSpec, heightMeasureSpec);
            }
        }
} /**
* Ask one of the children of this view to measure itself, taking into
* account both the MeasureSpec requirements for this view and its padding.
* The heavy lifting is done in getChildMeasureSpec.
*
* @param child The child to measure
* @param parentWidthMeasureSpec The width requirements for this view
* @param parentHeightMeasureSpec The height requirements for this view
*/
protected void measureChild(View child, int parentWidthMeasureSpec,
int parentHeightMeasureSpec) {
final LayoutParams lp = child.getLayoutParams();
final int childWidthMeasureSpec = getChildMeasureSpec(parentWidthMeasureSpec,
mPaddingLeft + mPaddingRight, lp.width);
final int childHeightMeasureSpec = getChildMeasureSpec(parentHeightMeasureSpec,
mPaddingTop + mPaddingBottom, lp.height);
child.measure(childWidthMeasureSpec, childHeightMeasureSpec);
}(5)在ViewGroup中并没有定义其测量的具体过程,因为ViewGroup是一个抽象类,它的测量过程的onMeasure方法需要各个子类去实现,比如LinearLayout、RelativeLayout等,
(6)我们以LinearLayout为例来讲一下ViewGroup:
    @Override
    protected void onMeasure(int widthMeasureSpec, int heightMeasureSpec) {
        if (mOrientation == VERTICAL) {
            measureVertical(widthMeasureSpec, heightMeasureSpec);
        } else {
            measureHorizontal(widthMeasureSpec, heightMeasureSpec);
        }
}/**
* Measures the children when the orientation of this LinearLayout is set
* to {@link #VERTICAL}.
*
* @param widthMeasureSpec Horizontal space requirements as imposed by the parent.
* @param heightMeasureSpec Vertical space requirements as imposed by the parent.
*
* @see #getOrientation()
* @see #setOrientation(int)
* @see #onMeasure(int, int)
*/
void measureVertical(int widthMeasureSpec, int heightMeasureSpec) {
...
// See how tall everyone is. Also remember max width.
for (int i = 0; i < count; ++i) {
final View child = getVirtualChildAt(i);
...
// Determine how big this child would like to be. If this or
// previous children have given a weight, then we allow it to
// use all available space (and we will shrink things later
// if needed).
/*
* 遍历子元素并对子元素执行这个方法,
* 这个方法内部会调用子元素的measure方法,
* 这样各个子元素就开始一次进入measure过程,
* 并且系统会通过mTotalLength这个变量来存储LinearLayout在竖直方向的初步高度。
* 没测量一个子元素,mTotalLength都会增加。
* */
measureChildBeforeLayout(
child, i, widthMeasureSpec, 0, heightMeasureSpec,
totalWeight == 0 ? mTotalLength : 0);
if (oldHeight != Integer.MIN_VALUE) {
lp.height = oldHeight;
}
final int childHeight = child.getMeasuredHeight();
final int totalLength = mTotalLength;
mTotalLength = Math.max(totalLength, totalLength + childHeight + lp.topMargin +
lp.bottomMargin + getNextLocationOffset(child));
...
}
...
// Add in our padding
mTotalLength += mPaddingTop + mPaddingBottom;
int heightSize = mTotalLength;
// Check against our minimum height
heightSize = Math.max(heightSize, getSuggestedMinimumHeight());
// Reconcile our calculated size with the heightMeasureSpec
int heightSizeAndState = resolveSizeAndState(heightSize, heightMeasureSpec, 0);
heightSize = heightSizeAndState & MEASURED_SIZE_MASK;
...
// 等子元素都测量完毕后,LinearLayout测量自己的大小:
setMeasuredDimension(resolveSizeAndState(maxWidth, widthMeasureSpec, childState),//这个方法在下面有介绍
heightSizeAndState);
if (matchWidth) {
forceUniformWidth(count, heightMeasureSpec);
}
} /**
* Utility to reconcile a desired size and state, with constraints imposed
* by a MeasureSpec. Will take the desired size, unless a different size
* is imposed by the constraints. The returned value is a compound integer,
* with the resolved size in the {@link #MEASURED_SIZE_MASK} bits and
* optionally the bit {@link #MEASURED_STATE_TOO_SMALL} set if the resulting
* size is smaller than the size the view wants to be.
*
* @param size How big the view wants to be
* @param measureSpec Constraints imposed by the parent
* @return Size information bit mask as defined by
* {@link #MEASURED_SIZE_MASK} and {@link #MEASURED_STATE_TOO_SMALL}.
*/
public static int resolveSizeAndState(int size, int measureSpec, int childMeasuredState) {
int result = size;
int specMode = MeasureSpec.getMode(measureSpec);
int specSize = MeasureSpec.getSize(measureSpec);
switch (specMode) {
case MeasureSpec.UNSPECIFIED:
result = size;
break;
case MeasureSpec.AT_MOST:
if (specSize < size) {
result = specSize | MEASURED_STATE_TOO_SMALL;
} else {
result = size;
}
break;
case MeasureSpec.EXACTLY:
result = specSize;
break;
}
return result | (childMeasuredState&MEASURED_STATE_MASK);
}3、解决View的measure过程和Activity生命周期不同步的问题:
源码位置:sources\android\view\View.java。
onWindowFocusChanged 这个方法的含义是:View已经初始化完毕了,宽高已经准备好了,这个时候获取宽高是没有问题的。
onWindowFocusChanged会被调用多次,当Activity的窗口得到焦点或失去焦点的时候都会被调用一次。
也就是说,当Activity继续执行或暂停执行的时候,onWindowFocusChanged就会被调用。
那如果频繁的onResume或onPause时,onWindowFocusChanged 也会被频繁的调用。
源码如下:
    /**
     * Called when the window containing this view gains or loses focus.  Note
     * that this is separate from view focus: to receive key events, both
     * your view and its window must have focus.  If a window is displayed
     * on top of yours that takes input focus, then your own window will lose
     * focus but the view focus will remain unchanged.
     *
     * @param hasWindowFocus True if the window containing this view now has
     *        focus, false otherwise.
     */
    public void onWindowFocusChanged(boolean hasWindowFocus) {
        InputMethodManager imm = InputMethodManager.peekInstance();
        if (!hasWindowFocus) {
            if (isPressed()) {
                setPressed(false);
            }
            if (imm != null && (mPrivateFlags & PFLAG_FOCUSED) != 0) {
                imm.focusOut(this);
            }
            removeLongPressCallback();
            removeTapCallback();
            onFocusLost();
        } else if (imm != null && (mPrivateFlags & PFLAG_FOCUSED) != 0) {
            imm.focusIn(this);
        }
        refreshDrawableState();
    }
重写onWindowFocusChanged 代码如下:
public void onWindowFocusChanged(boolean hasFocus) {
    super.onWindowFocusChanged(hasFocus);
    // 如果重新获得焦点,那就获取宽高值:
    if(hasFocus){
    	int width = view.getMeasuredWidth();
    	int height = view.getMeasureHeight();
    }
}
(4)解决方法二:view.post(runnable)
源码位置:sources\android\app\Activity.java。
通过post可以将一个runnable投递到消息队列的尾部,然后等待Looper调用此runnable的时候,View 也已经初始化好了。
源码如下:
    /**
     * Called after {@link #onCreate} — or after {@link #onRestart} when
     * the activity had been stopped, but is now again being displayed to the
	 * user.  It will be followed by {@link #onResume}.
     *
     * Derived classes must call through to the super class's
     * implementation of this method.  If they do not, an exception will be
     * thrown.
     *
     * @see #onCreate
     * @see #onStop
     * @see #onResume
     */
    protected void onStart() {
        if (DEBUG_LIFECYCLE) Slog.v(TAG, "onStart " + this);
        mCalled = true;

        if (!mLoadersStarted) {
            mLoadersStarted = true;
            if (mLoaderManager != null) {
                mLoaderManager.doStart();
            } else if (!mCheckedForLoaderManager) {
                mLoaderManager = getLoaderManager("(root)", mLoadersStarted, false);
            }
            mCheckedForLoaderManager = true;
        }

        getApplication().dispatchActivityStarted(this);
}protected void onStart() {
super.onStart();
view.post(new Runnable){
@Override
public void run(){
int width = view.getMeasuredWidth();
int height = view.getMeasuredHeight();
}
};
}(5)解决方法三:ViewTreeObserver
自己看书好了。
(6)解决方法四:view.measure(int widthMeasureSpec, int heightMeasureSpec)
通过手动对View进行measure来得到View的宽高。这种方法比较复杂,这里要分情况处理,根据View的 LayoutParames 来分:
match_parent:
直接放弃,无法measure出具体的宽高。因为我们此时还没有办法知道父容器的剩余空间。
具体的数值(dp/ps):
// 比如宽高都是100px
int widthMeasureSpec = MeasureSpec.makeMeasureSpec(100, MeasureSpec.EXACTLY);
int heightMeasureSpec = MeasureSpec.makeMeasureSpec(100,MeasureSpec.EXACTLY);

view.measure(widthMeasureSpec, heightMeasureSpec);int widthMeasureSpec = MeasureSpec.makeMeasureSpec( (1 << 30) - 1, MeasureSpec.AT_MOST);
int heightMeasureSpec = MeasureSpec.makeMeasureSpec( (1 << 30) - 1,MeasureSpec.AT_MOST);
view.measure(widthMeasureSpec, heightMeasureSpec);4、常见Measure错误使用方法:
int widthMeasureSpec = MeasureSpec.makeMeasureSpec( -1, MeasureSpec.UNSPECIFIED);
int heightMeasureSpec = MeasureSpec.makeMeasureSpec( -1, MeasureSpec.UNSPECIFIED);

view.measure(widthMeasureSpec, heightMeasureSpec);view.measure(LayoutParames.WRAP_CONTENT, LayoutParames.WRAP_CONTENT);五、View的layout过程
/**
 * Assign a size and position to a view and all of its
 * descendants
 *
 * This is the second phase of the layout mechanism.
 * (The first is measuring). In this phase, each parent calls
 * layout on all of its children to position them.
 * This is typically done using the child measurements
 * that were stored in the measure pass().
 *
 * Derived classes should not override this method.
 * Derived classes with children should override
 * onLayout. In that method, they should
 * call layout on each of their children.
 *
 * @param l Left position, relative to parent
 * @param t Top position, relative to parent
 * @param r Right position, relative to parent
 * @param b Bottom position, relative to parent
 */
@SuppressWarnings({"unchecked"})
public void layout(int l, int t, int r, int b) {
    if ((mPrivateFlags3 & PFLAG3_MEASURE_NEEDED_BEFORE_LAYOUT) != 0) {
        onMeasure(mOldWidthMeasureSpec, mOldHeightMeasureSpec);
        mPrivateFlags3 &= ~PFLAG3_MEASURE_NEEDED_BEFORE_LAYOUT;
    }

    int oldL = mLeft;
    int oldT = mTop;
    int oldB = mBottom;
    int oldR = mRight;

    /*
     * 首先通过setFrame方法来设定View的四个顶点的位置,
     * 即初始化mLeft、mTop、mBottom、mRight这四个值,
     * 这四个顶点一旦被确定,那么View在父容器中的位置也就确定了
     * */
    boolean changed = isLayoutModeOptical(mParent) ?
            setOpticalFrame(l, t, r, b) : setFrame(l, t, r, b);

    if (changed || (mPrivateFlags & PFLAG_LAYOUT_REQUIRED) == PFLAG_LAYOUT_REQUIRED) {
    	/*
    	 * 接着调用onLayout方法,这个方法的用途是父容器确定子元素的位置,和onMeasure方法类似。
    	 * onLayout的具体实现同样和具体的布局有关,
    	 * 所以View和ViewGroup都没有真正实现onLayout方法。
    	 * */
        onLayout(changed, l, t, r, b);
        mPrivateFlags &= ~PFLAG_LAYOUT_REQUIRED;

        ListenerInfo li = mListenerInfo;
        if (li != null && li.mOnLayoutChangeListeners != null) {
            ArrayList listenersCopy =
                    (ArrayList)li.mOnLayoutChangeListeners.clone();
            int numListeners = listenersCopy.size();
            for (int i = 0; i < numListeners; ++i) {
                listenersCopy.get(i).onLayoutChange(this, l, t, r, b, oldL, oldT, oldR, oldB);
            }
        }
    }

    mPrivateFlags &= ~PFLAG_FORCE_LAYOUT;
    mPrivateFlags3 |= PFLAG3_IS_LAID_OUT;
} /**
* Called from layout when this view should
* assign a size and position to each of its children.
*
* Derived classes with children should override
* this method and call layout on each of
* their children.
* @param changed This is a new size or position for this view
* @param left Left position, relative to parent
* @param top Top position, relative to parent
* @param right Right position, relative to parent
* @param bottom Bottom position, relative to parent
*/
protected void onLayout(boolean changed, int left, int top, int right, int bottom) {
} @Override
protected void onLayout(boolean changed, int l, int t, int r, int b) {
if (mOrientation == VERTICAL) {
layoutVertical(l, t, r, b);
} else {
layoutHorizontal(l, t, r, b);
}
}/**
* Position the children during a layout pass if the orientation of this
* LinearLayout is set to {@link #VERTICAL}.
*
* @see #getOrientation()
* @see #setOrientation(int)
* @see #onLayout(boolean, int, int, int, int)
* @param left
* @param top
* @param right
* @param bottom
*/
void layoutVertical(int left, int top, int right, int bottom) {
final int paddingLeft = mPaddingLeft;
int childTop;
int childLeft;
// Where right end of child should go
final int width = right - left;
int childRight = width - mPaddingRight;
// Space available for child
int childSpace = width - paddingLeft - mPaddingRight;
// 获取子元素个数:
final int count = getVirtualChildCount();
final int majorGravity = mGravity & Gravity.VERTICAL_GRAVITY_MASK;
final int minorGravity = mGravity & Gravity.RELATIVE_HORIZONTAL_GRAVITY_MASK;
switch (majorGravity) {
case Gravity.BOTTOM:
// mTotalLength contains the padding already
childTop = mPaddingTop + bottom - top - mTotalLength;
break;
// mTotalLength contains the padding already
case Gravity.CENTER_VERTICAL:
childTop = mPaddingTop + (bottom - top - mTotalLength) / 2;
break;
case Gravity.TOP:
default:
childTop = mPaddingTop;
break;
}
/*
* 遍历所有的子元素,并调用setChildFrame:
* */
for (int i = 0; i < count; i++) {
final View child = getVirtualChildAt(i);
if (child == null) {
childTop += measureNullChild(i);
} else if (child.getVisibility() != GONE) {
        final int childWidth = child.getMeasuredWidth();
        final int childHeight = child.getMeasuredHeight();
final LinearLayout.LayoutParams lp =
(LinearLayout.LayoutParams) child.getLayoutParams();
int gravity = lp.gravity;
if (gravity < 0) {
gravity = minorGravity;
}
final int layoutDirection = getLayoutDirection();
final int absoluteGravity = Gravity.getAbsoluteGravity(gravity, layoutDirection);
switch (absoluteGravity & Gravity.HORIZONTAL_GRAVITY_MASK) {
case Gravity.CENTER_HORIZONTAL:
childLeft = paddingLeft + ((childSpace - childWidth) / 2)
+ lp.leftMargin - lp.rightMargin;
break;
case Gravity.RIGHT:
childLeft = childRight - childWidth - lp.rightMargin;
break;
case Gravity.LEFT:
default:
childLeft = paddingLeft + lp.leftMargin;
break;
}
if (hasDividerBeforeChildAt(i)) {
childTop += mDividerHeight;
}
childTop += lp.topMargin;
/*
* 在这里设置子元素的四个顶点值,
* 其中的childTop会不断增大,
* 这就意味着后面的子元素会被放置在靠下的位置,
* 这刚好符合竖直方向的LinearLayout的特性。
* 但在setChildFrame中,其实它仅仅是调用了子元素的layout方法而已,
* */
setChildFrame(child, childLeft, childTop + getLocationOffset(child),
childWidth, childHeight);
childTop += childHeight + lp.bottomMargin + getNextLocationOffset(child);
i += getChildrenSkipCount(child, i);
}
}
} private void setChildFrame(View child, int left, int top, int width, int height) {
child.layout(left, top, left + width, top + height);
} final int childWidth = child.getMeasuredWidth();
final int childHeight = child.getMeasuredHeight(); /**
* Return the height of your view.
*
* @return The height of your view, in pixels.
*/
@ViewDebug.ExportedProperty(category = "layout")
public final int getHeight() {
return mBottom - mTop;
} /**
* Like {@link #getMeasuredHeightAndState()}, but only returns the
* raw width component (that is the result is masked by
* {@link #MEASURED_SIZE_MASK}).
*
* @return The raw measured height of this view.
*/
public final int getMeasuredHeight() {
return mMeasuredHeight & MEASURED_SIZE_MASK;
}ViewGroup需要负责子View显示的大小。当ViewGroup的大小为wrap_content时,ViewGroup就需要遍历子View,以便获得所有子View的大小,从而决定自己的大小。而在其他模式下则会通过具体的指定值来设置自身的大小。
ViewGroup在测量时通过遍历所有子View,从而调用子View的Measure方法来获得每一个子View的测量结果。
当子View测量完毕后,就需要将子View放到合适的位置,这个过程就是View 的Layout过程。ViewGroup在执行Layout过程时,同样是使用遍历来调用子View的Layout方法,并指定其具体显示的位置,从而来决定其布局位置。
在自定义ViewGroup时,通常会去重写onLayout()方法来控制其子View显示位置的逻辑。同样,如果需要支持wrap_content属性,那么它还必须重写onMeasure()方法,这点与View是相同的。
六、View的绘制draw
(1)当测量好一个View之后,我们就可以简单的重写 onDraw()方法,并在 Canvas 对象上来绘制所需要的图形。Canvas是onDraw()方法的一个参数。
要想在Android界面中绘制相应的图像,就必须在 Canvas 上进行绘制。 它就像一个画板,使用 Paint 就可以在上面作画了。
(2)通常我们要在onDraw外创建一个Canvas对象,创建时还要引入布局中的一个bitmap对象:
Canvas canvas = new Canvas(bitmap);(3)bitmap用来存储所有绘制在 Canvas 上的像素信息,都是设置给bitmap的。
举例:
//绘制两个bitmap:这两个是在onDraw中绘制的
canvas.drawBitmap(bitmap1,0,0,null);
canvas.drawBitmap(bitmap2.0,0,null);
	// 现在将bitmap2装载到onDrow()之外的Canvas对象中:
	Canvas mCanvas = new Canvas(bitmap2);
	// 然后通过mCanvas对bitmap2进行绘图:
	mCanvas.drawXXX;
(4)Draw过程比较简单,它的作用是将View绘制到屏幕上面。
(5)View的绘制过程遵循如下几步:
绘制背景 background.draw(canvas)
绘制自己 (onDraw)
绘制children (dispatchDraw)
绘制装饰 (onDrawScrollBars)
(6)下面看看draw方法的源码:
源码位置:sources\android\view\View.java。
/**
 * Manually render this view (and all of its children) to the given Canvas.
 * The view must have already done a full layout before this function is
 * called.  When implementing a view, implement
 * {@link #onDraw(android.graphics.Canvas)} instead of overriding this method.
 * If you do need to override this method, call the superclass version.
 *
 * @param canvas The Canvas to which the View is rendered.
 */
public void draw(Canvas canvas) {
    if (mClipBounds != null) {
        canvas.clipRect(mClipBounds);
    }
    final int privateFlags = mPrivateFlags;
    final boolean dirtyOpaque = (privateFlags & PFLAG_DIRTY_MASK) == PFLAG_DIRTY_OPAQUE &&
            (mAttachInfo == null || !mAttachInfo.mIgnoreDirtyState);
    mPrivateFlags = (privateFlags & ~PFLAG_DIRTY_MASK) | PFLAG_DRAWN;

    /*
     * Draw traversal performs several drawing steps which must be executed
     * in the appropriate order:
     *
     *      1. Draw the background
     *      2. If necessary, save the canvas' layers to prepare for fading
     *      3. Draw view's content
     *      4. Draw children
     *      5. If necessary, draw the fading edges and restore layers
     *      6. Draw decorations (scrollbars for instance)
     */

    // Step 1, draw the background, if needed 绘制背景
    int saveCount;

    if (!dirtyOpaque) {
        final Drawable background = mBackground;
        if (background != null) {
            final int scrollX = mScrollX;
            final int scrollY = mScrollY;

            if (mBackgroundSizeChanged) {
                background.setBounds(0, 0,  mRight - mLeft, mBottom - mTop);
                mBackgroundSizeChanged = false;
            }

            if ((scrollX | scrollY) == 0) {
                background.draw(canvas);
            } else {
                canvas.translate(scrollX, scrollY);
                background.draw(canvas);
                canvas.translate(-scrollX, -scrollY);
            }
        }
    }

    // skip step 2 & 5 if possible (common case)
    final int viewFlags = mViewFlags;
    boolean horizontalEdges = (viewFlags & FADING_EDGE_HORIZONTAL) != 0;
    boolean verticalEdges = (viewFlags & FADING_EDGE_VERTICAL) != 0;
    if (!verticalEdges && !horizontalEdges) {
        // Step 3, draw the content 绘制自己
        if (!dirtyOpaque) onDraw(canvas);

        // Step 4, draw the children 绘制Children
        dispatchDraw(canvas);

        // Step 6, draw decorations (scrollbars) 绘制装饰
        onDrawScrollBars(canvas);

        if (mOverlay != null && !mOverlay.isEmpty()) {
            mOverlay.getOverlayView().dispatchDraw(canvas);
        }

        // we're done...
        return;
    }
(8)在View.java中有dispatchDraw方法,但它是空的,其他的继承了View的比如说ViewGroup就要去重写这个方法去实现对子元素的绘制。
    /**
     * Called by draw to draw the child views. This may be overridden
     * by derived classes to gain control just before its children are drawn
     * (but after its own view has been drawn).
     * @param canvas the canvas on which to draw the view
     */
    protected void dispatchDraw(Canvas canvas) {

}但是,ViewGroup会使用dispatchDraw()方法绘制其子View,其过程同样是遍历所有的子View,并调用子View的绘制方法来完成绘制工作。
关于ViewGroup中dispatchDraw 方法的具体实现我们就在这里不列举了。
(8)View中还有一个特殊的方法:setWillNotDraw:
    /**
     * If this view doesn't do any drawing on its own, set this flag to
     * allow further optimizations. By default, this flag is not set on
     * View, but could be set on some View subclasses such as ViewGroup.
     *
     * Typically, if you override {@link #onDraw(android.graphics.Canvas)}
     * you should clear this flag.
     *
     * @param willNotDraw whether or not this View draw on its own
     */
    public void setWillNotDraw(boolean willNotDraw) {
        setFlags(willNotDraw ? WILL_NOT_DRAW : 0, DRAW_MASK);
}这个标记位对实际开发的意义是:当我们的自定义控件继承于ViewGroup并且本身不具备绘制功能时,就可以开启这个标记位从而便于系统进行后续的优化。
当然,当明确知道一个ViewGroup需要通过onDraw来绘制内容时,我们需要显式的关闭WILL_NOT_DRAW 这个标志位。
七、自定义View
在自定义View时,我们通常会去重写 onDraw()方法来绘制View的显示内容,如果该View还需要使用wrap_content 属性,那么还必须重写 onMeasure()方法。
另外,通过自定义 attrs属性,还可以设置新的属性配置值。
在View通常有以下一些比较重要的回调方法:
(1)onFinishInflate():从XML加载组件后回调。
(2)onSizeChanged():组件大小改变时回调。
(3)onMeasure():回调该方法来进行测量。
(4)onLayout():回调该方法来确定显示的位置。
(5)onTouchEvent():监听到触摸事件时回调。
自定义View的注意点:
自定义View的分类:
用于扩展已有的View的功能。
这种方法不需要自己支持wrap_content和padding等。
3、继承特定的ViewGroup,比如LinearLayout:(创建复合控件)
不需要处理ViewGroup的测量和布局。
1、对现有控件进行拓展:
一般来说,在onDraw()方法中对原生控件行为进行拓展。
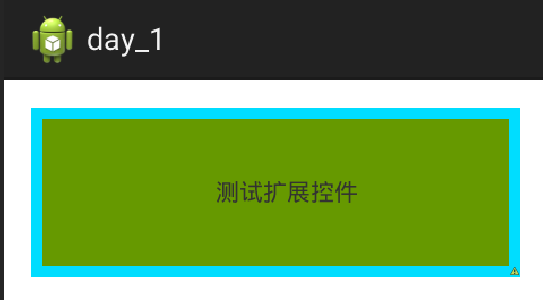
举例1:让一个TextView的背景更加丰富,给其多绘制几层背景:
	/**
	 * 初始化画笔等
	 */
	private void initPaint() {
		// 蓝色线条
		paint1 = new Paint();
		paint1.setColor(getResources().getColor(
				android.R.color.holo_blue_bright));
		paint1.setStyle(Paint.Style.FILL);
		// 绿色背景
		paint2 = new Paint();
		paint2.setColor(getResources()
				.getColor(android.R.color.holo_green_dark));
		paint2.setStyle(Paint.Style.FILL);
	}

	/**
	 * 我们可以在在调用super.onDraw(canvas)之前和之后实现自己的逻辑,
	 * 分别在系统绘制文字前后,完成自己的操作
	 */
	@Override
	protected void onDraw(Canvas canvas) {

		// TODO 回调父类方法super.onDraw(canvas)前,对TextView来说即是绘制文本内容之前
		/*
		 * 在绘制文字之下,绘制两个大小不同的矩形,形成一个重叠的效果,
		 * 再让系统调用super.onDraw方法,执行绘制文字的工作。
		 * */
		// 绘制一个外层矩形,蓝色那个
		canvas.drawRect(
				0,
				0,
				getMeasuredWidth(),
				getMeasuredHeight(),
				paint1);
		// 绘制一个内层矩形,绿色那个
		canvas.drawRect(
				10,
				10,
				getMeasuredWidth() - 10,
				getMeasuredHeight() - 10,
				paint2);
		canvas.save();
		// 绘制文字前平移10px
		canvas.translate(10, 0);

		super.onDraw(canvas);

		// TODO 回调父类方法后,对TextView来说即是绘制文本内容之后
		canvas.restore();

	}
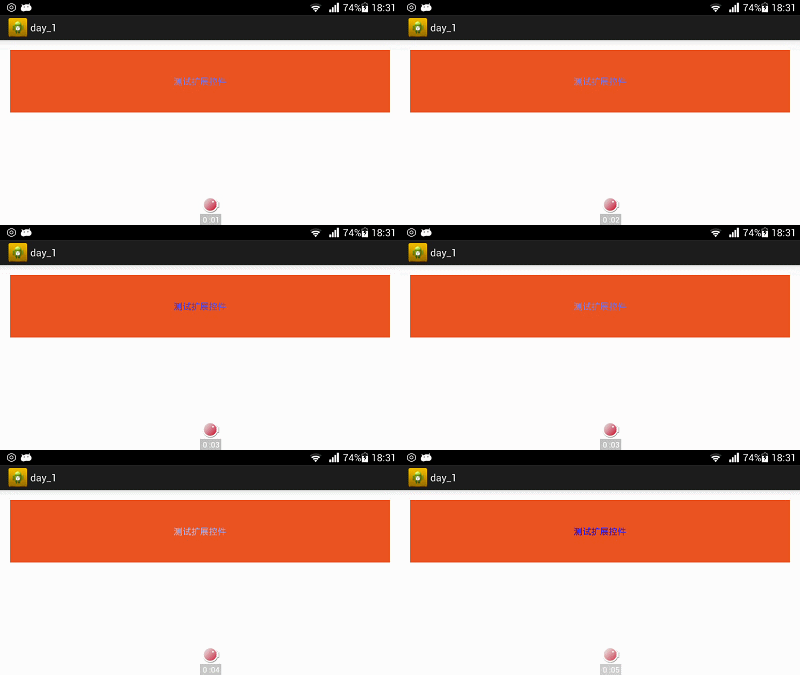
举例2:闪动的文字效果
private int mViewWidth;
private Paint mPaint;
private Linear Gradient linearGradient;
private Matrix matrix;
private int mTranslate;


@Override
protected void onSizeChanged(int w, int h, int oldw, int oldh) {

    super.onSizeChanged(w, h, oldw, oldh);

    if(mViewWidth==0){
        mViewWidth = getMeasuredWidth();//系统里的函数

        if(mViewWidth>0){
        	// 获取当前绘制TextView的Paint对象
        	mPaint = getPaint();
            // 给这个paint对象设置原生TextView没有的LinearGradient属性:
            linearGradient = new LinearGradient(
            0,
            0,
            mViewWidth,
            0,
                    new int[]{Color.BLUE,0xffffffff,Color.GREEN},
                    new float[]{0,1,2},
                    Shader.TileMode.MIRROR);
            paint.setShader(linearGradient);
            matrix = new Matrix();
        }
    }
}


/**
 * 在onDraw中通过矩阵的方式来不断平移渐变效果,从而在绘制文字时,产生动态的闪动的效果:
 */
@Override
protected void onDraw(Canvas canvas) {


// TODO 回调父类方法super.onDraw(canvas)前,对TextView来说即是绘制文本内容之前
super.onDraw(canvas);
// TODO 回调父类方法后,对TextView来说即是绘制文本内容之后
Log.e("mess", "------onDraw----");
if (matrix != null) {
	mTranslate += mViewWidth / 5;
	if (mTranslate > 2 * mViewWidth) {
	mTranslate = -mViewWidth;
	}
	matrix.setTranslate(mTranslate, 0);
	linearGradient.setLocalMatrix(matrix);
	postInvalidateDelayed(100);
	}
}
}
这个例子需要注意的地方是在onSizeChanged方法中,mPaint = getPaint();
这是什么意思呢,在第一个例子中,我们的Paint都是在程序中创建的新的,而这个例子中是同个getPaint()方法获取的。
也就是说,第一个例子中创建的Paint是要画在已有的TextView上的,
而第二个例子中我们获取了TextView它本身自己的Paint,然后在它的基础上进行修改,
这样就可以将效果加载在TextView本身的文字上了。
至于后面的那个matrix我确实没有理解。还没有用过。
2、创建复合控件
这种方式通常需要继承一个已有的ViewGroup,再给它添加指定功能的控件,从而组合成新的复合控件。
复合控件,最常见的其实就是我们的TitleBar了,一般就是一个left+title+right组合。
(1)定义属性:
为一个View提供可自定义的属性非常简单,只需要在res资源目录的values目录下创建一个attrs.xml的属性定义文件,并在该文件中通过如下代码定义相应的属性即可:
下面需要创建一个类,叫TitleBar,并且它继承自RelativeLayout中。在这个类中:
(2)获取自定义属性集TypedArray typed = context.obtainStyledAttributes(attrs, R.styleable.TitleBar);
系统提供了 TypedArray 这样的数据结构来获取自定义属性集,后面引用的 styleable 的TitleBar ,就是我们在XML中通过
	 /**
     * 获取自定义的属性
     *
     * @param context
     */
    private int leftTextColor;
    private Drawable leftBackGround;
    private String leftText;
    private float leftTextSize;

    private int rightTextColor;
    private String rightText;
    private float rightTextSize;

    private int titleTextColor;
    private String titleText;
    private float titleTextSize;

    /**
     * 通过这个方法,将你在attrs.xml中定义的 declare_styleable的
     * 所有属性的值存储到TypedArray中:
     * @param context
     * @param attrs
     */
    private void initAttr(Context context, AttributeSet attrs) {

    	// 得到TypedArray对象typed
        TypedArray typed = context.obtainStyledAttributes(attrs, R.styleable.TitleBar);

        // 从typed中取出对应的值为要设置的属性赋值,第二个参数是未指定时的默认值
        // 这里第一个参数是 R.styleable.name_attrname 耶
        leftTextColor = typed.getColor(R.styleable.TitleBar_leftTextColor, 0XFFFFFFFF);
        leftBackGround = typed.getDrawable(R.styleable.TitleBar_leftBackGround);
        leftText = typed.getString(R.styleable.TitleBar_leftText);
        leftTextSize = typed.getDimension(R.styleable.TitleBar_leftTextSize, 20);

        rightTextColor = typed.getColor(R.styleable.TitleBar_rightTextColor, 0XFFFFFFFF);
        rightText = typed.getString(R.styleable.TitleBar_rightText);
        rightTextSize = typed.getDimension(R.styleable.TitleBar_rightTextSize, 20);

        titleTextColor = typed.getColor(R.styleable.TitleBar_titleTextColor, 0XFFFFFFFF);
        titleText = typed.getString(R.styleable.TitleBar_title);
        titleTextSize = typed.getDimension(R.styleable.TitleBar_titleTextSize, 20);

        // 不要忘记调用,用来避免重新创建的时候的错误。
        typed.recycle();

    }
(3)组合控件(在UI模板类中)
UI模版TitleBar实际上由三个控件组成,即左边的点击按钮mLeftButton,右边的点击按钮mRightButton和中间的标题栏mTitleView。通过动态添加控件的方式,使用addView方法将这三个控件加入到定义的TitleBar模版中,并给它们设置我们前面所获取到的具体的属性值,比如标题的文字颜色、大小等:
这里要注意啦,下面的各种setXXX中,括号里都是刚刚上面initAttr中获取的值。
private TextView titleView;
private Button leftButton;
private Button rightButton;


private RelativeLayout.LayoutParams leftParams;
private RelativeLayout.LayoutParams rightParams;
private RelativeLayout.LayoutParams titleParams;


/**
 * 代码布局
 *
 * @param context
 */
@SuppressWarnings("deprecation")
private void initView(Context context) {
	// TitleBar上的三个控件
    titleView = new TextView(context);
    leftButton = new Button(context);
    rightButton = new Button(context);


    // 为创建的组件赋值,标题栏
    titleView.setText(titleText);
    titleView.setTextSize(titleTextSize);
    titleView.setTextColor(titleTextColor);
    titleView.setGravity(Gravity.CENTER);


    // 为创建的组件赋值,左边按钮
    leftButton.setText(leftText);
    leftButton.setTextColor(leftTextColor);
    leftButton.setBackgroundDrawable(leftBackGround);
    leftButton.setTextSize(leftTextSize);


    // 为创建的组件赋值,右边按钮
    rightButton.setText(rightText);
    rightButton.setTextSize(rightTextSize);
    rightButton.setTextColor(rightTextColor);


    // 为组件元素设置相应的布局元素,设置大小和位置
    // 在左边
    leftParams = new LayoutParams(LayoutParams.WRAP_CONTENT, LayoutParams.MATCH_PARENT);
    leftParams.addRule(RelativeLayout.ALIGN_PARENT_LEFT, RelativeLayout.TRUE);
    // 添加到ViewGroup中:
    addView(leftButton, leftParams);


    // 在右边
    rightParams = new LayoutParams(LayoutParams.WRAP_CONTENT, LayoutParams.MATCH_PARENT);
    rightParams.addRule(RelativeLayout.ALIGN_PARENT_RIGHT, RelativeLayout.TRUE);
    addView(rightButton, rightParams);


    //中间
    titleParams = new LayoutParams(LayoutParams.WRAP_CONTENT, LayoutParams.MATCH_PARENT);
    rightParams.addRule(RelativeLayout.CENTER_IN_PARENT, RelativeLayout.TRUE);
    addView(titleView, titleParams);


    //添加点击监听,(下面讲述如何引入的)
    /*
     * 这里的setOnClickListener是系统的关于一个Button的自带的点击事件
     * */
    leftButton.setOnClickListener(new OnClickListener() {


        @Override
        public void onClick(View v) {
        /*
         * 在对点击事件做相应以前,在调用这的MainActivity中,就已经把listenr传入进来了,
         * 在这里只需要直接调用就可以了。
         * 其中listener是一个setTitleBarClickListener接口方法的对象。
         * */
            if (listener != null) {
            //正常设置它们的点击事件处理onClick,只是在onClick中让它们执行我们设定的处理。
                listener.leftClick();
            }
        }
    });


    rightButton.setOnClickListener(new OnClickListener() {


        @Override
        public void onClick(View v) {
            if (listener != null) {
                listener.rightClick();
            }
        }
    });


}
(4)定义接口(在UI模板类中)
那么如何给这两个左右按钮设计点击事件呢?既然是UI模版,那么每个调用者所需要这些按钮能够实现的功能都是不一样的,因此,不能直接在UI模板中添加具体的实现逻辑,只能通过接口回调的思想,将具体的实现逻辑交给调用者:
/*
 * 这是一个接口方法,这个接口中有两个为实现的方法。
 * */
public interface TitleBarClickListener{
    //左点击
    void leftClick();
    //右点击
    void rightClick();
}
(5)暴露接口给调用者
/**
 * 暴露一个方法给调用者来注册接口回调,通过接口来获得回调者对接口方法TitleBarClickListener的实现
 * 这里的参数是一个TitleBarClickListener接口的接口对象。
 * @param listener
 */
public void setTitleBarClickListener(TitleBarClickListener listener) {
    this.listener = listener;
}
(6)实现接口的回调
就是说在调用者MainActivity的代码中重写接口中的leftClick()方法和rightClick()方法来实现具体的逻辑:
/**
 * 在调用者的代码中,调用者需要实现这样的一个接口,并完成接口中的方法,确定具体的实现逻辑
 * 并使用刚刚暴露的方法,将接口的对象传递进去,从而完成回调。
 * 通常情况下,可以使用匿名内部类的形式来实现接口中的方法:
 */
private TitleBar titlebar;


@Override
protected void onCreate(Bundle savedInstanceState) {
    super.onCreate(savedInstanceState);
    setContentView(R.layout.activity_main);
    titlebar = (TitleBar) findViewById(R.id.titlebar);
    /*
     * setTitleBarClickListener是在TitleBar定义中的一个方法,它用来接收listener。
     * TitleBarClickListener是在TitleBar中定义的一个接口,
     * 这个接口中有两个为实现的方法rightClick和leftClick。
     * 这里重写了leftClick和rightClick方法。
     * */
    titlebar.setTitleBarClickListener(new TitleBar.TitleBarClickListener(){

    @Override
    public void rightClick(){
    Toast.makeText(this, "right---", Toast.LENGTH_LONG).show();
    }

    @Override
    public void leftClick(){
    Toast.makeText(this, "left---", Toast.LENGTH_LONG).show();
    }
    });
}
(7)引用UI模板
在引用前,都需要指定第三方控件的名字空间:
xmlns:android="http://schemas.android.com/apk/res/android"这行代码就是在指定引用的名字控件xmlns,即xml namespace。这里指定了名字控件为“android”,因此在接下来使用系统属性的时候,才可以使用“android:”来引用Android的系统属性。
那么如果需要使用自己自定义的属性,那么就需要创建自己的名字空间,在Android Studio中,第三方的控件都使用如下的代码来引入名字空间:
xmlns:android="http://schemas.android.com/apk/res-auto"其中android是我们的名字空间,这个是可以自己改的,自己设置的,比如可以起名称叫cumtom什么的。
使用自定义的VIew与系统原生的View最大的区别就是在申明控件时,需要指定完整的包名,而在引用自定义的属性时,需要使用自定义的xmlns名字:
再更进一步,我们也可以将UI模板写到一个布局文件TitleBar.xml中:
3、重写VIew来实现全新的控件
创建自定义View的难点在于绘制控件和实现交互。
通常需要继承View类,并重写它的 onDraw()、onMeasure()等方法来实现绘制逻辑,
同时通过重写 onTouchEvent()等触控事件来实现交互逻辑。
我们还可以像实现控件方式那样,通过引入自定义属性,丰富自定义View的可定制性。
(1)例一:弧线展示图
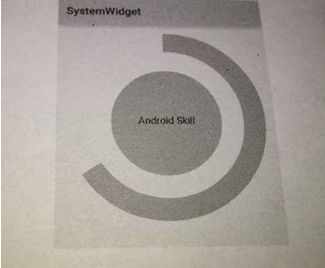
思路:这个view可以分为三个部分,中间的圆圈,中间显示的文字,外圈的圆弧。只要有了这样的思路,剩余的就是在onDraw()方法中去绘制了。
首先我们这个自定义的View名叫CirclePregressView。
private int mMeasureHeigth;// 控件高度
private int mMeasureWidth;// 控件宽度
// 圆形
private Paint mCirclePaint;
private float mCircleXY;//圆心坐标
private float mRadius;//圆形半径
// 圆弧
private Paint mArcPaint;
private RectF mArcRectF;//圆弧的外切矩形
private float mSweepAngle;//圆弧的角度
private float mSweepValue = 50;// 用来计算圆弧的角度
// 文字
private Paint mTextPaint;
private String mShowText;//文本内容
private float mShowTextSize;//文本大小

@Override
protected void onMeasure(int widthMeasureSpec, int heightMeasureSpec) {
//获取控件宽度
    mMeasureWidth = MeasureSpec.getSize(widthMeasureSpec);
    //获取控件高度
    mMeasureHeigth = MeasureSpec.getSize(heightMeasureSpec);
    // 设置大小
    setMeasuredDimension(mMeasureWidth, mMeasureHeigth);
    initView();
}

/**
 *准备画笔,
 */
private void initView() {

// View的长度为宽高的最小值:
    float length = Math.min(mMeasureWidth,mMeasureHeigth);

    /**
     * 圆
     */
    // 确定圆心坐标
    mCircleXY = length / 2;
    // 确定圆的半径
    mRadius = (float) (length * 0.5 / 2);
    // 定义画笔
    mCirclePaint = new Paint();
    // 去锯齿
    mCirclePaint.setAntiAlias(true);
    // 设置颜色
    mCirclePaint.setColor(getResources().getColor(android.R.color.holo_green_dark));

    /**
     * 圆弧
     */
    // 圆弧的外切矩形
    mArcRectF = new RectF(
    		(float) (length * 0.1),
    		(float) (length * 0.1),
    		(float) (length * 0.9),
    		(float) (length * 0.9));
    // 圆弧的角度
    mSweepAngle = (mSweepValue / 100f) * 360f;
    // 圆弧画笔
    mArcPaint = new Paint();
    // 设置颜色
    mArcPaint.setColor(getResources().getColor(android.R.color.holo_blue_bright));
    //圆弧宽度
    mArcPaint.setStrokeWidth((float) (length * 0.1));
    //圆弧
    mArcPaint.setStyle(Style.STROKE);

    /**
     * 文字
     */
    mShowText = setShowText();
    mShowTextSize = setShowTextSize();
    mTextPaint = new Paint();
    mTextPaint.setTextSize(mShowTextSize);
    mTextPaint.setTextAlign(Paint.Align.CENTER);


}

/**
 * 设置文字内容
 * @return
 */
private String setShowText() {
    this.invalidate();
    return "Android Skill";
}

/**
 * 设置文字大小
 * @return
 */
private float setShowTextSize() {
    this.invalidate();
    return 50;
}

/**
 * 这个函数还不能缺少,至于invalidate的使用方法,我现在还不知道呢
 */
public void forceInvalidate() {
    this.invalidate();
}

@Override
protected void onDraw(Canvas canvas) {
    super.onDraw(canvas);
    // 绘制圆
    canvas.drawCircle(mCircleXY, mCircleXY, mRadius, mCirclePaint);
    // 绘制圆弧,逆时针绘制,角度跟
    canvas.drawArc(mArcRectF, 90, mSweepAngle, false, mArcPaint);
    // 绘制文字
    canvas.drawText(mShowText, 0, mShowText.length(), mCircleXY, mCircleXY + mShowTextSize / 4, mTextPaint);
}
这个是写在自定义控件类中的:
/**
 * 让调用者来设置不同的状态值,比如这里默认值为25
 * @param sweepValue
 */
public void setSweepValue(float sweepValue) {
    if (sweepValue != 0) {
        mSweepValue = sweepValue;
    } else {
        mSweepValue = 25;
    }
    this.invalidate();
}
CircleProgressView circle = (CircleProgressView)findViewById(R.id.circle);
circle.setSweepValue(70);

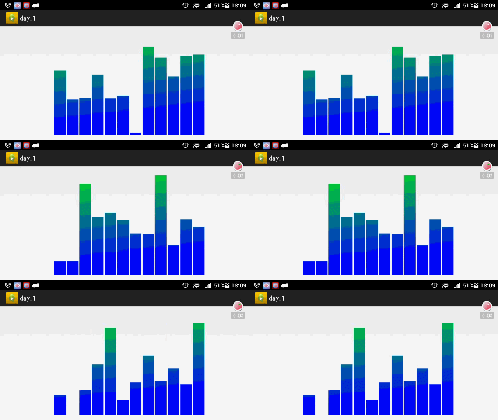
(2)例二:音频条形图:
思路:绘制n个小矩形,每个矩形有些偏移即可
private int mWidth;//控件的宽度
private int mRectWidth;// 矩形的宽度
private int mRectHeight;// 矩形的高度
private Paint paint;
private int mRectCount;// 矩形的个数
private int offset = 5;// 偏移
private double mRandom;
private LinearGradient lg;// 渐变

private void initView() {
    paint = new Paint();
    paint.setColor(Color.GREEN);
    paint.setStyle(Paint.Style.FILL);
    mRectCount = 12;
}

/**
 * 设置渐变效果:用Shader。
 */
@Override
protected void onSizeChanged(int w, int h, int oldw, int oldh) {
    super.onSizeChanged(w, h, oldw, oldh);
    mWidth = getWidth();
    mRectHeight = getHeight();
    mRectWidth = (int) (mWidth * 0.6 / mRectCount);
    lg = new LinearGradient(
    		0,
    		0,
    		mRectWidth,
    		mRectHeight,
    		Color.GREEN,
    		Color.BLUE,
    		TileMode.CLAMP);
    paint.setShader(lg);
}

/**
 *
 */
@Override
protected void onDraw(Canvas canvas) {
    super.onDraw(canvas);
    // 随机的为每个矩形条计算高度,而后设置高度。
    for (int i = 0; i < mRectCount; i++) {
        mRandom = Math.random();
        float currentHeight = (int) (mRectHeight * mRandom);
        canvas.drawRect(
        		(float) (mWidth * 0.4 / 2 + mRectWidth * i + offset * i),
        		currentHeight,
        		(float) (mWidth * 0.4 / 2 + mRectWidth * (i + 1) + offset * i),
        		mRectHeight,
        		paint);
    }
    // 调用Invalidate()方法通知View进行重绘。这里延缓1秒延迟重绘,比较容易看清楚。
    postInvalidateDelayed(1000);
}
后记:
就像本书作者说的:无论多么复杂的自定义view都是慢慢迭代起来的功能,不要被自定义view吓到。
八、自定义ViewGroup
1. 首先实现类似Scrollview的功能
    /**
     *
     * 使用遍历的方式通知子view进行自测
     *
     * */
    @Override
    protected void onMeasure(int widthMeasureSpec, int heightMeasureSpec) {
        super.onMeasure(widthMeasureSpec, heightMeasureSpec);
        int count = getChildCount();

        for (int i = 0; i < count; i++) {
            View childView = getChildAt(i);
            measureChild(childView, widthMeasureSpec, heightMeasureSpec);//让每个子View都显示完整的一屏
        }//这样在滑动的时候,可以比较好地实现后面的效果。
    }
2. 放置子view
/**
 * 计算屏幕高度
 *
 * @return
 */
private int getScreenHeight() {
    WindowManager manager = (WindowManager) getContext().getSystemService(Context.WINDOW_SERVICE);
    DisplayMetrics dm = new DisplayMetrics();
    manager.getDefaultDisplay().getMetrics(dm);
    return dm.heightPixels;
}

/**
 * 每个view独占一屏 放置view的位置
 *
 */
@Override
protected void onLayout(boolean changed, int l, int t, int r, int b) {

    // 设置ViewGroup的高度,在本例中,由于让每个子View占一屏的高度,因此整个ViewGroup的高度即子View的个数乘以屏幕的高度
    mScreenHeight = getScreenHeight();
    int childcount = getChildCount();
    MarginLayoutParams mlp = (MarginLayoutParams) getLayoutParams();
    mlp.height = childcount * mScreenHeight;
    setLayoutParams(mlp);

    //修改每个子VIew的top和bottom这两个属性,让它们能依次排列下来。
    for (int i = 0; i < childcount; i++) {
        View view = getChildAt(i);
        if (view.getVisibility() != View.GONE) {
            view.layout(l, i * mScreenHeight, r, (i + 1) * mScreenHeight);
        }
    }
}
3.响应滑动事件
3.1 重写触摸事件@Override
public boolean onTouchEvent(MotionEvent event) {
int action = event.getAction();
int y = (int) event.getY();
switch (action) {
case MotionEvent.ACTION_DOWN:
mLastY = y;
// 记录触摸起点
mStart = getScrollY();
break;
case MotionEvent.ACTION_MOVE:
if (!mScroller.isFinished()) {
mScroller.abortAnimation();
}
// dy在这里:
int dy = mLastY - y;
//View移动到上边沿
if (getScrollY() < 0) {
dy = 0;
}
//view移动到下边沿
if (getScrollY() > getHeight() - mScreenHeight) {
dy = 0;
}
Log.e("mess", mScreenHeight+"-----height="+getHeight()+"-----------view="+(getHeight()-mScreenHeight));
// 让手指滑动的时候让ViewGroup的所有子View也跟着滚动dy即可,计算dy的方法有很多:
scrollBy(0, dy);
mLastY = y;
break;
case MotionEvent.ACTION_UP:
// 记录触摸终点
mEnd = getScrollY();
int dScrollY = mEnd - mStart;
Log.e("mess", "---dscrollY="+dScrollY);
if (dScrollY > 0) {// 上滑
if (dScrollY < mScreenHeight / 3) {// 回彈效果
mScroller.startScroll(0, getScrollY(), 0, -dScrollY);
} else {// 滑到下一个view
mScroller.startScroll(0, getScrollY(), 0, mScreenHeight - dScrollY);
}
} else {// 下滑
if (-dScrollY < mScreenHeight / 3) {// 回彈
mScroller.startScroll(0, getScrollY(), 0, -dScrollY);
} else {
mScroller.startScroll(0, getScrollY(), 0, -mScreenHeight - dScrollY);
}
}
break;
}
//不要忘了,忘了这个有点坑了就
postInvalidate();
return true;
}3.2 实现滚动
@Override
    public void computeScroll() {
        super.computeScroll();
        if (mScroller.computeScrollOffset()) {
            scrollTo(0, mScroller.getCurrY());
            postInvalidate();
        }
    }

