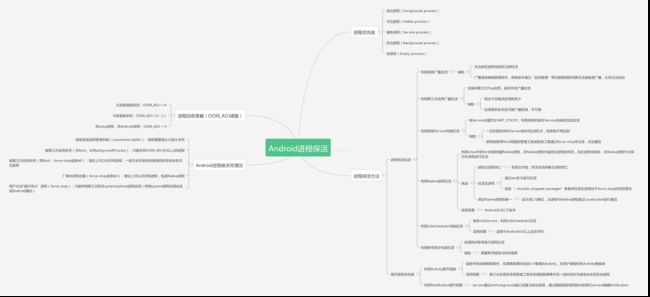
Android进程保活总结
最近学习了关于Android进程保活的相关知识,在此写下一篇博客总结下。
Android 进程优先级
如果需要保证我们的应用所在进程存活,那么我们就应该先了解一下Android系统中进程的分类。
在Android中,进程依据重要性被分为5级,越高级的进程越重要,在内存不够回收进程时也会越晚被回收:
前台进程(Foreground process):指用户当前操作必须的进程。一般来说,系统中仅存在极少的前台进程,而且它们会到最后才被回收掉。拥有以下特征的进程被视为前台进程:
- 拥有Activity运行在屏幕最前端的进程。(已调用Activity的onResume方法)
- 拥有正在运行的BroadcastReceiver的进程。(已调用BroadcastReceiver的onReceive方法)
- 拥有正在执行的Service的回调方法的进程。(Service的onCreate、onStart、onDestroy方法)
可见进程(Visible process):正在执行某些用户可见操作的进程。当杀死这些进程时,用户会有一定的影响。拥有以下特征的进程被视为可见进程:
- 拥有可视的,但不是在前台的Activity。(已调用onPause方法)(当另一个个Activity设置为dialog模式时可能出现这种情况)
- 拥有一个前台Service。(通过用startForeground)
- 拥有系统关键特性的Service,如动态壁纸、输入法等服务。
后台进程(Background process):这是一种对用户体验没有直接影响的进程,系统会在需要内存的时候随时回收这种进程,这种进程通常会持有一个已调用onStop方法的Activity。
空进程(Empty process):不含任何活动应用组件的进程。保留这种进程的的唯一目的是用作缓存,以缩短下次在其中运行组件所需的启动时间。 为使总体系统资源在进程缓存和底层内核缓存之间保持平衡,系统往往会终止这些进程。
更多详细的进程优先级内容可以参考Android官方文档:
https://developer.android.com/guide/topics/processes/process-lifecycle.html
https://developer.android.com/guide/components/processes-and-threads.html
Android 进程回收策略
众所周知,Android是基于Linux系统的。在Android进程回收策略中,Android进程与Linux进程根据OOM_ADJ阈值进行区分:
- OOM_ADJ >= 4:比较容易被杀死的进程
- OOM_ADJ 0 ~ 3:不容易被杀死的进程
- OOM_ADJ < 0 :纯Linux进程,非Android进程
/**
 * Activity manager code dealing with processes.
 */
final class ProcessList {
	...

    // OOM adjustments for processes in various states:

    // Adjustment used in certain places where we don't know it yet.
    // (Generally this is something that is going to be cached, but we
    // don't know the exact value in the cached range to assign yet.)
	// 未知进程,通常是用作缓存
    static final int UNKNOWN_ADJ = 16;

    // This is a process only hosting activities that are not visible,
    // so it can be killed without any disruption.
	// 拥有不可视的Activity的进程,可以不影响影响用户的情况下杀掉
    static final int CACHED_APP_MAX_ADJ = 15;
    static final int CACHED_APP_MIN_ADJ = 9;

    // The B list of SERVICE_ADJ -- these are the old and decrepit
    // services that aren't as shiny and interesting as the ones in the A list.
	// 一些旧的服务进程
    static final int SERVICE_B_ADJ = 8;

    // This is the process of the previous application that the user was in.
    // This process is kept above other things, because it is very common to
    // switch back to the previous app.  This is important both for recent
    // task switch (toggling between the two top recent apps) as well as normal
    // UI flow such as clicking on a URI in the e-mail app to view in the browser,
    // and then pressing back to return to e-mail.
	// 用户使用的前一个进程
    static final int PREVIOUS_APP_ADJ = 7;

    // This is a process holding the home application -- we want to try
    // avoiding killing it, even if it would normally be in the background,
    // because the user interacts with it so much.
	// 主界面进程
    static final int HOME_APP_ADJ = 6;

    // This is a process holding an application service -- killing it will not
    // have much of an impact as far as the user is concerned.
	// 持有应用服务的进程
    static final int SERVICE_ADJ = 5;

    // This is a process with a heavy-weight application.  It is in the
    // background, but we want to try to avoid killing it.  Value set in
    // system/rootdir/init.rc on startup.
	// 重量级应用进程
    static final int HEAVY_WEIGHT_APP_ADJ = 4;

    // This is a process currently hosting a backup operation.  Killing it
    // is not entirely fatal but is generally a bad idea.
	// 执行备份操作的进程
    static final int BACKUP_APP_ADJ = 3;

    // This is a process only hosting components that are perceptible to the
    // user, and we really want to avoid killing them, but they are not
    // immediately visible. An example is background music playback.
	// 拥有用户可感知组件的进程
    static final int PERCEPTIBLE_APP_ADJ = 2;

    // This is a process only hosting activities that are visible to the
    // user, so we'd prefer they don't disappear.
	// 拥有用户仅可见、不可交互的Activity的进程
    static final int VISIBLE_APP_ADJ = 1;

    // This is the process running the current foreground app.  We'd really
    // rather not kill it!
	// 前台运行的进程
    static final int FOREGROUND_APP_ADJ = 0;

    // This is a system persistent process, such as telephony.  Definitely
    // don't want to kill it, but doing so is not completely fatal.
	// 系统常驻进程
    static final int PERSISTENT_PROC_ADJ = -12;

    // The system process runs at the default adjustment.
	// 系统进程
    static final int SYSTEM_ADJ = -16;

    // Special code for native processes that are not being managed by the system (so
    // don't have an oom adj assigned by the system).
	// 为native进程保留,他们不被系统管理
    static final int NATIVE_ADJ = -17;

    ...
}
Android 进程被杀死情况
- 触发系统进程管理机制回收(Lowmemorykiller):这种方法会按照阈值从大到小进行清理
- 被没有进行Root的第三方应用杀死(使用killBackgroundProcess方法):这种方法只能杀死OOM_ADJ为4以上的进程
- 被进行Root的第三方应用杀死(使用force-stop或者kill):理论上来说可以杀死所有进程,但一般只会清理非系统关键进程和非前台可见进程
- 厂商的杀进程功能(force-stop或者kill):理论上来说可以杀死所有进程,包括Linux原生进程
- 用户主动“强行停止”进程(force-stop):只能停用第三方和非system/phone进程应用(停用system进程应用会造成Android系统重启)
Android 进程保活思路
- 通过提升Android进程优先级,使得进程更难以被回收
- 通过某些特殊的机制,在进程死后将其拉活
提升Android进程的优先级
利用Activity提升进程等级
public class OnePixelActivity extends Activity {

    private static final String TAG = "MyLog";

    public static OnePixelActivity instance = null;

    @Override
    protected void onCreate(@Nullable Bundle savedInstanceState) {
        super.onCreate(savedInstanceState);
        setContentView(R.layout.activity_one_pixel);
        Window window = getWindow();
        // 放在左上角
        window.setGravity(Gravity.START | Gravity.TOP);
        WindowManager.LayoutParams layoutParams = window.getAttributes();
        // 宽高为1px
        layoutParams.width = 1;
        layoutParams.height = 1;
        // 起始坐标
        layoutParams.x = 0;
        layoutParams.y = 0;
        window.setAttributes(layoutParams);
        instance = this;
        Log.d(TAG, "activity onCreate");
    }

    @Override
    protected void onDestroy() {
        instance = null;
        Log.d(TAG, "activity onDestroy");
        super.onDestroy();
    }
}public class ScreenBroadcastReceiver extends BroadcastReceiver {
private static final String TAG = "MyLog";
@Override
public void onReceive(Context context, Intent intent) {
String action = intent.getAction();
switch (action) {
case Intent.ACTION_SCREEN_ON: { //
Log.d(TAG, "screen_on");
// 关闭一像素Activity
if (OnePixelActivity.instance != null) {
OnePixelActivity.instance.finish();
}
break;
}
case Intent.ACTION_SCREEN_OFF: {
Log.d(TAG, "screen_off");
// 开启一像素Activity
Intent activityIntent = new Intent(context, OnePixelActivity.class);
activityIntent.addFlags(Intent.FLAG_ACTIVITY_NEW_TASK);
context.startActivity(activityIntent);
break;
}
default:
break;
}
}
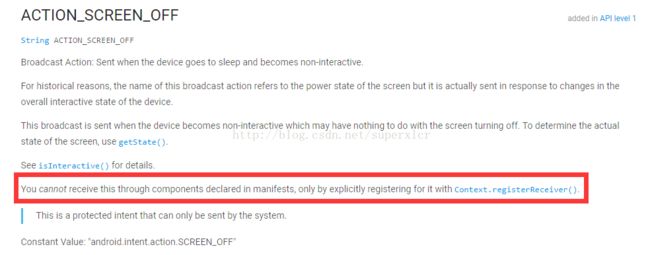
}值得注意的是Intent.ACTION_SCREEN_ON与Intent.ACTION_SCREEN_OFF只有通过Context.registerReceiver方法注册的广播接收器才能监听到,官方解释如下:
public class WorkService extends Service {

    private static final String TAG = "MyLog";

    private ScreenBroadcastReceiver receiver;

    @Nullable
    @Override
    public IBinder onBind(Intent intent) {
        return null;
    }

    @Override
    public void onCreate() {
        super.onCreate();
        Log.d(TAG, "service onCreate");
        receiver = new ScreenBroadcastReceiver();
        IntentFilter intentFilter = new IntentFilter();
        intentFilter.addAction(Intent.ACTION_SCREEN_ON);
        intentFilter.addAction(Intent.ACTION_SCREEN_OFF);
        registerReceiver(receiver, intentFilter);
    }

    @Override
    public void onDestroy() {
        Log.d(TAG, "service onDestroy");
        unregisterReceiver(receiver);
        super.onDestroy();
    }
}public class MainActivity extends AppCompatActivity {
@Override
protected void onCreate(Bundle savedInstanceState) {
super.onCreate(savedInstanceState);
setContentView(R.layout.activity_main);
Intent intent = new Intent(this, WorkService.class);
startService(intent);
finish();
}
}通过adb shell可以看到,在锁屏前应用所处的进程oom_adj值是较高的,锁屏后由于启动了Activity,oom_adj值降低了,进程的等级得到了相应的提高,变得更难以被回收了,这样可以一定程度上缓解我们的应用被第三方应用或系统管理工具在锁屏后为省电而被杀死的情况:
利用Notification提升权限
public class FakeService extends Service {

    private static final String TAG = "MyLog";

    public static FakeService instance = null;

    @Nullable
    @Override
    public IBinder onBind(Intent intent) {
        return null;
    }

    @Override
    public void onCreate() {
        super.onCreate();
        Log.d(TAG, "fake service onCreate");
        // 保存实例
        instance = this;
        // 开启服务前台运行
        Notification.Builder builder = new Notification.Builder(this);
        builder.setSmallIcon(R.mipmap.ic_launcher)
                .setContentTitle("fake")
                .setContentText("I am fake")
                .setWhen(System.currentTimeMillis());
        startForeground(1, builder.build());
        // 开启真正工作的Service
        Intent intent = new Intent(this, WorkService.class);
        startService(intent);
    }

    @Override
    public void onDestroy() {
        Log.d(TAG, "fake service onDestroy");
        // 清除实例
        instance = null;
        // 关闭Notification
        stopForeground(true);
        super.onDestroy();
    }
}
WorkService(工作的Service)代码如下:
public class WorkService extends Service {

    private static final String TAG = "MyLog";

    @Nullable
    @Override
    public IBinder onBind(Intent intent) {
        return null;
    }

    @Override
    public void onCreate() {
        super.onCreate();
        Log.d(TAG, "work service onCreate");
        // 开启服务前台运行,id与FakeService相同均为1
        Notification.Builder builder = new Notification.Builder(this);
        builder.setSmallIcon(R.mipmap.ic_launcher)
                .setContentTitle("fake")
                .setContentText("I am fake")
                .setWhen(System.currentTimeMillis());
        startForeground(1, builder.build());
        // 关闭FakeService,关闭Notification
        FakeService.instance.stopSelf();
    }

    @Override
    public void onDestroy() {
        Log.d(TAG, "work service onDestroy");
        super.onDestroy();
    }
}
主Activity依旧,开启Service后关闭:
public class MainActivity extends AppCompatActivity {

    @Override
    protected void onCreate(Bundle savedInstanceState) {
        super.onCreate(savedInstanceState);
        setContentView(R.layout.activity_main);
        Intent intent = new Intent(this, FakeService.class);
        startService(intent);
        finish();
    }
}
运行输出日志如下所示:
在Android进程死后进行拉活
利用系统广播拉活
利用第三方应用广播拉活
利用系统Service机制拉活
public class WorkService extends Service {

    private static final String TAG = "MyLog";

    @Nullable
    @Override
    public IBinder onBind(Intent intent) {
        return null;
    }

    @Override
    public void onCreate() {
        super.onCreate();
        Log.d(TAG, "work service onCreate");
    }

    @Override
    public int onStartCommand(Intent intent, int flags, int startId) {
        Log.d(TAG, "work service onStartCommand");
        Log.d(TAG, "work service onStartCommand intent :" + intent);
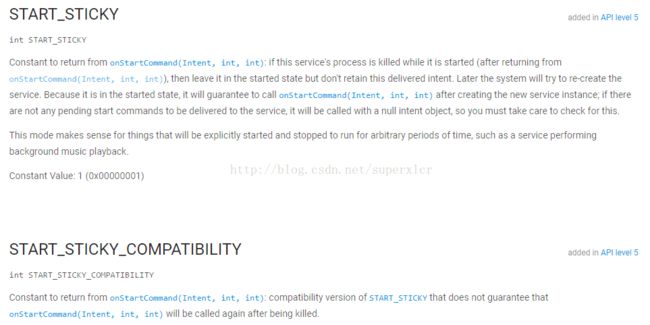
        return START_REDELIVER_INTENT;
    }
}
START_REDELIVER_INTENT效果:

利用Native进程拉活
- Native进程如何感知主进程的死亡:利用文件锁,而非轮询来判断主进程是否死亡,有利于性能
- Native进程如何拉活主进程:通过am命令进行拉活,并指定“--include-stopped-packages”参数来拉活主进程处于force-stop状态的情况
- 如何保证Native进程的唯一:设计成C/S模式,主进程与Native进程通过Localsocket进行通信
利用JobScheduler机制拉活
public class MyJobService extends JobService {

    private static final String TAG = "MyLog";

    @Override
    public void onCreate() {
        super.onCreate();
        Log.d(TAG, "onCreate");
        JobInfo.Builder builder = new JobInfo.Builder(1, new ComponentName(this, MyJobService.class));
        // 设置执行延迟
        builder.setOverrideDeadline(0);
        // 设置持续运行
        builder.setPersisted(true);
        JobScheduler jobScheduler = (JobScheduler) this.getSystemService(Context.JOB_SCHEDULER_SERVICE);
        jobScheduler.schedule(builder.build());
    }

    @Override
    public boolean onStartJob(JobParameters params) {
        Log.d(TAG, "onStartJob");
        return false;
    }

    @Override
    public boolean onStopJob(JobParameters params) {
        return false;
    }
}
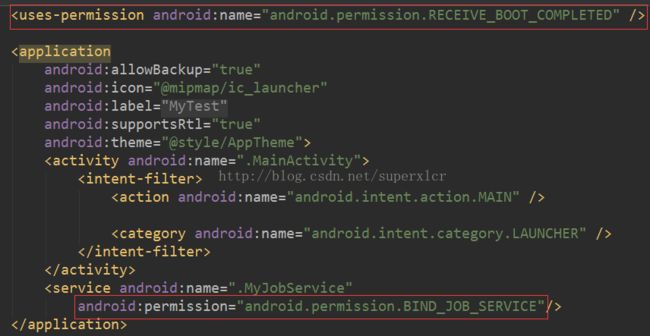
使用JobService和把Service设置为Persisted都需要我们在Manifest中配置相应的参数:
