Android修改状态栏颜色全方位教程
转载自:https://www.jianshu.com/p/932568ed31af
关键字:状态栏着色 透明状态栏 沉浸式 白底黑字
Github Demo:https://github.com/imflyn/Eyes
参考文章:
Android-transulcent-status-bar
Android 6.0状态栏使用灰色文字和图标
Android系统更改状态栏字体颜色
在谷歌官方的material设计文档中定义了新的状态栏设计。
https://material.io/guidelines/layout/structure.html#structure-system-bars
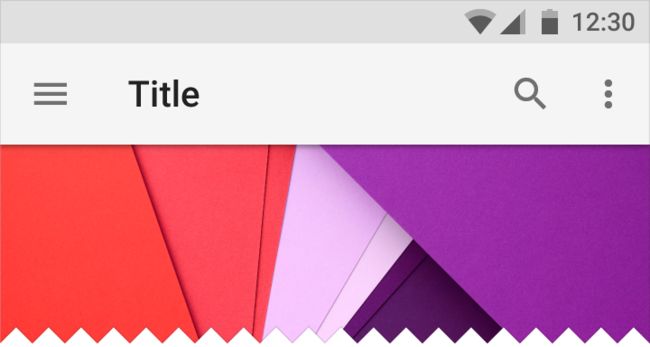
默认情况下,状态栏的颜色是黑色的。同时状态栏颜色也可以半透明或是指定任意一种颜色。
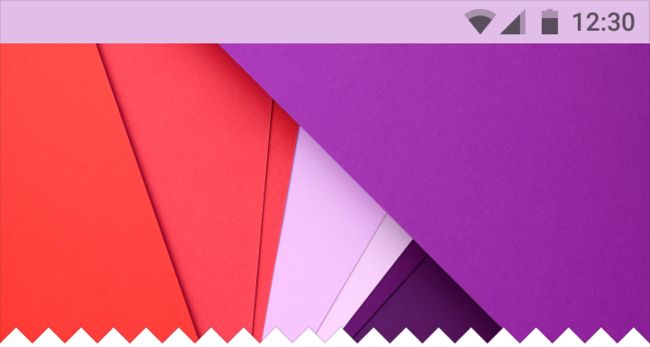
1.改变颜色后的状态栏
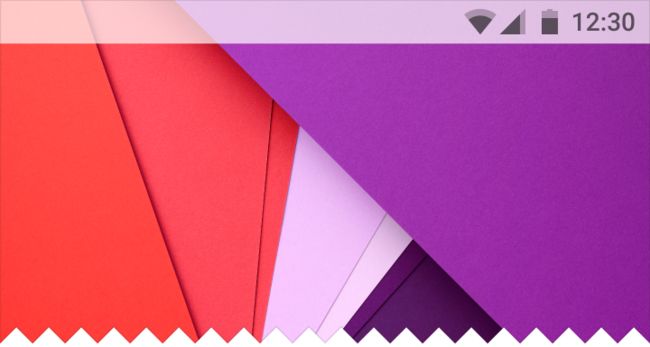
2.半透明状态栏
3.黑色状态栏
黑色icon或文字的状态栏
接下来讲一下具体实现
一.改变状态栏颜色
4.4-5.0的处理:
4.4-5.0还没有API可以直接修改状态栏颜色,所以必须先将状态栏设置为透明,然后在布局中添加一个背景为期望色值的View来作为状态栏的填充。
static void setStatusBarColor(Activity activity, int statusColor) {
    Window window = activity.getWindow();
    //设置Window为全透明
    window.addFlags(WindowManager.LayoutParams.FLAG_TRANSLUCENT_STATUS);

    ViewGroup mContentView = (ViewGroup) window.findViewById(Window.ID_ANDROID_CONTENT);
    //获取父布局
    View mContentChild = mContentView.getChildAt(0);
    //获取状态栏高度
    int statusBarHeight = getStatusBarHeight(activity);

    //如果已经存在假状态栏则移除,防止重复添加
    removeFakeStatusBarViewIfExist(activity);
    //添加一个View来作为状态栏的填充
    addFakeStatusBarView(activity, statusColor, statusBarHeight);
    //设置子控件到状态栏的间距
    addMarginTopToContentChild(mContentChild, statusBarHeight);
    //不预留系统栏位置
    if (mContentChild != null) {
        ViewCompat.setFitsSystemWindows(mContentChild, false);
    }
    //如果在Activity中使用了ActionBar则需要再将布局与状态栏的高度跳高一个ActionBar的高度,否则内容会被ActionBar遮挡
    int action_bar_id = activity.getResources().getIdentifier("action_bar", "id", activity.getPackageName());
    View view = activity.findViewById(action_bar_id);
    if (view != null) {
       TypedValue typedValue = new TypedValue();
        if (activity.getTheme().resolveAttribute(R.attr.actionBarSize, typedValue, true)) {
            int actionBarHeight = TypedValue.complexToDimensionPixelSize(typedValue.data, activity.getResources().getDisplayMetrics());
            setContentTopPadding(activity, actionBarHeight);
        }
    }
}
private static void removeFakeStatusBarViewIfExist(Activity activity) {
    Window window = activity.getWindow();
    ViewGroup mDecorView = (ViewGroup) window.getDecorView();

    View fakeView = mDecorView.findViewWithTag(TAG_FAKE_STATUS_BAR_VIEW);
    if (fakeView != null) {
        mDecorView.removeView(fakeView);
    }
}
private static View addFakeStatusBarView(Activity activity, int statusBarColor, int statusBarHeight) {
    Window window = activity.getWindow();
    ViewGroup mDecorView = (ViewGroup) window.getDecorView();

    View mStatusBarView = new View(activity);
    FrameLayout.LayoutParams layoutParams = new FrameLayout.LayoutParams(ViewGroup.LayoutParams.MATCH_PARENT, statusBarHeight);
    layoutParams.gravity = Gravity.TOP;
    mStatusBarView.setLayoutParams(layoutParams);
    mStatusBarView.setBackgroundColor(statusBarColor);
    mStatusBarView.setTag(TAG_FAKE_STATUS_BAR_VIEW);

    mDecorView.addView(mStatusBarView);
    return mStatusBarView;
}
private static void addMarginTopToContentChild(View mContentChild, int statusBarHeight) {
    if (mContentChild == null) {
        return;
    }
    if (!TAG_MARGIN_ADDED.equals(mContentChild.getTag())) {
        FrameLayout.LayoutParams lp = (FrameLayout.LayoutParams) mContentChild.getLayoutParams();
        lp.topMargin += statusBarHeight;
        mContentChild.setLayoutParams(lp);
        mContentChild.setTag(TAG_MARGIN_ADDED);
    }
}
static void setContentTopPadding(Activity activity, int padding) {
     ViewGroup mContentView = (ViewGroup) activity.getWindow().findViewById(Window.ID_ANDROID_CONTENT);
     mContentView.setPadding(0, padding, 0, 0);
}
Android5.0以上的处理:
static void setStatusBarColor(Activity activity, int statusColor) {
    Window window = activity.getWindow();
    //取消状态栏透明
    window.clearFlags(WindowManager.LayoutParams.FLAG_TRANSLUCENT_STATUS);
    //添加Flag把状态栏设为可绘制模式
    window.addFlags(WindowManager.LayoutParams.FLAG_DRAWS_SYSTEM_BAR_BACKGROUNDS);
    //设置状态栏颜色
    window.setStatusBarColor(statusColor);
    //设置系统状态栏处于可见状态
    window.getDecorView().setSystemUiVisibility(View.SYSTEM_UI_FLAG_VISIBLE);
    //让view不根据系统窗口来调整自己的布局
    ViewGroup mContentView = (ViewGroup) window.findViewById(Window.ID_ANDROID_CONTENT);
    View mChildView = mContentView.getChildAt(0);
    if (mChildView != null) {
        ViewCompat.setFitsSystemWindows(mChildView, false);
        ViewCompat.requestApplyInsets(mChildView);
    }
}
二.透明状态栏
4.4-5.0的处理:
static void translucentStatusBar(Activity activity) {
    Window window = activity.getWindow();
    //设置Window为透明
    window.addFlags(WindowManager.LayoutParams.FLAG_TRANSLUCENT_STATUS);

    ViewGroup mContentView = (ViewGroup) activity.findViewById(Window.ID_ANDROID_CONTENT);
    View mContentChild = mContentView.getChildAt(0);

    //移除已经存在假状态栏则,并且取消它的Margin间距
    removeFakeStatusBarViewIfExist(activity);
    removeMarginTopOfContentChild(mContentChild, getStatusBarHeight(activity));
    if (mContentChild != null) {
        //fitsSystemWindow 为 false, 不预留系统栏位置.
        ViewCompat.setFitsSystemWindows(mContentChild, false);
    }
}
5.0以上的处理:
static void translucentStatusBar(Activity activity, boolean hideStatusBarBackground) {
    Window window = activity.getWindow();
    //添加Flag把状态栏设为可绘制模式
    window.addFlags(WindowManager.LayoutParams.FLAG_DRAWS_SYSTEM_BAR_BACKGROUNDS);
    if (hideStatusBarBackground) {
        //如果为全透明模式,取消设置Window半透明的Flag
        window.clearFlags(WindowManager.LayoutParams.FLAG_TRANSLUCENT_STATUS);
        //设置状态栏为透明
        window.setStatusBarColor(Color.TRANSPARENT);
        //设置window的状态栏不可见
        window.getDecorView().setSystemUiVisibility(View.SYSTEM_UI_FLAG_LAYOUT_STABLE | View.SYSTEM_UI_FLAG_LAYOUT_FULLSCREEN);
    } else {
        //如果为半透明模式,添加设置Window半透明的Flag
        window.addFlags(WindowManager.LayoutParams.FLAG_TRANSLUCENT_STATUS);
        //设置系统状态栏处于可见状态
        window.getDecorView().setSystemUiVisibility(View.SYSTEM_UI_FLAG_VISIBLE);
    }
    //view不根据系统窗口来调整自己的布局
    ViewGroup mContentView = (ViewGroup) window.findViewById(Window.ID_ANDROID_CONTENT);
    View mChildView = mContentView.getChildAt(0);
    if (mChildView != null) {
        ViewCompat.setFitsSystemWindows(mChildView, false);
        ViewCompat.requestApplyInsets(mChildView);
    }
}
三.使用CollapsingToolbarLayout使ToolBar具有折叠效果
类似图片中的效果
首先是XML布局:
4.4-5.0的处理:
static void setStatusBarColorForCollapsingToolbar(Activity activity, final AppBarLayout appBarLayout, final CollapsingToolbarLayout collapsingToolbarLayout,
                                                  Toolbar toolbar, int statusColor) {
    Window window = activity.getWindow();
    //设置Window为全透明
    window.addFlags(WindowManager.LayoutParams.FLAG_TRANSLUCENT_STATUS);
    ViewGroup mContentView = (ViewGroup) window.findViewById(Window.ID_ANDROID_CONTENT);

    //AppBarLayout,CollapsingToolbarLayout,ToolBar,ImageView的fitsSystemWindow统一改为false, 不预留系统栏位置.
    View mContentChild = mContentView.getChildAt(0);
    mContentChild.setFitsSystemWindows(false);
    ((View) appBarLayout.getParent()).setFitsSystemWindows(false);
    appBarLayout.setFitsSystemWindows(false);
    collapsingToolbarLayout.setFitsSystemWindows(false);
    collapsingToolbarLayout.getChildAt(0).setFitsSystemWindows(false);

    toolbar.setFitsSystemWindows(false);
    //为Toolbar添加一个状态栏的高度, 同时为Toolbar添加paddingTop,使Toolbar覆盖状态栏,ToolBar的title可以正常显示.
    if (toolbar.getTag() == null) {
        CollapsingToolbarLayout.LayoutParams lp = (CollapsingToolbarLayout.LayoutParams) toolbar.getLayoutParams();
        int statusBarHeight = getStatusBarHeight(activity);
        lp.height += statusBarHeight;
        toolbar.setLayoutParams(lp);
        toolbar.setPadding(toolbar.getPaddingLeft(), toolbar.getPaddingTop() + statusBarHeight, toolbar.getPaddingRight(), toolbar.getPaddingBottom());
        toolbar.setTag(true);
    }
    //移除已经存在假状态栏则,并且取消它的Margin间距
    int statusBarHeight = getStatusBarHeight(activity);
    removeFakeStatusBarViewIfExist(activity);
    removeMarginTopOfContentChild(mContentChild, statusBarHeight);
    //添加一个View来作为状态栏的填充
    final View statusView = addFakeStatusBarView(activity, statusColor, statusBarHeight);

    CoordinatorLayout.Behavior behavior = ((CoordinatorLayout.LayoutParams) appBarLayout.getLayoutParams()).getBehavior();
    if (behavior != null && behavior instanceof AppBarLayout.Behavior) {
        int verticalOffset = ((AppBarLayout.Behavior) behavior).getTopAndBottomOffset();
        if (Math.abs(verticalOffset) > appBarLayout.getHeight() - collapsingToolbarLayout.getScrimVisibleHeightTrigger()) {
            statusView.setAlpha(1f);
        } else {
            statusView.setAlpha(0f);
        }
    } else {
        statusView.setAlpha(0f);
    }
    appBarLayout.addOnOffsetChangedListener(new AppBarLayout.OnOffsetChangedListener() {
        @Override
        public void onOffsetChanged(AppBarLayout appBarLayout, int verticalOffset) {
            if (Math.abs(verticalOffset) > appBarLayout.getHeight() - collapsingToolbarLayout.getScrimVisibleHeightTrigger()) {
                //toolbar被折叠时显示状态栏
                if (statusView.getAlpha() == 0) {
                    statusView.animate().cancel();
                    statusView.animate().alpha(1f).setDuration(collapsingToolbarLayout.getScrimAnimationDuration()).start();
                }
            } else {
                //toolbar展开时显示状态栏
                if (statusView.getAlpha() == 1) {
                    statusView.animate().cancel();
                    statusView.animate().alpha(0f).setDuration(collapsingToolbarLayout.getScrimAnimationDuration()).start();
                }
            }
        }
    });
}
5.0以上的处理:
static void setStatusBarColorForCollapsingToolbar(final Activity activity, final AppBarLayout appBarLayout, final CollapsingToolbarLayout collapsingToolbarLayout,
                                                  Toolbar toolbar, final int statusColor) {
    final Window window = activity.getWindow();
    //取消设置Window半透明的Flag
    window.clearFlags(WindowManager.LayoutParams.FLAG_TRANSLUCENT_STATUS);
    ////添加Flag把状态栏设为可绘制模式
    window.addFlags(WindowManager.LayoutParams.FLAG_DRAWS_SYSTEM_BAR_BACKGROUNDS);
    //设置状态栏为透明
    window.setStatusBarColor(Color.TRANSPARENT);
    //设置系统状态栏处于可见状态
    window.getDecorView().setSystemUiVisibility(View.SYSTEM_UI_FLAG_VISIBLE);
    //通过OnApplyWindowInsetsListener()使Layout在绘制过程中将View向下偏移了,使collapsingToolbarLayout可以占据状态栏
    ViewCompat.setOnApplyWindowInsetsListener(collapsingToolbarLayout, new OnApplyWindowInsetsListener() {
        @Override
        public WindowInsetsCompat onApplyWindowInsets(View v, WindowInsetsCompat insets) {
            return insets;
        }
    });

    ViewGroup mContentView = (ViewGroup) window.findViewById(Window.ID_ANDROID_CONTENT);
    View mChildView = mContentView.getChildAt(0);
    //view不根据系统窗口来调整自己的布局
    if (mChildView != null) {
        ViewCompat.setFitsSystemWindows(mChildView, false);
        ViewCompat.requestApplyInsets(mChildView);
    }

    ((View) appBarLayout.getParent()).setFitsSystemWindows(false);
    appBarLayout.setFitsSystemWindows(false);
    collapsingToolbarLayout.setFitsSystemWindows(false);
    collapsingToolbarLayout.getChildAt(0).setFitsSystemWindows(false);
    //设置状态栏的颜色
    collapsingToolbarLayout.setStatusBarScrimColor(statusColor);
    toolbar.setFitsSystemWindows(false);
    //为Toolbar添加一个状态栏的高度, 同时为Toolbar添加paddingTop,使Toolbar覆盖状态栏,ToolBar的title可以正常显示.
    if (toolbar.getTag() == null) {
        CollapsingToolbarLayout.LayoutParams lp = (CollapsingToolbarLayout.LayoutParams) toolbar.getLayoutParams();
        int statusBarHeight = getStatusBarHeight(activity);
        lp.height += statusBarHeight;
        toolbar.setLayoutParams(lp);
        toolbar.setPadding(toolbar.getPaddingLeft(), toolbar.getPaddingTop() + statusBarHeight, toolbar.getPaddingRight(), toolbar.getPaddingBottom());
        toolbar.setTag(true);
    }

    appBarLayout.addOnOffsetChangedListener(new AppBarLayout.OnOffsetChangedListener() {
        private final static int EXPANDED = 0;
        private final static int COLLAPSED = 1;
        private int appBarLayoutState;

        @Override
        public void onOffsetChanged(AppBarLayout appBarLayout, int verticalOffset) {
            //toolbar被折叠时显示状态栏
            if (Math.abs(verticalOffset) > collapsingToolbarLayout.getScrimVisibleHeightTrigger()) {
                if (appBarLayoutState != COLLAPSED) {
                    appBarLayoutState = COLLAPSED;//修改状态标记为折叠
                    setStatusBarColor(activity, statusColor);
                }
            } else {
                //toolbar显示时同时显示状态栏
                if (appBarLayoutState != EXPANDED) {
                    appBarLayoutState = EXPANDED;//修改状态标记为展开
                    translucentStatusBar(activity, true);
                }
            }
        }
    });
}
四.更改状态栏字体颜色
在Android 6.0的Api中提供了SYSTEM_UI_FLAG_LIGHT_STATUS_BAR这么一个常量,可以使状态栏文字设置为黑色,但对6.0以下是不起作用的。
小米和魅族的手机也可以达到这个效果,要做一些特殊的处理。可以参考小米和魅族的开发者文档。
Flyme沉浸式状态栏
MIUI 6 沉浸式状态栏调用方法
MIUI 9「状态栏黑色字符」实现方法变更通知
public static void setStatusBarLightMode(Activity activity, int color) {
    if (Build.VERSION.SDK_INT >= Build.VERSION_CODES.KITKAT) {
        //判断是否为小米或魅族手机,如果是则将状态栏文字改为黑色
        if (MIUISetStatusBarLightMode(activity, true) || FlymeSetStatusBarLightMode(activity, true)) {
            //设置状态栏为指定颜色
            if (Build.VERSION.SDK_INT >= Build.VERSION_CODES.LOLLIPOP) {//5.0
                activity.getWindow().setStatusBarColor(color);
            } else if (Build.VERSION.SDK_INT >= Build.VERSION_CODES.KITKAT) {//4.4
                //调用修改状态栏颜色的方法
                setStatusBarColor(activity, color);
            }
        } else if (Build.VERSION.SDK_INT >= Build.VERSION_CODES.M) {
            //如果是6.0以上将状态栏文字改为黑色,并设置状态栏颜色
            activity.getWindow().setBackgroundDrawableResource(android.R.color.transparent);
            activity.getWindow().getDecorView().setSystemUiVisibility(View.SYSTEM_UI_FLAG_LAYOUT_FULLSCREEN | View.SYSTEM_UI_FLAG_LIGHT_STATUS_BAR);
            activity.getWindow().setStatusBarColor(color);

            //fitsSystemWindow 为 false, 不预留系统栏位置.
            ViewGroup mContentView = (ViewGroup) activity.getWindow().findViewById(Window.ID_ANDROID_CONTENT);
            View mChildView = mContentView.getChildAt(0);
            if (mChildView != null) {
                ViewCompat.setFitsSystemWindows(mChildView, true);
                ViewCompat.requestApplyInsets(mChildView);
            }
        }
    }
}
小米MiUi修改状态栏方法
static boolean MIUISetStatusBarLightMode(Activity activity, boolean darkmode) {
    boolean result = false;
    Class clazz = activity.getWindow().getClass();
    try {
        int darkModeFlag = 0;
        Class layoutParams = Class.forName("android.view.MiuiWindowManager$LayoutParams");
        Field field = layoutParams.getField("EXTRA_FLAG_STATUS_BAR_DARK_MODE");
        darkModeFlag = field.getInt(layoutParams);
        Method extraFlagField = clazz.getMethod("setExtraFlags", int.class, int.class);
        extraFlagField.invoke(activity.getWindow(), darkmode ? darkModeFlag : 0, darkModeFlag);
        result = true;
    } catch (Exception e) {
        e.printStackTrace();
    }
    return result;
}
如果是MIUI9的系统还需要加上这段代码
Window window = getWindow();
window.addFlags(WindowManager.LayoutParams.FLAG_DRAWS_SYSTEM_BAR_BACKGROUNDS);
window.clearFlags(WindowManager.LayoutParams.FLAG_TRANSLUCENT_STATUS);
window.getDecorView().setSystemUiVisibility(View.SYSTEM_UI_FLAG_LIGHT_STATUS_BAR);
Flyme修改状态栏方法
static boolean FlymeSetStatusBarLightMode(Activity activity, boolean darkmode) {
    boolean result = false;
    try {
        WindowManager.LayoutParams lp = activity.getWindow().getAttributes();
        Field darkFlag = WindowManager.LayoutParams.class
                .getDeclaredField("MEIZU_FLAG_DARK_STATUS_BAR_ICON");
        Field meizuFlags = WindowManager.LayoutParams.class
                .getDeclaredField("meizuFlags");
        darkFlag.setAccessible(true);
        meizuFlags.setAccessible(true);
        int bit = darkFlag.getInt(null);
        int value = meizuFlags.getInt(lp);
        if (darkmode) {
            value |= bit;
        } else {
            value &= ~bit;
        }
        meizuFlags.setInt(lp, value);
        activity.getWindow().setAttributes(lp);
        result = true;
    } catch (Exception e) {
        e.printStackTrace();
    }
    return result;
}
结语:
更详细的参考Demo在github中,如果有错误也希望大家能够指出。
作者:imflyn
链接:https://www.jianshu.com/p/932568ed31af
來源:简书
著作权归作者所有。商业转载请联系作者获得授权,非商业转载请注明出处。
