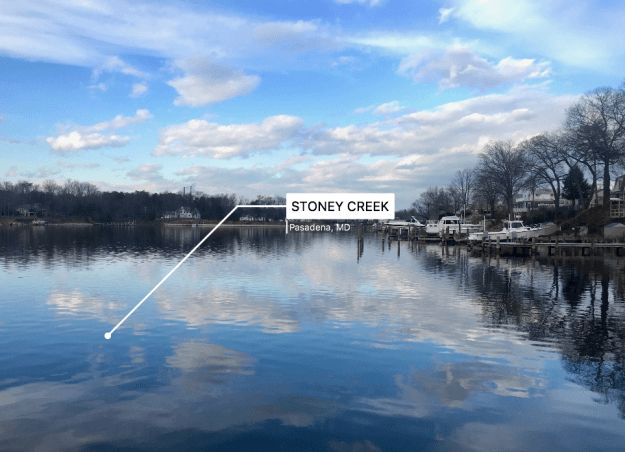
在本文中,您将学习如何使用JavaFX的动画API创建标注。 您可以在https://www.youtube.com/watch?v=XTHbB0LRdT4的 YouTube网站上查看这些标注的演示示例。
什么是标注?
我敢肯定,您已经看过广告或科幻电影,它们使用在图像顶部显示的标注来指示场景中的物体。 在本文中,您将学习如何使用JavaFX的Animation API创建动画标注效果。 使用这种效果,您可以将文本放置到场景中,然后通过线条或箭头将文本连接到感兴趣的项目。
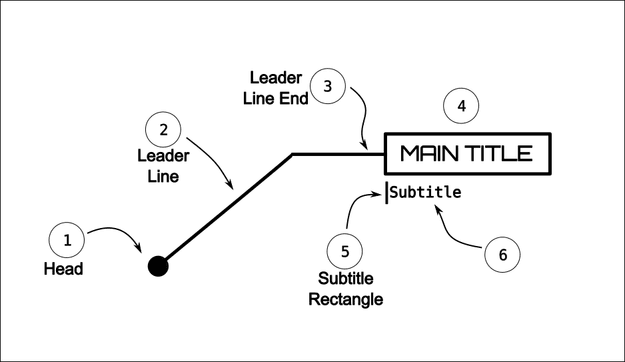
图1显示了在本文的上下文中组合在一起构成标注的各个部分。
图1.典型标注的不同部分
以下是图1中所示各个部分的定义:
- 头部 –指示图像中的项目的点(圆圈)
- 引导线 –从头部到另一点的线,通常形成对角线
- 引伸线末端 – 引伸线段的末端 (水平线)
- 主标题 –主标题文本。 正文开始在引导线的终点滚动
- 字幕矩形 –来自主标题底部的一个小动画矩形
- 字幕 - 字幕文字。 字幕文本将在主标题文本下方
并非所有标注都相同。 不过,大多数将包含这些元素中的大多数。
标注通常以静态方式指出书籍或杂志中的内容,但如果可以对标注进行动画处理,则在视频中要好得多。 一个不错的动画效果是从绘制一个点(头)开始,然后画一条线(引导线),然后滚动一个主要标题,最后滚动一个字幕。 当动画结束显示时,它可以暂停一会儿(恰好足以允许观看者阅读标题文本),然后将整个过程反向进行,以退出场景。
动画标注
现在您知道了标注的构成,我们可以跳入一些JavaFX代码来为图1中所示的每个片段(1-6)设置动画。
由于标注的每个部分都是按顺序进行动画处理的,因此您将首先创建一个javafx.animation.SequentialTransition实例。 一个SequentialTransition拥有零到许多Animation对象。 创建方法如下:
SequentialTransition calloutAnimation = new SequentialTransition();
顾名思义,动画将按顺序进行。 您需要在calloutAnimation上设置的其他内容是循环计数和自动反转属性。 例如:
// Allow animation to go in reverse
   calloutAnimation.setCycleCount(2);
   calloutAnimation.setAutoReverse(true);
通过上述设置,动画可以在阅读者有时间查看和吸收标注之后反转顺序。 若要添加动画,请在顺序过渡动画对象上调用.getChildren()。add()方法。 以下是将头部动画添加到顺序过渡动画对象的代码。 方法buildHeadAnim()返回一个javafx.animation.Animation实例。
// Animation of head
   Circle head = new Circle(600, 550, 5); // center x, y, radius
   head.setFill(Color.WHITE);
   calloutAnimation.getChildren().add(buildHeadAnim(head));
头部动画
为头部创建动画时,可以使用任何形状,例如矩形或圆形。 在接下来的示例中,头部是JavaFX Circle形状。 动画从零半径开始,然后缩放到更大的半径。 显示的方法创建并返回一个javafx.animation.Timeline对象。
protected Animation buildHeadAnim(Node head) {
   Circle headCircle = (Circle) head;
   return new Timeline(
      new KeyFrame(Duration.millis(1),
         new KeyValue(headCircle.visibleProperty(), true),
         new KeyValue(headCircle.radiusProperty(), 0)
      ), // start value
      new KeyFrame(Duration.millis(300),
        new KeyValue(headCircle.radiusProperty(), 5.0d)) // end value
   );
}时间轴由一个初始关键帧组成,该初始关键帧将头圈的visible属性设置为true,并将radius属性设置为零。 接下来,使用关键值定义结束关键帧,以在300毫秒内将radius属性从零插入到5.0。
领导线动画
在设置引导线动画时,该线将看起来就像是用铅笔进行描画或绘制。 在下面的代码中,将对端点坐标进行插值(线性)。 从头部的中心(600,550)到lineToPoint坐标(400,300)画一条线。 我对值进行了硬编码,以使代码更简洁。 endX / endY的实际键值分别设置为getLeaderLineToPoint()。getX()和getLeaderLineToPoint()。getY() 。
protected Animation buildBeginLeaderLineAnim(Line leaderLine) {
   return new Timeline(
      new KeyFrame(Duration.millis(1),
         new KeyValue(leaderLine.visibleProperty(), true)),// show
      new KeyFrame(Duration.millis(300),
         new KeyValue(leaderLine.endXProperty(), 400),
         new KeyValue(firstLeaderLine.endYProperty(), 300)
      )
   );
}
领导线结束动画
由于动画化引线的末端部分的代码将与以前的动画非常相似,因此,我将省略该代码。 要查看完整列表,请访问: https : //github.com/carldea/callouts/tree/master/src/com/carlfx/callouts 。
主标题文字动画
主标题文本动画由一个HBox组成,该HBox包含一个Text节点,该文本节点将根据引线终点的方向向左或向右滚动。 例如,如果引出线终点的方向指向右侧,则主标题文本将显示为向右滚动。
以下是负责对主标题文本进行动画处理的buildMainTitleAnim()方法。 由于该方法是标注动画中最复杂的部分,因此我想分享我在使用过程中遇到的一些技巧。
protected Animation buildMainTitleAnim(HBox mainTitleBackground) {
     // main title box
    // Calculate main title width and height upfront
    Rectangle2D mainTitleBounds = getBoundsUpfront(mainTitleBackground);

    double mainTitleWidth = mainTitleBounds.getWidth();
    double mainTitleHeight = mainTitleBounds.getHeight();

    // Position mainTitleText background beside the end part of the leader line.
    Point2D endPointLLine = calcEndPointOfLeaderLine();
    double x = endPointLLine.getX();
    double y = endPointLLine.getY();

    // Viewport to make main title appear to scroll
    Rectangle mainTitleViewPort = new Rectangle();
    mainTitleViewPort.setWidth(0);
    mainTitleViewPort.setHeight(mainTitleHeight);

    mainTitleBackground.setClip(mainTitleViewPort);
    mainTitleBackground.setLayoutX(x);
    mainTitleBackground.setLayoutY(y - (mainTitleHeight/2));

    // Animate main title from end point to the left.
    if (LEFT == getEndLeaderLineDirection()) {
        // animate layout x and width
        return new Timeline(
           new KeyFrame(Duration.millis(1),
              new KeyValue(mainTitleBackground.visibleProperty(), true),
              new KeyValue(mainTitleBackground.layoutXProperty(), x)
           ), // show
           new KeyFrame(Duration.millis(200),
              new KeyValue(mainTitleBackground.layoutXProperty(), x - mainTitleWidth),
              new KeyValue(mainTitleViewPort.widthProperty(), mainTitleWidth)
           )
        );
    }

    // Animate main title from end point to the right
    return new Timeline(
       new KeyFrame(Duration.millis(1),
          new KeyValue(mainTitleBackground.visibleProperty(), true)), // show
       new KeyFrame(Duration.millis(200),
             new KeyValue(mainTitleViewPort.widthProperty(), mainTitleWidth)
       )
    );
}
放置主标题文本时,您的代码将需要预先知道边界区域的大小。 下面是一种方法,该方法采用包含文本节点的HBox,然后计算HBox的宽度和高度,而不必在主场景图上显示该框。
protected Rectangle2D getBoundsUpfront(Region node) {
    // Calculate main title width and height
    Group titleRoot = new Group();
    new Scene(titleRoot);
    titleRoot.getChildren().add(node);
    titleRoot.applyCss();
    titleRoot.layout();
    return new Rectangle2D(0, 0, node.getWidth(), node.getHeight());
}您可以在此示例中看到javafx.scene.Node类中的applyCss()和layout()方法如何负责在应用CSS样式后确定宽度和高度。 在上方,您会发现一个场景是临时创建的。
字幕动画
为了简洁起见,我省略了字幕动画。 我相信您会看到我在Github上提到的完整代码清单。 在动画的初始开始和内插到结束键值方面,字幕动画均遵循与标题动画相同的模式。
播放标注动画
假设将构成标注的节点添加到JavaFX Pane布局节点,则需要停止顺序动画calloutAnimation 。 然后,您需要初始化所有不显示的节点(visible属性设置为false)。 最后,您需要调用play()方法。
getChildren().addAll(head,
      firstLeaderLine,
      secondLeaderLine,
      mainTitle,
      subTitleRect,
      subTitle);

   calloutAnimation.stop();
   getChildren().forEach(node -> node.setVisible(false));
   calloutAnimation.play();
结论
通过使用JavaFX的动画API和简单的形状,创建动画标注非常容易。 在本文中,您学习了如何使用SequentialTransition对象来顺序调用较小的动画(时间轴)。
构建每个时间轴动画的标注的每个步骤,将使用根据形状属性(例如圆的半径)在关键值上插值的关键帧。 之后,在学习如何对引导线进行动画处理之后,您还学到了一个巧妙的技巧,该技巧可以通过applyCss()和layout()方法确定主标题文本的大小。 由于样式和字体大小的原因,在将UI组件呈现到主场景图上之前,很难知道它的大小。
现在,您知道如何实现动画标注,我相信您将使应用程序更具吸引力。 编码愉快!
翻译自: https://www.javacodegeeks.com/2018/10/animated-effects-javafx-callouts.html

