IOS自适应前段库-Masonry的使用
Masonry是一个轻量级的布局框架,拥有自己的描述语法,采用更优雅的链式语法封装自动布局,简洁明了并具有高可读性,而且同时支持 iOS 和 Max OS X。Masonry是一个用代码写iOS或OS界面的库,可以代替Auto layout。Masonry的github地址:https://github.com/SnapKit/Masonry
本章内容
- Masonry配置
- Masonry使用
- Masonry实例
Masonry配置
- 推荐使用pods方式引入类库,pod 'Masonry',若不知道pod如何使用,情况我的另一篇文章: 提高ios开发效率的工具
- 引入头文件 #import "Masonry.h"
Masonry使用讲解
mas_makeConstraints 是给view添加约束,约束有几种,分别是边距,宽,高,左上右下距离,基准线。添加过约束后可以有修正,修正有offset(位移)修正和multipliedBy(倍率)修正。
语法一般是 make.equalTo or make.greaterThanOrEqualTo or make.lessThanOrEqualTo + 倍数和位移修正。
注意点1: 使用 mas_makeConstraints方法的元素必须事先添加到父元素的中,例如[self.view addSubview:view];
注意点2: masequalTo 和 equalTo 区别:masequalTo 比equalTo多了类型转换操作,一般来说,大多数时候两个方法都是 通用的,但是对于数值元素使用mas_equalTo。对于对象或是多个属性的处理,使用equalTo。特别是多个属性时,必须使用equalTo,例如 make.left.and.right.equalTo(self.view);
注意点3: 注意到方法with和and,这连个方法其实没有做任何操作,方法只是返回对象本身,这这个方法的左右完全是为了方法写的时候的可读性 。make.left.and.right.equalTo(self.view);和make.left.right.equalTo(self.view);是完全一样的,但是明显的加了and方法的语句可读性 更好点。
Masonry初级使用例子
|
1
2
3
4
5
6
7
8
9
10
11
12
13
14
15
16
17
18
19
20
21
22
23
24
25
26
27
28
29
30
31
32
33
34
35
36
37
38
39
40
41
42
43
44
45
46
|
// exp1: 中心点与self.view相同,宽度为400*400
-(void)exp1{
UIView *view = [UIView
new
];
[view setBackgroundColor:[UIColor redColor]];
[self.view addSubview:view];
[view mas_makeConstraints:^(MASConstraintMaker *make) {
make.center.equalTo(self.view);
make.size.mas_equalTo(CGSizeMake(400,400));
}];
}
//exp2: 上下左右边距都为10
-(void)exp2{
UIView *view = [UIView
new
];
[view setBackgroundColor:[UIColor redColor]];
[self.view addSubview:view];
[view mas_makeConstraints:^(MASConstraintMaker *make) {
make.edges.equalTo(self.view).
with
.insets(UIEdgeInsetsMake(10, 10, 10, 10));
// make.left.equalTo(self.view).with.offset(10);
// make.right.equalTo(self.view).with.offset(-10);
// make.top.equalTo(self.view).with.offset(10);
// make.bottom.equalTo(self.view).with.offset(-10);
}];
}
//exp3 让两个高度为150的view垂直居中且等宽且等间隔排列 间隔为10
-(void)exp3{
UIView *view1 = [UIView
new
];
[view1 setBackgroundColor:[UIColor redColor]];
[self.view addSubview:view1];
UIView *view2 = [UIView
new
];
[view2 setBackgroundColor:[UIColor redColor]];
[self.view addSubview:view2];
[view1 mas_makeConstraints:^(MASConstraintMaker *make) {
make.centerY.mas_equalTo(self.view.mas_centerY);
make.height.mas_equalTo(150);
make.width.mas_equalTo(view2.mas_width);
make.left.mas_equalTo(self.view.mas_left).
with
.offset(10);
make.right.mas_equalTo(view2.mas_left).offset(-10);
}];
[view2 mas_makeConstraints:^(MASConstraintMaker *make) {
make.centerY.mas_equalTo(self.view.mas_centerY);
make.height.mas_equalTo(150);
make.width.mas_equalTo(view1.mas_width);
make.left.mas_equalTo(view1.mas_right).
with
.offset(10);
make.right.equalTo(self.view.mas_right).offset(-10);
}];
}
|
Masonry高级使用例子1
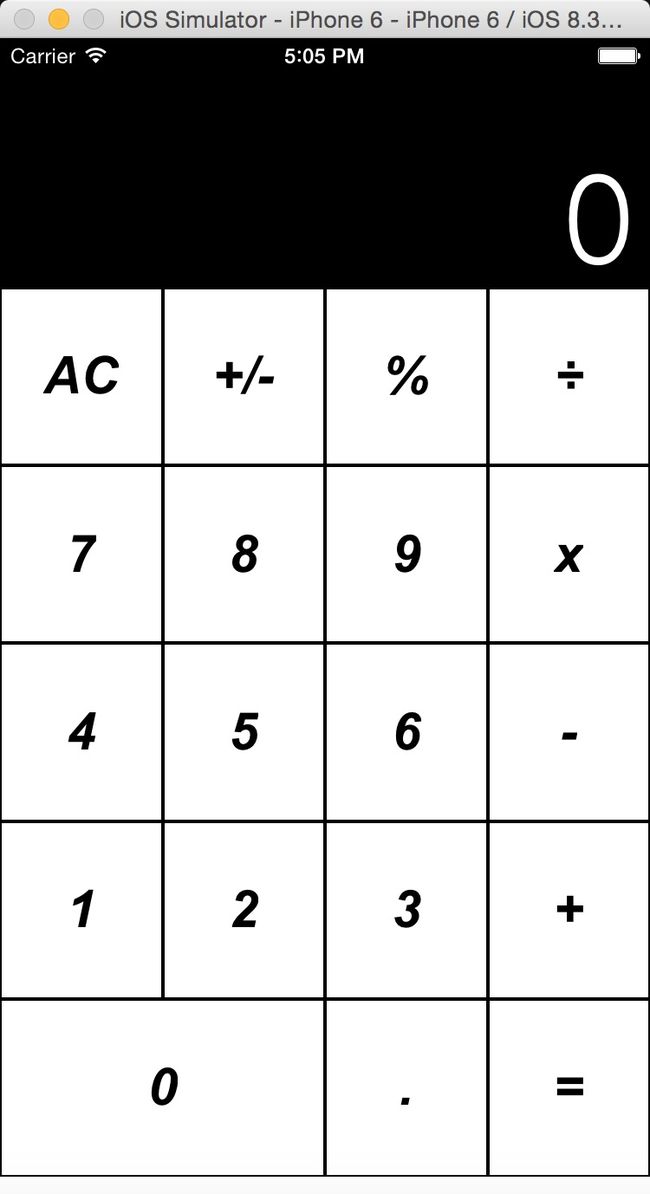
iOS计算器使用Masorny布局:
|
1
2
3
4
5
6
7
8
9
10
11
12
13
14
15
16
17
18
19
20
21
22
23
24
25
26
27
28
29
30
31
32
33
34
35
36
37
38
39
40
41
42
43
44
45
46
47
48
49
50
51
52
53
54
55
56
57
58
59
60
61
62
63
64
65
66
67
68
69
70
71
72
73
74
75
76
77
78
79
80
81
82
83
84
85
86
87
88
89
90
91
92
93
94
95
96
97
98
99
100
101
102
103
104
105
106
107
108
109
110
111
112
113
114
115
116
117
118
119
120
121
122
123
124
125
126
127
128
129
130
131
|
//高级布局练习 ios自带计算器布局
-(void)exp4{
//申明区域,displayView是显示区域,keyboardView是键盘区域
UIView *displayView = [UIView
new
];
[displayView setBackgroundColor:[UIColor blackColor]];
[self.view addSubview:displayView];
UIView *keyboardView = [UIView
new
];
[self.view addSubview:keyboardView];
//先按1:3分割 displView(显示结果区域)和 keyboardView(键盘区域)
[displayView mas_makeConstraints:^(MASConstraintMaker *make) {
make.top.equalTo(self.view.mas_top);
make.left.and.right.equalTo(self.view);
make.height.equalTo(keyboardView).multipliedBy(0.3f);
}];
[keyboardView mas_makeConstraints:^(MASConstraintMaker *make) {
make.top.equalTo(displayView.mas_bottom);
make.bottom.equalTo(self.view.mas_bottom);
make.left.and.right.equalTo(self.view);
}];
//设置显示位置的数字为0
UILabel *displayNum = [[UILabel alloc]init];
[displayView addSubview:displayNum];
displayNum.text = @
"0"
;
displayNum.font = [UIFont fontWithName:@
"HeiTi SC"
size:70];
displayNum.textColor = [UIColor whiteColor];
displayNum.textAlignment = NSTextAlignmentRight;
[displayNum mas_makeConstraints:^(MASConstraintMaker *make) {
make.left.and.right.equalTo(displayView).
with
.offset(-10);
make.bottom.equalTo(displayView).
with
.offset(-10);
}];
//定义键盘键名称,?号代表合并的单元格
NSArray *keys = @[@
"AC"
,@
"+/-"
,@
"%"
,@
"÷"
,@
"7"
,@
"8"
,@
"9"
,@
"x"
,@
"4"
,@
"5"
,@
"6"
,@
"-"
,@
"1"
,@
"2"
,@
"3"
,@
"+"
,@
"0"
,@
"?"
,@
"."
,@
"="
];
int indexOfKeys = 0;
for
(NSString *key
in
keys){
//循环所有键
indexOfKeys++;
int rowNum = indexOfKeys %4 ==0? indexOfKeys/4:indexOfKeys/4 +1;
int colNum = indexOfKeys %4 ==0? 4 :indexOfKeys %4;
NSLog(@
"index is:%d and row:%d,col:%d"
,indexOfKeys,rowNum,colNum);
//键样式
UIButton *keyView = [UIButton buttonWithType:UIButtonTypeCustom];
[keyboardView addSubview:keyView];
[keyView setTitleColor:[UIColor blackColor] forState:UIControlStateNormal];
[keyView setTitle:key forState:UIControlStateNormal];
[keyView.layer setBorderWidth:1];
[keyView.layer setBorderColor:[[UIColor blackColor]CGColor]];
[keyView.titleLabel setFont:[UIFont fontWithName:@
"Arial-BoldItalicMT"
size:30]];
//键约束
[keyView mas_makeConstraints:^(MASConstraintMaker *make) {
//处理 0 合并单元格
if
([key isEqualToString:@
"0"
] || [key isEqualToString:@
"?"
] ){
if
([key isEqualToString:@
"0"
]){
[keyView mas_makeConstraints:^(MASConstraintMaker *make) {
make.height.equalTo(keyboardView.mas_height).
with
.multipliedBy(.2f);
make.width.equalTo(keyboardView.mas_width).multipliedBy(.5);
make.left.equalTo(keyboardView.mas_left);
make.baseline.equalTo(keyboardView.mas_baseline).
with
.multipliedBy(.9f);
}];
}
if
([key isEqualToString:@
"?"
]){
[keyView removeFromSuperview];
}
}
//正常的单元格
else
{
make.width.equalTo(keyboardView.mas_width).
with
.multipliedBy(.25f);
make.height.equalTo(keyboardView.mas_height).
with
.multipliedBy(.2f);
//按照行和列添加约束,这里添加行约束
switch
(rowNum) {
case
1:
{
make.baseline.equalTo(keyboardView.mas_baseline).
with
.multipliedBy(.1f);
keyView.backgroundColor = [UIColor colorWithRed:205 green:205 blue:205 alpha:1];
}
break
;
case
2:
{
make.baseline.equalTo(keyboardView.mas_baseline).
with
.multipliedBy(.3f);
}
break
;
case
3:
{
make.baseline.equalTo(keyboardView.mas_baseline).
with
.multipliedBy(.5f);
}
break
;
case
4:
{
make.baseline.equalTo(keyboardView.mas_baseline).
with
.multipliedBy(.7f);
}
break
;
case
5:
{
make.baseline.equalTo(keyboardView.mas_baseline).
with
.multipliedBy(.9f);
}
break
;
default
:
break
;
}
//按照行和列添加约束,这里添加列约束
switch
(colNum) {
case
1:
{
make.left.equalTo(keyboardView.mas_left);
}
break
;
case
2:
{
make.right.equalTo(keyboardView.mas_centerX);
}
break
;
case
3:
{
make.left.equalTo(keyboardView.mas_centerX);
}
break
;
case
4:
{
make.right.equalTo(keyboardView.mas_right);
[keyView setBackgroundColor:[UIColor colorWithRed:243 green:127 blue:38 alpha:1]];
}
break
;
default
:
break
;
}
}
}];
}
}
|
本例子使用的baseline去控制高度位置,这似乎不是太准,如果想要精准控制高度位置,可以使用一行一行添加的方法,每次当前行的top去equelTo上一行的bottom。 给个提示:
|
1
2
3
4
|
for
(遍历所有行)
for
(遍历所以列)
//当前行约束根据上一行去设置
......
|
下一个例子中,使用上面类似的方法
Masonry高级使用例子2
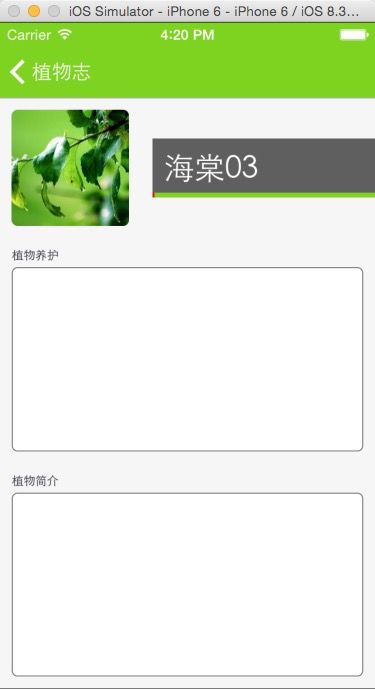
根据设计图,使用masonry布局:
步骤1
步骤2
步骤1
|
1
2
3
4
5
6
7
8
9
10
11
12
13
14
15
16
17
18
19
20
21
22
23
24
25
26
27
28
29
30
31
32
33
34
35
36
37
38
39
40
41
42
43
44
45
46
47
48
49
50
51
52
53
54
55
56
57
58
59
60
61
62
63
64
65
66
67
68
69
70
71
72
73
74
75
76
77
78
79
80
81
82
83
84
85
86
87
|
-(void)createUI{
UIView *titleView = [UIView
new
];
titleView.backgroundColor = [UIColor redColor];
UIView *caredView = [UIView
new
];
[self.view addSubview:caredView];
UIView *brifeView = [UIView
new
];
[self.view addSubview:brifeView];
//self.view
self.view.backgroundColor = [UIColor colorWithWhite:0.965 alpha:1.000];
//thrm
UIImageView *plantThrm = [[UIImageView alloc]initWithImage:[UIImage imageNamed:@
"defalutPlantReferenceIcon"
]];
[self.view addSubview:plantThrm];
[plantThrm mas_makeConstraints:^(MASConstraintMaker *make) {
make.left.and.top.equalTo(self.view).
with
.offset(10);
}];
//title
[self.view addSubview:titleView];
UIImageView *bgTitleView = [[UIImageView alloc]initWithImage:[UIImage imageNamed:@
"bg-plant-reference-title"
]];
[titleView addSubview:bgTitleView];
[titleView mas_makeConstraints:^(MASConstraintMaker *make) {
make.right.equalTo(self.view.mas_right);
make.left.equalTo(plantThrm.mas_right).
with
.offset(20);
make.centerY.equalTo(plantThrm.mas_centerY);
}];
[bgTitleView mas_makeConstraints:^(MASConstraintMaker *make) {
make.edges.equalTo(titleView);
}];
UILabel *title = [[UILabel alloc]init];
title.textColor = [UIColor whiteColor];
title.font = [UIFont fontWithName:@
"Heiti SC"
size:26];
title.text = _reference.name;
[titleView addSubview:title];
[title mas_makeConstraints:^(MASConstraintMaker *make) {
make.left.equalTo(titleView.mas_left).offset(10);
make.width.equalTo(titleView.mas_width);
make.centerY.equalTo(titleView.mas_centerY);
}];
//植物养护
UILabel *caredTitle = [[UILabel alloc]init];
caredTitle.textColor = [UIColor colorWithRed:0.172 green:0.171 blue:0.219 alpha:1.000];
caredTitle.font = [UIFont fontWithName:@
"Heiti SC"
size:10];
caredTitle.text = @
"植物养护"
;
[self.view addSubview:caredTitle];
[caredTitle mas_makeConstraints:^(MASConstraintMaker *make) {
make.top.equalTo(plantThrm.mas_bottom).
with
.offset(20);
make.left.and.right.equalTo(self.view).
with
.offset(10);
make.height.mas_equalTo(10);
}];
//将图层的边框设置为圆脚
caredView.layer.cornerRadius = 5;
caredView.layer.masksToBounds = YES;
//给图层添加一个有色边框
caredView.layer.borderWidth = 1;
caredView.layer.borderColor = [[UIColor colorWithWhite:0.521 alpha:1.000] CGColor];
caredView.backgroundColor = [UIColor whiteColor];
[caredView mas_makeConstraints:^(MASConstraintMaker *make) {
make.top.equalTo(caredTitle.mas_bottom).
with
.offset(5);
make.left.equalTo(self.view.mas_left).
with
.offset(10);
make.right.equalTo(self.view.mas_right).
with
.offset(-10);
make.height.equalTo(brifeView);
}];
//植物简介
UILabel *brifeTitle = [[UILabel alloc]init];
brifeTitle.textColor = [UIColor colorWithRed:0.172 green:0.171 blue:0.219 alpha:1.000];
brifeTitle.font = [UIFont fontWithName:@
"Heiti SC"
size:10];
brifeTitle.text = @
"植物简介"
;
[self.view addSubview:brifeTitle];
[brifeTitle mas_makeConstraints:^(MASConstraintMaker *make) {
make.top.equalTo(caredView.mas_bottom).
with
.offset(20);
make.left.and.right.equalTo(self.view).
with
.offset(10);
make.height.mas_equalTo(10);
}];
//将图层的边框设置为圆脚
brifeView.layer.cornerRadius = 5;
brifeView.layer.masksToBounds = YES;
//给图层添加一个有色边框
brifeView.layer.borderWidth = 1;
brifeView.layer.borderColor = [[UIColor colorWithWhite:0.521 alpha:1.000] CGColor];
brifeView.backgroundColor = [UIColor whiteColor];
[brifeView mas_makeConstraints:^(MASConstraintMaker *make) {
make.top.equalTo(brifeTitle.mas_bottom).
with
.offset(5);
make.left.equalTo(self.view.mas_left).
with
.offset(10);
make.right.equalTo(self.view.mas_right).
with
.offset(-10);
make.bottom.equalTo(self.view.mas_bottom).
with
.offset(-10);
make.height.equalTo(caredView);
}];
}
|
完成之后如下图 步骤1
步骤2,在上面的基础上,增加植物养护部分ui构造的代码,思想是,先构造出四行,然后根据每行单独构造出行样式。
|
1
2
3
4
5
6
7
8
9
10
11
12
13
14
15
16
17
18
19
20
21
22
23
24
25
26
27
28
29
30
31
32
33
34
35
36
37
38
39
40
41
42
43
44
45
46
47
48
49
50
51
52
53
54
55
56
57
58
59
60
61
62
63
64
65
66
67
68
69
70
71
72
73
74
75
76
77
78
79
80
81
82
83
84
85
86
87
88
89
90
91
92
93
94
95
96
97
98
99
100
101
102
103
104
105
106
107
108
109
110
111
112
113
114
115
116
117
118
119
120
121
122
123
124
125
126
127
128
129
130
131
132
133
134
135
136
137
138
139
140
141
142
143
144
145
146
147
148
149
150
151
152
153
154
155
156
157
158
159
160
161
162
163
164
165
166
167
168
169
170
171
172
173
174
175
176
177
178
179
180
181
182
183
184
185
186
187
188
189
190
191
192
193
194
195
196
197
198
199
200
201
202
203
204
205
206
207
208
209
210
211
212
213
214
215
216
217
218
219
220
221
222
223
224
225
226
227
228
229
230
231
|
//把块拆分为四行
-(void)createIndexUIWithView:(UIView *)view{
//拆分四行
UIView *row1 = [UIView
new
];
UIView *row2 = [UIView
new
];
UIView *row3 = [UIView
new
];
UIView *row4 = [UIView
new
];
[view addSubview:row1];
[view addSubview:row2];
[view addSubview:row3];
[view addSubview:row4];
[row1 mas_makeConstraints:^(MASConstraintMaker *make) {
make.right.and.left.equalTo(view);
make.height.equalTo(view.mas_height).multipliedBy(0.25);
make.top.equalTo(view.mas_top);
}];
[row2 mas_makeConstraints:^(MASConstraintMaker *make) {
make.right.and.left.equalTo(view);
make.top.equalTo(row1.mas_bottom);
make.height.equalTo(view.mas_height).multipliedBy(0.25);
}];
[row3 mas_makeConstraints:^(MASConstraintMaker *make) {
make.right.equalTo(view.mas_right);
make.top.equalTo(row2.mas_bottom);
make.height.equalTo(view.mas_height).multipliedBy(0.25);
make.left.equalTo(view.mas_left);
}];
[row4 mas_makeConstraints:^(MASConstraintMaker *make) {
make.right.and.left.equalTo(view);
make.top.equalTo(row3.mas_bottom);
make.height.equalTo(view.mas_height).multipliedBy(0.25);
}];
[self createIndexRowUI:PlantReferenceWaterIndex withUIView:row1];
[self createIndexRowUI:PlantReferenceSumIndex withUIView:row2];
[self createIndexRowUI:PlantReferenceTemperatureIndex withUIView:row3];
[self createIndexRowUI:PlantReferenceElectrolyteIndex withUIView:row4];
}
//构造每行的UI
-(void)createIndexRowUI:(PlantReferenceIndex) index withUIView:(UIView *)view{
//index标题
|


