Android进程保活、拉活方案
引言
最近产品提出了一个非常BT的需求,说我们所做的APP要做到像微信和QQ那种即时用户清理了进程还是能收到消息的效果,当时心中就卧槽了一顿,虽然心里一万只曹尼玛翻滚着,但是功能还是要做啊,因为生活还得继续啊。
我们虽然做不到像微信、QQ这种白名单大佬(白名单指的是一些APP跟某些手机厂商合作,我们通过清理内存是杀不死这些进程的。)的效果,但是我们可以利用黑科技来尽量保证我们自己的APP不被系统杀死。现在市面上的保活和拉活方式有以下几种方案:
| 保活方式 | Activity 1像素保活、前台服务保活 |
|---|---|
| 拉活方式 | 广播拉活、系统Service拉活、账户同步拉活、JobScheduler、双进程拉活、推送拉活、NDK fork拉活 |
进程被杀死无非就是由于系统内存过低,并且进程的优先级比较低,所以才会被系统kill掉,想要进程保活必须提高进程的优先级。下面是进程优先级高低图:
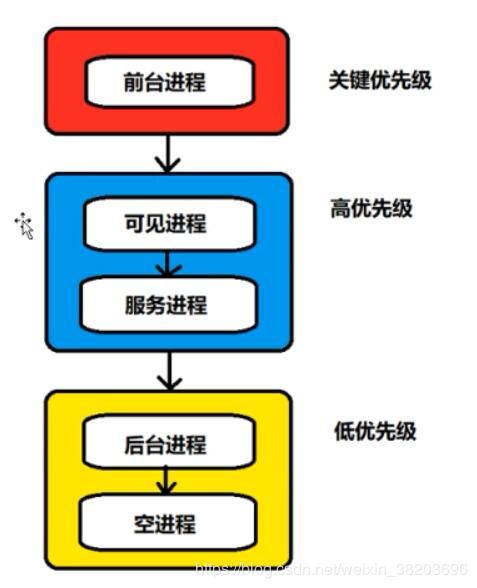
何时杀死进程?
内存阈值在不同的手机上不一样,一旦低于阈值,Android就会杀死对应优先级的进程,例如:当内存小于315MB(80640),就会杀死空进程。我们可以通过adb shell后输入`cat /sys/module/lowmemorykiller/parameters/minfree`来查看阈值,如下图所示(阈值的单位是4KB):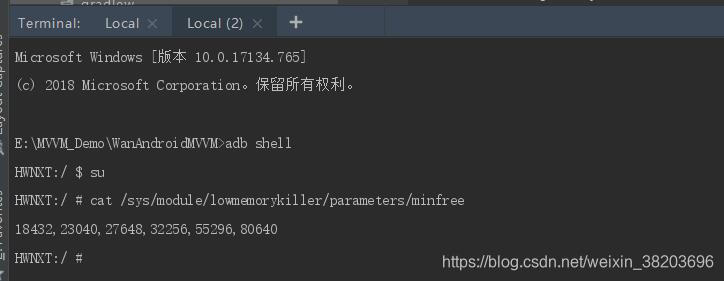
第一个值:18432(72MB)当阈值达到这个值时候,前台进程就会被杀死;
第二个值:23040(90MB)当阈值达到这个值的时候,可见进程就会被杀死;
第三个值:27648(108MB)当阈值达到这个值的时候,服务进程会被杀死;
第四个值:32256(126MB)当阈值达到这个值的时候,后台进程会被杀死;
第五个值:55296(216MB)当阈值达到这个值的时候,ContentProvider会被杀死;
第六个值:80640(315MB)当阈值达到这个值的时候,空进程会被杀死。
如何判断进程的优先级

- 红色部分是容易被回收的进程,属于android进程
- 绿色部分是较难被回收的进程,属于android进程
- 其他部分则不是android进程,也不会被系统回收,一般是ROM自带的app和服务才能拥有
通过oom_adj的值,判断进程的优先级,不同的手机的oom_adj的值可能不一样。oom_adj值越小,优先级越高,也就也难被杀死,我们日常开发的APP最高能达到的值是0,即前台进程。oom_adj的值我们可以通过 adb shell 直接输入cat /proc/你的process ID/oom_adj来获取(有一个前提,手机必须是root过的才能获取到值)
如何保活?
1、activity 1像素保活
第一步:创建SinglePixelActivity,如
public class SinglePixelActivity extends AppCompatActivity {
    private static final String TAG = "SinglePixelActivity";

    @Override
    protected void onCreate(@Nullable Bundle savedInstanceState) {
        super.onCreate(savedInstanceState);
        Log.e(TAG, "启动1像素Activity");
        Window window = getWindow();
        window.setGravity(Gravity.START | Gravity.TOP);
        WindowManager.LayoutParams params = window.getAttributes();
        params.width = 1;
        params.height = 1;
        params.x= 0;
        params.y = 0;
        window.setAttributes(params);
 		KeepManager.getInstance().setKeepActivity(this);
    }

    @Override
    protected void onDestroy() {
        super.onDestroy();
        FixMemLeak.fixLeak(this);
        Log.e(TAG, "关闭1像素Activity");
    }
}
第二步:创建KeepManager,和KeepReceiver用来监听屏幕是否息屏
KeepManager.class:
public class KeepManager {
    private static final KeepManager mInstance = new KeepManager();

    private KeepReceiver mKeepReceiver;

    private WeakReference mKeepActivity;

    private KeepManager() {}

    public static KeepManager getInstance() {
        return mInstance;
    }

    public void registerKeep(Context context) {
        IntentFilter filter = new IntentFilter();
        filter.addAction(Intent.ACTION_SCREEN_ON);
        filter.addAction(Intent.ACTION_SCREEN_OFF);

        mKeepReceiver = new KeepReceiver();
        context.registerReceiver(mKeepReceiver, filter);
    }

    public void unRegisterKeep(Context context){
        if (mKeepReceiver != null) {
            context.unregisterReceiver(mKeepReceiver);
        }
    }

    public void startKeep(Context context) {
        Intent intent = new Intent(context, SinglePixelActivity.class);
        intent.setFlags(Intent.FLAG_ACTIVITY_NEW_TASK);
        context.startActivity(intent);
    }

    public void finishKeep() {
        if (mKeepActivity != null) {
            Activity activity = mKeepActivity.get();
            if (activity != null) {
               activity.finish();
            }
            mKeepActivity = null;
        }
    }

    public void setKeepActivity(Activity activity) {
        this.mKeepActivity = new WeakReference<>(activity);
    }
}
KeepReceiver.class:
public class KeepReceiver extends BroadcastReceiver {
    private static final String TAG = "KeepReceiver";
    @Override
    public void onReceive(Context context, Intent intent) {
        String action = intent.getAction();
        Log.e(TAG, "onReceive:" + action);
        if (TextUtils.equals(action,Intent.ACTION_SCREEN_ON)) {
            KeepManager.getInstance().finishKeep();
        } else if (TextUtils.equals(action,Intent.ACTION_SCREEN_ON)){
            KeepManager.getInstance().startKeep(context);
        }
    }
}
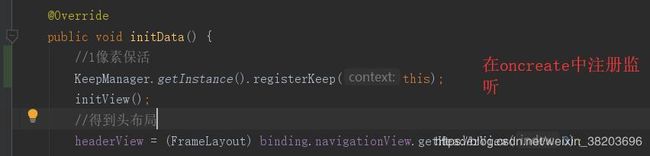
第三步:在MainActivity中注册监听和取消监听

第四步:在清单文件中注册广播和activity
注意:还要再定义一个Style主题,例如:
缺点:存在一个Activity不够干净,同时需要在锁屏才能监听到,如果用户一直处于亮屏状态,oom_adj的值不会变小,如果内存过小,进程会被杀死。
2、前台Service保活
启动一个前台服务,从而拉高进程的优先级:
第一步:创建一个ForegroundService类集成Service:
ForegroundService.class
public class ForegroundService extends Service {
    private static final String TAG = "ForegroundService";
    private static final int SERVICE_ID = 1;


    @Nullable
    @Override
    public IBinder onBind(Intent intent) {
        return null;
    }

    @Override
    public void onCreate() {
        super.onCreate();
        Log.e(TAG, "ForegroundService 创建了");
        if (Build.VERSION.SDK_INT < Build.VERSION_CODES.JELLY_BEAN_MR2) {   //4.3以下
            startForeground(SERVICE_ID, new Notification());
        } else if (Build.VERSION.SDK_INT < Build.VERSION_CODES.O) {//4.3-7.0
            startForeground(SERVICE_ID, new Notification());
            startService(new Intent(this, InnerService.class));//通过启动一个inner服务隐藏通知栏
        } else {    //8.0以上
            NotificationManager manager = (NotificationManager) getSystemService(NOTIFICATION_SERVICE);
            NotificationChannel channel = new NotificationChannel("wanandroid", "wanAndroid", NotificationManager.IMPORTANCE_LOW);
            if (manager != null) {
                manager.createNotificationChannel(channel);
                Notification notification = new NotificationCompat.Builder(this, "wanandroid").build();
                startForeground(SERVICE_ID, notification);

            }

        }
    }

    public static class InnerService extends Service{

        @Nullable
        @Override
        public IBinder onBind(Intent intent) {
            return null;
        }

        @Override
        public void onCreate() {
            super.onCreate();
            Log.e(TAG, "InnerService 创建了");
            startForeground(SERVICE_ID, new Notification());
            stopSelf();
        }
    }

}
第二步:在清单文件中注册服务;(注意:这里两个服务都需要注册)
第三步:在Activity中启动服务。
注意: ForegroundService和InnerService 的服务ID必须要一致,否则不能隐藏通知栏。
缺点:这种保活方式有一个缺点,就是在API > 26即8.0以上版本的通知栏隐藏不了。
OK,保活就讲到这里,下面我们将如何拉活进程。
**
如何拉活进程?
1、广播拉活
Android在7.0之后对广播增加了一些限制,在8.0以后就更加严格了,现在接收系统广播的拉活方式基本上已经用不了了。
2、账户同步拉活
账户同步这篇文章讲的比较全面:账户同步拉活在此我就不作多讲了
3、JobSchedule 机制拉活
JobSchedule 允许在特定状态与特定时间间隔周期执行任务。我们可以利用它的这个特点来完成保活功能,效果就像开启一个定时器,与普通定时器不同的是其调度由系统来完成。
第一步:创建MyJobService实现JobService,如:
public class MyJobService extends JobService {
    private static final String TAG = "MyJobService";

    @Override
    public boolean onStartJob(JobParameters jobParameters) {
        Log.e(TAG, "onStartJob");
        if (Build.VERSION.SDK_INT < Build.VERSION_CODES.N) {
            startJob(this);
        }
        return false;
    }

    @Override
    public boolean onStopJob(JobParameters jobParameters) {
        return false;
    }

    public static void startJob(Context context) {
        JobScheduler jobScheduler = (JobScheduler) context.getSystemService(Context.JOB_SCHEDULER_SERVICE);
//        setPersisted 在设备重启依然执行
        JobInfo.Builder builder = new JobInfo.Builder(8, new ComponentName(context
                .getPackageName(), MyJobService.class.getName())).setPersisted(true);
        //小于7.0
        if (Build.VERSION.SDK_INT < Build.VERSION_CODES.N) {
            builder.setPeriodic(1000);
        } else {
            builder.setMinimumLatency(1000);
        }
        assert jobScheduler != null;
        jobScheduler.schedule(builder.build());
    }


}
第二步:在清单中注册MyJobService
第三步:手动开启JobSchedule
在activity的oncreate方法中启动Service
MyJobService.startJob(this);
4、双进程守护
双进程守护本质上是开启两个服务,一个本地服务和一个远程服务,当其中一个服务被杀死时,另一个服务会自动的把被杀死的那个服务拉活。
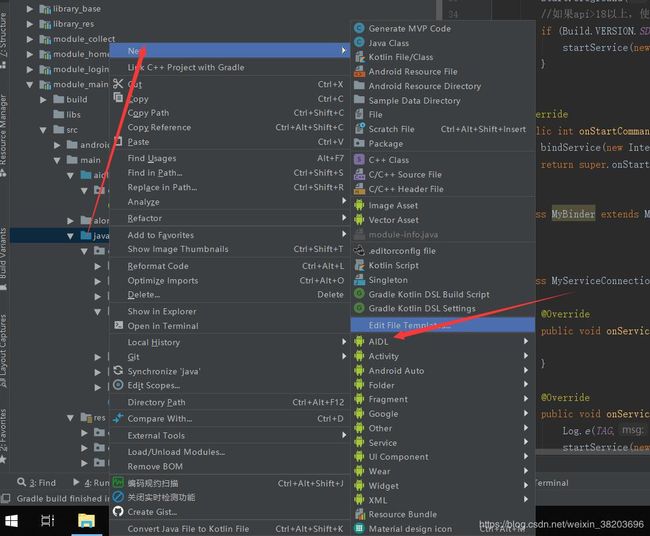
第一步:创建一个空的AIDL文件

2、创建本地LocalService和远程RemoteService
LocalService.class:
public class LocalService extends Service {
    private static final String TAG = "ProcessService";
    private ServiceConnection serviceConnection;
    private MyBinder myBinder;

    @Nullable
    @Override
    public IBinder onBind(Intent intent) {
        return myBinder;
    }

    @Override
    public void onCreate() {
        super.onCreate();
        myBinder = new MyBinder();
        serviceConnection = new MyServiceConnection();

        //让服务变成前台服务
        startForeground(10, new Notification());
        //如果api>18以上,使用相同id再启动一个前台服务,然后结束这个服务
        if (Build.VERSION.SDK_INT >= Build.VERSION_CODES.JELLY_BEAN_MR2) {
            startService(new Intent(this, InnerService.class));
        }
    }

    @Override
    public int onStartCommand(Intent intent, int flags, int startId) {
        bindService(new Intent(this, RemoteService.class), serviceConnection, BIND_AUTO_CREATE);
        return super.onStartCommand(intent, flags, startId);
    }

    class MyBinder extends MyBinderInterface.Stub{

    }

    class MyServiceConnection implements ServiceConnection {

        @Override
        public void onServiceConnected(ComponentName componentName, IBinder iBinder) {

        }

        @Override
        public void onServiceDisconnected(ComponentName componentName) {
            Log.e(TAG,"RemoteService 进程可能被干掉了,拉活");
            startService(new Intent(LocalService.this, RemoteService.class));
            bindService(new Intent(LocalService.this, RemoteService.class), serviceConnection, BIND_AUTO_CREATE);

        }
    }

    public static class InnerService extends Service {

        @Override
        public void onCreate() {
            super.onCreate();
            startForeground(10, new Notification());
            stopSelf();
        }

        @Nullable
        @Override
        public IBinder onBind(Intent intent) {
            return null;
        }
    }

}
RemoteService.class:
public class RemoteService extends Service{
    private static final String TAG = "ProcessService";
    private ServiceConnection serviceConnection;
    private MyBinder myBinder;

    @Nullable
    @Override
    public IBinder onBind(Intent intent) {
        return myBinder;
    }

    @Override
    public void onCreate() {
        super.onCreate();
        myBinder = new MyBinder();
        serviceConnection = new MyServiceConnection();

        //让服务变成前台服务
        startForeground(10, new Notification());
        //如果api>18以上,使用相同id再启动一个前台服务,然后结束这个服务
        if (Build.VERSION.SDK_INT >= Build.VERSION_CODES.JELLY_BEAN_MR2) {
            startService(new Intent(this, LocalService.InnerService.class));
        }
    }

    @Override
    public int onStartCommand(Intent intent, int flags, int startId) {
        bindService(new Intent(this, LocalService.class), serviceConnection, BIND_AUTO_CREATE);
        return super.onStartCommand(intent, flags, startId);
    }

    class MyBinder extends MyBinderInterface.Stub{

    }

    class MyServiceConnection implements ServiceConnection {

        @Override
        public void onServiceConnected(ComponentName componentName, IBinder iBinder) {

        }

        @Override
        public void onServiceDisconnected(ComponentName componentName) {
            Log.e(TAG,"LocalService 进程可能被干掉了,拉活");
            startService(new Intent(RemoteService.this, LocalService.class));
            bindService(new Intent(RemoteService.this, LocalService.class), serviceConnection, BIND_AUTO_CREATE);

        }
    }

    public static class InnerService extends Service {

        @Override
        public void onCreate() {
            super.onCreate();
            startForeground(10, new Notification());
            stopSelf();
        }

        @Nullable
        @Override
        public IBinder onBind(Intent intent) {
            return null;
        }
    }
}
第三步:在清单文件中注册服务
第四步:在Activity中的onCreate方法开启两个服务
 startService(new Intent(this, LocalService.class));
 startService(new Intent(this, RemoteService.class));
我们还可以利用上面的JobSchedule 进一步保活我们的进程
public class MyJobService extends JobService {
    private static final String TAG = "MyJobService";

    @Override
    public boolean onStartJob(JobParameters jobParameters) {
        Log.e(TAG, "onStartJob");
        if (Build.VERSION.SDK_INT < Build.VERSION_CODES.N) {
            startJob(this);
        }
        boolean isLocalRun = isServiceRunning(this, LocalService.class.getName());
        boolean isRemoteRun = isServiceRunning(this, RemoteService.class.getName());
        if (!isLocalRun || !isRemoteRun) {
            startService(new Intent(this, LocalService.class));
            startService(new Intent(this, RemoteService.class));
        }

        return false;
    }

    @Override
    public boolean onStopJob(JobParameters jobParameters) {
        return false;
    }

    public static void startJob(Context context) {
        JobScheduler jobScheduler = (JobScheduler) context.getSystemService(Context.JOB_SCHEDULER_SERVICE);
//        setPersisted 在设备重启依然执行
        JobInfo.Builder builder = new JobInfo.Builder(8, new ComponentName(context
                .getPackageName(), MyJobService.class.getName())).setPersisted(true);
        //小于7.0
        if (Build.VERSION.SDK_INT < Build.VERSION_CODES.N) {
            builder.setPeriodic(1000);
        } else {
            builder.setMinimumLatency(1000);
        }
        assert jobScheduler != null;
        jobScheduler.schedule(builder.build());
    }

    /**
     * 判断服务是否开启
     *
     * @return
     */
    public static boolean isServiceRunning(Context context, String ServiceName) {
        if (TextUtils.isEmpty(ServiceName)) {
            return false;
        }
        ActivityManager myManager = (ActivityManager) context.getSystemService(Context.ACTIVITY_SERVICE);
        ArrayList runningService = (ArrayList) myManager.getRunningServices(1000);
        for (int i = 0; i < runningService.size(); i++) {
            Log.i("服务运行1:",""+runningService.get(i).service.getClassName().toString());
            if (runningService.get(i).service.getClassName().toString().equals(ServiceName)) {
                return true;
            }
        }
        return false;
    }


}
**
总结
进程保活和拉活的方案到这里就结束了,随着谷歌公司对Android的安全机制做的越发的好,想要永久保活是完全不可能的,除非我们的APP可以跟一些手机厂商合作添加到白名单中才能实现永久保活, 另外系统会优先杀死占用内存多的应用,所以想让自己的APP活的更久,还可以从性能的角度上去优化,让其尽可能少的占用内存。如果有说的不对的地方可以评论指出错误的地方,谢谢!