39.FFmpeg学习笔记 - iOS硬编码视频到h264
一、概述
硬编码使用场景通常是从摄像头采集图像数据,然后利用系统提供的接口进行硬编码。
从摄像头采集数据用的是AVFoundation框架,硬编码用的是iOS 8开放的VideoToolbox框架。
二、用AVFoundation采集数据
用AVFoundation采集摄像头的数据步骤基本固定,下面详细说一说:
1.初始化会话,并设置摄像头采集图像的分辨率
    //初始化会话
    self.captureSession = [[AVCaptureSession alloc] init];
    if ([self.captureSession canSetSessionPreset:AVCaptureSessionPreset1280x720]) {
        self.captureSession.sessionPreset = AVCaptureSessionPreset1280x720;
    }
2.查找摄像头,并添加到会话中
 //查找后置摄像头
    AVCaptureDevice *inputCamera = nil;
    NSArray *devices = [AVCaptureDevice devicesWithMediaType:AVMediaTypeVideo];
    for (AVCaptureDevice *device in devices)
    {
        if ([device position] == AVCaptureDevicePositionBack)
        {
            inputCamera = device;
        }
    }
    //包装到AVCaptureDeviceInput
    NSError *error;
    self.deviceInput = [[AVCaptureDeviceInput alloc] initWithDevice:inputCamera error:&error];
    if (error) {
        NSLog(@"%@", error);
        return;
    }

    //输入设备添加到会话
    if ([self.captureSession canAddInput:self.deviceInput]) {
        [self.captureSession addInput:self.deviceInput];
    }
3.创建输出设备,并设置输出数据的属性,然后添加到会话中
    //创建输出设备
    self.captureOutput = [[AVCaptureVideoDataOutput alloc] init];
    //允许丢帧
    self.captureOutput.alwaysDiscardsLateVideoFrames = YES;

    //打印支持的像素格式
    NSArray *typeArray = [self.captureOutput availableVideoCVPixelFormatTypes];
    for (NSNumber *type in typeArray) {
        NSLog(@"**%c%c%c%c", (type.intValue >> 24), ((type.intValue & 0x00ff0000) >> 16), ((type.intValue & 0x0000ff00) >> 8), (type.intValue & 0x000000ff));
    }
    //设置输出的像素格式
    [self.captureOutput setVideoSettings:[NSDictionary dictionaryWithObject:[NSNumber numberWithInt:kCVPixelFormatType_420YpCbCr8BiPlanarVideoRange] forKey:(id)kCVPixelBufferPixelFormatTypeKey]];

     //设置输出串行队列和数据回调
    dispatch_queue_t outputQueue = dispatch_queue_create("CaptureQueue", DISPATCH_QUEUE_SERIAL);
    [self.captureOutput setSampleBufferDelegate:self queue:outputQueue];

    if ([self.captureSession canAddOutput:self.captureOutput]) {
        [self.captureSession addOutput:self.captureOutput];
    }
4.初始化连接,并设置输出视频的方向。如果是前置摄像头,需要设置镜像属性videoMirrored,否则输出的视频是左右镜像的。另外需要注意的是,设置此属性,仅影响输出的数据,并不能改变实时预览的效果。
    //设置输出的视频方向
    self.captureConnection = [self.captureOutput connectionWithMediaType:AVMediaTypeVideo];
    [self.captureConnection setVideoOrientation:AVCaptureVideoOrientationPortrait];
    if (inputCamera.position == AVCaptureDevicePositionFront && self.captureConnection.supportsVideoMirroring)
    {
        self.captureConnection.videoMirrored = YES;
    }
5.设置预览图层,用于实时显示摄像头采集到底画面。
    self.previewLayer = [[AVCaptureVideoPreviewLayer alloc] initWithSession:self.captureSession];
    [self.previewLayer setVideoGravity:AVLayerVideoGravityResizeAspect];
    //设置实时预览的方向
    self.previewLayer.connection.videoOrientation = AVCaptureVideoOrientationPortrait;
    [self.previewLayer setFrame:self.view.bounds];
    [self.view.layer addSublayer:self.previewLayer];
6.一切准备就绪,调用如下代码,开始视频采集。
    // 摄像头权限判断
    AVAuthorizationStatus videoAuthStatus = [AVCaptureDevice authorizationStatusForMediaType:AVMediaTypeVideo];
    if (videoAuthStatus != AVAuthorizationStatusAuthorized)
    {
        NSLog(@"摄像头权限没开");
        return;
    }
    dispatch_async(dispatch_get_global_queue(DISPATCH_QUEUE_PRIORITY_DEFAULT, 0), ^{
        [self.captureSession startRunning];
    });
由于startRunning的调用会block线程,所以进行了异步调用。
7.实现代理回调函数,每采集到一帧画面,都会调用此函数。然后用回调的视频数据进行编码。
- (void)captureOutput:(AVCaptureOutput *)captureOutput didOutputSampleBuffer:(CMSampleBufferRef)sampleBuffer fromConnection:(AVCaptureConnection *)connection {

}
三、用VideoToolbox编码
一些数据结构:
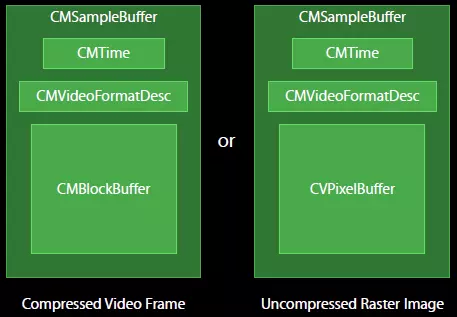
CVPixelBufferRef/CVImageBufferRef:存放编码前和解码后的图像数据,这俩货其实是同一个东西CMTime:时间戳相关,时间以64-bit/32-bit的形式出现CMBlockBufferRef:编码后输出的数据CMFormatDescriptionRef/CMVideoFormatDescriptionRef:图像存储方式,编解码器等格式描述。这俩货也是同一个东西CMSampleBufferRef:存放编解码前后的视频图像的容器数据
1.先调用VTCompressionSessionCreate创建编码的session,宽高为视频采集到的宽高,编码类型选择h264,设置encodeCallback回调函数,每编码一帧会调用这个函数。_compressionSession为创建的session。
    //宽高和视频采集的分辨率有关
    int width = 720, height = 1280;
    OSStatus status = VTCompressionSessionCreate(NULL, width, height, kCMVideoCodecType_H264, NULL, NULL, NULL, encodeCallback, (__bridge void *)(self),  &_compressionSession);
    if (noErr != status)
    {
        NSLog(@"could not create CompressionSession");
        return;
    }
2.创建session后,设置session的属性
    // 设置实时编码输出(避免延迟)
    status = VTSessionSetProperty(self.compressionSession, kVTCompressionPropertyKey_RealTime, kCFBooleanTrue);
    if (status != noErr) {
        NSLog(@"set realtime fail");
        return;
    }

    //Baseline没有B帧,用于直播,减小延迟
    status = VTSessionSetProperty(self.compressionSession, kVTCompressionPropertyKey_ProfileLevel, kVTProfileLevel_H264_Baseline_AutoLevel);
    if (status != noErr) {
        NSLog(@"set profile level fail");
        return;
    }

    // GOP size
    status = VTSessionSetProperty(self.compressionSession, kVTCompressionPropertyKey_MaxKeyFrameInterval, (__bridge CFTypeRef)@(15));
    if (status != noErr) {
        NSLog(@"set gop size fail");
        return;
    }

    // 设置期望帧率
    status = VTSessionSetProperty(self.compressionSession, kVTCompressionPropertyKey_ExpectedFrameRate, (__bridge CFTypeRef)@(25));
    if (status != noErr) {
        NSLog(@"set ExpectedFrameRate fail");
        return;
    }

    //配置是否产生B帧
    status = VTSessionSetProperty(self.compressionSession, kVTCompressionPropertyKey_AllowFrameReordering, kCFBooleanFalse);
    if (noErr != status)
    {
        NSLog(@"set b frame allow fail");
        return;
    }

    //设置平均码率 单位 bit per second,3500Kbps
    int averageBitRate = 3500 * 1024;
    status = VTSessionSetProperty(self.compressionSession, kVTCompressionPropertyKey_AverageBitRate, (__bridge CFTypeRef)@(averageBitRate));
    if (noErr != status)
    {
        NSLog(@"set AverageBitRate fail");
        return;
    }

    //参考webRTC 限制最大码率不超过平均码率的1.5倍,单位为byte per second
    int64_t dataLimitBytesPerSecondValue = averageBitRate * 1.5 / 8;
    CFNumberRef bytesPerSecond = CFNumberCreate(kCFAllocatorDefault, kCFNumberSInt64Type, &dataLimitBytesPerSecondValue);
    int64_t oneSecondValue = 1;
    CFNumberRef oneSecond = CFNumberCreate(kCFAllocatorDefault, kCFNumberSInt64Type, &oneSecondValue);
    const void* nums[2] = {bytesPerSecond, oneSecond};
    CFArrayRef dataRateLimits = CFArrayCreate(NULL, nums, 2, &kCFTypeArrayCallBacks);
    status = VTSessionSetProperty(self.compressionSession, kVTCompressionPropertyKey_DataRateLimits, dataRateLimits);
    if (noErr != status)
    {
        NSLog(@"set DataRateLimits fail");
        return;
    }
平均码率,可以参考h264文档中的建议码率,然后微调它,以此选择合适的码率。
| 视频大小 | 分辨率 | 建议码率 |
| 480P | 720X480 | 1800Kbps |
| 720P | 1280X720 | 3500Kbps |
| 1080P | 1920X1080 | 8500Kbps |
3.设置属性后,调用下面的一行代码,准备编码
    //准备编码
    VTCompressionSessionPrepareToEncodeFrames(self.compressionSession);
4.由于打算将编码的视频数据写入到文件中,所以下面创建文件用于写入
    //编码后,写入h264文件中
    NSString *file = [[NSSearchPathForDirectoriesInDomains(NSDocumentDirectory, NSUserDomainMask, YES) lastObject] stringByAppendingPathComponent:@"result.h264"];
    [[NSFileManager defaultManager] removeItemAtPath:file error:nil];
    [[NSFileManager defaultManager] createFileAtPath:file contents:nil attributes:nil];
    self.fileHandle = [NSFileHandle fileHandleForWritingAtPath:file];
5.在视频采集的回调函数中调用VTCompressionSessionEncodeFrame来进行编码,执行后,会调用编码回调函数。
- (void)captureOutput:(AVCaptureOutput *)captureOutput didOutputSampleBuffer:(CMSampleBufferRef)sampleBuffer fromConnection:(AVCaptureConnection *)connection {
CVImageBufferRef imageBuffer = (CVImageBufferRef)CMSampleBufferGetImageBuffer(sampleBuffer);
//设置编码时间戳
CMTime pts = CMTimeMake(self.frameNum++, 25);
OSStatus status = VTCompressionSessionEncodeFrame(self.compressionSession,
imageBuffer,
pts,
kCMTimeInvalid,
NULL, NULL, NULL);
if (status != noErr) {
NSLog(@"Encode failed");
VTCompressionSessionInvalidate(self.compressionSession);
CFRelease(self.compressionSession);
self.compressionSession = NULL;
return;
}
NSLog(@"EncodeFrame Success");
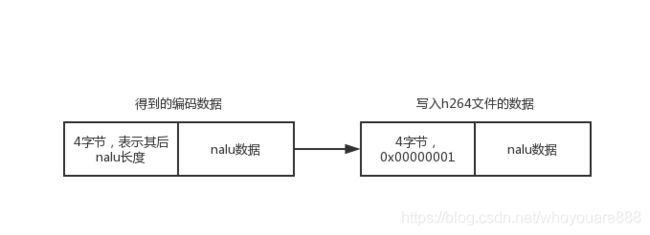
}6.在编码回调函数中,将得到的编码数据,写入到h264文件中。得到的编码数据是一串nalu单元,每个nalu单元之间用4个字节表示其后的nalu的长度。
在回调函数中,先判断此帧是否为关键帧,如果是关键帧,则获取sps、pps数据,并写入到文件中,然后将帧数据写入到文件中。
写入到h264文件中,需要将这4个字节换成固定4个字节的startcode:0x00000001,这样才能区分每个nalu单元。
void encodeCallback(void *outputCallbackRefCon, void *sourceFrameRefCon, OSStatus status, VTEncodeInfoFlags infoFlags, CMSampleBufferRef sampleBuffer)
{
    NSLog(@"encodeCallback");
    if (status != noErr) {
        return;
    }

    if (!CMSampleBufferDataIsReady(sampleBuffer))
    {
        return;
    }

    if (infoFlags & kVTEncodeInfo_FrameDropped)
    {
        NSLog(@"---encode dropped frame");
        return;
    }

    ViewController *encoder = (__bridge ViewController *)outputCallbackRefCon;

    const char header[] = "\x00\x00\x00\x01";
    size_t headerLen = 4;  //4字节的0x00000001分隔码
    NSData *headerData = [NSData dataWithBytes:header length:headerLen];

    // 判断是否是关键帧
    bool isKeyFrame = !CFDictionaryContainsKey((CFDictionaryRef)CFArrayGetValueAtIndex(CMSampleBufferGetSampleAttachmentsArray(sampleBuffer, true), 0), (const void *)kCMSampleAttachmentKey_NotSync);
    // 获取sps & pps数据
    if (isKeyFrame)
    {
        NSLog(@"编码了一个关键帧");
        CMFormatDescriptionRef formatDescriptionRef = CMSampleBufferGetFormatDescription(sampleBuffer);

        // 关键帧需要加上SPS、PPS信息
        size_t sParameterSetSize, sParameterSetCount;
        const uint8_t *sParameterSet;
        OSStatus spsStatus = CMVideoFormatDescriptionGetH264ParameterSetAtIndex(formatDescriptionRef, 0, &sParameterSet, &sParameterSetSize, &sParameterSetCount, 0);

        size_t pParameterSetSize, pParameterSetCount;
        const uint8_t *pParameterSet;
        OSStatus ppsStatus = CMVideoFormatDescriptionGetH264ParameterSetAtIndex(formatDescriptionRef, 1, &pParameterSet, &pParameterSetSize, &pParameterSetCount, 0);

        if (noErr == spsStatus && noErr == ppsStatus)
        {
            NSData *sps = [NSData dataWithBytes:sParameterSet length:sParameterSetSize];
            NSData *pps = [NSData dataWithBytes:pParameterSet length:pParameterSetSize];

            [encoder.fileHandle writeData:headerData];
            [encoder.fileHandle writeData:sps];
            [encoder.fileHandle writeData:headerData];
            [encoder.fileHandle writeData:pps];

        }

    }

    CMBlockBufferRef dataBuffer = CMSampleBufferGetDataBuffer(sampleBuffer);
    size_t length, totalLength;
    char *dataPointer;
    OSStatus statusCodeRet = CMBlockBufferGetDataPointer(dataBuffer, 0, &length, &totalLength, &dataPointer);
    if (statusCodeRet == noErr) {
        size_t bufferOffset = 0;
        static const int AVCCHeaderLength = 4; // 返回的nalu数据前四个字节不是0001的startcode,而是大端模式的帧长度length

        // 循环获取nalu数据
        while (bufferOffset < totalLength - AVCCHeaderLength) {
            uint32_t NALUnitLength = 0;
            // Read the NAL unit length
            memcpy(&NALUnitLength, dataPointer + bufferOffset, AVCCHeaderLength);

            // 从大端转系统端
            NALUnitLength = CFSwapInt32BigToHost(NALUnitLength);

            NSData* data = [[NSData alloc] initWithBytes:(dataPointer + bufferOffset + AVCCHeaderLength) length:NALUnitLength];
            [encoder.fileHandle writeData:headerData];
            [encoder.fileHandle writeData:data];

            // Move to the next NAL unit in the block buffer
            bufferOffset += AVCCHeaderLength + NALUnitLength;
        }
    }
}
demo地址:
https://github.com/whoyouare888/Note/tree/master/VideoToolbox/VTEncode