go test 单元测试
文章目录
- go test [flag] flag 有:
- 打印/报告
- T 类型 普通测试用例
- 除了打印报告的方法外还有:方法:
- Name 返回当前测试用例名称
- Parallel 标记当前测试用例可以并行测试
- Helper 将函数标记为测试助手函数
- Run 执行 子测试
- B 类型 基准测试(压力测试)
- B 类型有 T 类型的所有方法,除了和 T 共有的函数外还有:
- ReportAllocs 打开当前基准测试的内存统计功能
- ResetTimer 重置计时器
- RunParallel 并行执行给定测试
- SetBytes 记录处理的字节数
- SetParallelism 开始对测试进行计时
- StopTimer 停止对测试进行计时。
- 测试控制台输出的例子
- Main 测试
- HTTP 测试
- 补充
- 覆盖率
- 使用Short标记可跳过的测试用例
go test [flag] flag 有:
go help testflag 查看有那些 flag:
-args: 测试函数接收命令行参数,注意:该参数后所有参数会被当做命令行参数传递给测试用例,正确使用方式举例:go test -v -run TestFibOnce b_test.go -args "in 7" expected=13;-c: 将测试文件编译生成可执行函数, 加-o指定文件名(默认文件名test.test);- 编译:
go test -c -o test_fib.test b_test.go; - 使用二进制文件:
./test_fib.test -test.v -test.run TestFibOnce "in=7" expected=13测试用例同上;T -i: 安装作为测试依赖项的软件包。不要运行测试。-json: 以 json 格式输出。-bench regexp:仅运行与正则表达式匹配的那些基准。多个正则表达式以/隔开-benchtime t: 对每个基准运行足够的迭代,以t表示为time.Duration(例如-benchtime 1h30s)。- 默认值为1秒(1s)。
- 特殊语法
Nx意味着要运行基准测试N次(例如,-benchtime 100x)。 -count n: 运行每个测试和基准测试n次(默认为1)。如果设置了-cpu,则对每个GOMAXPROCS值运行n次。示例始终运行一次。-cover: 覆盖率-covermode set,count,atomic: 设置要测试的包装的覆盖率分析的模式。-cpu: 指定应为其执行测试或基准的GOMAXPROCS值的列表。 默认值为GOMAXPROCS的当前值。-failfast: 第一次测试失败后,请勿开始新的测试。-list regexp: 列出 与正则匹配的测试用例列表,例如go test -list Test .列出名字以Test为开头的测试用例;-parallel n: 调用t.Parallel的测试功能。并设置 并行运行的测试数量为n,n 默认为GOMAXPROCS,请注意,-parallel仅适用于单个测试二进制文件。-run regexp: 执行与正则表达式相匹配的测试用例;-short: 一个快速测试的标记,在测试用例中可以使用testing.Short()来绕开一些测试,详细使用方法看 -short 的使用;-timeout d: 如果测试用例的运行时间超过持续时间 d,则出现恐慌。如果 d 为 0,则禁用超时。默认值为 10分钟(10m);-v: 显示详细测试信息,打印t.Log()和t.Logf()输出;-benchmem: 打印基准测试的内存分配统计信息。-blockprofile block.out: 性能剖析, 记录 阻塞事件的分析数据 到block.out,可以供给go tool pprof使用。- 例如:
go tool pprof test.test block.out输入web会生成 svg 图像(需要安装graphviz):

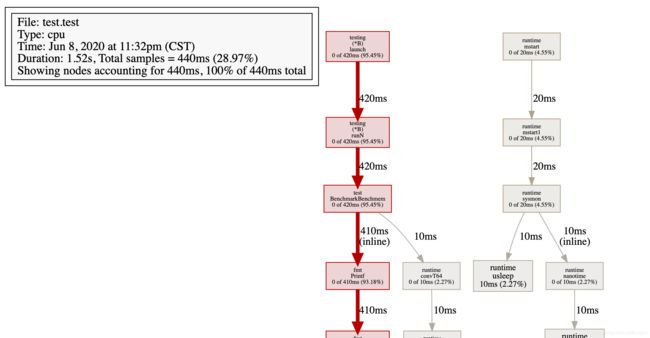
-blockProfilerate n: 探查器每n纳秒中采样一个阻塞事件;-coverprofile cover.out: 看覆盖率;-cpuprofile cpu.out: 性能剖析, 记录 cpu 性能刨析 到文件,可以供给go tool pprof使用- 例如:
go tool pprof test.test cpu.out输入web会生成 svg 图像(需要安装graphviz):
-memprofile mem.out: 性能剖析, 同上 记录内存使用数据到文件,可以供给go tool pprof使用- 例如:
go tool pprof test.test mem.out输入web会生成 svg 图像(需要安装graphviz):

打印/报告
- 当我们遇到一个断言错误的时候,标识这个测试失败,会使用到:
Fail: 测试失败,测试继续,也就是之后的代码依然会执行
FailNow: 测试失败,测试中断
在 FailNow 方法实现的内部,是通过调用 runtime.Goexit() 来中断测试的。
- 当我们遇到一个断言错误,只希望跳过这个错误,但是不希望标识测试失败,会使用到:
SkipNow: 跳过测试,测试中断
在 SkipNow 方法实现的内部,是通过调用 `runtime.Goexit()` 来中断测试的。
- 当我们只希望打印信息,会用到 :
Log: 输出信息
Logf: 输出格式化的信息
注意:默认情况下,单元测试成功时,它们打印的信息不会输出,可以通过加上 -v` 选项,输出这些信息。但对于基准测试,它们总是会被输出。
- 当我们希望跳过这个测试,并且打印出信息,会用到:
Skip: 相当于 Log + SkipNow
Skipf: 相当于 Logf + SkipNow
- 当我们希望断言失败的时候,标识测试失败,并打印出必要的信息,但是测试继续,会用到:
Error: 相当于 Log + Fail
Errorf: 相当于 Logf + Fail
- 当我们希望断言失败的时候,标识测试失败,打印出必要的信息,但中断测试,会用到:
Fatal: 相当于 Log + FailNow
Fatalf: 相当于 Logf + FailNow
T 类型 普通测试用例
T 类型用于管理测试状态并支持格式化测试日志。测试日志会在执行测试的过程中不断累积,并在测试完成时转储至标准输出。测试用例以 Test 开头:
// 被测试的函数
func Fib(n int) int {
    if n < 2 {
            return n
    }
    return Fib(n-1) + Fib(n-2)
}
// 执行测试
func TestFib(t *testing.T) {
    var fibTests = []struct {
        in       int // input
        expected int // expected result
    }{
        {1, 1},
        {2, 1},
        {3, 2},
        {4, 3},
        {5, 5},
        {6, 8},
        {7, 13},
    }

    for _, tt := range fibTests {
        actual := Fib(tt.in)
        if actual != tt.expected {      // 断言结果是否和预期相等
            t.Errorf("Fib(%d) = %d; expected %d", tt.in, actual, tt.expected)
        }
    }
}
/* go test -v -run TestFib b_test.go
# 参数说明:
    -v  打印详细信息
    -run 运行执行测试用例函数
    后跟用例寻找范围,文件名 或 "."(代表当前目录下所有文件)
# 输出:
=== RUN   TestFib
--- PASS: TestFib (0.00s)
PASS
ok      command-line-arguments  0.002s
*/
除了打印报告的方法外还有:方法:
Name 返回当前测试用例名称
func (t *T) Name() string
Parallel 标记当前测试用例可以并行测试
func (t *T) Parallel()
比如下面两个测试用例可并行执行测试:
func TestOne(t *testing.T) {
    t.Parallel()
    ...
}
func TestTwo(t *testing.T) {
    t.Parallel()
    ...
}
Helper 将函数标记为测试助手函数
func (t *T) Helper()
使用示例:
func failure(t *testing.T) {
    t.Helper()                 // 标记自己为helper函数
    t.Fatal("failure")
}
func TestHelper(t *testing.T){
    failure(t)
}
/*   执行 o test -v -run TestHelper  输出:
~/Projects/go/src/test/test $  go test -v -run TestHelper
=== RUN   TestHelper
    TestHelper: b_test.go:128: failure          // 这里错误信息 显示是在 第 128 行 即 TestHelper 函数中
--- FAIL: TestHelper (0.00s)
FAIL
exit status 1
FAIL    test/test       0.006s

对比注释掉 t.Helper() 输出:
~/Projects/go/src/test/test $  go test -v -run TestHelper
=== RUN   TestHelper
    TestHelper: b_test.go:125: failure     // 这里错误信息 显示是在 第 128 行 即 failure 函数中
--- FAIL: TestHelper (0.00s)
FAIL
exit status 1
FAIL    test/test       0.006s
*/
Run 执行 子测试
func (t *T) Run(name string, f func(b *B)) bool
子测试,又叫 命名测试 (named tests),它意味着您现在可以拥有嵌套测试,这对于自定义(和过滤)给定测试的示例非常有用。
使用示例:
func TestFoo(t *testing.T) {
// 可通过指定 -run regexp 和 -bench regexp flag 的正则来执行某子测试:
go test -run ''      # Run 所有测试。
go test -run Foo     # Run 匹配 "Foo" 的顶层测试,例如 "TestFooBar"。
go test -run Foo/A=  # 匹配顶层测试 "Foo",运行其匹配 "A=" 的子测试。
go test -run /A=1    # 运行所有匹配 "A=1" 的子测试。
子测试也可以使用 t.Parallel() 来标记并行执行。所有的子测试完成后,父测试才会完成。在下面这个例子中,所有的测试是相互并行运行的,当然也只是彼此之间,不包括定义在其他顶层测试的子测试:
func TestGroupedParallel(t *testing.T) {
    for _, tc := range tests {
        tc := tc // capture range variable
        t.Run(tc.Name, func(t *testing.T) {
            t.Parallel()
            ...
        })
    }
}
B 类型 基准测试(压力测试)
B 类型用于管理基准测试的计时行为,并指示应该迭代地运行测试多少次。B 类型测试用例以 Benchmark 开头:
func BenchmarkHello(b *testing.B) {
    for i := 0; i < b.N; i++ {
        fmt.Sprintf("hello")
    }
}

func BenchmarkBenchmem(b *testing.B) {
    for n := 0; n < b.N; n++ {
        actual := Fib(7)
        fmt.Printf("Fib(%d)=%d\n", n, actual)
    }
}
B 类型有 T 类型的所有方法,除了和 T 共有的函数外还有:
ReportAllocs 打开当前基准测试的内存统计功能
func (b *B) ReportAllocs()
打开当前基准测试的内存统计功能,与使用 -test.benchmem 设置类似,但 ReportAllocs 只影响那些调用了该函数的基准测试。
ResetTimer 重置计时器
func (b *B) ResetTimer()
对已经逝去的基准测试时间以及内存分配计数器进行清零。对于正在运行中的计时器,这个方法不会产生任何效果。
使用示例:
func BenchmarkBigLen(b *testing.B) {
    big := NewBig()      // 费时操作 比如初始化某个变量
    b.ResetTimer()
    for i := 0; i < b.N; i++ {
        big.Len()
    }
}
RunParallel 并行执行给定测试
func (b *B) RunParallel(body func(*PB))
以并行的方式执行给定的基准测试。 RunParallel 会创建出多个 goroutine ,并将 b.N 分配给这些 goroutine 执行, 其中 goroutine 数量的默认值为 GOMAXPROCS 。用户如果想要增加非 CPU 受限(``non-CPU-bound)基准测试的并行性, 那么可以在RunParallel之前调用SetParallelism。RunParallel 通常会与-cpu` 标志一同使用。
body 函数将在每个 goroutine 中执行,这个函数需要设置所有 goroutine 本地的状态, 并迭代直到 pb.Next返回 false 值为止。因为 StartTimer 、 StopTimer和 ResetTimer 这三个函数都带有全局作用,所以 body 函数不应该调用这些函数;除此之外,body 函数也不应该调用 Run 函数。
func BenchmarkRunParallel(b *testing.B) {
    templ := template.Must(template.New("test").Parse("Hello, {{.}}!"))
    // RunParallel 将创建 GOMAXPROCS 个 goroutine,并在其中分配工作。
    b.RunParallel(func(pb *testing.PB){
        // 每个goroutine都有自己的byte.Buffer。
        var buf bytes.Buffer
        for pb.Next() {
            // 循环体在所有goroutine中总共执行b.N次。
            buf.Reset()
            templ.Execute(&buf, "World")
        }
    })
}
// go test -v -bench=^BenchmarkRunParallel$ -run=^$
SetBytes 记录处理的字节数
func (b *B) SetBytes(n int64)
记录在单个操作中处理的字节数量。 在调用了这个方法之后, 基准测试将会报告 ns/op 以及 MB/s.
SetParallelism 开始对测试进行计时
func (b *B) StartTimer()
这个函数在基准测试开始时会自动被调用,它也可以在调用 StopTimer 之后恢复进行计时。
StopTimer 停止对测试进行计时。
func (b *B) StopTimer()
停止对测试进行计时。
测试控制台输出的例子
func ExampleHello() {
    fmt.Println("Hello")
    // Output: hello
}

/* go test -run ExampleHello
# 输出:
--- FAIL: ExampleHello (0.00s)
got:
Hello
want:
hello
FAIL
FAIL    command-line-arguments    0.009s
FAIL
Main 测试
TestMain 的使用场景:
开始测试之前有初始化操作,比如 http 测试有时需要授权操作、创建连接时。
测试结束后要做数据清理等操作时。
func Add(a,b int) int {
    return a+b
}

func TestMain(m *testing.M) {
    fmt.Println("开始测试...")
    m.Run()
    fmt.Println("测试结束...")
}

/* 输出:
=== RUN   TestAdd
--- PASS: TestAdd (0.00s)
PASS
测试结束...
ok      command-line-arguments  0.007s
HTTP 测试
Go 语言目前的 web 开发是比较多的,那么在我们对功能函数有了测试之后,HTTP 的测试又该怎样做呢?
Go 的标准库为我们提供了一个 httptest 的库,通过它就能够轻松的完成 HTTP 的测试。
示例1:
package main

import (
    "fmt"
    "io"
    "io/ioutil"
    "net/http"
    "net/http/httptest"
)

var HandleHelloWorld = func(w http.ResponseWriter, r *http.Request) {
    io.WriteString(w, "Hello World!")
}

func main() {
    req := httptest.NewRequest("GET", "http://example.com/foo", nil)
    w := httptest.NewRecorder()
    HandleHelloWorld(w, req)

    resp := w.Result()
    body, _ := ioutil.ReadAll(resp.Body)

    fmt.Println(resp.StatusCode)
    fmt.Println(resp.Header.Get("Content-Type"))
    fmt.Println(string(body))
}
示例2:
package test

import (
    "bytes"
    "encoding/json"
    "fmt"
    "io/ioutil"
    "net/http"
    "net/http/httptest"
    "testing"
)

func testAPI(w http.ResponseWriter, r *http.Request){
    body, err := ioutil.ReadAll(r.Body)
    if err != nil {
        http.Error(w, "请求 body 异常", 500)
    }
    fmt.Println(string(body))
    // fmt.Fprint(w, "ok")
    http.Error(w, "请求 body 异常", 500)
}


func Test_testApi(t *testing.T) {
    tests := []struct {
        name string
    }{
        {
            name: "test api",
        },
    }

    for _, tt := range tests {
        t.Run(tt.name, func(t *testing.T){
            // 传入一个 http 处理器 创建一个 server
            ts := httptest.NewServer(http.HandlerFunc(testAPI))
            defer ts.Close()

            params := struct{
                Params string    `json:"params"`
            }{
                Params: "params body",
            }
            paramsByte, _ := json.Marshal(params)

            // 像上面那个处理器发送一个 post 请求
            resp, err := http.Post(ts.URL, "application/json", bytes.NewBuffer(paramsByte))
            if err != nil {
                t.Error(err)
            }
            defer resp.Body.Close()

            // 检查返回 http status
            t.Logf("Status Code: %d",resp.StatusCode)
            if resp.StatusCode != http.StatusCreated && resp.StatusCode != http.StatusOK {
                body, _ := ioutil.ReadAll(resp.Body)
                t.Error(string(body))
            }
        })
    }
}
/*
=== RUN   Test_testApi
=== RUN   Test_testApi/test_api
{"params":"params body"}
    Test_testApi/test_api: http_test.go:51: Status Code: 500
    Test_testApi/test_api: http_test.go:54: 请求 body 异常

--- FAIL: Test_testApi (0.00s)
    --- FAIL: Test_testApi/test_api (0.00s)
FAIL
FAIL    command-line-arguments  0.021s
FAIL
*/
示例3 beego 框架测试:
b, err := json.Marshal(&Req{Username:"test", Passoword:"123456"})
r, _ := http.NewRequest("POST", "/user/login", bytes.NewBuffer(b))
r.Header.Set("User-Agent", "beego_server")
r.Body = ioutil.NopCloser(bytes.NewBuffer(b))
r.ContentLength = int64(len(b))
r.Header.Set("Content-Type", "application/json")

w := httptest.NewRecorder()
beego.BeeApp.Handlers.ServeHTTP(w, r)
更复杂的示例:beego 单元测试示例.md
补充
覆盖率
由单元测试的代码,触发运行到的被测试代码的代码行数占所有代码行数的比例,被称为测试覆盖率,代码覆盖率不一定完全精准,但是可以作为参考,可以帮我们测量和我们预计的覆盖率之间的差距。
go tool 工具提供了测量覆盖率的功能:
# 生成指定 package 的测试覆盖率(fib.out 后面不带参数的,默认是命令所在目录)
go test -v -covermode=count -coverprofile fib.out
# 查看汇总的 fib 测试覆盖率
go tool cover -func=fib.out
# 生成 html
go tool cover -html=fib.out -o fib.html
使用Short标记可跳过的测试用例
func TestTimeConsuming(t *testing.T) {
    if testing.Short() {
        t.Skip("skipping test in short mode.")
    }
    ...
}
运行 go test 时添加 -short flag 即可跳过如上面代码的测试用例,go test -short -v -run=.