Hive2.0安装完整版——Hive2.3.4
@羲凡——只为了更好的活着
Hive安装完整版——Hive2.3.4
Hive是大数据生态圈中最常用的数据仓库,也是有hadoop集群的公司的必备。所以hive安装和使用也是大数据开发或运维人员都必须掌握的。hive的安装很简单,而且Hive1.0和Hive2.0版本的安装都非常类似,完全可以套用。此文中选择Hive2.3.4作为示范!
一、下载对应的安装包
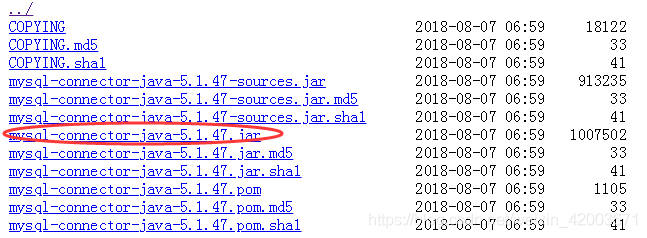
1.下载mysql驱动
下载地址如下
http://central.maven.org/maven2/mysql/mysql-connector-java/5.1.47/

2.下载mysql(Ubuntu版本)
第一种方式.下载地址我的博客资源中(本文我使用我自己的版本)
https://download.csdn.net/download/weixin_42003671/10920380
推荐使用第一种方式
第二种方式.官网上下载最新版的,地址如下
https://dev.mysql.com/downloads/repo/apt/
3.下载Hive2.3.4
下载地址如下
https://archive.apache.org/dist/hive/hive-2.3.4/

二、安装mysql(Ubuntu)
- 删除旧版本mysql
# 删除mysql
sudo apt-get remove mysql-*
# 清理残留的数据
dpkg -l |grep ^rc|awk '{print $2}' |sudo xargs dpkg -P
清理数据是如果出现 dpkg: error: --purge needs at least one package name argument,这说明没有残留的配置文件。如果弹出别的窗口这点击Yes即可。
- 通过APT方式安装Mysql
sudo dpkg -i mysql-apt-config_0.8.9-1_all.deb
sudo apt-get update
sudo apt-get install mysql-server # 会出现两次弹窗,输入root密码即可
安装成功,在任意界面输入mysql -V,如果出现mysql Ver 14.14 Distrib 5.7.24, for Linux (x86_64) using EditLine wrapper,则说明你mysql5.7.24版本已经安装成功。
- 修改mysql参数
# 进入mysql
mysql -uroot -p # 然后输入mysql的密码
进入mysql后
# 切换成mysql库
use mysql;
# 查询用户信息
select User,Host,authentication_string from user;
# 设置远程登录权限
grant all privileges on *.* to 'root'@'%' identified by '1q2w3e4r' with grant option;
# 授权本地客户端登录此库
grant all privileges on *.* to 'root'@'10.101.8.1' identified by '1q2w3e4r';
# 刷新配置信息
flush privileges;
# 退出
exit
进入/etc/mysql/mysql.conf.d/mysqld.cnf文件将 bind-address 设置成 0.0.0.0
- 重启 mysql
sudo service mysql restart
看到如下信息说明mysql重启成功
 * Stopping MySQL Community Server 5.7.24
...
 * MySQL Community Server 5.7.24 is stopped
 * Re-starting MySQL Community Server 5.7.24
..
 * MySQL Community Server 5.7.24 is started
三、安装Hive
- 解压hive并配置 /etc/profile
# 解压
cd /usr/local/package #进入tar包所在的目录
tar -zxf apache-hive-2.3.4-bin.tar.gz -C ../ #解压到当前文件夹
mv apache-hive-2.3.4-bin hive-2.3.4-bin #重命名文件夹
#添加HIVE_HOME到/etc/profile文件中
sudo vi /etc/profile
   export HIVE_HOME=/usr/local/package/hive-2.3.4-bin
   export PATH=$PATH:$HIVE_HOME/bin
source /etc/profile
- 修改配置文件
cd $HIVE_HOME/conf #进入$HIVE_HOME/conf配置文件所在的目录
mv hive-env.sh.template hive-env.sh #重命名环境文件
mv hive-log4j2.properties.template hive-log4j2.properties #重命名日志文件
cp hive-default.xml.template hive-site.xml #拷贝生成xml文件
a.修改 hive-env.sh
将第48行改为HADOOP_HOME=/usr/local/package/hadoop-2.7.3
将第51行改为export HIVE_CONF_DIR=/usr/local/package/hive-2.3.4-bin/conf
b.修改 hive-log4j2.properties
将第24行改为property.hive.log.dir =/usr/local/package/hive-2.3.4-bin/logs
c.修改 hive-site.xml
将configuration中的内容换成如下配置
<configuration>

<property>
	<name>hive.metastore.warehouse.dirname>
	<value>/user/hive/warehousevalue>
property>

<property>
	<name>hive.cli.print.headername>
	<value>truevalue>
property>

<property>
	<name>hive.cli.print.current.dbname>
	<value>truevalue>
property>

<property>
	<name>hive.exec.mode.local.autoname>
	<value>truevalue>
property>

<property>
	<name>hive.metastore.urisname>
	<value>thrift://deptest37:9083value>
	<description>Thrift URI for the remote metastore. Used by metastore client to connect to remote metastore.description>
property>

<property>
	<name>javax.jdo.option.ConnectionURLname>
	<value>jdbc:mysql://deptest37:3306/hive?createDatabaseIfNotExist=true&useSSL=falsevalue>
	<description>JDBC connect string for a JDBC metastoredescription>
property>
<property>
	<name>javax.jdo.option.ConnectionUserNamename>
	<value>rootvalue>
	<description>username to use against metastore databasedescription>
property>
<property>
	<name>javax.jdo.option.ConnectionPasswordname>
	<value>1q2w3e4rvalue>
	<description>password to use against metastore databasedescription>
property>
<property>
	<name>javax.jdo.option.ConnectionDriverNamename>
	<value>com.mysql.jdbc.Drivervalue>
	<description>Driver class name for a JDBC metastoredescription>
property>
configuration>
- 创建hive元数据说在路径
hdfs dfs -mkdir /tmp #如果有这个路径,这不需要重新创建
hdfs dfs -mkdir -p /user/hive/warehouse #创建目录
hdfs dfs -chmod g+w /tmp #修改文件权限
hdfs dfs -chmod g+w /user/hive/warehouse #修改文件权限
- 添加mysql驱动
cp mysql-connector-java-5.1.47.jar $HIVE_HOME/lib
- 初始化mysql元数据库
schematool -initSchema -dbType mysql //初始化成功最后会出现
如果初始化成功,则会出现如下几行
Starting metastore schema initialization to 2.3.0
Initialization script hive-schema-2.3.0.mysql.sql
Initialization script completed
schemaTool completed
- 开启元数据
nohup hive --service metastore & #开启元数据
三、启动hive并测试
1.输入 hive进入hive,显示如下
Logging initialized using configuration in file:/usr/local/package/hive-2.3.4-bin/conf/hive-log4j2.properties Async: true
Hive-on-MR is deprecated in Hive 2 and may not be available in the future versions. Consider using a different execution engine (i.e. spark, tez) or using Hive 1.X releases.
hive (default)>
2.创建 aarontest 库和aarontest.staff 表,并将 /data/staff.txt 下面的数据load到该表中,结果如下
hive (default)> show databases;
OK
database_name
default
Time taken: 1.368 seconds, Fetched: 1 row(s)
hive (default)> create database aarontest;
OK
Time taken: 5.725 seconds
hive (default)> create table aarontest.staff(
              > name string,
              > age int)
              > row format delimited fields terminated by "\t";
OK
Time taken: 6.275 seconds
hive (default)> load data local inpath '/data/staff.txt' into table aarontest.staff;
Loading data to table aarontest.staff
OK
Time taken: 6.307 seconds
hive (default)> select * from aarontest.staff;
OK
staff.name	staff.age
xiaodong	23
xiaohong	24
xiaoming	18
Time taken: 1.945 seconds, Fetched: 3 row(s)
总结重点
1.配置企业使用的hive,元数据一定要用mysql(默认的derby数据库不支持多点登录),所有mysql的配置至关重要,特别是将 bind-address 设置成 0.0.0.0
2.在开启元数据服务前必须 初始化mysql元数据库
3.如果设置了thriftURL,必须 开启元数据服务
若对博客中有任何问题,欢迎留言交流
恭喜您已经完成hive 的安装
恭喜您已经完成hive 的安装
恭喜您已经完成hive 的安装
@羲凡——只为了更好的活着