springboot+pagehelper实现真分页以及多数据源的应用
**写在前面,认真看本文,你可以获得的技能:1.springboot项目的搭建 2.springboot+Oracle实现增删改查 3. 多数据源的配置 4.前后台交互并实现真分页(网上乱七八糟的绝大部分都是假的分页)**
1. spring-boot项目的创建
- 1.1 Idea新建一个spring项目
- 2.1 测试表
- 2.2 pom文件添加oracle驱动
- 2.3 测试Oracle是否连接上
- 2.3.1 OracleConnection 代码
- 3. Spring-MVC实现简单的增删改查
- 3.1 配置druid数据源
- 3.1.1 properties数据源配置
- 3.1.2 pom.xml
- 3.1.3 配置druid
- 3.2 一套Mvc
- 3.2.1 domain下的User实体类
- 3.2.2 mapper.oracle 下的UserMapper
- 3.2.3 userMapper.xml
- 3.2.4 service: UserService 和UserServiceImpl
- 3.2.5 controller下: UserController
- 3.3 测试
- 4. 多数据源的连接
- 4.1 多数据源解释
- 4.2 properties文件
- 4.3 同样在druid中配置properties和config
- 4.3.1 Cluster1OracleDataSourceProperties 类
- 4.3.2 Cluster1OracleDataSourceConfig类
- 4.3.3 贴个图
- 4.4 总结
- 5. 前台页面显示与真分页
- 5.1 写在前面
- 5.2 后台相关类
- 5.2.1 Params
- 5.2.2 ResultInfo
- 5.2.3 ResultUtil 分页自定义类
- 5.2.4 mapper
- 5.2.5 mapper.xml
- 5.2.6 service
- 5.2.7 serviceImpl
- 5.2.8 controller
- 5.3 前台页面
- 5.3.1 index.html
- 5.3.2 theOne.js
- 5.3.3 index.js
- 5.3.4 总结
- 5.4 debug 测试
- 5.4.1 浏览器输入url
- 5.4.2 看controller层
- 5.4.3 看serviceImpl层
- 5.4.4 第一个debug走完,看页面
- 5.4.5 第二个debug
1.1 Idea新建一个spring项目
操作 File—>new–>project 选择spring initializr

项目存储位置,以及名称(demo)

直接下一步,其中的dependencies暂时什么都不选,后面自己添加
现在的项目样子:
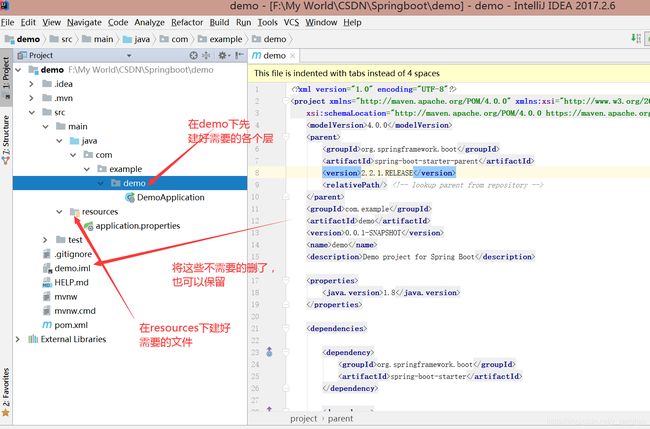
建立好的模型是这个样子的:

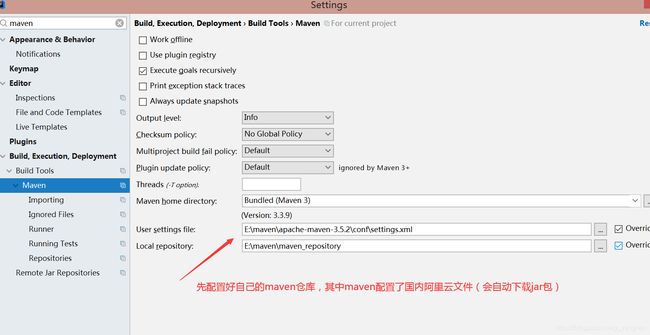
配置maven仓库:
至此一个spring 项目就建立好了
2.1 测试表
先在Oracle中创建一个测试表 表名为user_test(随意起)

2.2 pom文件添加oracle驱动

下面展示一下 代码。
			com.oracle
			ojdbc6
			11.2.0.1.0


			org.springframework.boot
			spring-boot-starter-jdbc
爆红解决方案:orale驱动手动导入
2.3 测试Oracle是否连接上

2.3.1 OracleConnection 代码
package com.example.demo.test;

import java.sql.*;

public class OracleConnection {
    public static Connection getConnection(){
        String url="jdbc:oracle:thin:@自己的:orcl";
        String username="账号";
        String password="密码";
        String driver="oracle.jdbc.driver.OracleDriver";
        try {
            Class.forName(driver);
            Connection con= DriverManager.getConnection(url, username, password);
            Statement state=con.createStatement();   //容器
            String sql="select * from user_test";   //SQL语句
            ResultSet resultSet= state.executeQuery(sql);         //将sql语句上传至数据库执行
            while (resultSet.next()){
                System.out.println(resultSet.getString(1)+"--"+resultSet.getString(2));
            }
            con.close();//关闭通道
            return con;
        } catch (ClassNotFoundException e) {
            e.printStackTrace();
        } catch (SQLException e) {
            e.printStackTrace();
        }
        return null;
    }
    public static void main(String[] args) {
        Connection conn=OracleConnection.getConnection();
    }
}
到目前为止,就可以实现Oracle和后台交互,但是太粗糙了,下面进行第三部spring-MVC实现简单的操作
3. Spring-MVC实现简单的增删改查
3.1 配置druid数据源
3.1.1 properties数据源配置
properties文件,也可以是yml文件,我习惯写properties文件

3.1.2 pom.xml
添加相关的dependency4个,加上先前的两个一共6个
			org.springframework.boot
			spring-boot-starter-web


			com.alibaba
			druid
			1.1.10


			org.mybatis.spring.boot
			mybatis-spring-boot-starter
			1.3.2


			com.github.pagehelper
			pagehelper
			5.1.2
3.1.3 配置druid

类1:OracleDataSourceProperties类
package com.example.demo.druid;

import org.springframework.boot.context.properties.ConfigurationProperties;
import org.springframework.stereotype.Component;

@Component
@ConfigurationProperties(prefix = "spring.datasource.oracle")//这里就是properties中配置的数据源前缀
public class OracleDataSourceProperties {
    private String url;
    private String username;
    private String password;
    private String  driverClassName;

    public String getUrl() {
        return url;
    }

    public void setUrl(String url) {
        this.url = url;
    }

    public String getUsername() {
        return username;
    }

    public void setUsername(String username) {
        this.username = username;
    }

    public String getPassword() {
        return password;
    }

    public void setPassword(String password) {
        this.password = password;
    }

    public String getDriverClassName() {
        return driverClassName;
    }

    public void setDriverClassName(String driverClassName) {
        this.driverClassName = driverClassName;
    }
}
类2:OracleDataSourceConfig 注意/****/中的问题。
package com.example.demo.druid;
import com.alibaba.druid.pool.DruidDataSourceFactory;
import com.github.pagehelper.PageInterceptor;
import org.apache.ibatis.plugin.Interceptor;
import org.apache.ibatis.session.SqlSessionFactory;
import org.mybatis.spring.SqlSessionFactoryBean;
import org.mybatis.spring.annotation.MapperScan;
import org.springframework.beans.factory.annotation.Autowired;
import org.springframework.beans.factory.annotation.Qualifier;
import org.springframework.context.annotation.Bean;
import org.springframework.context.annotation.Configuration;
import org.springframework.context.annotation.Primary;
import org.springframework.core.io.support.PathMatchingResourcePatternResolver;
import org.springframework.jdbc.datasource.DataSourceTransactionManager;
import javax.sql.DataSource;
import java.util.Properties;
@Configuration
@MapperScan(basePackages = OracleDataSourceConfig.PACKAGE, sqlSessionFactoryRef = "oracleSqlSessionFactory")
public class OracleDataSourceConfig {
    //你的mapper位置,会自动扫描,这也就是自动装配的好处了
      /**
           这里我在mapper层下又建立了一个包oracle,专门用来存储这个数据源的mapper,
           为后面的多数据源配置做准备。一定要注意不要写错。
     **/
    static final String PACKAGE = "com.example.demo.mapper.oracle";
    //你的mapper.xml位置
    static final String MAPPER_LOCATION = "classpath:oracleMapper/*.xml";

    @Autowired
    private OracleDataSourceProperties config;
    /**
     @primary 这个是用来区分数据源的,如果你是多数据源配置,那么一定要在你的主数据源上
     添加@primary注释,否则多数据源容易出错。如果你只有一个数据源,那么可以不要这个注解。
   **/
    @Bean(name = "oracleDataSource")
    @Primary
    public DataSource oracleDataSource() throws Exception{

        Properties properties = new Properties();
        properties.put("driverClassName", config.getDriverClassName());
        properties.put("url", config.getUrl());
        properties.put("username", config.getUsername());
        properties.put("password", config.getPassword());


        //#申请连接时,空闲时间大于(timeBetweenEvictionRunsMillis),则检测连接的有效性    true
        properties.put("testWhileIdle", "true");
        //#申请连接时,检测连接的有效性(性能损耗)  false
        properties.put("testOnBorrow", "false");
        //#归还连接时,检测连接的有效性(性能损耗) false
        properties.put("testOnReturn", "false");
        return DruidDataSourceFactory.createDataSource(properties);
    }

    @Bean(name = "oracleTransactionManager")
    @Primary
    public DataSourceTransactionManager oracleTransactionManager()throws Exception{
        return new DataSourceTransactionManager(oracleDataSource());
    }

    @Bean(name = "oracleSqlSessionFactory")
    @Primary
    public SqlSessionFactory oracleSqlSessionFactory(@Qualifier("oracleDataSource") DataSource oracleDataSource) throws Exception{
        final SqlSessionFactoryBean sessionFactory = new SqlSessionFactoryBean();
        sessionFactory.setDataSource(oracleDataSource);

        Properties p = new Properties();
        p.setProperty("offsetAsPageNum", "true");
        p.setProperty("rowBoundsWithCount", "true");
        p.setProperty("reasonable", "true");
        //5.1.2版本的pagehelper
        Interceptor interceptor = new PageInterceptor();
        interceptor.setProperties(p);
        Interceptor[] plugins =  new Interceptor[]{interceptor};
        sessionFactory.setPlugins(plugins);
        sessionFactory.setMapperLocations(new PathMatchingResourcePatternResolver().getResources(OracleDataSourceConfig.MAPPER_LOCATION));
        return sessionFactory.getObject();
    }
}
3.2 一套Mvc
domain(实体类),mapper(dao层),service(服务层),mapper.xml,controller(控制层)
这里需要注意一下,我在mapper层下又建立了一个oracle包,UserMapper是在oracle层下的。

3.2.1 domain下的User实体类
package com.example.demo.domain;

public class User {
    private String username;
    private String password;
    public String getUsername() {
        return username;
    }
    public void setUsername(String username) {
        this.username = username;
    }
    public String getPassword() {
        return password;
    }
    public void setPassword(String password) {
        this.password = password;
    }
}
3.2.2 mapper.oracle 下的UserMapper
@Repository
public interface UserMapper {
    List getAll();
}
3.2.3 userMapper.xml
3.2.4 service: UserService 和UserServiceImpl
UserService:
public interface UserService {
    List getAll();
}
UserServiecImpl:
@Service
public class UserServiceImpl implements UserService {

    @Autowired
    private UserMapper userMapper;
    @Override
    public List getAll() {       //这里暂时简单的这样写,后面如果要实现真分页的话
        return userMapper.getAll();    //还需要封装才能实现真分页,后面再说。
    }
}
3.2.5 controller下: UserController
@RequestMapping("/test")
@RestController
public class UserController {
    @Autowired
    private UserService userService;
    @RequestMapping("/getAll")
    private List getAll(){
        List users=userService.getAll();
        //将查询到的集合遍历一下
        for (User u:users){
            System.out.println("username:"+u.getUsername()+"_______password:"+u.getPassword());
        }
        return users;
    }
}
3.3 测试
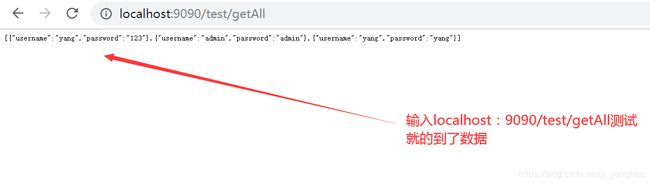

至此,简单的Oracle库配合spring实现简单的操作,就可以了,如果你需要增删改,自己可以在mapper中添加即可,这里我就不一一写了,只是一个model而已。
4. 多数据源的连接
4.1 多数据源解释
就是你一个项目,可能连接的数据库不止一个,比如一个Oracle数据库,一个MySql数据库,这时就需要用到多数据源配置了。
4.2 properties文件

4.3 同样在druid中配置properties和config
4.3.1 Cluster1OracleDataSourceProperties 类
package com.example.demo.druid;

import org.springframework.boot.context.properties.ConfigurationProperties;
import org.springframework.stereotype.Component;
@Component
@ConfigurationProperties(prefix = "cluster1.spring.datasource.oracle")/**注意配置的前缀**/
public class Cluster1OracleDataSourceProperties {

    private String url;
    private String username;
    private String password;
    private String driverClassName;

    public String getUrl() {
        return url;
    }

    public void setUrl(String url) {
        this.url = url;
    }

    public String getUsername() {
        return username;
    }

    public void setUsername(String username) {
        this.username = username;
    }

    public String getPassword() {
        return password;
    }

    public void setPassword(String password) {
        this.password = password;
    }

    public String getDriverClassName() {
        return driverClassName;
    }

    public void setDriverClassName(String driverClassName) {
        this.driverClassName = driverClassName;
    }
}
4.3.2 Cluster1OracleDataSourceConfig类
//特别注意必须有一个数据源的config需要添加@primary注解
package com.example.demo.druid;

import com.alibaba.druid.pool.DruidDataSourceFactory;
import com.github.pagehelper.PageInterceptor;
import org.apache.ibatis.plugin.Interceptor;
import org.apache.ibatis.session.SqlSessionFactory;
import org.mybatis.spring.SqlSessionFactoryBean;
import org.mybatis.spring.annotation.MapperScan;
import org.springframework.beans.factory.annotation.Autowired;
import org.springframework.beans.factory.annotation.Qualifier;
import org.springframework.context.annotation.Bean;
import org.springframework.context.annotation.Configuration;
import org.springframework.core.io.support.PathMatchingResourcePatternResolver;
import org.springframework.jdbc.datasource.DataSourceTransactionManager;

import javax.sql.DataSource;
import java.util.Properties;

@Configuration
@MapperScan(basePackages = Cluster1OracleDataSourceConfig.PACKAGE, sqlSessionFactoryRef = "cluster1oracleCdSqlSessionFactory")
public class Cluster1OracleDataSourceConfig {

    static final String PACKAGE = "com.example.mapper.oracleclu";
    static final String MAPPER_LOCATION = "classpath*:oraclecluMapper/*.xml";

    @Autowired
    private Cluster1OracleDataSourceProperties config;

    @Bean(name = "cluster1oracleCdDataSource")
    public DataSource cluster1oracleCdDataSource() throws Exception{

        Properties properties = new Properties();
        properties.put("driverClassName", config.getDriverClassName());
        properties.put("url", config.getUrl());
        properties.put("username", config.getUsername());
        properties.put("password", config.getPassword());
        properties.put("testWhileIdle", "true");
        //#申请连接时,检测连接的有效性(性能损耗)  false
        properties.put("testOnBorrow", "false");
        //#归还连接时,检测连接的有效性(性能损耗) false
        properties.put("testOnReturn", "false");
        return DruidDataSourceFactory.createDataSource(properties);
    }

    @Bean(name = "cluster1oracleCdTransactionManager")
    public DataSourceTransactionManager cluster1oracleCdTransactionManager()throws Exception{
        return new DataSourceTransactionManager(cluster1oracleCdDataSource());
    }

    @Bean(name = "cluster1oracleCdSqlSessionFactory")
    public SqlSessionFactory cluster1oracleCdSqlSessionFactory(@Qualifier("cluster1oracleCdDataSource") DataSource cluster1oracleCdDataSource) throws Exception{
        final SqlSessionFactoryBean sessionFactory = new SqlSessionFactoryBean();
        sessionFactory.setDataSource(cluster1oracleCdDataSource);

        Properties p = new Properties();
        p.setProperty("offsetAsPageNum", "true");
        p.setProperty("rowBoundsWithCount", "true");
        p.setProperty("reasonable", "true");

        //5.1.2版本的pagehelper
        Interceptor interceptor = new PageInterceptor();
        interceptor.setProperties(p);
        Interceptor[] plugins =  new Interceptor[]{interceptor};
        sessionFactory.setPlugins(plugins);
        sessionFactory.setMapperLocations(new PathMatchingResourcePatternResolver().getResources(Cluster1OracleDataSourceConfig.MAPPER_LOCATION));
        return sessionFactory.getObject();
    }
}
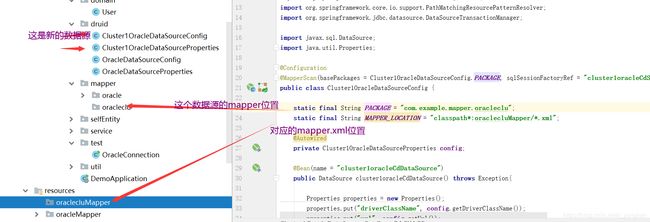
4.3.3 贴个图
4.4 总结
如果还想添加新的数据源,只需要重复操作就可以实现。但是一定要注意,不同的数据源,存储mapper和mapper.xml的位置是不同的。也就是说新的数据源,需要重新建包。这时在对应的mapper层下写对应的mapper,就可以实现多数据源了。
5. 前台页面显示与真分页
5.1 写在前面
本人是后台开发人员,前台页面,只能简单的分享一下啊,实现简单的页面展示,以及真分页。
5.2 后台相关类
5.2.1 Params
  //Params 类是前台传给后台的参数类,可以有多个参数,由于分页,所以必须有几个基本参数
  public class Params {
    /** 必须的三个参数  **/
    private Integer pageNum;
    private Integer pageSize;
    private PageInfo pageInfo;       //是这个包: import com.github.pagehelper.PageInfo;
    /*自己的查询条件,可以是多个*/
    private String moHu;//模糊查询条件
      /**
             getter(),setter() 这里自己写了,都贴下来有点多,后面的都这样写了。
      **/
5.2.2 ResultInfo
// ResultInfo  是将查询的数据封装,以便传给后台。
public class ResultInfo {
    private Integer code;
    private String msg;
    private Object data;
    private boolean isSuccess;
 /**
   getter(),setter(),toString(),无参有参方法。

 **/
}
5.2.3 ResultUtil 分页自定义类
/**进查询到的list进行封装     全贴了吧,不敢省**/
package com.example.demo.util;

import com.github.pagehelper.PageInfo;
import com.example.demo.selfEntity.ResultInfo;

import java.util.List;

public class ResultUtil {

    /**
     * 请求成功时返回结果
     * @param data
     * @param code
     * @param msg
     * @param flag
     * @return
     */
    public static ResultInfo getResultInfoOk(Object data, Integer code, String msg, boolean flag){
        ResultInfo resultInfo = new ResultInfo(code, msg, data, flag);
        return resultInfo;
    }

    public static ResultInfo getResultInfoOk(Object data, Integer code, String msg){
        ResultInfo resultInfo = new ResultInfo(code, msg, data, true);
        return resultInfo;
    }

    public static ResultInfo getResultInfoOk(Object data, boolean flag){
        ResultInfo resultInfo = new ResultInfo(200, "", data, flag);
        return resultInfo;
    }

    public static ResultInfo getResultInfoOk(Object data, Integer type){
        ResultInfo resultInfo = null;
        switch (type){
            case 1:PageInfo pageInfo = new PageInfo((List)data);
                   resultInfo = new ResultInfo(200, "", pageInfo, true);
                break;
            case 2:resultInfo = new ResultInfo(200, "", data, true);
                break;
            default:
        }
        return resultInfo;
    }
    public static ResultInfo getResultInfoOk(Object data){
        ResultInfo resultInfo = null;
        if(data instanceof List){
            PageInfo pageInfo = new PageInfo((List)data);
            resultInfo = new ResultInfo(200, "", pageInfo, true);
        }else {
            resultInfo = new ResultInfo(200, "", data, true);
        }
        return resultInfo;
    }

    /**
     * 请求失败时返回结果
     * @param data
     * @param code
     * @param msg
     * @return
     */
    public static ResultInfo getResultInfoFailed(Object data, Integer code, String msg){
        ResultInfo resultInfo = new ResultInfo(code, msg, data, false);
        return resultInfo;
    }
    public static ResultInfo getResultInfoFailed(Object data, String msg){
        ResultInfo resultInfo = new ResultInfo(200, msg, data, false);
        return resultInfo;
    }
}
5.2.4 mapper
@Repository
public interface UserMapper {
    /*分页mapper*/
    List getAllUser(Params params);

    List getAll();
}
5.2.5 mapper.xml
5.2.6 service
public interface UserService {
   /*分页专用*/
   ResultInfo getAll(Params params); //注意参数

   List getAll();
}
5.2.7 serviceImpl
/**serviceImpl是真正分页的地方,需要注意**/
package com.example.demo.service.ServiceImpl;

import com.example.demo.domain.User;
import com.example.demo.mapper.oracle.UserMapper;
import com.example.demo.service.UserService;
import com.example.demo.util.Params;
import com.example.demo.selfEntity.ResultInfo;
import com.example.demo.util.ResultUtil;
import com.github.pagehelper.PageHelper;
import org.springframework.beans.factory.annotation.Autowired;
import org.springframework.stereotype.Service;

import java.util.List;
@Service
public class UserServiceImpl implements UserService {
    @Autowired
    private UserMapper userMapper;
    @Override
    public ResultInfo getAll(Params params) {
        /*开启分页*/
        if(params.getPageNum()!=null&¶ms.getPageSize()!=null){
            PageHelper.startPage(params.getPageNum(),params.getPageSize(),true);
        }
        List users=userMapper.getAllUser(params);
        /*封装查询的list*/
        ResultInfo resultInfo= ResultUtil.getResultInfoOk(users);
        return resultInfo;
    }
    @Override
    public List getAll() {
        return userMapper.getAll();
    }
}
5.2.8 controller
import com.example.demo.service.UserService;
import com.example.demo.util.Params;
import com.example.demo.selfEntity.ResultInfo;
import org.springframework.beans.factory.annotation.Autowired;
import org.springframework.web.bind.annotation.RequestBody;
import org.springframework.web.bind.annotation.RequestMapping;
import org.springframework.web.bind.annotation.RestController;

@RequestMapping("/user")
@RestController
public class UserController {
    @Autowired
    private UserService userService;
    @RequestMapping("/getAll")
    public ResultInfo getAll(@RequestBody Params params){
        ResultInfo resultInfo=userService.getAll(params);
        return resultInfo;
    }
}
5.3 前台页面
其中导入的一些css,以及js,除了自己写的(我提供代码),其他的都是可以在网上找到的
5.3.1 index.html
User
5.3.2 theOne.js
这是一个template路由,对Vue不熟的小伙伴,可以跳过,直接复制就可以了
var theOneTemplate;
var laypage;
var layer;
var element;
const url='../';
layui.use(['laypage','layer'],function () {
laypage=layui.laypage;
layer=layui.layer;
})
layui.use(['element'],function () {
element=layui.element;
})
var theOneTemplate={
data(){
return {
mjAll:[],
pageSize:'15',
moHu:''
}
},
template:`
一键查询
姓名
密码
{{item.username}}
{{item.password}}
`,
methods:{
cx:function () {
let _this=this;
querymj(_this,1,_this.pageSize, _this.moHu);
}
},
created:function () {},
mounted:function () {},
watch:{
}
}
function querymj(obj,pageNum,pageSize,moHu) {
axios.post(url+'user/getAll',{pageNum:pageNum,pageSize:pageSize,moHu: moHu
,pageInfo:{"pageNum":pageNum, "pageSize":pageSize}
})
.then(function (infoResp) {
let count=infoResp.data.data.total;
obj.mjAll=infoResp.data.data.list;
if(count>0){
let _this=obj;
laypage.render({
elem:'sjzx-page',
count:count,
limit:pageSize,
curr:pageNum ,
layout:['count','prev','page','next','refresh','skip'],
theme: '#5EB660',
jump:function (obj,first) {
if(!first){
querymj(_this,obj.curr,_this.pageSize, _this.moHu)
}
}
});
}else {
alert("没有数据")
}
count=0
});
}
export {theOneTemplate};
5.3.3 index.js
页面js
var theOneTemplate;
var laypage;
var layer;
var element;
const url='../';
layui.use(['laypage','layer'],function () {
laypage=layui.laypage;
layer=layui.layer;
})
layui.use(['element'],function () {
element=layui.element;
})
var theOneTemplate={
data(){
return {
mjAll:[],
pageSize:'15',
moHu:''
}
},
template:`
一键查询
姓名
密码
{{item.username}}
{{item.password}}
`,
methods:{
cx:function () {
let _this=this;
querymj(_this,1,_this.pageSize, _this.moHu);
}
},
created:function () {},
mounted:function () {},
watch:{
}
}
function querymj(obj,pageNum,pageSize,moHu) {
axios.post(url+'test/getAll',{pageNum:pageNum,pageSize:pageSize,moHu: moHu
,pageInfo:{"pageNum":pageNum, "pageSize":pageSize}
})
.then(function (infoResp) {
let count=infoResp.data.data.total;
obj.mjAll=infoResp.data.data.list;
if(count>0){
let _this=obj;
laypage.render({
elem:'sjzx-page',
count:count,
limit:pageSize,
curr:pageNum ,
layout:['count','prev','page','next','refresh','skip'],
theme: '#5EB660',
jump:function (obj,first) {
if(!first){
querymj(_this,obj.curr,_this.pageSize, _this.moHu)
}
}
});
}else {
alert("没有数据")
}
count=0
});
}
export {theOneTemplate};
5.3.4 总结
   在后台,我就写了这三个,一个html,两个js,其中的Css一个都没写(css太多了,太烦,调的很麻烦),
 这样就可以实现分页了,其中的index.js,调用的是axious,没有使用ajax,个人习惯而已,其实ajax更简单
5.4 debug 测试
debug测试看看是如何分页的。
5.4.1 浏览器输入url
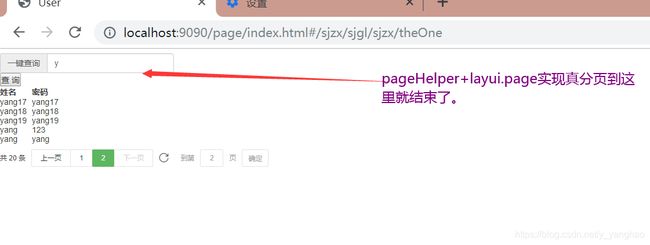
debug,后,直接在浏览器中输入localhost:9090/page/index.html
模糊查询,直接输入了一个y,然后点击查询

5.4.2 看controller层
注意pageNum,是第一页,当你点击第二页是,pageNum就变成2了

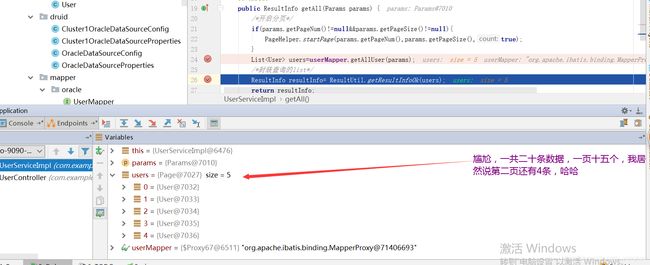
5.4.3 看serviceImpl层

5.4.4 第一个debug走完,看页面

5.4.5 第二个debug
点击下一页
controller serviceImpl 和页面 三张图就一起展示了。

serviceImpl:
页面显示:
其实,还有很多东西可以写,比如说在密码后面再添加一个操作编辑,可以点击增删改查,配合layui还可以在修改的时候,弹出一个修改框等等,这里就不一一介绍了,本来计划还有 6:多线程 7:非controller调用service服务以及 8:slf4j 日志打印的,实在是今天周五了,下班放假出去浪了。
如果有什么问题,可以留言,只要看到就会恢复的,另附上一个md文档,里面的代码比较详细,需要的可以自行下载。
上述功能都是本人测试过的,按照着肯定可以实现。
本文链接:springboot+pagehelper实现真分页以及多数据源的应用
https://blog.csdn.net/y_yanghao/article/details/106288987
写文不宜,转发请注明转载地址,有什么问题,请留言一起相互学习