2019独角兽企业重金招聘Python工程师标准>>> ![]()
这里记录一下ffmpeg的编译过程并且在Andorid中使用的过程。
编译ffmpeg
这里拿的当前日期最新的release版本ffmpeg4.0.2,编译环境mac,下载mac版本的ffmepg后进行编译,编译脚本build.sh如下:
#!/bin/bash
export NDK=/Users/linchen/Library/Android/sdk/ndk-bundle
export SYSROOT=$NDK/platforms/android-19/arch-arm/
export TOOLCHAIN=$NDK/toolchains/arm-linux-androideabi-4.9/prebuilt/darwin-x86_64
export CPU=arm
export PREFIX=/Users/linchen/Desktop/arm #最终编译后的头文件以及so包的位置
export ADDI_CFLAGS="-marm"
function build_one
{
./configure \
    --prefix=$PREFIX \
    --cross-prefix=$TOOLCHAIN/bin/arm-linux-androideabi- \
    --arch=arm \
    --sysroot=$SYSROOT \
    --extra-cflags="-Os -fpic $ADDI_CFLAGS" \
    --extra-ldflags="$ADDI_LDFLAGS" \
    --cc=$TOOLCHAIN/bin/arm-linux-androideabi-gcc \
    --nm=$TOOLCHAIN/bin/arm-linux-androideabi-nm \
    --enable-shared \
    --enable-runtime-cpudetect \
    --enable-gpl \
    --enable-small \
    --target-os=android \
    --enable-cross-compile \
    --disable-debug \
    --disable-static \
    --disable-doc \
    --disable-asm \
    --disable-ffmpeg \
    --disable-ffplay \
    --disable-ffprobe \
    --enable-postproc \
    --enable-avdevice \
    --disable-symver \
    --disable-stripping \
$ADDITIONAL_CONFIGURE_FLAG
sed -i '' 's/HAVE_LRINT 0/HAVE_LRINT 1/g' config.h
sed -i '' 's/HAVE_LRINTF 0/HAVE_LRINTF 1/g' config.h
sed -i '' 's/HAVE_ROUND 0/HAVE_ROUND 1/g' config.h
sed -i '' 's/HAVE_ROUNDF 0/HAVE_ROUNDF 1/g' config.h
sed -i '' 's/HAVE_TRUNC 0/HAVE_TRUNC 1/g' config.h
sed -i '' 's/HAVE_TRUNCF 0/HAVE_TRUNCF 1/g' config.h
sed -i '' 's/HAVE_CBRT 0/HAVE_CBRT 1/g' config.h
sed -i '' 's/HAVE_RINT 0/HAVE_RINT 1/g' config.h
make clean
# 这里是定义用几个CPU编译
make -j4
make install
}
build_one
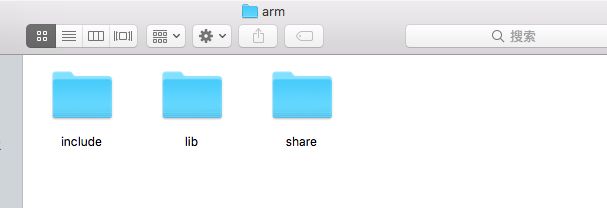
build.sh在ffmpeg4.0.2的根目录下,首先需要安装一些需要的编译环境如gcc等,由于我的机子中以前已经安装了,所以直接运行bash build.sh命令就可以了,编译后在我的桌面上会出现arm文件夹:
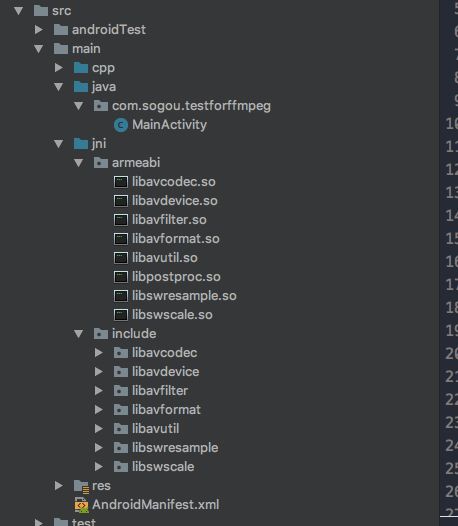
其中include文件夹是导出的头文件文件夹,lib中的so包是需要使用的,接下来新建一个支持c++的Android项目,在新建的时候选择support c++,Android Studio会自动帮我们配置好,接下添加编译好的文件到Android Studio中: 
由于我的手机是arm64-v8a的cpu架构,又由于编译ffmpeg选择的架构,所以这里使用armeabi通用架构支持,因此文件夹就创建了armeabi,如果手机cpu架构不同,可以再编译ffmpeg的时候指定对应的架构,具体参考这篇文章。
接下来编写一下Cmake代码:
cmake_minimum_required(VERSION 3.4.1)


add_library( # Sets the name of the library.
        native-lib

        # Sets the library as a shared library.
        SHARED

        # Provides a relative path to your source file(s).
        src/main/cpp/native-lib.cpp)


find_library( # Sets the name of the path variable.
        log-lib

        # Specifies the name of the NDK library that
        # you want CMake to locate.
        log)


set(distribution_DIR ${CMAKE_SOURCE_DIR}/src/main/jni/armeabi)
add_library( avutil
             SHARED
             IMPORTED )
set_target_properties( avutil
                       PROPERTIES IMPORTED_LOCATION
                       ${distribution_DIR}/libavutil.so)
add_library( swresample
             SHARED
             IMPORTED )
set_target_properties( swresample
                       PROPERTIES IMPORTED_LOCATION
                       ${distribution_DIR}/libswresample.so)
add_library( avcodec
             SHARED
             IMPORTED )
set_target_properties( avcodec
                       PROPERTIES IMPORTED_LOCATION
                       ${distribution_DIR}/libavcodec.so)
add_library( avfilter
             SHARED
             IMPORTED )
set_target_properties( avfilter
                       PROPERTIES IMPORTED_LOCATION
                       ${distribution_DIR}/libavfilter.so)
add_library( swscale
             SHARED
             IMPORTED )
set_target_properties( swscale
                       PROPERTIES IMPORTED_LOCATION
                       ${distribution_DIR}/libswscale.so)
add_library( avdevice
             SHARED
             IMPORTED )
set_target_properties( avdevice
                       PROPERTIES IMPORTED_LOCATION
                       ${distribution_DIR}/libavdevice.so)
add_library( avformat
             SHARED
             IMPORTED )
set_target_properties( avformat
                       PROPERTIES IMPORTED_LOCATION
                       ${distribution_DIR}/libavformat.so)
add_library( postproc
             SHARED
             IMPORTED )
set_target_properties( postproc
                       PROPERTIES IMPORTED_LOCATION
                       ${distribution_DIR}/libpostproc.so)
set(CMAKE_VERBOSE_MAKEFILE on)
set(CMAKE_CXX_FLAGS "${CMAKE_CXX_FLAGS} -std=gnu++11")
include_directories(src/main/cpp)
include_directories(src/main/jni/include)

target_link_libraries( # Specifies the target library.
        native-lib
        avutil       #工具库(大部分需要)
        swresample    #音频采样数据格式转换
        avcodec      #编解码(重要)
        avfilter      #滤镜特效处理
        swscale       #视频像素数据格式转换
        avdevice     #各种设备的输入输出
        avformat     #封装格式处理
        postproc     #后加工


        # Links the target library to the log library
        # included in the NDK.
        ${log-lib})
然后再MainActivity中使用so库:
public class MainActivity extends AppCompatActivity {

    // Used to load the 'native-lib' library on application startup.
    static {
	//加载so包是有序的一定要那么写,不过这里我是复制过来的,所以没出现问题
        System.loadLibrary("avutil");
        System.loadLibrary("swresample");
        System.loadLibrary("avcodec");
        System.loadLibrary("avfilter");
        System.loadLibrary("swscale");
        System.loadLibrary("avdevice");
        System.loadLibrary("avformat");
        System.loadLibrary("postproc");
        System.loadLibrary("native-lib");
    }

    @Override
    protected void onCreate(Bundle savedInstanceState) {
        super.onCreate(savedInstanceState);
        setContentView(R.layout.activity_main);

        // Example of a call to a native method
        TextView tv = (TextView) findViewById(R.id.sample_text);
        tv.setText(stringFromJNI());
    }

    /**
     * A native method that is implemented by the 'native-lib' native library,
     * which is packaged with this application.
     */
    public native String stringFromJNI();
}
这里编译过程中遇到一个问题:
Build command failed. Error while executing process /Users/linchen/Library/Android/sdk/cmake/3.6.4111459/bin/cmake with arguments {--
...
../../../../src/main/jni/armeabi/libavutil.so: error adding symbols: File in wrong format clang++: error: linker command failed with exit code 1 (use -v to see invocation) ninja: build stopped: subcommand failed.
问题是jni文件夹下的架构包缺失,使用ndk abi过滤器过滤即可:
ndk {
            abiFilters 'armeabi'
        }
编译完成后运行项目发现直接奔溃了,说ffmpeg的so包找不到,解压apk一看还真是,最终发现设置sourceSets的路径不对,修改如下:
sourceSets{
        main{
            jniLibs.srcDirs = ['src/main/jni']
        }
    }
最终编译成功,项目正常启动,不过还没写代码验证,这里主要先记录一下配置的过程。
项目地址如下:
https://github.com/JerryChan123/FFmpegDemo
参考资料
https://www.jianshu.com/p/da64059799d5
https://www.jianshu.com/p/3b58174e89f1
