DirectX3D游戏开发一 第一个DirectX3D项目
欢迎访问EasyLiu的博客!此博客为博主原创,未经允许不得转载!
开发环境:WIN764+VS2013+DirectX SDK(June 2010)
首先提供DirectX3D软件包下载地址:下载地址。
下载下来之后直接双击安装就行,默认安装目录为:C:\Program Files (x86)\Microsoft DirectX SDK (June 2010)(不管你的系统是32还是64位)。
下面就开始我们的第一个DirectX3D项目。
1、新建一个空的win32应用程序,记住不是win32控制台应用程序,这两者是由区别的!
2、项目完成以后,配置DirectX开发环境:
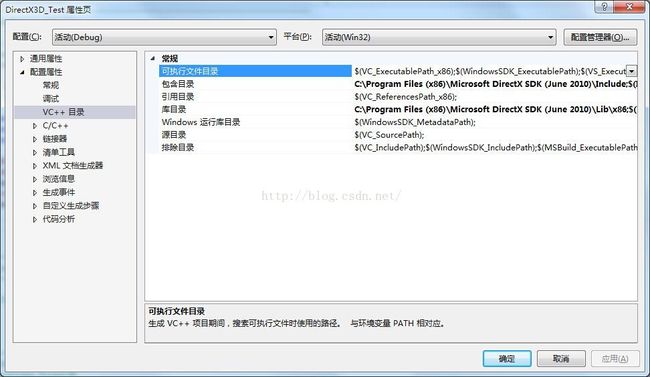
选择“项目”--》“属性”,打开属性配置窗口如下所示:
选择“VC++目录”,把DirectX SDK 的“包含目录(Include)”以及"库目录(Lib)"包含进去,分别为:
C:\Program Files (x86)\Microsoft DirectX SDK (June 2010)\Include
C:\Program Files (x86)\Microsoft DirectX SDK (June 2010)\Lib\x86,虽然我的系统是win764位,但是当我的引用库目录改为x64时候会报错,改为x86就不会报错,不知道 怎么回事!
点击确定退出属性配置窗口。
新建文件:main.cpp,在文件开头加上引用库:
#pragma comment(lib, "d3d9.lib")
#pragma comment(lib, "d3dx9.lib")
打开帮助文档:C:\Program Files (x86)\Microsoft DirectX SDK (June 2010)\Documentation\DirectX9\directx_sdk.chm,切换到如下目录:
Toutorial 1就详细讲了怎么创建一个DirectX 3D项目,虽然是英文但是应该不难看,并且Toutorial 1有对应的Sample 工程,位于如下目录:
C:\Program Files (x86)\Microsoft DirectX SDK (June 2010)\\Samples\C++\Direct3D\Tutorials\Tut01_CreateDevice,这里包含了一个完整的工程,我们只需把其代码复制到 我们的文件main.cpp里面就行了!
下面是源代码:应该不难看懂,纯粹使用win32 API开发,包括设计窗口、注册窗口、创建窗口等一系列过程,如果对win32开发还不是很懂的朋友可以先看一下孙鑫的VC++深入详解,讲得很详细,通俗易懂!
//-----------------------------------------------------------------------------
// File: CreateDevice.cpp
//
// Desc: This is the first tutorial for using Direct3D. In this tutorial, all
//       we are doing is creating a Direct3D device and using it to clear the
//       window.
//
// Copyright (c) Microsoft Corporation. All rights reserved.
//-----------------------------------------------------------------------------

#pragma comment(lib, "d3d9.lib") //引入依赖库
#pragma comment(lib, "d3dx9.lib")


#include
#include "Windows.h"//必须得包含这个文件夹
#pragma warning( disable : 4996 ) // disable deprecated warning
#include
#pragma warning( default : 4996 )


//-----------------------------------------------------------------------------
// Global variables
//-----------------------------------------------------------------------------
LPDIRECT3D9         g_pD3D = NULL; // Used to create the D3DDevice
LPDIRECT3DDEVICE9   g_pd3dDevice = NULL; // Our rendering device


//-----------------------------------------------------------------------------
// Name: InitD3D()
// Desc: Initializes Direct3D
//-----------------------------------------------------------------------------
HRESULT InitD3D(HWND hWnd)
{
	// Create the D3D object, which is needed to create the D3DDevice.
	if (NULL == (g_pD3D = Direct3DCreate9(D3D_SDK_VERSION)))
		return E_FAIL;

	// Set up the structure used to create the D3DDevice. Most parameters are
	// zeroed out. We set Windowed to TRUE, since we want to do D3D in a
	// window, and then set the SwapEffect to "discard", which is the most
	// efficient method of presenting the back buffer to the display.  And
	// we request a back buffer format that matches the current desktop display
	// format.
	D3DPRESENT_PARAMETERS d3dpp;
	ZeroMemory(&d3dpp, sizeof(d3dpp));
	d3dpp.Windowed = TRUE;
	d3dpp.SwapEffect = D3DSWAPEFFECT_DISCARD;
	d3dpp.BackBufferFormat = D3DFMT_UNKNOWN;

	// Create the Direct3D device. Here we are using the default adapter (most
	// systems only have one, unless they have multiple graphics hardware cards
	// installed) and requesting the HAL (which is saying we want the hardware
	// device rather than a software one). Software vertex processing is
	// specified since we know it will work on all cards. On cards that support
	// hardware vertex processing, though, we would see a big performance gain
	// by specifying hardware vertex processing.
	if (FAILED(g_pD3D->CreateDevice(D3DADAPTER_DEFAULT, D3DDEVTYPE_HAL, hWnd,
		D3DCREATE_SOFTWARE_VERTEXPROCESSING,
		&d3dpp, &g_pd3dDevice)))
	{
		return E_FAIL;
	}

	// Device state would normally be set here

	return S_OK;
}


//-----------------------------------------------------------------------------
// Name: Cleanup()
// Desc: Releases all previously initialized objects
//-----------------------------------------------------------------------------
VOID Cleanup()
{
	if (g_pd3dDevice != NULL)
		g_pd3dDevice->Release();

	if (g_pD3D != NULL)
		g_pD3D->Release();
}


//-----------------------------------------------------------------------------
// Name: Render()
// Desc: Draws the scene
//-----------------------------------------------------------------------------
VOID Render()
{
	if (NULL == g_pd3dDevice)
		return;

	// Clear the backbuffer to a blue color
	g_pd3dDevice->Clear(0, NULL, D3DCLEAR_TARGET, D3DCOLOR_XRGB(0, 0, 255), 1.0f, 0);

	// Begin the scene
	if (SUCCEEDED(g_pd3dDevice->BeginScene()))
	{
		// Rendering of scene objects can happen here

		// End the scene
		g_pd3dDevice->EndScene();
	}

	// Present the backbuffer contents to the display
	g_pd3dDevice->Present(NULL, NULL, NULL, NULL);
}


//-----------------------------------------------------------------------------
// Name: MsgProc()
// Desc: The window's message handler
//-----------------------------------------------------------------------------
LRESULT WINAPI MsgProc(HWND hWnd, UINT msg, WPARAM wParam, LPARAM lParam)
{
	switch (msg)
	{
	case WM_DESTROY:
		Cleanup();
		PostQuitMessage(0);
		return 0;
	}

	return DefWindowProc(hWnd, msg, wParam, lParam);
}


//-----------------------------------------------------------------------------
// Name: wWinMain()
// Desc: The application's entry point
//-----------------------------------------------------------------------------
INT WINAPI wWinMain(HINSTANCE hInst, HINSTANCE, LPWSTR, INT)
{
	UNREFERENCED_PARAMETER(hInst);

	// Register the window class
	WNDCLASSEX wc =
	{
		sizeof(WNDCLASSEX), CS_CLASSDC, MsgProc, 0L, 0L,
		GetModuleHandle(NULL), NULL, NULL, NULL, NULL,
		"D3D Tutorial", NULL
	};
	RegisterClassEx(&wc);

	// Create the application's window
	HWND hWnd = CreateWindow("D3D Tutorial", "D3D Tutorial 01: CreateDevice",
		WS_OVERLAPPEDWINDOW, 100, 100, 300, 300,
		NULL, NULL, wc.hInstance, NULL);

	// Initialize Direct3D
	if (SUCCEEDED(InitD3D(hWnd)))
	{
		// Show the window
		ShowWindow(hWnd, SW_SHOWDEFAULT);
		UpdateWindow(hWnd);

		// Enter the message loop
		MSG msg;
		ZeroMemory(&msg, sizeof(msg));
		while (msg.message != WM_QUIT)
		{
			if (PeekMessage(&msg, NULL, 0U, 0U, PM_REMOVE))
			{
				TranslateMessage(&msg);
				DispatchMessage(&msg);
			}
			else
				Render();
		}
	}

	UnregisterClass("D3D Tutorial", wc.hInstance);
	return 0;
}
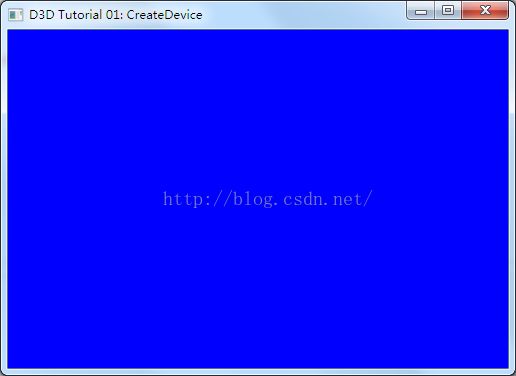
运行结果如下所示:
源代码分析
首先是添加头文件:d3d9.h
声明LPDIRECT3D9 和LPDIRECT3DDEVICE9变量:
LPDIRECT3D9         g_pD3D = NULL; // Used to create the D3DDevice 指向接口IDirect3D9的指针
LPDIRECT3DDEVICE9   g_pd3dDevice = NULL; // Our rendering device   指向IDirect3DDevice9接口的指针
然后添加InitD3D,Cleanup,Render方法。
InitD3D方法
HRESULT InitD3D(HWND hWnd)
{
	// Create the D3D object, which is needed to create the D3DDevice.
	if (NULL == (g_pD3D = Direct3DCreate9(D3D_SDK_VERSION)))
		return E_FAIL;

	//fill D3DCAPS9 struct with the capabilities of the primary display adapter
	D3DCAPS9 caps;
	g_pD3D->GetDeviceCaps(D3DADAPTER_DEFAULT, D3DDEVTYPE_HAL, &caps);
	//can we use hardware vertex processing?
	DWORD vp = 0;
	if (caps.DevCaps&D3DDEVCAPS_HWTRANSFORMANDLIGHT)
	{
		//yes,support hardware vertex processing
		vp = D3DCREATE_HARDWARE_VERTEXPROCESSING;
	}
	else
	{
		//no,
		vp = D3DCREATE_SOFTWARE_VERTEXPROCESSING;
	}


	D3DPRESENT_PARAMETERS d3dpp;
	ZeroMemory(&d3dpp, sizeof(d3dpp));
	d3dpp.Windowed = TRUE;
	d3dpp.SwapEffect = D3DSWAPEFFECT_DISCARD;
	d3dpp.BackBufferFormat = D3DFMT_UNKNOWN;


	if (FAILED(g_pD3D->CreateDevice(D3DADAPTER_DEFAULT, D3DDEVTYPE_HAL, hWnd,
		vp,
		&d3dpp, &g_pd3dDevice)))
	{
		return E_FAIL;
	}

	// Device state would normally be set here

	return S_OK;
}
(1)Hwnd为窗口句柄,在此为当前窗口,Direct3Dcreate方法创建IDirect3D9对象,其中只有一个参数,D3D_SDK_VERSION,为当前SDK版本。
(2)检查设备性能。Direct3D提供的每一项性能都对应于结构D3DCAPS9中的一个数据成员或者某一位,以某一具体硬件为基础(默认运行的显卡),初始化一个D3DCAPS9类型的实例,然后通过检查该D3DCAPS9实例中相应的数据成员或者某一位来判断设备是否支持某项性能。这里判断显卡是否支持硬件顶点运算。
(3)D3DPRESENT_PARAMETERS结构体定义了Direct3D设备的信息,在对相关参数进行赋值之前,先将所有参数归零处理,不然,有可能造成创建Direct3D设备失败。D3DPRESENT_PARAMETERS中信息有很多,在此我们只是用其中三个:Windowed = true,表示已窗口模式显示;SwapEffect指定系统如何将后台缓冲区的内容提交到前台,SwapEffect = D3DSWAPEFFECT_DISCARD,表示后台缓冲区的内容提交到前台后,清除后台缓冲区内容;BackBufferFormat指后台缓冲区像素格式,BackBufferFormat = D3DFMT_UNKNOWN,表示后台缓冲区像素格式和当前使用的显卡的像素格式是相同的。
(4)利用已初始化的结构D3DPRESENT_PARAMETERS创建IDirect3DDevice9对象(一个C++对象,代表了我们用来显示3D图形的物理硬件设备)。第一个参数表示使用哪一块显卡,一般情况下为D3DADAPTER_DEFAULT,使用当前显卡;第二个参数表示Direct3D的设备类型,在此我们将其设置为硬件抽象层D3DDEVTYPE_HAL;第三个参数就是方法传入的窗口句柄;第四个参数为Direct3D设备的行为标志,在此选择之前我们通过检查设备性能得到的变量vp;第五和第六个参数分别为指向d3dpp的指针和Direct3D设备指针的地址。
一切创建成功后,方法返回S_OK。
Cleanup()方法
VOID Cleanup()
{
	if (g_pd3dDevice != NULL)
		g_pd3dDevice->Release();
	if (g_pD3D != NULL)
		g_pD3D->Release();
} Render()方法
VOID Render()
{
	if (NULL == g_pd3dDevice)
		return;

	// Clear the backbuffer to a blue color
	g_pd3dDevice->Clear(0, NULL, D3DCLEAR_TARGET, D3DCOLOR_XRGB(192, 192, 192), 1.0f, 0);

	// Begin the scene
	if (SUCCEEDED(g_pd3dDevice->BeginScene()))
	{
		// Rendering of scene objects can happen here

		// End the scene
		g_pd3dDevice->EndScene();
	}

	// Present the backbuffer contents to the display
	g_pd3dDevice->Present(NULL, NULL, NULL, NULL);
}从Render()方法中我们可以看出,Direct3D设备对象是一切Direct 3D图形绘制的基础。
首先Clear方法,作用是清空后台缓冲区,其中参数分别为:count,表示pRect参数的矩形的数量,如果pRect为NULL,则count必须为0,如果pRect是有效的指针,则count必须不为0;pRect存储着需要清空的矩形区域;Flags参数表示要清空的缓冲区,此处设置为D3DCLEAR_TARGET,表示清空颜色缓冲区;Color参数表示以什么颜色填充清空后的缓冲区的每个像素的颜色;Z参数表示清空深度缓冲区(ZBUFFER)后每个像素的深度值;Stencil表示清空模板缓冲区后每个像素的模板值。
BeginScene()方法,必须在进行图形渲染之前调用此方法,而在图形渲染结束后,必须调用EndScene()方法,并且,两者必须成对出现。
Render的最后一个方法Present方法,是将在后台渲染的东西翻转到前台,这样就完成了图形渲染的过程。其中Present的第一个参数,表示后台复制源矩形指针,一般为NULL,表示整个后台区域;第二个参数表示前台目标矩形指针,一般为NULL,表示整个前台区域;第三个参数表示当前渲染图形的窗口句柄,一般情况为NULL;第四个参数为最小更新区域指针,一般为NULL。并且,在InitD3D方法中的D3DPRESENT_PARAMETERS结构的SwapEffect参数的值不是D3DSWAPEFFECT_COPY的时候,Present的第一、二、四个参数必须为NULL。
// Enter the message loop
		MSG msg;
		ZeroMemory(&msg, sizeof(msg));
		while (msg.message != WM_QUIT)
		{
			if (PeekMessage(&msg, NULL, 0U, 0U, PM_REMOVE))
			{
				TranslateMessage(&msg);
				DispatchMessage(&msg);
			}
			else
				Render();
		}
总结:帮助文档还是挺好的,写的很详细,还有助于锻炼我们的英文水平!哈哈!


