Android《第一行代码》酷欧天气
代码下载地址:GitHub
在原来项目的基础上,针对文章中天气信息为假数据,做了一些对接口和类的修改
一、功能需求
- 可以罗列出全国所有的省市县
- 可以查看全国任意城市的天气信息
- 可以自由切换城市。查看其它城市的天气
- 提供手动更新及后台自动更新的功能
二、获取数据
获取全国省市县的数据信息:
使用作者架设的供学习使用的服务器(返回JSON数据格式):
http://guolin.tech/api/china
获取详细的天气信息:
使用和风天气免费接口:https://free-api.heweather.net/s6
和风天气首页
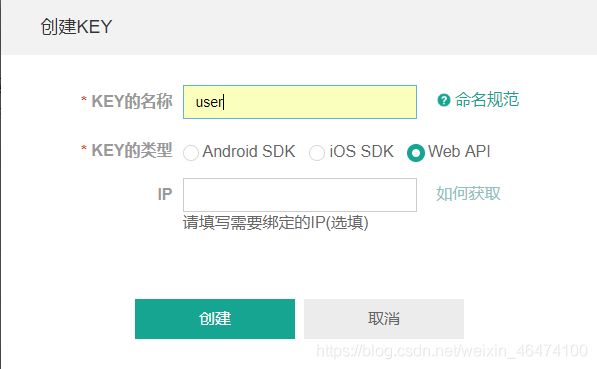
- .注意,使用和风天气的接口需要自行申请key,注册一个自己的账号,并创建自己的应用(控制台->应用管理->新建应用),然后点击添加key,类型选择Web API

有了API key,我们就能获取到任意城市的天气信息了。
三、创建数据库和表
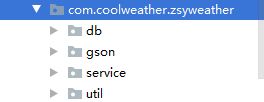
- db:保存数据库模型相关代码
- gson:存放GSON模型相关代码
- service:存放服务相关代码
- util:存放工具相关代码
接下来,我们就可以开始创建数据库了。
1、添加库依赖:
    dependencies {
    	...
	    implementation 'org.litepal.android:java:3.0.0'//对数据库进行的操作
	    implementation "com.squareup.okhttp3:okhttp:4.4.0"//进行网络请求
	    implementation 'com.google.code.gson:gson:2.8.6'//解析JSON数据
	    implementation 'com.github.bumptech.glide:glide:4.11.0'//加载和展示图片
	}
2、建立三张表:province、city、county,分别存放省、市、县的数据信息,对应到实体类,就应该建立Province、City、County这3个类。

3、配置litepal.xml文件
目录:app/src/main/assets/litepal.xml
这一步将3个实体类添加到映射表中
4、配置LitePalApplication:
修改AndroidManifest.xml中的代码:
<manifest xmlns:android="http://schemas.android.com/apk/res/android"
    package="com.coolweather.zsyweather">

    <application
        android:name="org.litepal.LitePalApplication"
        android:allowBackup="true"
        android:icon="@mipmap/logo"
        android:label="@string/app_name"
        android:roundIcon="@mipmap/ic_launcher_round"
        android:supportsRtl="true"
        android:theme="@style/AppTheme">
        ...
    </application>
</manifest>
四、遍历全国省市县数据
由于数据都是从服务器端获取到的,故我们需要与服务器进行交互。通常情况下,我们将这些通用的网络操作提取到一个公共的类里,并提供一个静态方法,当想要发起网络请求时,只需简单地调用一下这个方法即可。
我们在util包下增加一个HttpUtil类
public class HttpUtil {
    public static void sendOkHttpRequest(String address, okhttp3.Callback callback){
        OkHttpClient client = new OkHttpClient();
        Request request = new Request.Builder().url(address).build();
        client.newCall(request).enqueue(callback);
    }
}
现在,我们发起一条HTTP请求只需要调用sendOkHttpRequest()方法,传入请求地址,然后注册一个回调来处理服务器响应就可以了。
因此,我们在util包下新建一个Utility类,用来解析和处理返回的JSON数据。对于省级、市级、县级的数据,处理的方式都是类似的:先使用JSONArray和JSONObject将数据解析出来,然后组装成实体类对象,再调用save()方法将数据存储到数据库当中。
代码示例如下:
	/**
     * 解析和处理服务器返回的省级数据
     */
    public static boolean handleProvinceResponse(String response){
        if(!TextUtils.isEmpty(response)){
            try{
                JSONArray allProvince = new JSONArray(response);
                for (int i = 0; i < allProvince.length(); i++){
                    JSONObject provinceObject = allProvince.getJSONObject(i);
                    Province province = new Province();
                    province.setProvinceName(provinceObject.getString("name"));
                    province.setProvinceCode(provinceObject.getInt("id"));
                    province.save();
                }
                return true;
            }catch (JSONException e){
                e.getStackTrace();
            }
        }
        return false;
    }
接下来的步骤就是遍历省市县了,我们通过碎片的方式编写,因为之后还会复用。写完之后不要忘了将碎片添加到活动里。
- 由于我们自定义了标题栏,因此不需要原生的ActionBar了,修改res/values/styles.xml中的代码,将主题改为Theme.AppCompat.Light.NoActionBar。
<resources>

    <!-- Base application theme. -->
    <style name="AppTheme" parent="Theme.AppCompat.Light.NoActionBar">
        <!-- Customize your theme here. -->
        <item name="colorPrimary">@color/colorPrimary</item>
        <item name="colorPrimaryDark">@color/colorPrimaryDark</item>
        <item name="colorAccent">@color/colorAccent</item>
    </style>

</resources>
最后,我们在AndroidManifest.xml中加入声明权限的代码:
<uses-permission android:name="android.permission.INTERNET" />
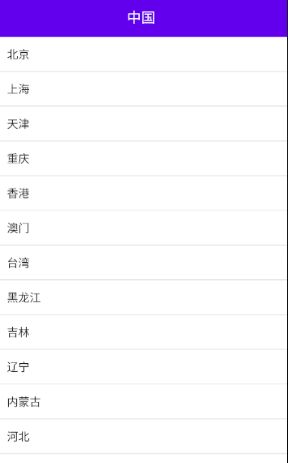
如果没什么意外的话,程序运行以后,我们就能得到全国省市县的列表了

五、显示天气信息
5.1 数据解析
查看和风天气的官方文档,我们可以总结出返回数据的大致格式:
{
	"HeWeather6":[
			{
				"status":"ok",
				"basic":{},
				"update":{},
				"now":{},
				"daily_forecast":[]
				"lifestyle":[]
			}
	]
}
可以看到,和风天气返回的数据十分复杂,如果使用JSONObject来解析就会很麻烦,这里我们使用GSON对天气信息进行解析。
其中,basic、update、now、daily_forecast、lifestyle的内部又会有具体的内容,我们可以将这5个部分定义成5个实体类。
例如basic,我们看看里面的具体内容:
"basic":{
	"cid": "CN101010100",
	"location": "北京"
}
按照此结构,可以在歌颂包下定义一个basic类:
public class Basic {
    @SerializedName("cid")
    public String weatherId;

    @SerializedName("location")
    public String cityName;
}
由于JSON中的一些字段不太适合直接作为Java字段来命名,因此使用@SerializedName注解的方式让二者之间建立映射关系。
其余几个类也按照同样的方式定义就可以了。
最后创建一个总的实例类来引用刚刚创建的各个实体类:
public class Weather {
    public String status;
    public Basic basic;
    public Now now;
    public Update update;

    @SerializedName("daily_forecast")
    public List<Forecast> forecastList;

    @SerializedName("lifestyle")
    public List<Lifestyle> lifestyleList;
}
由于daily_forecast和lifestyle中包含的是一个数组,因此这里使用了集合的方式来引用,另外增加了status字段。
5.2 布局部分
由于代码冗长,我们将整体布局分成几个部分去写,最后将它们引入到activity_weather.xml中。
5.3 将天气显示到界面上
在Utility类中添加一个用于解析天气JSON数据的方法:
    /**
     * 将返回的JSON数据解析成Weather实体类
     */
    public static Weather handleWeatherResponse(String response){
        try{
            Log.d("Utility", response);
            JSONObject jsonObject = new JSONObject(response);
            JSONArray jsonArray = jsonObject.getJSONArray("HeWeather6");
            String weatherContent = jsonArray.getJSONObject(0).toString();

            return new Gson().fromJson(weatherContent, Weather.class);
        }catch (Exception e){
            e.printStackTrace();
        }
        return null;
    }
先是通过JSONObject和JSONArray将天气数据中的主体结构内容解析出来,然后通过调用fromJson()方法就能将JSON数据转换成Weather对象了(之前已经按照数据格式定义过相应的GSON实体类)。
关键代码示例如下:
    /**
     * 根据天气id请求城市天气信息
     */
    public void requestWeather(final String weatherId){
        Log.d("WeatherActivity", weatherId);
        String weatherUrl = "https://api.heweather.net/s6/weather?location=" +
                weatherId + "&key=138948890c4349baab0893d52848bf7b";//参照文档接口示例拼装接口地址
        HttpUtil.sendOkHttpRequest(weatherUrl, new Callback() {
            @Override
            public void onFailure(@NotNull Call call, @NotNull IOException e) {
                runOnUiThread(new Runnable() {
                    @Override
                    public void run() {
                        Toast.makeText(WeatherActivity.this, "获取天气信息失败", Toast.LENGTH_SHORT).show();
                        swipeRefresh.setRefreshing(false);
                    }
                });
            }

            @Override
            public void onResponse(@NotNull Call call, @NotNull Response response) throws IOException {
                final String responseText = response.body().string();
                final Weather weather = Utility.handleWeatherResponse(responseText);//将返回的JSON数据转换成Weather对象
                runOnUiThread(new Runnable() {//将当前线程切换回主线程
                    @Override
                    public void run() {
                        if(weather != null && "ok".equals(weather.status)){//如果请求成功,则将数据缓存到SharePreference中,并显示数据
                            SharedPreferences.Editor editor = PreferenceManager
                                    .getDefaultSharedPreferences(WeatherActivity.this).edit();
                            editor.apply();
                            showWeatherInfo(weather);
                        }else{
                            Toast.makeText(WeatherActivity.this, "获取天气信息失败", Toast.LENGTH_SHORT).show();
                        }
                        swipeRefresh.setRefreshing(false);
                    }
                });
            }
        });
        loadBingPic();
    }
5.4 完成从列表跳转到天气页面的逻辑
略
5.5 天气情况缓存
为了避免每次打开程序都要重新选择城市,我们将天气数据缓存,并在MainActivity中进行判断,如果缓存中有数据,则直接跳转到天气界面显示。
SharedPreferences prefs = PreferenceManager.getDefaultSharedPreferences(this);
if(prefs.getString("weather", null) != null){
	Intent intent = new Intent(this, WeatherActivity.class);
    startActivity(intent);
    finish();
}
- 剩下的代码没什么难点,跟着书上敲就完全ok了(有空再写)
