Centos 7.2 源码安装lnmp
1,下载需要安装的软件
下载需要安装的软件--nginx,mysql,php,pcre等
vim /etc/sysconfig/selinux
2
将文件中SELINUX=enforcing改为disabled,然后执行”setenforce 0″不用重启地关闭selinux。
SELINUX=disabled
3
关闭放火墙
systemctl stop firewalld.service
3,安装nginx
1
用yum安装需要的组件
yum install -y make zlib zlib-devel gcc-c++ libtool openssl openssl-devel2
安装pcre-8.36
tar xf pcre-8.36.tar.gz && cd pcre-8.36 && ./configure && make && make installcd ../ --进入上层目录
tar xf nginx-1.13.1.tar.gz && cd nginx-1.13.1 --解压并进入nginx目录
./configure --user=www --group=www --prefix=/usr/local/nginx --with-http_stub_status_module --with-http_ssl_module --with-http_gzip_static_module --with-ipv6 --with-http_sub_module --with-pcre=../pcre-8.36 && make && make install --编译安装nginx
4,配置nginx
把配置好的nginx.conf替换原有的
 cp nginx.conf  /usr/local/nginx/conf/
 cp: overwrite ‘/usr/local/nginx/conf/nginx.conf’? y
检查nginx语法是否正确(一般会出现www用户不存在错误,添加www用户就可以了)
/usr/local/nginx/sbin/nginx -t
nginx: the configuration file /usr/local/nginx/conf/nginx.conf syntax is ok nginx: configuration file /usr/local/nginx/conf/nginx.conf test is successfulecho "export PATH=\$PATH:/usr/local/nginx/sbin" >> /etc/profile
. /etc/profile设置nginx开机启动
cp init.d.nginx /etc/init.d/nginx
chmod +x /etc/init.d/nginx
systemctl enable nginx

nginx安装完毕!
4,安装mysql5.7
1
到官网下载mysql5.7
wget https://cdn.mysql.com//Downloads/MySQL-5.7/mysql-5.7.23-linux-glibc2.12-x86_64.tar.gz2
安装mysql
useradd mysql -s /sbin/nologin --创建mysql用户
tar xf mysql-5.7.23-linux-glibc2.12-x86_64.tar.gz --解压mysql
ln -s mysql-5.7.23-linux-glibc2.12-x86_64 mysql --建立软连接
chown -R mysql.mysql mysql-5.7.23-linux-glibc2.12-x86_64 --授权mysql用户和用户组权限
rm /etc/my.cnf --删除系统的自带的mysql配置文件,最好先备份
vim /etc/mysql --重新配置mysql.cnf,根据客户自己要求配置
mkdir /usr/local/src/mysql/data -p 创建mysql的数据目录
chown -R mysql.mysql data 授权mysql用户和用户组
[root@iZwz9hzc7pd8k6u859n9rzZ mysql]# pwd
/usr/local/src/mysql
[root@iZwz9hzc7pd8k6u859n9rzZ mysql]# bin/mysqld --initialize --user=mysql
2018-09-03T09:31:38.626744Z 0 [Warning] Using pre 5.5 semantics to load error messages from /usr/local/src/mysql/share/english/.
2018-09-03T09:31:38.626788Z 0 [Warning] If this is not intended, refer to the documentation for valid usage of --lc-messages-dir and --language parameters.
2018-09-03T09:31:38.855487Z 0 [Warning] InnoDB: New log files created, LSN=45790
2018-09-03T09:31:39.588730Z 0 [Warning] InnoDB: Creating foreign key constraint system tables.
2018-09-03T09:31:39.739173Z 0 [Warning] No existing UUID has been found, so we assume that this is the first time that this server has been started. Generating a new UUID: 292bd909-af5c-11e8-9d11-00163e0472e8.
2018-09-03T09:31:39.741939Z 0 [Warning] Gtid table is not ready to be used. Table 'mysql.gtid_executed' cannot be opened.
2018-09-03T09:31:39.744528Z 1 [Note] A temporary password is generated for root@localhost: ;gkpz%hfR1cA
--初始化mysql mysql的初始密码是:;gkpz%hfR1cA[client]
port = 3306
socket = /tmp/mysql.sock
[mysqld]
port = 3306
socket = /tmp/mysql.sock
datadir = /usr/local/src/mysql/data
skip-external-locking
key_buffer_size = 16M
max_allowed_packet = 1M
table_open_cache = 64
sort_buffer_size = 512K
net_buffer_length = 8K
read_buffer_size = 256K
read_rnd_buffer_size = 512K
myisam_sort_buffer_size = 8M
thread_cache_size = 8
query_cache_size = 8M
tmp_table_size = 16M
explicit_defaults_for_timestamp = true
#skip-networking
max_connections = 500
max_connect_errors = 100
open_files_limit = 65535
log-bin=mysql-bin
binlog_format=mixed
server-id = 1
expire_logs_days = 10
early-plugin-load = ""
lc-messages-dir = /usr/local/src/mysql/share/english
default_storage_engine = InnoDB
innodb_data_home_dir = /usr/local/src/mysql/data
innodb_data_file_path = ibdata1:10M:autoextend
innodb_log_group_home_dir = /usr/local/src/mysql/data
innodb_buffer_pool_size = 16M
innodb_log_file_size = 5M
innodb_log_buffer_size = 8M
innodb_flush_log_at_trx_commit = 1
innodb_lock_wait_timeout = 50
[mysqldump]
quick
max_allowed_packet = 16M
[mysql]
no-auto-rehash
[myisamchk]
key_buffer_size = 20M
sort_buffer_size = 20M
read_buffer = 2M
write_buffer = 2M
[mysqlhotcopy]
interactive-timeout3
配置mysql
cp support-files/mysql.server /etc/init.d/mysqld --复制启动文件
chmod +x /etc/init.d/mysqld --授权可执行
vim /etc/init.d/mysqld --修改启动文件
basedir=/usr/local/src/mysql
datadir=/usr/local/src/mysql/data  --填写mysql安装路径和数据路径,需根据实际情况来。
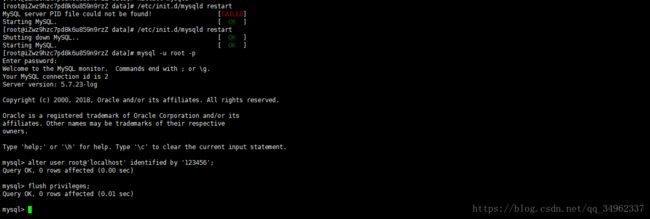
/etc/init.d/mysqld restart --重启mysql
alter user root@'localhost' identified by '123456'; --根据临时密码修改root密码
flush privileges;  --使修改密码生效
systemctl enable mysqld  --设置开机自带启动

mysql5.7安装完毕!
5,安装php
1
yum安装扩展
yum install -y make cmake gcc gcc-c++ gcc-g77 flex bison file libtool libtool-libs autoconf kernel-devel patch wget libjpeg libjpeg-devel libpng libpng-devel libpng10 libpng10-devel gd gd-devel libxml2 libxml2-devel zlib zlib-devel glib2 glib2-devel unzip tar bzip2 bzip2-devel libevent libevent-devel ncurses ncurses-devel curl curl-devel libcurl libcurl-devel e2fsprogs e2fsprogs-devel krb5 krb5-devel libidn libidn-devel openssl openssl-devel vim-minimal gettext gettext-devel ncurses-devel gmp-devel pspell-devel unzip libcap diffutils ca-certificates net-tools libc-client-devel psmisc libXpm-devel git-core c-ares-devel libicu-devel libxslt libxslt-devel pcre pcre-devel
yum install -y epel-release
yum install -y libmcrypt-devel
2
安装php
tar xf php-7.0.20.tar.gz && cd php-7.0.20
./configure --prefix=/usr/local/php --with-config-file-path=/usr/local/php/etc --enable-fpm --with-fpm-user=www --with-fpm-group=www --with-mysql=mysqlnd --with-mysqli=mysqlnd --with-pdo-mysql=mysqlnd --with-iconv-dir --with-freetype-dir=/usr/local/freetype --with-jpeg-dir --with-png-dir --with-zlib --with-libxml-dir=/usr --enable-xml --disable-rpath --enable-bcmath --enable-shmop --enable-sysvsem --enable-inline-optimization --with-curl --enable-mbregex --enable-mbstring --with-mcrypt --enable-ftp --with-gd --enable-gd-native-ttf --with-openssl --with-mhash --enable-pcntl --enable-sockets --with-xmlrpc --enable-zip --enable-soap --with-gettext --disable-fileinfo --enable-intl --with-xsl
--没有报错后,才进行后面的make和make install
make && make install --编译和安装echo "export PATH=\$PATH:/usr/local/php/bin" >> /etc/profile --加入系统变量
. /etc/profile --生效php变量
cp /usr/local/src/lnmp/php-7.0.20/sapi/fpm/init.d.php-fpm /etc/init.d/php-fpm
chmod +x /etc/init.d/php-fpm --添加可执行权限
/etc/init.d/php-fpm restart --php-fpm重启
systemctl enable php-fpm --加入开机启动

4
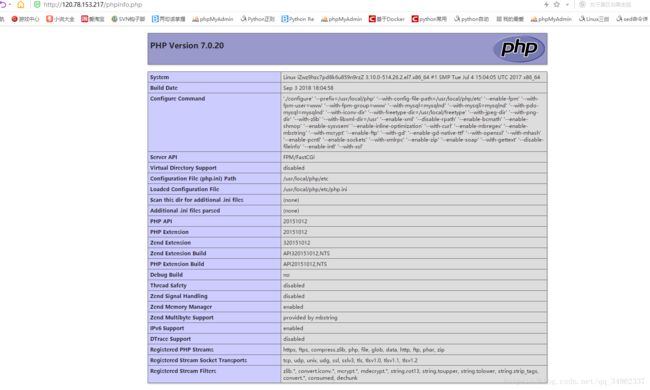
php和nginx结合测试
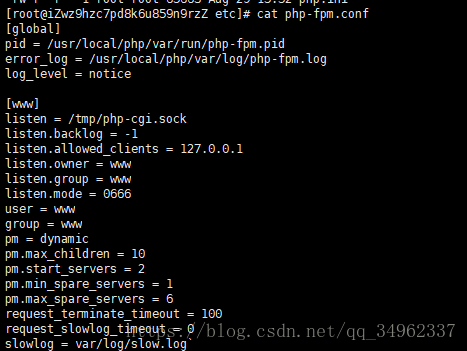
首先我们php用的是scok文件通信,而非直接用端口
所以为了方便在ngin的conf目录建立php的配置文件
cd /usr/local/nginx/conf/  --进入nginx的conf目录
创建php.conf
创建phpinfo.php
mkdir wwwroot/default -p --在/home/目录下创建默认网站根目录
chown -R www.www wwwroot/default/ --授www用户和用户组 location ~ [^/]\.php(/|$)
{
try_files $uri =404;
fastcgi_pass unix:/tmp/php-cgi.sock;
fastcgi_index index.php;
include fastcgi.conf;
}phpinfo.php
phpinfo();
?>


